3 Ways to Check if a Disk Uses MBR or GPT Partition in Windows 10: Namely, there are two hard disk partition styles GPT (GUID partisietabel) en MBR (Master Boot Record) which can be used for a disk. Now, most of the Windows 10 users aren’t aware of which partition they are using and therefore, this tutorial will help them figure out whether they are using MBR or GPT Partition style. The modern version of Windows uses GPT partition which is required for booting Windows in UEFI mode.

Whereas older Windows operating system uses MBR which was required for booting Windows into BIOS mode. Both of the partition styles are just different ways of storing the partition table on a drive. Master Boot Record (MBR) is a special boot sector located at the beginning of a drive which contains information about the bootloader for the installed OS and drive’s logical partitions. MBR partition style can only work with disks which are up to 2TB in size and it only supports up to four primary partitions.
GUID Partition Table (GPT) is a new partition style replacing the old MBR and if your drive is GPT then every partition on your drive has a globally unique identifier or GUID – a random string so long that every GPT partition in the whole world has its own unique identifier. GPT supports up to 128 partition rather than the 4 primary partitions limited by MBR and GPT keeps a backup of the partition table at the end of the disk whereas MBR only store boot data at only one place.
Furthermore, GPT disk provides greater reliability due to replication and cyclical redundancy check (CRC) protection of the partition table. In short, GPT is the best disk partition style out there which supports all the latest features and gives you more room for working smoothly on your system. So without wasting any time let’s see How to Check if a Disk Uses MBR or GPT Partition in Windows 10 with the help of the below-listed tutorial.
3 maniere om te kyk of 'n skyf MBR- of GPT-partisie gebruik in Windows 10
Maak seker dat jy 'n herstelpunt skep vir ingeval iets verkeerd gaan.
Method 1: Check if a Disk Uses MBR or GPT Partition in Device Manager
1. Druk Windows-sleutel + R en tik dan devmgmt.msc en druk Enter om oop te maak Toestelbestuurder.

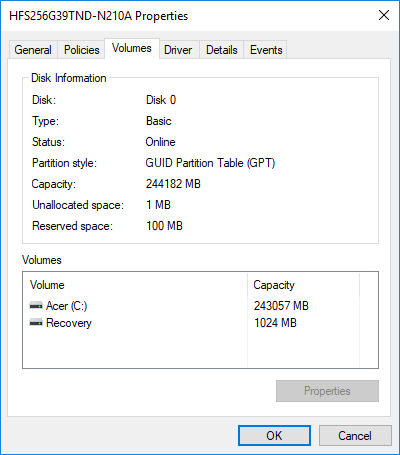
2.Expand Disk drives then regs-kliek op die skyf you want to check and select Eienskappe.
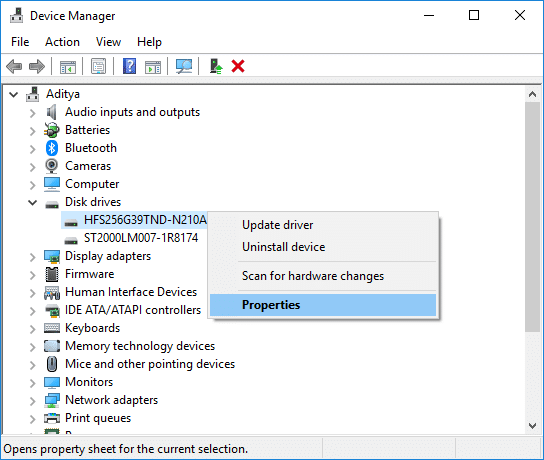
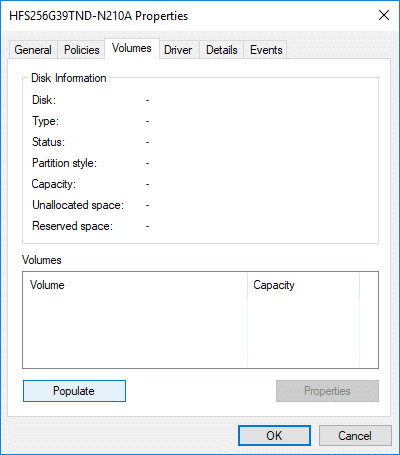
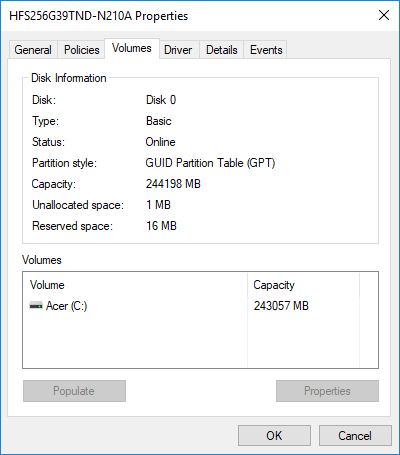
3.Under Disk Properties switch to Volumes-oortjie en klik op Populate button op die bodem.
4. Nou onder "Verdelingstyl” see if the Partition style for this disk is GUID Partition Table (GPT) or Master Boot Record (MBR).
Lees ook: Herstel die skyfkontrole kon nie uitgevoer word nie omdat Windows nie toegang tot die skyf het nie
Method 2: Check if a Disk Uses MBR or GPT Partition in Disk Management
1. Druk Windows-sleutel + R en tik dan diskmgmt.msc en druk Enter om oop te maak Skyfbestuur.

2. Nou right-click on the “Disk #” (instead of # there will be number e.g. Disk 1 or Disk 0) you want to check and select Eienskappe.
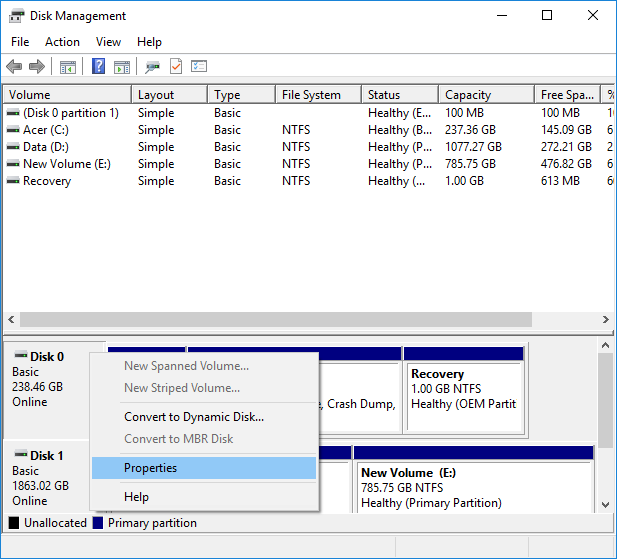
3.Inside the Disk properties window switch to Volumes tab.
4.Next, under “Partiton style” see if the Partition style for this disk is GUID Partition Table (GPT) or Master Boot Record (MBR).
5.Once finished, you can close the Disk Management window.
Dit is How to Check if a Disk Uses MBR or GPT Partition in Windows 10, but if you still want to use another method than continue.
Method 3: Check if a Disk Uses MBR or GPT Partition in Command Prompt
1. Druk Windows-sleutel + X en kies dan Command Prompt (Admin).

2.Tik die volgende opdrag een vir een en druk Enter na elkeen:
disk part
lys skyf
3.Now you will see all the disk with information such as status, size, free etc but you need to check if the Disk # has a * (asterisk) in its GPT column or not.
let wel: Instead of “Disk #” there will be number e.g. Disk 1 or Disk 0.
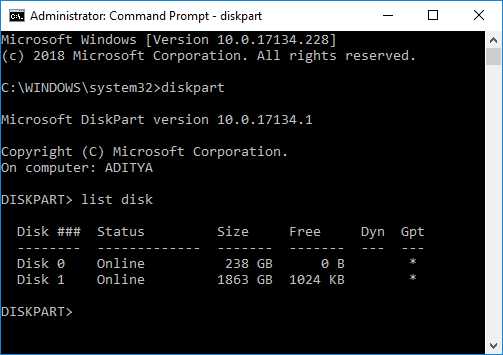
4.If the Disk # has a * (asterisk) in its GPT column dan dit disk has a GPT partition style. Whereas, if the Disk # doesn’t
have a * (asterisk) in its GPT column then this disk will have an MBR partition style.
Aanbeveel:
Dit is dit wat jy suksesvol geleer het How to Check if a Disk Uses MBR or GPT Partition in Windows 10 maar as jy nog enige vrae het oor hierdie tutoriaal, vra dit gerus in die kommentaarafdeling.

