If you don’t see Wireless Adapter under Network Connections neither there is a Network adapter tab under device manager then it seems like your Network Adapter is missing or not detected on your Windows 10 which is a serious issue because you won’t be able to access the Internet until the issue is resolved. In short, when you click on the Wireless icon on the system tray there won’t be any device listed in order to connect to the Internet and if you open Device Manager then you won’t see the Network Adapter tab.
These are the reasons behind the Network Adapter missing issue:
- Network adapter missing in Device manager
- No Network Adapters showing in Device Manager
- Network Adapter Not Detected
- Network Adapter Not Found Windows 10
- No Network Adapter In Device Manager
The main cause of this issue seems to be outdated, incompatible or corrupted Network Adapter drivers. If you have recently upgraded from previous versions of Windows then it’s possible that the old drivers will not work with the new Windows and hence the issue. So without wasting any time let’s see how to actually Fix Network Adapter Missing in Windows 10 issue with the below-listed troubleshooting steps.
Note: Just make sure to uninstall any VPN software on your PC before continuing.
በዊንዶውስ 10 ውስጥ የጎደለውን የአውታረ መረብ አስማሚ ያስተካክሉ
የሆነ ችግር ከተፈጠረ ልክ የመልሶ ማግኛ ነጥብ መፍጠርዎን ያረጋግጡ።
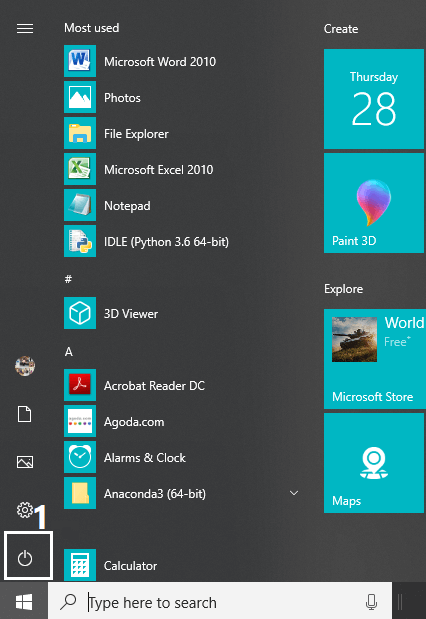
Method 1: Reboot your Computer
አብዛኞቻችን ስለዚህ መሠረታዊ ዘዴ እናውቃለን። ኮምፒውተርህን እንደገና ማስጀመር አንዳንድ ጊዜ አዲስ ጅምር በማድረግ ማንኛውንም የሶፍትዌር ግጭት ማስተካከል ይችላል። ስለዚህ ኮምፒውተራቸውን በእንቅልፍ ላይ ማስቀመጥ የሚመርጡ ሰው ከሆኑ ኮምፒተርዎን እንደገና ማስጀመር ጥሩ ሀሳብ ነው.
1. ላይ ጠቅ ያድርጉ ጀምር ምናሌ እና ከዚያ ጠቅ ያድርጉ የኃይል አዝራር ከታች በግራ ጥግ ላይ ይገኛል.
2. በመቀጠል በ ላይ ጠቅ ያድርጉ እንደገና ጀምር አማራጭ እና ኮምፒተርዎ እራሱን እንደገና ይጀምራል.
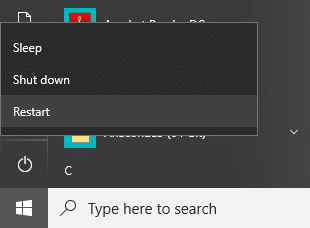
ኮምፒዩተሩ እንደገና ከጀመረ በኋላ ችግርዎ እንደተፈታ ወይም እንዳልተፈታ ያረጋግጡ።
Method 2: Flush DNS and Reset Winsock Components
1. Open elevated Command Prompt.
2. አሁን የሚከተለውን ትዕዛዝ ይተይቡ እና ከእያንዳንዱ በኋላ አስገባን ይጫኑ.
ipconfig / release
ipconfig / flushdns
ipconfig / renew

3. እንደገና Command Prompt ይክፈቱ እና የሚከተለውን ትዕዛዝ አንድ በአንድ ይተይቡ እና ከእያንዳንዱ በኋላ አስገባን ይምቱ.
ipconfig /flushdns
nbtstat –r
netsh int ip reset
netsh winsock reset
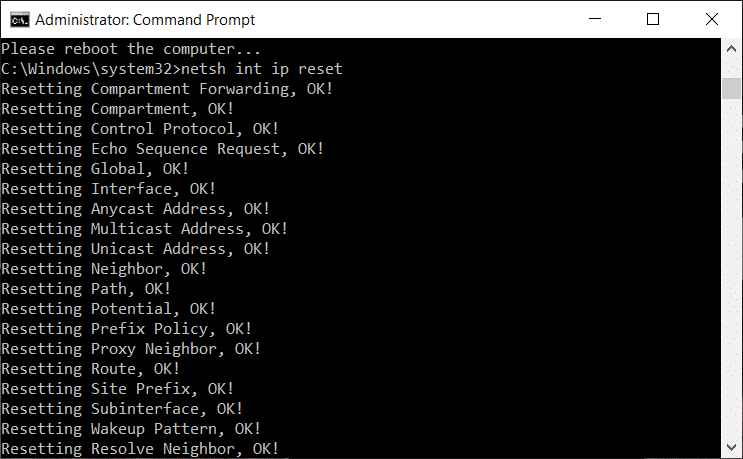
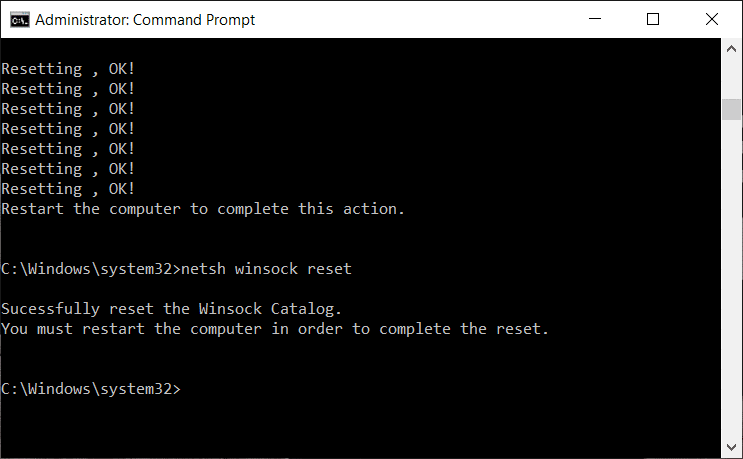
4. Reboot to apply changes. Flushing DNS seems to Fix Network Adapter Driver Issues on Windows 10.
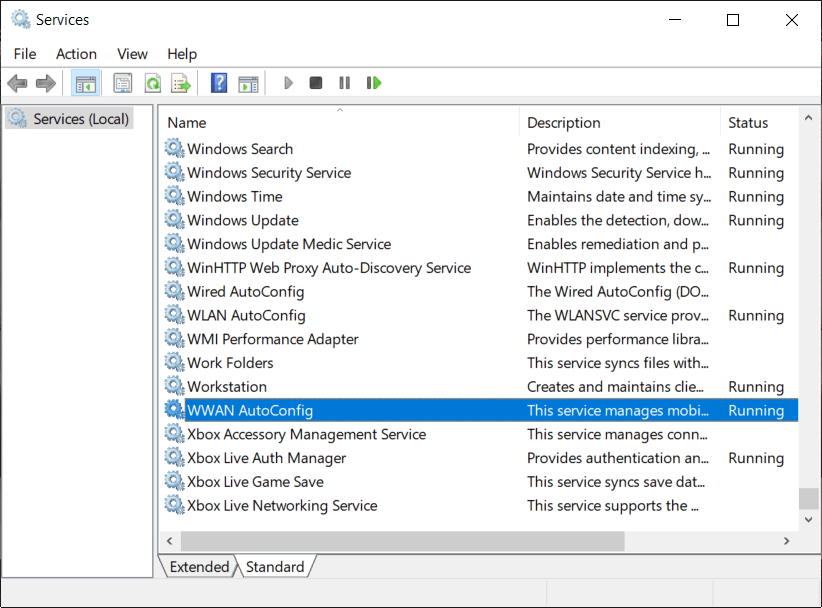
Method 3: Run WWAN AutoConfig Service
1. Windows Key + R ን ይጫኑ ከዚያም ይተይቡ services.msc እና ኢትን ጠቅ ያድርጉ.

2. አግኝ WWAN AutoConfig Service in the list (press W to reach to the end of the list quickly).
3. ሁለቴ ጠቅ ያድርጉ WWAN AutoConfig Service.
4. If the service is already running then click on Stop, then from the Startup type drop-down select ራስ-ሰር.
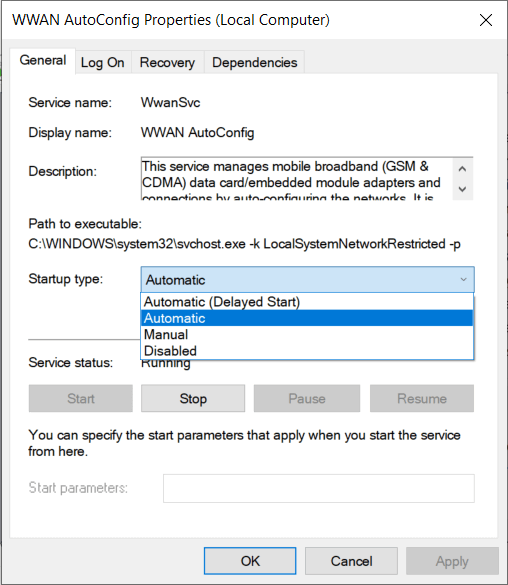
5. Click Apply followed by OK.
6. በ ላይ በቀኝ ጠቅ ያድርጉ WWAN AutoConfig Service እና ይምረጡ ይጀምሩ.
ዘዴ 4፡ የአውታረ መረብ አስማሚ ነጂዎችን አዘምን
1. የዊንዶውስ ቁልፍ + R ተጫን እና "" ብለው ይተይቡ.devmgmt.msc” ለመክፈት በ Run dialogue box ውስጥ እቃ አስተዳደር.

2. ዘርጋ የአውታረ መረብ ማስተካከያዎች፣ ከዚያ በቀኝ መዳፊት ቁልፍዎ ላይ ጠቅ ያድርጉ የ Wi-Fi መቆጣጠሪያ (ለምሳሌ Broadcom ወይም Intel) እና ይምረጡ የአሽከርካሪ ሶፍትዌርን ያዘምኑ።

3. አሁን ይምረጡ "የዘመነውን የአሽከርካሪ ሶፍትዌር በራስ ሰር ይፈልጉ".
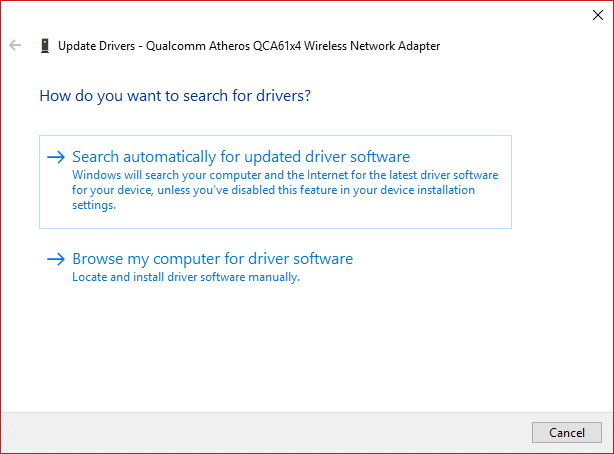
4. አሁን Windows will automatically search for the Network driver update and if new update is found, it will automatically download and install it.
5. አንዴ እንደጨረሱ ሁሉንም ነገር ይዝጉ እና ፒሲዎን እንደገና ያስነሱ.
6. አሁንም ፊት ለፊት ከተጋፈጡ Network Adapter Missing in Windows 10 issue, then again right-click on your WiFi controller and select ነጂ አዘምን በመሣሪያ አስተዳዳሪ ውስጥ.
7. አሁን፣ በዝማኔ ሾፌር ሶፍትዌር ዊንዶውስ ውስጥ፣ “ የሚለውን ይምረጡ።ለሞተሩ ሶፍትዌር የእኔን ኮምፒተር ይፈልጉ."

8. አሁን ይምረጡ "በኮምፒውተሬ ላይ ካሉት ሾፌሮች ዝርዝር ውስጥ ላንሳ።"

9. ሞክር ከተዘረዘሩት ስሪቶች ውስጥ ነጂዎችን አዘምን (ተኳሃኝ ሃርድዌር ላይ ምልክት ማድረግዎን ያረጋግጡ)።
10. ከላይ ያለው ካልሰራ ወደ ይሂዱ የአምራቹ ድር ጣቢያ ሾፌሮችን ለማዘመን.

11. የቅርብ ጊዜውን ሾፌር ከአምራቹ ድህረ ገጽ ያውርዱ እና ይጫኑ ከዚያም ፒሲዎን እንደገና ያስጀምሩ።
Method 5: Uninstall Network Adapter Drivers
1. ዊንዶውስ ቁልፍ + R ን ይጫኑ ከዚያም "" ብለው ይተይቡ.devmgmt.msc"እና የመሣሪያ አስተዳዳሪን ለመክፈት አስገባን ይጫኑ።
2. የአውታረ መረብ አስማሚዎችን ዘርጋ እና አግኝ የአውታረ መረብ አስማሚ ስምዎ።
3. እርግጠኛ ይሁኑ የአስማሚውን ስም አስገባ የሆነ ችግር ከተፈጠረ ብቻ.
4. Right-click on your network adapter and uninstall it.

5. It will ask for confirmation አዎ የሚለውን ይምረጡ።
6. Restart your PC and Windows will automatically install the network adapter drivers again.
7. If the drivers are not installed automatically then again open the Device Manager.
8. From the Device Manager menu, click on እርምጃ ከዚያ " ላይ ጠቅ ያድርጉየሃርድዌር ለውጦችን ይቃኙ".

ዘዴ 6: ዊንዶውስ ወቅታዊ መሆኑን ያረጋግጡ
1. ይጫኑ የዊንዶውስ ቁልፍ + I to open Settings then click on ዝመና እና ደህንነት።
![]()
2. From the left-hand side, menu click on Windows Update.
3. Now click on the “ዝማኔዎችን ይመልከቱ” የሚለውን ቁልፍ ማናቸውንም ያሉትን ዝመናዎች ለመፈተሽ።

4. If any updates are pending then click on ዝመናዎችን ያውርዱ እና ይጫኑ።

5. Once the updates are downloaded, install them and your Windows will become up-to-date.
6. After the updates are installed reboot your PC to save changes.
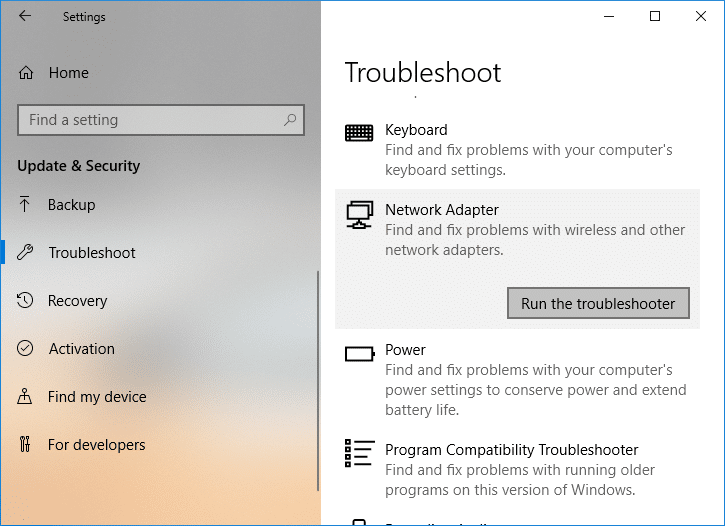
ዘዴ 7፡ የአውታረ መረብ አስማሚ መላ ፈላጊን ያሂዱ
1. መቼት ለመክፈት ዊንዶውስ ቁልፍ + Iን ይጫኑ እና ከዚያ ን ይጫኑ ዝመና እና ደህንነት።
![]()
2. በግራ በኩል ባለው ምናሌ ውስጥ ይምረጡ መላ ፈልግ.
3. መላ ፍለጋ ስር ንካ የበይነመረብ ግንኙነቶች ከዚያም ይህንን ይጫኑ መላ ፈላጊውን ያሂዱ።

4. መላ ፈላጊውን ለማሄድ በስክሪኑ ላይ ተጨማሪ መመሪያዎችን ይከተሉ።
5. ከላይ ያለው ችግር ካላስተካከለው ከችግር መስኮቱ ላይ ጠቅ ያድርጉ የአውታረመረብ አስማሚ እና ከዚያ ጠቅ ያድርጉ መላ ፈላጊውን ያሂዱ።
5. ለውጦችን ለማስቀመጥ ፒሲዎን እንደገና ያስነሱ እና ይችሉ እንደሆነ ይመልከቱ fix the Network Adapter Missing issue.
ዘዴ 8፡ Intel PROSet/ገመድ አልባ ሶፍትዌርን ጫን
አንዳንድ ጊዜ ችግሩ የተፈጠረው በ Intel PROSet ሶፍትዌር ምክንያት ነው ፣ ስለሆነም ማዘመን ይመስላል fix Network Adapter Missing in Windows 10 issue. ስለዚህ, ወደዚህ ሂድ እና የቅርብ ጊዜውን የ PROSet/ገመድ አልባ ሶፍትዌር አውርድና ጫን። ይህ የሶስተኛ ወገን ሶፍትዌር ሲሆን ከዊንዶውስ ይልቅ የዋይፋይ ግንኙነትዎን የሚያስተዳድር ሲሆን PROset/Wireless Software ጊዜው ያለፈበት ከሆነ የአሽከርካሪዎች ችግር ሊያስከትል ይችላል የገመድ አልባ አውታረ መረብ አስማሚ። Hence, read How to Update Network Adapter Drivers on Windows 10.
ዘዴ 9: የአውታረ መረብ ግንኙነትን ዳግም ያስጀምሩ
1. መቼት ለመክፈት ዊንዶውስ ቁልፍ + Iን ይጫኑ እና ከዚያ ን ይጫኑ አውታረ መረብ እና በይነመረብ.

2. በግራ በኩል ባለው ምናሌ ውስጥ ይምረጡ ሁኔታ
3. አሁን ወደታች ይሸብልሉ እና ጠቅ ያድርጉ የአውታረ መረብ ዳግም ማስጀመር በሥር.

4. እንደገና ጠቅ ያድርጉ “አሁን ዳግም ያስጀምሩ” የአውታረ መረብ ዳግም ማስጀመሪያ ክፍል ስር።

5. This will successfully reset your network adapter and once it is complete the system will be restarted.
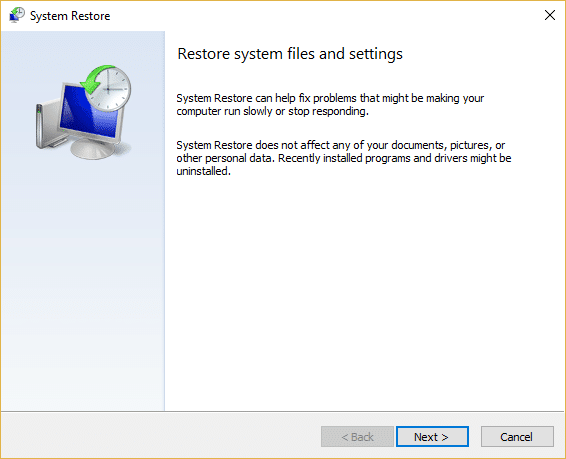
ዘዴ 10: የስርዓት እነበረበት መልስ ያከናውኑ
System Restore always works in resolving the error, therefore System Restore can definitely help you in fixing this error. So without wasting any time run system restore in order to resolve Network Adapter Missing issue.
Method 11: Using elevated Command Prompt
1. Windows Key + X ን ይጫኑ ከዛም ይምረጡ Command Prompt (በአስተዳደሩ).

2. የሚከተለውን ትእዛዝ በ cmd ያስገቡ እና አስገባን ይጫኑ።
netcfg –s n
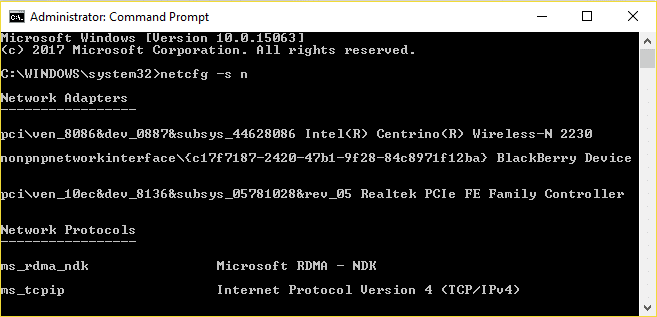
3. This will display a list of networking protocols and in that list find DNI_DNE.
4. If DNI_DNE is listed then type the following command into cmd:
reg ሰርዝ HKCRCLSID {988248f3-a1ad-49bf-9170-676cbbc36ba3} / va / f
netcfg -v -u ቀን_ቀን
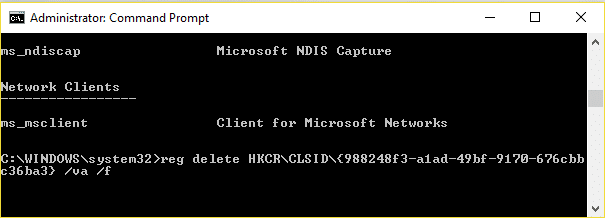
5. If you don’t see DNI_DNE listed then only run the command netcfg -v -u dni_dne.
6. Now if you receive the error 0x80004002 after trying to run the above command then you need to delete the above key manually.
7. Windows Key + R ን ይጫኑ ከዚያም ይተይቡ ሒደት እና ኢትን ጠቅ ያድርጉ.

8. Navigate to the following Registry Key:
HKEY_CLASSES_ROOTCLSID{988248f3-a1ad-49bf-9170-676cbbc36ba3}
9. Delete this key and then again type netcfg -v -u ቀን_ቀን command in cmd.
10. ለውጦችን ለማስቀመጥ ፒሲዎን እንደገና ያስነሱ።
ለእርስዎ የተመከሩ
ያ ነው በተሳካ ሁኔታ ያለህ በዊንዶውስ 10 ውስጥ የጎደለውን የአውታረ መረብ አስማሚ ያስተካክሉ ግን አሁንም ይህንን ልጥፍ በተመለከተ ማንኛቸውም ጥያቄዎች ካሉዎት በአስተያየቱ ክፍል ውስጥ እነሱን ለመጠየቅ ነፃነት ይሰማዎ።

