Process and Compressed Memory is a Windows 10 feature responsible for memory compression (also referred to as RAM compression and memory compression). This feature basically utilizes data compression to reduce the size or number of paging request to and from the auxiliary storage. In short, this feature is designed to take less amount of disk space and memory but in this case the System and Compressed Memory process start using 100% Disk and Memory, causing the affected PC to become slow.

In Windows 10, a compressions store is added to the concept of Memory Manager, which is an in-memory collection of compressed pages. So whenever the memory starts to fill up, the System and Compressed Memory process will compress the unused pages instead of writing them to the disk. The benefit of this is the amount of memory used per process is reduced, which allows Windows 10 to maintain more programs or apps in physical memory.
The problem appears to be incorrect Virtual Memory settings. Someone changed the paging file size from automatic to a particular value, virus or malware, Google Chrome or Skype, corrupt system files etc. So without wasting any time let’s see how to actually Fix 100% Disk Usage by System and Compressed Memory with the help of below-listed troubleshooting guide.
[SOLVED] 100% Disk Usage by System and Compressed Memory
የሆነ ችግር ከተፈጠረ ብቻ የመልሶ ማግኛ ነጥብ መፍጠርዎን ያረጋግጡ።
ዘዴ 1፡ የተበላሹ የስርዓት ፋይሎችን መጠገን
1. የትእዛዝ ጥያቄን ይክፈቱ። ተጠቃሚው በመፈለግ ይህንን እርምጃ ማከናወን ይችላል። 'cmd' እና ከዚያ Enter ን ይጫኑ.

2. አሁን የሚከተለውን በ cmd ውስጥ ያስገቡ እና አስገባን ይምቱ።
Sfc/scannow sfc /scannow /offbootdir=c: /offwindir=c:windows (ከላይ ካልተሳካ ይህን ይሞክሩ)
![SFC scan now command prompt | [SOLVED] 100% Disk Usage by System and Compressed Memory](https://lbsite.org/wp-content/uploads/2023/01/SFC-scan-now-command-prompt.png)
3. ከላይ ያለው ሂደት እስኪጠናቀቅ ድረስ ይጠብቁ እና አንዴ ከጨረሱ በኋላ ፒሲዎን እንደገና ያስጀምሩ.
4. እንደገና cmd ይክፈቱ እና የሚከተለውን ትዕዛዝ ይተይቡ እና ከእያንዳንዱ በኋላ አስገባን ይምቱ.
Dism / ኦንላይን / ማጽጃ-ምስል / CheckHealth Dism / በመስመር ላይ / ማጽጃ-ምስል / ስካን ጤና ዲስም / በመስመር ላይ / ማጽጃ-ምስል / ወደነበረበት መመለስHealth

5. የ DISM ትዕዛዙ ይሂድ እና እስኪጠናቀቅ ይጠብቁ።
6. ከላይ ያለው ትዕዛዝ የማይሰራ ከሆነ ከታች ያለውን ይሞክሩ፡-
Dism / Image: C: ከመስመር ውጭ / ማጽጃ-ምስል / ጤናን ወደነበረበት መመለስ / ምንጭ: c: testmountwindows Dism / የመስመር ላይ / ማጽጃ-ምስል / ጤናን ወደነበረበት መመለስ / ምንጭ: c: testmountwindows / LimitAccess
ማስታወሻ: C: RepairSource ዊንዶውስ በጥገና ምንጭዎ (Windows Installation or Recovery Disc) ይተኩ።
7. ለውጦችን ለማስቀመጥ ፒሲዎን እንደገና ያስነሱ እና ይችሉ እንደሆነ ይመልከቱ Fix 100% Disk Usage by System and Compressed Memory Issue.
Method 2: Set Correct Paging File Size
1. Windows Key + R ን ይጫኑ ከዚያም ይተይቡ sysdm.cpl እና ለመክፈት Enter ን ይምቱ System Properties.

2. ወደ የላቀ ትር እና ከዚያ ጠቅ ያድርጉ በአፈጻጸም ስር ያሉ ቅንብሮች።

3. Again switch to the Advanced tab and click Change under Virtual Memory.

4. Checkmark “ለሁሉም የዲጂቶች የመጠባበቂያ ፋይል መጠንን ያቀናብሩ."
![Checkmark Automatically manage paging file size for all drives | [SOLVED] 100% Disk Usage by System and Compressed Memory](https://lbsite.org/wp-content/uploads/2023/02/Checkmark-Automatically-manage-paging-file-size-for-all-drives.png)
5. Click OK, then click Apply followed by OK.
6. Select Yes to Restart your PC to save changes.
ዘዴ 3፡ ፈጣን ጅምርን አሰናክል
1. Windows Key + R ን ይጫኑ ከዚያም መቆጣጠሪያውን ይተይቡ እና ለመክፈት Enter ን ይጫኑ መቆጣጠሪያ ሰሌዳ.

2. ላይ ጠቅ ያድርጉ ሃርድ ዌር እና ድምጽ ከዚያ ጠቅ ያድርጉ የኃይል አማራጮች.

3. ከዚያ ከግራ መስኮት ፓነል ይምረጡ "የኃይል አዝራሮች ምን እንደሚያደርጉ ይምረጡ."

4. አሁን ላይ ጠቅ ያድርጉ "በአሁኑ ጊዜ የማይገኙ ቅንብሮችን ይቀይሩ."

5. ምልክት ያንሱ"ፈጣን ጅምር”እና ጠቅ ያድርጉ ለውጦችን አስቀምጥ.
![Uncheck Turn on fast startup | [SOLVED] 100% Disk Usage by System and Compressed Memory](https://lbsite.org/wp-content/uploads/2023/01/Uncheck-Turn-on-fast-startup.png)
6. Restart your PC and see if you’re able to Fix 100% Disk Usage by System and Compressed Memory Issue.
Method 4: Disable Superfetch Service
1. Windows Key + R ን ይጫኑ ከዚያም ይተይቡ services.msc እና ኢትን ጠቅ ያድርጉ.

2. አግኝ ሱፐርፌትች service from the list then right-click on it and select ንብረቶች.

3. Under Service status, if the service is running, click on ተወ.
4. አሁን ከ መነሻ ነገር type drop-down select ተሰናክሏል.

5. ተግብር የሚለውን ጠቅ ያድርጉ፣ በመቀጠል እሺ.
6. ለውጦችን ለማስቀመጥ ፒሲዎን እንደገና ያስነሱ።
If the above method doesn’t disable Superfetch services then you can follow disable Superfetch using Registry:
1. Windows Key + R ን ይጫኑ ከዚያም ይተይቡ ሒደት እና Registry Editor ለመክፈት አስገባን ይጫኑ።

2. ወደሚከተለው የመመዝገቢያ ቁልፍ ይሂዱ፡
HKEY_LOCAL_MACHINESYSTEMCurrentControlSetControlSession ManagerMemory ManagementPrefetchParameters
3. Make sure you have selected PrefetchParameters ከዚያ በቀኝ መስኮት ውስጥ ሁለቴ ጠቅ ያድርጉ ሱፐርፌትን አንቃ ቁልፍ እና change it’s value to 0 in the Value data field.

4. Click OK and close the Registry Editor.
5. ለውጦችን ለማስቀመጥ እና መቻልዎን ለማየት ፒሲዎን እንደገና ያስጀምሩ Fix 100% Disk Usage by System and Compressed Memory Issue.
Method 5: Adjust your PC for Best Performance
1. Windows Key + R ን ይጫኑ ከዚያም ይተይቡ sysdm.cpl እና ለመክፈት Enter ን ይምቱ System Properties.
2. ወደ የላቀ ትር እና ከዚያ ጠቅ ያድርጉ ቅንብሮች በታች አፈጻጸም.
3. Under Visual Effects checkmark “ምርጥ አፈጻጸም ያስተካክሉ".

4. ተግብር የሚለውን ጠቅ ያድርጉ፣ በመቀጠል እሺ.
5. ፒሲዎን እንደገና ያስነሱ እና መቻልዎን ይመልከቱ Fix 100% Disk Usage by System and Compressed Memory Issue.
Method 6: Kill the Speech Runtime Executable Process
1. ይጫኑ Ctrl + Shift + Esc ተግባር አስተዳዳሪን ለማስጀመር።
2. በውስጡ የሂደቶች ትር, ፈልግ Speech Runtime Executable.
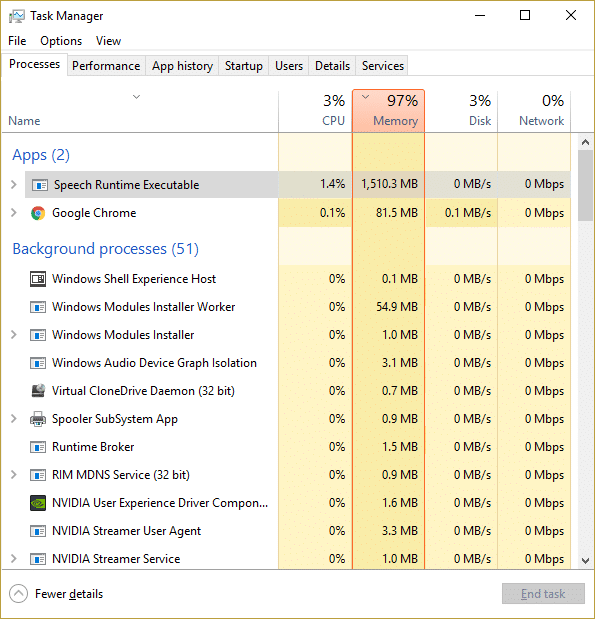
3. በላዩ ላይ በቀኝ ጠቅ ያድርጉ እና ይምረጡ ተግባርን ጨርስ.
ዘዴ 7፡ ሲክሊነርን እና ማልዌርባይትን ያሂዱ
1. አውርድ እና ጫን። ሲክሊነር & ማልዌርባይት
2. ማልዌርባይትስን ያሂዱ እና የእርስዎን ስርዓት ጎጂ ፋይሎች ካሉ እንዲቃኝ ይፍቀዱለት። ማልዌር ከተገኘ በራስ-ሰር ያስወግዳቸዋል።

3. አሁን ሲክሊነርን ያሂዱ እና ይምረጡ ብጁ ጽዳት.
4. በብጁ ማጽጃ ስር, የሚለውን ይምረጡ የዊንዶውስ ትር እና ነባሪዎችን ምልክት ያድርጉ እና ጠቅ ያድርጉ ተንትን.
![Select Custom Clean then checkmark default in Windows tab | [SOLVED] 100% Disk Usage by System and Compressed Memory](https://lbsite.org/wp-content/uploads/2023/01/Select-Custom-Clean-then-checkmark-default-in-Windows-tab.png)
5. ትንታኔው ከተጠናቀቀ በኋላ የሚሰረዙትን ፋይሎች ለማስወገድ እርግጠኛ መሆንዎን ያረጋግጡ።

6. በመጨረሻም በ ላይ ጠቅ ያድርጉ ማጽጃን ያሂዱ አዝራር እና ሲክሊነር ኮርሱን እንዲያሄድ ይፍቀዱለት።
7. ስርዓትዎን የበለጠ ለማጽዳት, የመመዝገቢያ ትሩን ይምረጡእና የሚከተሉት መፈተሻቸውን ያረጋግጡ፡-

8. ላይ ጠቅ ያድርጉ ጉዳዮችን ይቃኙ አዝራር እና ሲክሊነር እንዲቃኝ ይፍቀዱ እና ከዚያ ጠቅ ያድርጉ የተመረጡ ጉዳዮችን ያስተካክሉ አዝራር.
![Once scan for issues is completed click on Fix selected Issues | [SOLVED] 100% Disk Usage by System and Compressed Memory](https://lbsite.org/wp-content/uploads/2023/01/Once-scan-for-issues-is-completed-click-on-Fix-selected-Issues.png)
9. ሲክሊነር ሲጠይቅ "በመዝገቡ ላይ የመጠባበቂያ ለውጦችን ይፈልጋሉ?" አዎ የሚለውን ይምረጡ.
10. አንዴ ምትኬዎ ከተጠናቀቀ በኋላ በ ላይ ጠቅ ያድርጉ ሁሉንም የተመረጡ ጉዳዮች ያስተካክሉ አዝራር.
11. ለውጦችን ለማስቀመጥ ፒሲዎን እንደገና ያስጀምሩ።
Method 8: Change configuration of Google Chrome and Skype
ለ Google Chrome: Navigate to the following under Chrome: Settings > Show Advanced Settings > Privacy > Use a prediction service to load pages more quickly. Disable the toggle next to “Use a prediction service to load pages.”

Change configuration For Skype
1. Make sure you have exited Skype, if not end task from Task Manager for Skype.
2. Press Windows Key + R then type the following and click OK:
C:Program Files (x86)SkypePhone
3. በቀኝ ጠቅ ያድርጉ ስካይፕ እና ይምረጡ ንብረቶች.

4. ወደ ይቀይሩ የደህንነት ትር እና ጠቅ ያድርጉ አርትእ.

5. ይምረጡ ሁሉም የመተግበሪያ ፓኬጆች under Group or user names then checkmark Write በታች ፍቀድ።

6. Click Apply, followed by OK and see if you’re able to Fix 100% Disk Usage by System and Compressed Memory Issue.
Method 9: Set Correct Permission for System and Compressed Memory Process
1. Windows Key + R ን ይጫኑ ከዚያም ይተይቡ Taskschd.msc and hit Enter to open Task Scheduler.

2. ወደሚከተለው መንገድ ሂድ፡
Task Scheduler Library > Microsoft > Windows > MemoryDiagnostic
![Double click on ProcessMemoryDiagnostic Events | [SOLVED] 100% Disk Usage by System and Compressed Memory](https://lbsite.org/wp-content/uploads/2023/02/Double-click-on-ProcessMemoryDiagnostic-Events.png)
3. Double click on ProcessMemoryDiagnostic Events ከዚያም ይህንን ይጫኑ ተጠቃሚ ወይም ቡድን ይቀይሩ under Security Options.

4. ጠቅታ የላቀ ከዚያም ይህንን ይጫኑ Find Now.

5. የእርስዎን ይምረጡ አስተዳዳሪ መለያ from the list then click OK.

6. እንደገና እሺ የሚለውን ጠቅ ያድርጉ to add your administrator account.
7. Checkmark ከፍተኛ መብቶች አግኝ እና ከዚያ እሺን ጠቅ ያድርጉ።

8. Follow the same steps for RunFullMemoryDiagnostic and close everything.
9. ለውጦችን ለማስቀመጥ ፒሲዎን እንደገና ያስነሱ።
Method 10: Disable System and Compressed Memory Process
1. Windows Key + R ን ይጫኑ ከዚያም ይተይቡ Taskschd.msc እና ለመክፈት Enter ን ይምቱ የተግባር መርሐግብር
2. ወደሚከተለው መንገድ ሂድ፡
Task Scheduler Library > Microsoft > Windows > MemoryDiagnostic
3. በቀኝ ጠቅ ያድርጉ RunFull Memory Diagnostic እና ይምረጡ አሰናክል.
![Right-click on RunFullMemoryDiagnostic and select Disable | [SOLVED] 100% Disk Usage by System and Compressed Memory](https://lbsite.org/wp-content/uploads/2023/02/Right-click-on-RunFullMemoryDiagnostic-and-select-Disable.png)
4. Close Task Scheduler and restart your PC.
የሚመከር:
ያ ነው በተሳካ ሁኔታ ያለህ Fix 100% Disk Usage by System and Compressed Memory ግን አሁንም ይህንን ልጥፍ በተመለከተ ማንኛቸውም ጥያቄዎች ካሉዎት በአስተያየቱ ክፍል ውስጥ እነሱን ለመጠየቅ ነፃነት ይሰማዎ።

