Fix The Service Couldn’t Be Started Windows Defender Error 0x80070422: Windows Defender is a malware protection software which is inbuilt into Windows 10. Now it is used widely by Windows users because it’s reliable, but in some cases, users also installed 3rd party Antivirus software such as Norton, Quick Heal etc which is not recommend because they corrupt the files of Windows Defender. Once you completely uninstall 3rd party antivirus you won’t be able to use Windows Defender properly because files required by it have already been corrupted and can no longer be used.
“The service couldn’t be started.
The service cannot be started, either because it is disabled or because it has no enabled devices associated with it.”
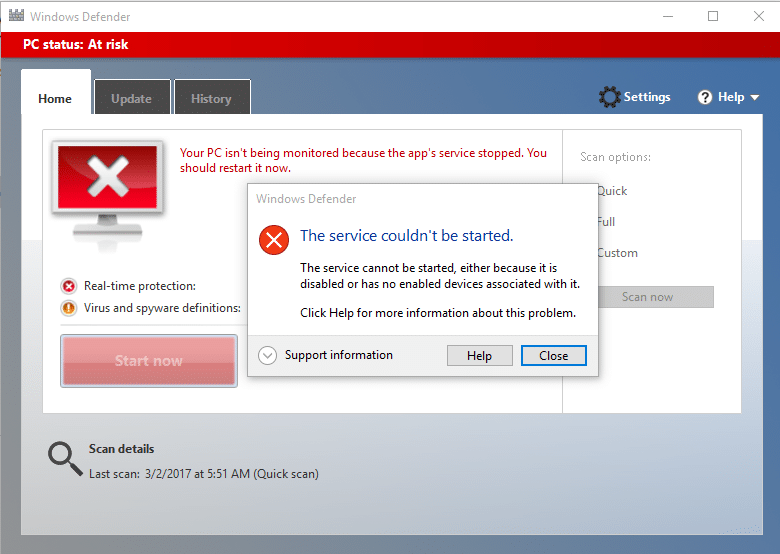
Windows Defender is turned off when you use a 3rd party Antivirus and once you uninstall the Antivirus software you won’t be able to turn ON Windows Defender. If you try to enable Windows Defender you will face the error “The Service Couldn’t Be Started” with error code 0x80070422. So without wasting any time let’s see how to actually Fix The Service Couldn’t Be Started Windows Defender Error 0x80070422 with the help of below-listed troubleshooting guide.
Fix The Service Couldn’t Be Started Windows Defender Error 0x80070422
تأكد من إنشاء نقطة استعادة في حالة حدوث خطأ ما.
الطريقة السادسة: تشغيل SFC وCHKDSK
1.اضغط على Windows Key + X ثم انقر فوق موجه الأوامر (المسؤول).

2- الآن اكتب ما يلي في cmd واضغط على Enter:
Sfc / scannow sfc / scannow / offbootdir = c: / offwindir = c: windows (إذا فشل أعلاه ، فجرب هذا)

3.انتظر حتى تنتهي العملية المذكورة أعلاه ، وبمجرد الانتهاء ، قم بإعادة تشغيل جهاز الكمبيوتر الخاص بك.
4. بعد ذلك، قم بتشغيل CHKDSK من هنا إصلاح أخطاء نظام الملفات باستخدام أداة التحقق من القرص (CHKDSK).
5- دع العملية المذكورة أعلاه تكتمل وأعد تشغيل الكمبيوتر مرة أخرى لحفظ التغييرات.
Method 2: Temporarily Disable 3rd party Antivirus
1. انقر بزر الماوس الأيمن على رمز برنامج مكافحة الفيروسات من علبة النظام وحدد تعطيل.

2. بعد ذلك، حدد الإطار الزمني الذي سيتم خلاله سيظل برنامج مكافحة الفيروسات معطلاً.

ملحوظة: اختر أقل وقت ممكن، على سبيل المثال 15 دقيقة أو 30 دقيقة.
3.Once done, again try to run Windows Defender and check if the error resolves or not.
4- اضغط على Windows Key + X ثم اختر لوحة التحكم.

5.التالي، انقر على النظام والأمن.
6. ثم انقر فوق جدار حماية Windows.

7. الآن من جزء النافذة اليسرى، انقر فوق تشغيل جدار حماية Windows أو إيقاف تشغيله.

8.حدد إيقاف تشغيل جدار حماية Windows وأعد تشغيل الكمبيوتر. Again try to open Windows Defender and see if you’re able to Fix The Service Couldn’t Be Started Windows Defender Error 0x80070422.
إذا لم تنجح الطريقة المذكورة أعلاه، فتأكد من اتباع نفس الخطوات بالضبط لتشغيل جدار الحماية لديك مرة أخرى.
الطريقة الأولى: تأكد من تحديث Windows
1. اضغط على مفتاح Windows + I ثم حدد التحديث والأمان.

2.التالي، انقر مرة أخرى التحقق من وجود تحديثات وتأكد من تثبيت أي تحديثات معلقة.

3. بعد تثبيت التحديثات، قم بإعادة تشغيل جهاز الكمبيوتر الخاص بك ومعرفة ما إذا كان بإمكانك القيام بذلك Fix The Service Couldn’t Be Started Windows Defender Error 0x80070422.
Method 4: Make sure Windows Defender service is set to Automatic
ملحوظة: If Windows Defender service is grayed out in Services Manager then follow this post.
1.اضغط على مفتاح Windows + R ثم اكتب services.msc ثم اضغط على Enter.

2.Find the following services in the Services window:
خدمة فحص شبكة مكافحة الفيروسات لـ Windows Defender
خدمة مكافحة الفيروسات ويندوز المدافع
Windows Defender Security Center Service
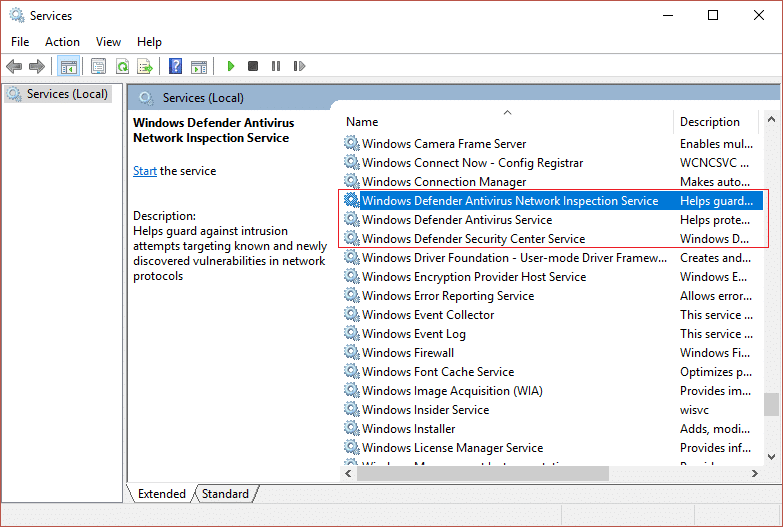
3.Double-click on each of them and make sure their Startup type is set to أوتوماتيك and click Start if the services are not already running.
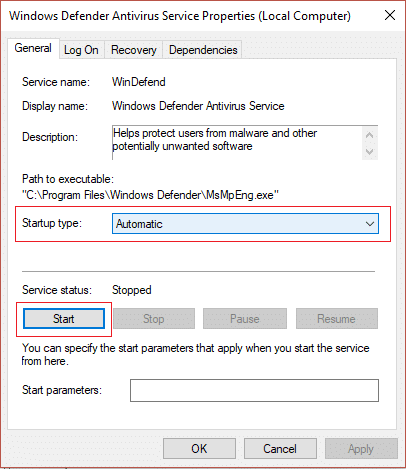
4. انقر فوق تطبيق ثم موافق.
5- أعد تشغيل الكمبيوتر لحفظ التغييرات ومعرفة ما إذا كنت قادرًا على ذلك Fix The Service Couldn’t Be Started Windows Defender Error 0x80070422.
Method 5: Enable Windows Defender through Registry Editor
1.اضغط على مفتاح Windows + R ثم اكتب رجديت ثم اضغط على Enter.

2- انتقل إلى مفتاح التسجيل التالي:
HKEY_LOCAL_MACHINESYSTEMCurrentControlSetServicesWinDefend
3. الآن انقر بزر الماوس الأيمن على WinDefend وحدد أذونات.
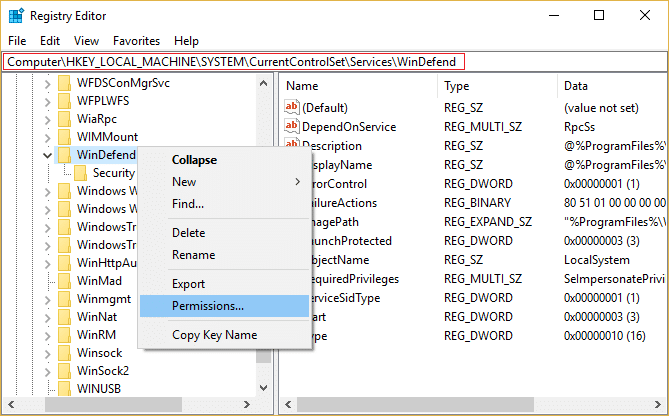
4.Follow this guide in order to take full control or ownership of the above registry key.
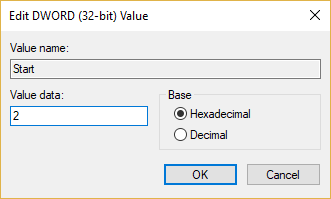
5.After that make sure you have selected WinDefend then in the right window double-click on Start DWORD.
6.Change the value to 2 in the value data field and click OK.
7.Close Registry Editor and reboot your PC.
8.Again try to enable Windows Defender and this time it should work.
الطريقة الرابعة: قم بتشغيل CCleaner و Malwarebytes
1. تحميل وتثبيت سي كلينر & البرامج الضارة.
2.قم بتشغيل Malwarebytes والسماح له بفحص نظامك بحثًا عن الملفات الضارة.
3. إذا تم العثور على برامج ضارة، فسيتم إزالتها تلقائيًا.
4. تشغيل الآن سي كلينر وفي قسم "المنظف"، ضمن علامة التبويب Windows، نقترح التحقق من الاختيارات التالية المراد تنظيفها:

5. بمجرد التأكد من تحديد النقاط الصحيحة، انقر ببساطة شغل المنظف، ودع CCleaner يأخذ مجراه.
6. لتنظيف نظامك، حدد علامة التبويب "التسجيل" وتأكد من التحقق مما يلي:

7. حدد المسح بحثًا عن المشكلة واسمح لـ CCleaner بالمسح، ثم انقر فوق عالج المسائل المختارة.
8. عندما يسأل CCleaner "هل تريد إجراء نسخ احتياطي للتغييرات في التسجيل؟"اختر نعم.
9. بمجرد اكتمال عملية النسخ الاحتياطي، حدد إصلاح كافة المشكلات المحددة.
10. أعد تشغيل جهاز الكمبيوتر الخاص بك لحفظ التغييرات ومعرفة ما إذا كان بإمكانك القيام بذلك Fix The Service Couldn’t Be Started Windows Defender Error 0x80070422.
Method 7: Refresh or Reset your PC
1.Press Windows Key + I to open Settings then select التحديث والأمان.
2.From left-hand menu select التعافى وانقر على "إبداء الأن” under Reset this PC.

3.Select the option to احتفظ بملفاتي.

4.Follow the instructions on the screen to complete the process.
5.This will take some time and your computer will restart.
الطريقة السابعة: إصلاح تثبيت Windows 8
هذه الطريقة هي الملاذ الأخير لأنه إذا لم ينجح شيء، فمن المؤكد أن هذه الطريقة ستعمل على إصلاح جميع المشاكل في جهاز الكمبيوتر الخاص بك. إصلاح التثبيت فقط باستخدام ترقية موضعية لإصلاح مشكلات النظام دون حذف بيانات المستخدم الموجودة على النظام. لذا اتبع هذه المقالة لمعرفة كيفية إصلاح تثبيت نظام التشغيل Windows 10 بسهولة.
موصى به لك:
هذا كل شيء، لقد نجحت Fix The Service Couldn’t Be Started Windows Defender Error 0x80070422 ولكن إذا كان لا يزال لديك أي أسئلة بخصوص هذا الدليل فلا تتردد في طرحها في قسم التعليقات.

