If the wireless icon or network icon is missing from Windows Taskbar, then it’s possible that the network service might not be running or some 3rd party application is conflicting with system tray notifications which can easily be resolved by restarting Windows Explorer and starting network services. In addition to above causes sometimes its also possible that the issue is caused by incorrect Windows settings.
![]()
By default, the WiFi icon or Wireless icon always appears in the Taskbar in Windows 10. The network status is automatically refreshed when your PC is either connected or disconnected from a network. So without wasting any time let’s see how to Fix WiFi Icon Missing From Taskbar In Windows 10 with the help o the below-listed guide.
إصلاح رمز WiFi مفقود من شريط المهام في نظام التشغيل Windows 10
Make sure to create a restore point, just in case something goes wrong.
Method 1: Restore missing wireless icon
1. From the taskbar, click on the small “سهم للاعلى” which shows system tray notifications and check if WiFi icon is hidden there.
![]()
2. Sometimes the Wifi icon is accidentally dragged to this area and to fix this issue drag the icon back to its original place.
3. أعد تشغيل الكمبيوتر لحفظ التغييرات.
الطريقة 2: تمكين رمز WiFi من الإعدادات
1. Press Windows Key + I open Settings then click on إضفاء الطابع الشخصي.

2. من القائمة اليمنى ، حدد شريط المهام.
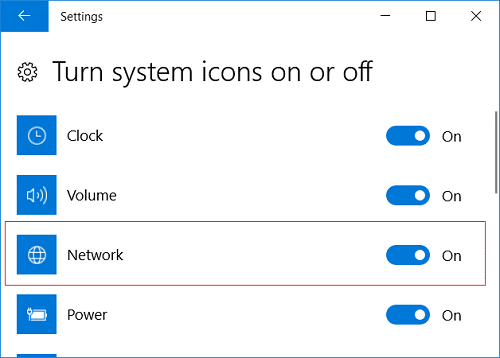
3. Scroll down to the bottom then under Notification area click on “تحويل رموز النظام أو إيقاف تشغيله."
![]()
4. تأكد من أن toggle for Network or WiFi is enabled, if not click on it to enable it.
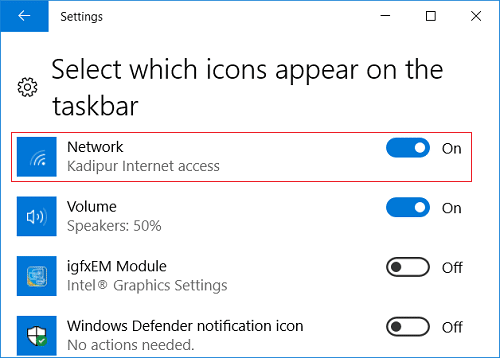
5. Press back arrow then under the same heading click on “حدد الرموز التي تظهر على شريط المهام."
![]()
6. تأكد Network or Wireless is set to enable.
7. Restart your PC to save changes and see if you’re able to Fix WiFi Icon Missing From Taskbar In Windows 10.
أسلوب 3: إعادة تشغيل مستكشف Windows
1. صحافة على Ctrl + Shift + ESC المفاتيح معًا لإطلاق مدير المهام.
2. تجد EXPLORER.EXE في القائمة ثم انقر بزر الماوس الأيمن عليه و حدد إنهاء المهمة.

3. Now, this will close the Explorer and to run it again, انقر فوق ملف > تشغيل مهمة جديدة.

4. اكتب EXPLORER.EXE واضغط على "موافق" لإعادة تشغيل Explorer.

5. Exit Task Manager, and this should Fix WiFi Icon Missing From Taskbar In Windows 10.
Method 4: Restart Network Services
1. اضغط على مفتاح Windows + R ثم اكتب services.msc ثم اضغط على Enter.

2. Find the below-listed services then make sure they are running by right-clicking on each of them and selecting آبدأ:
إجراء اتصال عن بعد
اتصالات شبكة الاتصال
التوصيل والتشغيل
إدارة اتصال الوصول عن بعد
مهاتفة
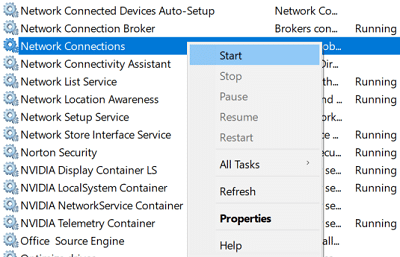
3. Once you have started all the services, again check if the WiFi icon is back or not.
Method 5: Enable Network icon in Group Policy Editor
1. اضغط على مفتاح Windows + R ثم اكتب GPEDIT.MSC ثم اضغط على Enter.

2. Now, under Group Policy Editor, navigate to the following path:
تكوين المستخدم> قوالب الإدارة> قائمة ابدأ وشريط المهام
3. Make sure to select Start Menu and Taskbar in the right window pane double-click on Remove the networking icon.
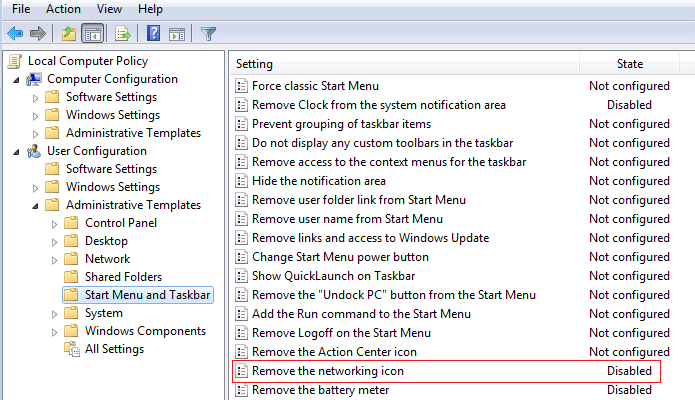
4. Once the Properties window opens, select معاق ثم انقر فوق "تطبيق" متبوعًا بـ "موافق".
![]()
5. Restart Windows Explorer and again check if you’re able to Fix WiFi Icon Missing From Taskbar In Windows 10.
الطريقة الخامسة: إصلاح التسجيل
1. اضغط على مفتاح Windows + R ثم اكتب رجديت واضغط على Enter لفتح محرر التسجيل.

2. انتقل إلى مفتاح التسجيل التالي:
HKEY_LOCAL_MACHINESYSTEMCurrentControlSetControlNetwork
3. Now under this key, locate the Config key ثم انقر بزر الماوس الأيمن فوقه وحدد حذف.
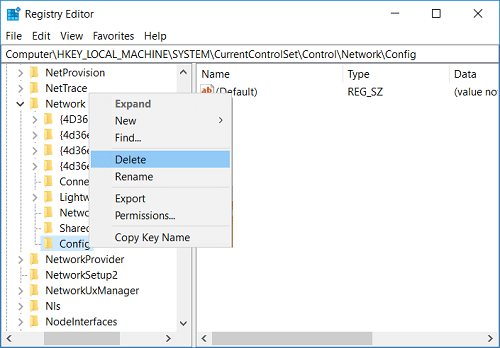
4. If you don’t find the above key, then no worries continue.
5. أعد تشغيل الكمبيوتر لحفظ التغييرات.
Method 7: Run Network Adapter Troubleshooter
1. Right-click on the network icon and select استكشاف مشاكل.
![]()
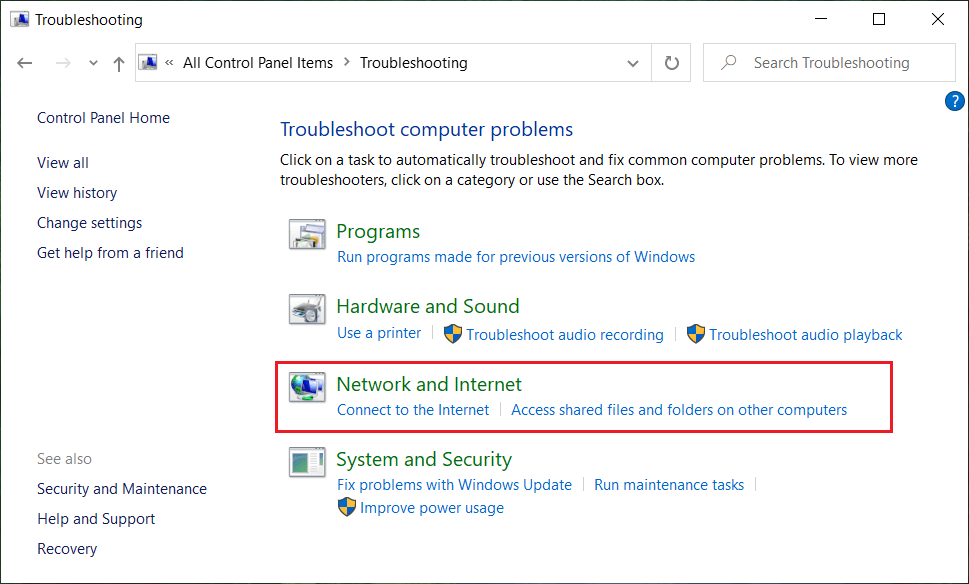
2. اتبع التعليمات التي تظهر على الشاشة.
3. افتح لوحة التحكم وابحث استكشاف الأخطاء: في شريط البحث في الجانب الأيمن العلوي وانقر على استكشاف الأخطاء وإصلاحها.

4. الآن، حدد "شبكة تواصل وانترنت."
5. In the next screen, click on the محول الشبكة.
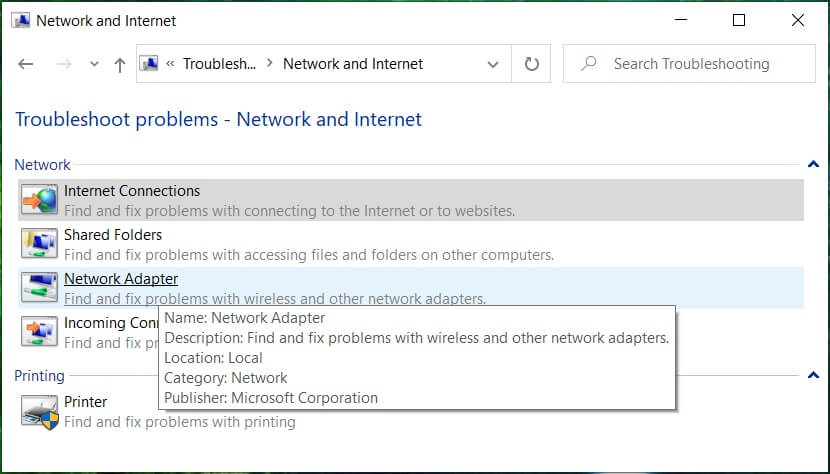
6. Follow the on-screen instruction to Fix WiFi Icon Missing From Taskbar In Windows 10.
Method 8: Reinstall Network Adapter
1. اضغط على مفتاح Windows + R ثم اكتب devmgmt.msc واضغط على Enter لفتح Device Manager.

2. Expand Network Adapters then right-click on your wireless adapter and select الغاء التثبيت.

3. Reboot your PC to save changes and again open Device Manager.
4. Now right-click on محولات الشبكة وحدد تفحص تغييرات الأجهزة.
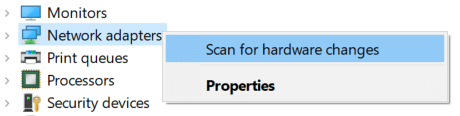
5. If the issue is resolved by now, you don’t need to continue but if the problem still exists, then continue.
6. انقر بزر الماوس الأيمن على wireless adapter under Network Adapters وحدد تحديث برنامج التشغيل.

7. تحديد "تصفح جهاز الكمبيوتر الخاص بي للحصول على برنامج التشغيل."

8. انقر مرة أخرى على "اسمح لي بالاختيار من قائمة برامج التشغيل المتوفرة على جهاز الكمبيوتر الخاص بي."

9. Select the latest available driver from the list and click Next.
10. أعد تشغيل الكمبيوتر لحفظ التغييرات.
أوصى:
هذا كل ما لديك بنجاح إصلاح رمز WiFi مفقود من شريط المهام في نظام التشغيل Windows 10 ولكن إذا كان لا يزال لديك أي أسئلة بخصوص هذا المنشور ، فلا تتردد في طرحها في قسم التعليقات.

