Process and Compressed Memory is a Windows 10 feature responsible for memory compression (also referred to as RAM compression and memory compression). This feature basically utilizes data compression to reduce the size or number of paging request to and from the auxiliary storage. In short, this feature is designed to take less amount of disk space and memory but in this case the System and Compressed Memory process start using 100% Disk and Memory, causing the affected PC to become slow.

In Windows 10, a compressions store is added to the concept of Memory Manager, which is an in-memory collection of compressed pages. So whenever the memory starts to fill up, the System and Compressed Memory process will compress the unused pages instead of writing them to the disk. The benefit of this is the amount of memory used per process is reduced, which allows Windows 10 to maintain more programs or apps in physical memory.
The problem appears to be incorrect Virtual Memory settings. Someone changed the paging file size from automatic to a particular value, virus or malware, Google Chrome or Skype, corrupt system files etc. So without wasting any time let’s see how to actually Fix 100% Disk Usage by System and Compressed Memory with the help of below-listed troubleshooting guide.
[SOLVED] 100% Disk Usage by System and Compressed Memory
تأكد من إنشاء نقطة استعادة، فقط في حالة حدوث خطأ ما.
الطريقة 1: إصلاح ملفات النظام الفاسدة
1. افتح موجه الأوامر. يمكن للمستخدم تنفيذ هذه الخطوة من خلال البحث عن "كمد" ثم اضغط على إنتر.

2. الآن اكتب ما يلي في cmd واضغط على Enter:
Sfc / scannow sfc / scannow / offbootdir = c: / offwindir = c: windows (إذا فشل أعلاه ، فجرب هذا)
![SFC scan now command prompt | [SOLVED] 100% Disk Usage by System and Compressed Memory](https://lbsite.org/wp-content/uploads/2023/01/SFC-scan-now-command-prompt.png)
3. انتظر حتى تنتهي العملية المذكورة أعلاه وبمجرد الانتهاء ، أعد تشغيل الكمبيوتر.
4. افتح cmd مرة أخرى واكتب الأمر التالي ثم اضغط على زر الإدخال بعد كل أمر:
التخلص / عبر الإنترنت / تنظيف الصورة / CheckHealth Dism / عبر الإنترنت / Cleanup-Image / ScanHealth Dism / Online / Cleanup-Image / RestoreHealth

5. دع الأمر DISM يعمل وانتظر حتى ينتهي.
6. إذا لم يعمل الأمر أعلاه، فجرّب ما يلي:
Dism / Image: C: Offline / Cleanup-Image / RestoreHealth / المصدر: c: testmountwindows Dism / Online / Cleanup-Image / RestoreHealth / المصدر: c: testmountwindows / LimitAccess
ملحوظة: استبدل C: RepairSourceWindows بمصدر الإصلاح (تثبيت Windows أو قرص الاسترداد).
7. أعد تشغيل جهاز الكمبيوتر الخاص بك لحفظ التغييرات ومعرفة ما إذا كان بإمكانك القيام بذلك Fix 100% Disk Usage by System and Compressed Memory Issue.
Method 2: Set Correct Paging File Size
1. اضغط على مفتاح Windows + R ثم اكتب sysdm.cpl واضغط على Enter للفتح خصائص النظام.

2. قم بالتبديل إلى علامة التبويب خيارات متقدمة ثم انقر فوق الإعدادات ضمن الأداء.

3. Again switch to the Advanced tab and click Change under Virtual Memory.

4. Checkmark “إدارة حجم ملف ترحيل الصفحات تلقائيًا لكافة محركات الأقراص."
![Checkmark Automatically manage paging file size for all drives | [SOLVED] 100% Disk Usage by System and Compressed Memory](https://lbsite.org/wp-content/uploads/2023/02/Checkmark-Automatically-manage-paging-file-size-for-all-drives.png)
5. Click OK, then click Apply followed by OK.
6. Select Yes to Restart your PC to save changes.
الطريقة الأولى: تعطيل بدء التشغيل السريع
1. اضغط على مفتاح Windows + R ثم اكتب control واضغط على Enter للفتح لوحة التحكم.

2. انقر على الأجهزة والصوت ثم انقر فوق خيارات الطاقة.

3. ثم حدد من نافذة النافذة اليسرى "اختر ما تفعله أزرار الطاقة."

4. الآن اضغط على "تغيير الإعدادات غير المتوفرة حاليًا."

5. قم بإلغاء تحديد "قم بتشغيل بدء التشغيل السريع"وانقر على حفظ التغييرات.
![Uncheck Turn on fast startup | [SOLVED] 100% Disk Usage by System and Compressed Memory](https://lbsite.org/wp-content/uploads/2023/01/Uncheck-Turn-on-fast-startup.png)
6. Restart your PC and see if you’re able to Fix 100% Disk Usage by System and Compressed Memory Issue.
Method 4: Disable Superfetch Service
1. اضغط على مفتاح Windows + R ثم اكتب services.msc ثم اضغط على Enter.

2. تجد سوبر فيتش service from the list then right-click on it and select خصائص.

3. Under Service status, if the service is running, click on يتوقف.
4. الآن، من بدء التشغيل type drop-down select معاق.

5. انقر فوق "تطبيق"، متبوعًا بـ حسنا.
6. أعد تشغيل الكمبيوتر لحفظ التغييرات.
If the above method doesn’t disable Superfetch services then you can follow disable Superfetch using Registry:
1. اضغط على مفتاح Windows + R ثم اكتب رجديت واضغط على Enter لفتح محرر التسجيل.

2. انتقل إلى مفتاح التسجيل التالي:
HKEY_LOCAL_MACHINESYSTEMCurrentControlSetControlSession Managerإدارة الذاكرةمعلمات الجلب المسبق
3. Make sure you have selected معلمات الجلب المسبق ثم في النافذة اليمنى انقر مرتين على تفعيل Superfetch مفتاح و change it’s value to 0 in the Value data field.

4. Click OK and close the Registry Editor.
5. أعد تشغيل جهاز الكمبيوتر الخاص بك لحفظ التغييرات ومعرفة ما إذا كان بإمكانك القيام بذلك Fix 100% Disk Usage by System and Compressed Memory Issue.
Method 5: Adjust your PC for Best Performance
1. اضغط على مفتاح Windows + R ثم اكتب sysdm.cpl واضغط على Enter للفتح خصائص النظام.
2. قم بالتبديل إلى متقدم ثم انقر فوق الإعدادات مع أداء.
3. Under Visual Effects checkmark “ضبط حصول على أفضل أداء".

4. انقر فوق "تطبيق"، متبوعًا بـ حسنا.
5. أعد تشغيل جهاز الكمبيوتر الخاص بك ومعرفة ما إذا كنت قادرًا على ذلك Fix 100% Disk Usage by System and Compressed Memory Issue.
Method 6: Kill the Speech Runtime Executable Process
1. صحافة على Ctrl + Shift + ESC لتشغيل إدارة المهام.
2. في ال علامة تبويب العمليات، تجد Speech Runtime Executable.
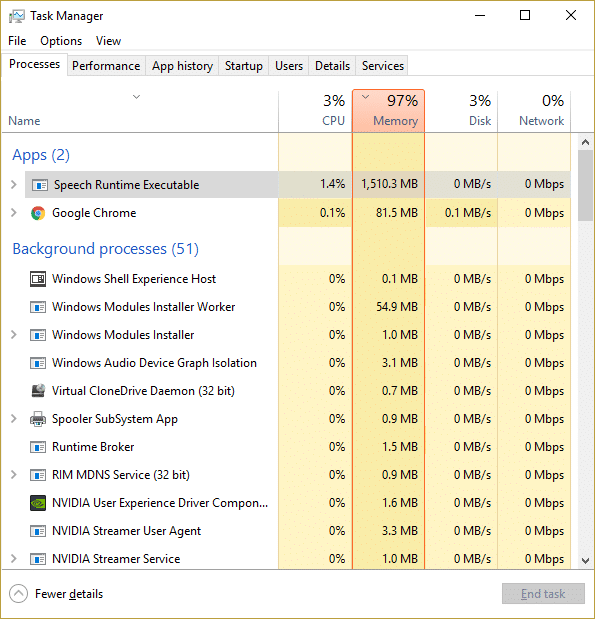
3. انقر بزر الماوس الأيمن عليه واختر إنهاء المهمة.
الطريقة الرابعة: قم بتشغيل CCleaner و Malwarebytes
1. تحميل وتثبيت سي كلينر والبرامج الضارة.
2. قم بتشغيل Malwarebytes والسماح له بفحص نظامك بحثًا عن الملفات الضارة. إذا تم العثور على برامج ضارة ، فسيتم إزالتها تلقائيًا.

3. الآن قم بتشغيل CCleaner وحدد تنظيف مخصص.
4. تحت Custom Clean ، حدد ملف علامة تبويب Windows وعلامة الاختيار الافتراضية وانقر فوق حلل.
![Select Custom Clean then checkmark default in Windows tab | [SOLVED] 100% Disk Usage by System and Compressed Memory](https://lbsite.org/wp-content/uploads/2023/01/Select-Custom-Clean-then-checkmark-default-in-Windows-tab.png)
5. بمجرد اكتمال التحليل ، تأكد من أنك متأكد من إزالة الملفات المراد حذفها.

6. أخيرًا ، انقر فوق شغل المنظف زر ودع CCleaner يأخذ مجراه.
7. لتنظيف نظامك بشكل أكبر ، حدد علامة التبويب التسجيل، وتأكد من فحص ما يلي:

8. انقر على تفحص المشاكل الزر والسماح لـ CCleaner بالمسح ، ثم انقر فوق ملف عالج المسائل المختارة .
![Once scan for issues is completed click on Fix selected Issues | [SOLVED] 100% Disk Usage by System and Compressed Memory](https://lbsite.org/wp-content/uploads/2023/01/Once-scan-for-issues-is-completed-click-on-Fix-selected-Issues.png)
9. عندما يطلب CCleaner "هل تريد إجراء نسخ احتياطي للتغييرات في التسجيل؟" حدد "نعم".
10. بمجرد اكتمال النسخ الاحتياطي ، انقر فوق إصلاح جميع القضايا المحددة .
11. أعد تشغيل الكمبيوتر لحفظ التغييرات.
Method 8: Change configuration of Google Chrome and Skype
بالنسبة إلى غوغل كروم: Navigate to the following under Chrome: Settings > Show Advanced Settings > Privacy > Use a prediction service to load pages more quickly. Disable the toggle next to “Use a prediction service to load pages.”

Change configuration For Skype
1. Make sure you have exited Skype, if not end task from Task Manager for Skype.
2. Press Windows Key + R then type the following and click OK:
C:Program Files (x86)SkypePhone
3. انقر بزر الماوس الأيمن Skype.exe وحدد خصائص.

4. التبديل إلى علامة التبويب الأمان ثم انقر تحرير.

5. حدد جميع حزم التطبيق under Group or user names then checkmark Write مع السماح.

6. Click Apply, followed by OK and see if you’re able to Fix 100% Disk Usage by System and Compressed Memory Issue.
Method 9: Set Correct Permission for System and Compressed Memory Process
1. اضغط على مفتاح Windows + R ثم اكتب devmgmt.msc and hit Enter to open Task Scheduler.

2. انتقل إلى المسار التالي:
Task Scheduler Library > Microsoft > Windows > MemoryDiagnostic
![Double click on ProcessMemoryDiagnostic Events | [SOLVED] 100% Disk Usage by System and Compressed Memory](https://lbsite.org/wp-content/uploads/2023/02/Double-click-on-ProcessMemoryDiagnostic-Events.png)
3. انقر نقرًا مزدوجًا فوق ProcessMemoryDiagnostic Events ثم انقر فوق تغيير المستخدم أو المجموعة under Security Options.

4. انقر متقدم ثم انقر فوق Find Now.

5. حدد الخاص بك حساب المسؤول from the list then click OK.

6. مرة أخرى انقر فوق موافق to add your administrator account.
7. Checkmark تشغيل مع امتيازات أعلى ثم انقر فوق "موافق".

8. Follow the same steps for RunFullMemoryDiagnostic and close everything.
9. أعد تشغيل الكمبيوتر لحفظ التغييرات.
Method 10: Disable System and Compressed Memory Process
1. اضغط على مفتاح Windows + R ثم اكتب devmgmt.msc واضغط على Enter للفتح جدول المهام.
2. انتقل إلى المسار التالي:
Task Scheduler Library > Microsoft > Windows > MemoryDiagnostic
3. انقر بزر الماوس الأيمن RunFullMemoryDiagnostic وحدد تعطيل.
![Right-click on RunFullMemoryDiagnostic and select Disable | [SOLVED] 100% Disk Usage by System and Compressed Memory](https://lbsite.org/wp-content/uploads/2023/02/Right-click-on-RunFullMemoryDiagnostic-and-select-Disable.png)
4. Close Task Scheduler and restart your PC.
أوصى:
هذا كل ما لديك بنجاح Fix 100% Disk Usage by System and Compressed Memory ولكن إذا كان لا يزال لديك أي أسئلة بخصوص هذا المنشور ، فلا تتردد في طرحها في قسم التعليقات.

