Process and Compressed Memory is a Windows 10 feature responsible for memory compression (also referred to as RAM compression and memory compression). This feature basically utilizes data compression to reduce the size or number of paging request to and from the auxiliary storage. In short, this feature is designed to take less amount of disk space and memory but in this case the System and Compressed Memory process start using 100% Disk and Memory, causing the affected PC to become slow.

In Windows 10, a compressions store is added to the concept of Memory Manager, which is an in-memory collection of compressed pages. So whenever the memory starts to fill up, the System and Compressed Memory process will compress the unused pages instead of writing them to the disk. The benefit of this is the amount of memory used per process is reduced, which allows Windows 10 to maintain more programs or apps in physical memory.
The problem appears to be incorrect Virtual Memory settings. Someone changed the paging file size from automatic to a particular value, virus or malware, Google Chrome or Skype, corrupt system files etc. So without wasting any time let’s see how to actually Fix 100% Disk Usage by System and Compressed Memory with the help of below-listed troubleshooting guide.
[SOLVED] 100% Disk Usage by System and Compressed Memory
Bir şey səhv olarsa, bərpa nöqtəsi yaratdığınızdan əmin olun.
Metod 1: Zədələnmiş sistem fayllarını təmir edin
1. Əmr əmrini açın. İstifadəçi axtarış edərək bu addımı yerinə yetirə bilər 'cmd' sonra Enter düyməsini basın.

2. İndi cmd-də aşağıdakıları yazın və enter düyməsini basın:
Sfc /scannow sfc /scannow /offbootdir=c: /offwindir=c:windows (Yuxarıda uğursuz olarsa, bunu cəhd edin)
![SFC scan now command prompt | [SOLVED] 100% Disk Usage by System and Compressed Memory](https://lbsite.org/wp-content/uploads/2023/01/SFC-scan-now-command-prompt.png)
3. Yuxarıdakı prosesin bitməsini gözləyin və tamamlandıqdan sonra kompüterinizi yenidən başladın.
4. Yenidən cmd açın və aşağıdakı əmri yazın və hər birindən sonra enter düyməsini basın:
Dism /Online /Təmizləmə-Şəkil /CheckHealth Dism /Online /Təmizləmə-Şəkil /ScanHealth Dism /Online /Təmizləmə-Şəkil /RestoreHealth

5. DISM əmrini işə salın və onun bitməsini gözləyin.
6. Yuxarıdakı əmr işləmirsə, aşağıdakıları sınayın:
Dism /Image:C:offline /Cleanup-Image /RestoreHealth /Mənbə:c:testmountwindows Dism /Online /Cleanup-Image /RestoreHealth /Mənbə:c:testmountwindows /LimitAccess
Qeyd: C:RepairSourceWindows-u təmir mənbəyinizlə əvəz edin (Windows Quraşdırma və ya Bərpa Diski).
7. Dəyişiklikləri saxlamaq və edə bildiyinizə baxmaq üçün kompüterinizi yenidən başladın Fix 100% Disk Usage by System and Compressed Memory Issue.
Method 2: Set Correct Paging File Size
1. Windows Key + R düymələrini basın, sonra yazın sysdm.cpl və açmaq üçün Enter düyməsini basın Sistem Xüsusiyyətləri.

2. düyməsinə keçin Ətraflı sekmə və sonra basın Performans altındakı parametrlər.

3. Again switch to the Advanced tab and click Change under Virtual Memory.

4. Checkmark “Bütün sürücülər üçün disk yaddaşının ölçüsünü avtomatik idarə et."
![Checkmark Automatically manage paging file size for all drives | [SOLVED] 100% Disk Usage by System and Compressed Memory](https://lbsite.org/wp-content/uploads/2023/02/Checkmark-Automatically-manage-paging-file-size-for-all-drives.png)
5. Click OK, then click Apply followed by OK.
6. Select Yes to Restart your PC to save changes.
Metod 3: Sürətli başlanğıcı söndürün
1. Windows Key + R düyməsini basın, sonra nəzarət yazın və açmaq üçün Enter düyməsini basın İdarə paneli.

2. Basın Hardware və Sound sonra vurun Güc Seçimləri.

3. Sonra, sol pəncərə panelindən seçin "Güc düymələrinin nə etdiyini seçin."

4. İndi vurun "Hal-hazırda mövcud olmayan ayarları dəyişdirin."

5. " işarəsini çıxarınSürətli başlanğıcı aktivləşdirin”Düyməsini basın və vurun Dəyişiklikləri yadda saxla.
![Uncheck Turn on fast startup | [SOLVED] 100% Disk Usage by System and Compressed Memory](https://lbsite.org/wp-content/uploads/2023/01/Uncheck-Turn-on-fast-startup.png)
6. Restart your PC and see if you’re able to Fix 100% Disk Usage by System and Compressed Memory Issue.
Method 4: Disable Superfetch Service
1. Windows Key + R düymələrini basın, sonra yazın services.msc və daxil edin.

2. Tapın Super gətirmə service from the list then right-click on it and select Properties.

3. Under Service status, if the service is running, click on Dayan.
4. İndi, dən Başlanğıc type drop-down select Əlil.

5. Tətbiq et və ardınca vurun OK.
6. Dəyişiklikləri saxlamaq üçün kompüterinizi yenidən başladın.
If the above method doesn’t disable Superfetch services then you can follow disable Superfetch using Registry:
1. Windows Key + R düymələrini basın, sonra yazın regedit və Qeydiyyat Redaktorunu açmaq üçün Enter düyməsini basın.

2. Aşağıdakı qeyd defteri açarına keçin:
HKEY_LOCAL_MACHINESYSTEMCurrentControlSetControlSession ManagerMemory ManagementPrefetchParameters
3. Make sure you have selected PrefetchParameters sonra sağ pəncərədə üzərinə iki dəfə klikləyin Superfetch-i aktivləşdirin key və change it’s value to 0 in the Value data field.

4. Click OK and close the Registry Editor.
5. Dəyişiklikləri saxlamaq və edə bildiyinizə baxmaq üçün kompüterinizi yenidən başladın Fix 100% Disk Usage by System and Compressed Memory Issue.
Method 5: Adjust your PC for Best Performance
1. Windows Key + R düymələrini basın, sonra yazın sysdm.cpl və açmaq üçün Enter düyməsini basın Sistem Xüsusiyyətləri.
2. düyməsinə keçin Qabaqcıl nişanını və sonra üzərinə klikləyin Parametrlər altında Performans.
3. Under Visual Effects checkmark “Ən yaxşı performans üçün seçin".

4. Tətbiq et və ardınca vurun OK.
5. Reboot your PC and see if you’re able to Fix 100% Disk Usage by System and Compressed Memory Issue.
Method 6: Kill the Speech Runtime Executable Process
1. Basın Ctrl + Shift + Esc Tapşırıq menecerini işə salmaq üçün.
2. İçində Proseslər nişanıtapmaq Speech Runtime Executable.
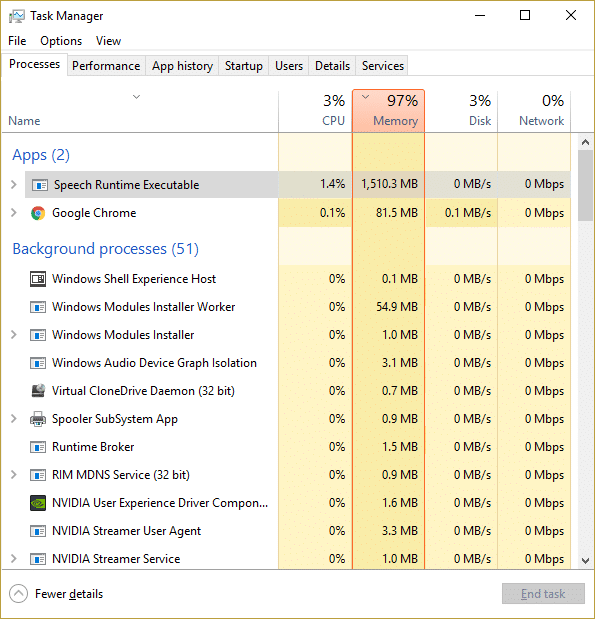
3. Üzərinə sağ klikləyin və seçin Son tapşırıq.
Metod 7: CCleaner və Malwarebytes-i işə salın
1. Yüklə və quraşdırın CCleaner & Zərərli proqram baytları.
2. Malwarebytes-i işə salın və sisteminizi zərərli fayllar üçün taramasına icazə verin. Zərərli proqram aşkar edilərsə, onları avtomatik olaraq siləcək.

3. İndi CCleaner-i işə salın və seçin Xüsusi Təmiz.
4. Xüsusi Təmizləmə altında, seçin Windows nişanı və defoltları işarələyin və vurun Təhlil etmək.
![Select Custom Clean then checkmark default in Windows tab | [SOLVED] 100% Disk Usage by System and Compressed Memory](https://lbsite.org/wp-content/uploads/2023/01/Select-Custom-Clean-then-checkmark-default-in-Windows-tab.png)
5. Təhlil tamamlandıqdan sonra silinəcək faylları silməkdən əmin olun.

6. Nəhayət, düyməsini vurun Təmizləyicini işə salın düyməsini basın və CCleaner-in öz kursunu işə salmasına icazə verin.
7. Sisteminizi daha da təmizləmək üçün, Qeydiyyat sekmesini seçin, və aşağıdakıların yoxlanıldığından əmin olun:

8. Tıklayınız Problemləri Scan düyməsini basın və CCleaner-ə skan etməyə icazə verin, sonra üzərinə klikləyin Seçilmiş Problemləri Düzəlt düyməsini basın.
![Once scan for issues is completed click on Fix selected Issues | [SOLVED] 100% Disk Usage by System and Compressed Memory](https://lbsite.org/wp-content/uploads/2023/01/Once-scan-for-issues-is-completed-click-on-Fix-selected-Issues.png)
9. CCleaner soruşduqda "Reyestrdə dəyişikliklərin ehtiyat nüsxəsini istəyirsiniz?" Bəli seçin.
10. Yedəkləmə tamamlandıqdan sonra üzərinə klikləyin Bütün seçilmiş problemləri həll edin düyməsini basın.
11. Dəyişiklikləri saxlamaq üçün kompüterinizi yenidən başladın.
Method 8: Change configuration of Google Chrome and Skype
Google Chrome üçün: Navigate to the following under Chrome: Settings > Show Advanced Settings > Privacy > Use a prediction service to load pages more quickly. Disable the toggle next to “Use a prediction service to load pages.”

Change configuration For Skype
1. Make sure you have exited Skype, if not end task from Task Manager for Skype.
2. Press Windows Key + R then type the following and click OK:
C:Program Files (x86)SkypePhone
3. Sağ düyməni vurun skype.exe və seçin Properties.

4. keçin Təhlükəsizlik sekmesi basın Düzəliş edin.

5. Seçin BÜTÜN TƏTBİQ PAKETLƏRİ under Group or user names then checkmark Write altında İcazə verin.

6. Click Apply, followed by OK and see if you’re able to Fix 100% Disk Usage by System and Compressed Memory Issue.
Method 9: Set Correct Permission for System and Compressed Memory Process
1. Windows Key + R düymələrini basın, sonra yazın Taskschd.msc and hit Enter to open Task Scheduler.

2. Aşağıdakı yola keçin:
Task Scheduler Library > Microsoft > Windows > MemoryDiagnostic
![Double click on ProcessMemoryDiagnostic Events | [SOLVED] 100% Disk Usage by System and Compressed Memory](https://lbsite.org/wp-content/uploads/2023/02/Double-click-on-ProcessMemoryDiagnostic-Events.png)
3. üzərinə iki dəfə klikləyin ProcessMemoryDiagnostic Events və sonra basın İstifadəçi və ya qrupu dəyişdirin under Security Options.

4. klik Qabaqcıl və sonra basın Find Now.

5. Özünüzü seçin Administrator hesabı from the list then click OK.

6. Yenə OK düyməsini basın to add your administrator account.
7. Checkmark Yüksək güzəştlər ilə işləyin və sonra Tamam düyməsini basın.

8. Follow the same steps for RunFullMemoryDiagnostic and close everything.
9. Dəyişiklikləri saxlamaq üçün kompüterinizi yenidən başladın.
Method 10: Disable System and Compressed Memory Process
1. Windows Key + R düymələrini basın, sonra yazın Taskschd.msc və açmaq üçün Enter düyməsini basın Tapşırıq Zamanlayıcı.
2. Aşağıdakı yola keçin:
Task Scheduler Library > Microsoft > Windows > MemoryDiagnostic
3. Sağ düyməni vurun RunFullMemoryDiagnostic və seçin Çıxarın.
![Right-click on RunFullMemoryDiagnostic and select Disable | [SOLVED] 100% Disk Usage by System and Compressed Memory](https://lbsite.org/wp-content/uploads/2023/02/Right-click-on-RunFullMemoryDiagnostic-and-select-Disable.png)
4. Close Task Scheduler and restart your PC.
Tövsiyə edilir:
Uğurla əldə etdiyiniz budur Fix 100% Disk Usage by System and Compressed Memory lakin bu yazı ilə bağlı hələ də hər hansı bir sualınız varsa, şərh bölməsində onlardan soruşmaqdan çekinmeyin.

