Fix Desktop Icons keep getting rearranged after Windows 10 Creators Update: After installing the latest Windows 10 Creators Update users are complaining about a new strange issue where the desktop icons keep getting rearranged automatically. Every time the user hits refresh the desktop icons arrangement is changed or messed up. In short whatever you do from saving a new file on the desktop, to rearranging icons on the desktop, to renaming files or shortcuts on the desktop affects the icon arrangement in some way or other.
![]()
In some cases, in addition to above issues, users are also complaining about the icon spacing issue as before the update the space between icons was different and after the Creators Update, the icon spacing is also messed up. Below is the official Windows announcement of a new feature being introduced in Creators Update called Desktop Icon Placement Improvements:
Windows now more intelligently rearranges and scales desktop icons when you switch between different monitors and scaling settings, seeking to preserve your custom icon layout rather than scrambling them.
Now the main issue about this feature is you can’t disable it and this time Microsoft has really messed up by introducing this feature which is causing more harm than good. Anyway without wasting any more time let’s see how to actually Fix Desktop Icons keep getting rearranged after Windows 10 Creators Update with the below-listed troubleshooting guide.
Fix Значкі на працоўным стале працягваюць перастаўляцца пасля Windows 10 Creators Update
Пераканайцеся, што стварыць кропку аднаўлення толькі ў выпадку, калі нешта пойдзе не так.
Спосаб 1: Змена выгляду значкоў
1. Пстрыкніце правай кнопкай мышы на працоўным стале і выберыце выгляд і змяніць прагляд з выбранага вамі выгляду на любы іншы. Напрыклад, калі выбраны «Сярэдні», націсніце «Малы».

2. Цяпер зноў выберыце той жа выгляд, які быў абраны раней, напрыклад, які мы б выбралі Зноў сярэдні.
3. Далей выберыце «невялікі” у опцыі Прагляд, і вы адразу ўбачыце змены ў значку на працоўным стале.
![]()
4.Пасля гэтага значок не будзе перастаўляцца аўтаматычна.
Method 2: Enable Align icons to grid
1.Right-click on an empty space on the desktop then select View і зніміце сцяжок Align icons to grid.
![]()
2.Now again from the view option enable Align icons to grid and see if you are able to fix the issue.
3. Калі не, то з опцыі Прагляд зніміце сцяжок з пункта «Аўтаматычнае размяшчэнне значкоў». і ўсё атрымаецца.
Спосаб 3: Зніміце сцяжок Дазволіць тэмам змяняць значкі працоўнага стала
1.Press Windows Key + I to open Settings then click Персаналізацыя.
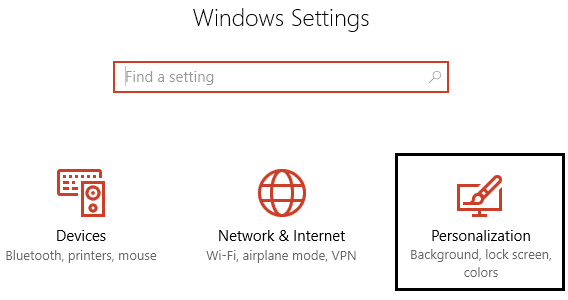
2. У левым меню абярыце Тэмы а затым націсніце Налады значкоў працоўнага стала.
![]()
3. Цяпер у акне налад значкоў працоўнага стала зніміце галачку з опцыі «Дазволіць тэмам змяняць значкі працоўнага стала» унізе.
![]()
4.Націсніце "Ужыць", а затым "ОК".
5. Перазагрузіце кампутар, каб захаваць змены, і паглядзіце, ці зможаце вы гэта зрабіць Fix Desktop Icons keep getting rearranged automatically issue.
Спосаб 4: Выдаліць кэш значкоў
1.Make sure to save all the work which you are currently doing on your PC and close all the present applications or folder windows.
2. Націсніце адначасова Ctrl + Shift + Esc, каб адкрыць Дыспетчар задач.
3. Пстрыкніце правай кнопкай мышы Windows Explorer і абярыце Заканчэнне задання.

4.Click Размовы затым націсніце на Запусціць новае заданне.

5.Тып cmd.exe у поле значэння і націсніце OK.

6. Цяпер увядзіце наступную каманду ў cmd і націскайце Enter пасля кожнай:
CD /d %userprofile%AppDataLocal
DEL IconCache.db /a
ВЫХАД
![]()
7. Пасля паспяховага выканання ўсіх каманд зачыніце камандны радок.
8.Цяпер зноў адкрыйце Дыспетчар задач, калі вы закрылі, і націсніце Файл > Запусціць новую задачу.
9. Увядзіце explorer.exe і націсніце OK. Гэта прывядзе да перазапуску Правадыра Windows і Fix Desktop Icons keep getting rearranged issue.

Method 5: Roll back to the previous Windows 10 build
1.First, go to the Login screen then click on кнопка харчавання затым утрымлівайце Shift а затым націсніце на Перазапуск.
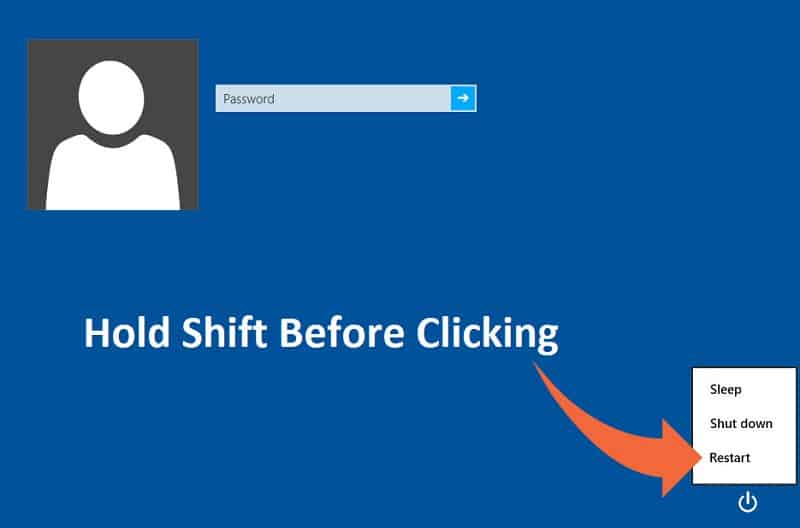
2. Пераканайцеся, што вы не адпускаеце кнопку Shift, пакуль не ўбачыце Меню пашыраных параметраў аднаўлення.

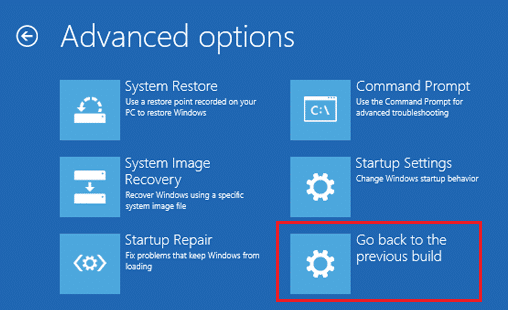
3. Цяпер перайдзіце да наступнага ў меню дадатковых параметраў аднаўлення:
Ліквідацыю непаладак > Дадатковыя параметры > Вярнуцца да папярэдняй зборкі.
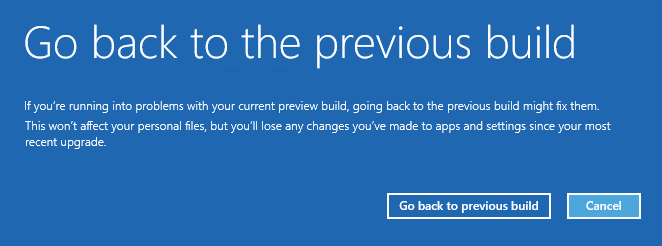
3.After a few seconds, you will be asked to choose your User Account. Click on the User Account, type in your password and click Continue. Once done, choose the option Go Back to the Previous Build again.
Рэкамендуецца для вас:
Вось і ўсё ў вас атрымалася Fix Значкі на працоўным стале працягваюць перастаўляцца пасля Windows 10 Creators Update але калі ў вас усё яшчэ ёсць якія-небудзь пытанні адносна гэтага кіраўніцтва, не саромейцеся задаваць іх у раздзеле каментарыяў.
![Fix WMI Provider Host High CPU Usage [Windows 10]](https://lbsite.org/wp-content/uploads/2023/02/Fix-WMI-Provider-Host-High-CPU-Usage-on-Windows-10.png "Fix WMI Provider Host High CPU Usage [Windows 10]")
