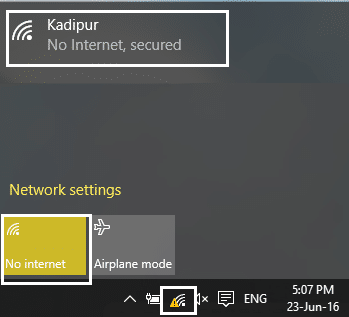
If a WiFi network has the ‘limited connectivity’ sign next to it, it means that you’re connected to the network but do not have access to the internet. The main reason for this issue is that the DHCP server is not responding. And when the DHCP server doesn’t respond the computer automatically assigns an IP address to itself because the DHCP server was unable to assign the IP address. Hence the ‘Limited or No connectivity’ error.
Выпраўце праблемы з абмежаваным доступам або адсутнасцю падключэння Wi-Fi
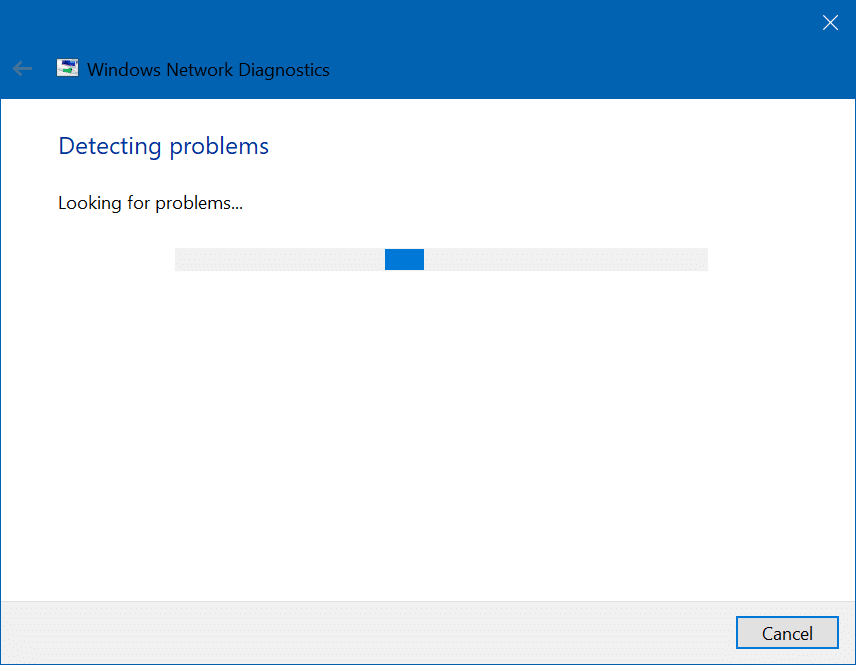
Method 1: Run Network troubleshooter
1. Пстрыкніце правай кнопкай мышы на значок сеткі at the taskbar and click on Ліквідацыю непаладак.
![]()
2. The Network Diagnostics window will open. Follow the on-screen instructions to run the Troubleshooter.
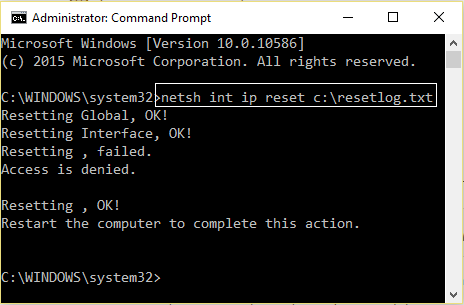
Спосаб 2: Скід TCP / IP
1. Right-click on the Windows button and select “Command Prompt(Admin).”

2. Увядзіце наступную каманду: netsh int ip reset c:resetlog.txt
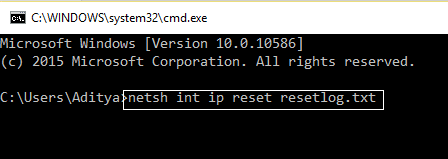
3. If you don’t want to specify the directory path then use this command: Netsh INT IP resetlog.txt скіду
4. Перазагрузіце ПК.
Спосаб 3: Змена налад брандмаўэра Bitdefender (Або вашага антывіруснага брандмаўэра)
1. Open Settings of Bitdefender Internet Security and choose Брандмаўэр.
2. Націсніце "Advanced Settings"Кнопку.
3. Пераканайцеся, што «Уключыць агульны доступ да інтэрнэт-злучэння» адзначана.
Заўвага: If you don’t have the above setting then disable “Block Internet Connection Sharing” instead of above.
4. Click the OK button to save changes.
5. And if it doesn’t work try disabling your Antivirus Firewall and enabling Windows Firewall.
For maximum people changing firewall settings fixes the limited access or no connectivity WiFi problem, but if it didn’t work for you don’t lose hope we still have a long way to go, so follow the next method.
Method 4: Change adapter settings
1. Open the Bitdefender, then select Protection module і націсніце Firewall feature.
2. Make sure the Firewall is turned ON and then go to the Adapters tab and perform the following changes:
Set Network type to "Home/Office"
Set Stealth Mode to "Off"
Set Generic to "On"
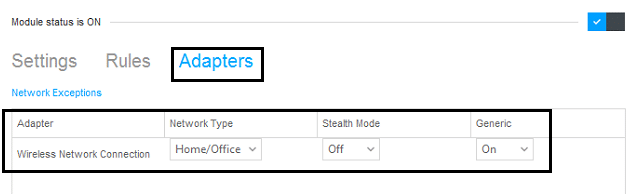
3. Restart your PC to apply these changes.
Method 5: Wake up your Wi-Fi Adapter
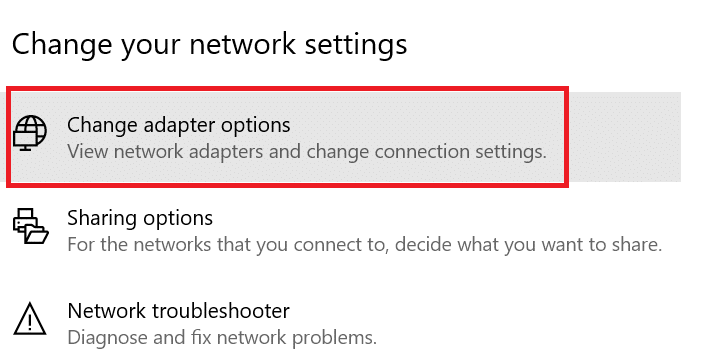
1. Пстрыкніце правай кнопкай мышы on the network icon in the notification area and select адкрыты Network & Internet Settings.

2. пад Змена налад сеткінацісніце на Change Adapter Options.
3. Націсніце на свой Сетка WiFi і абярыце Ўласцівасці.
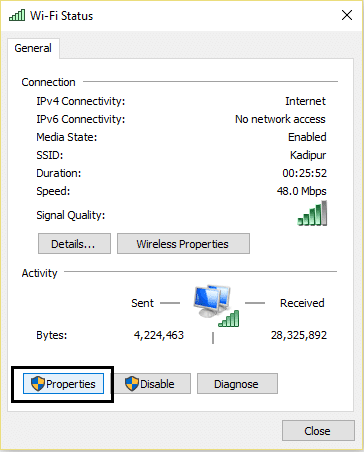
4. Зараз у Уласцівасці WiFi націсніце Наладзьце.
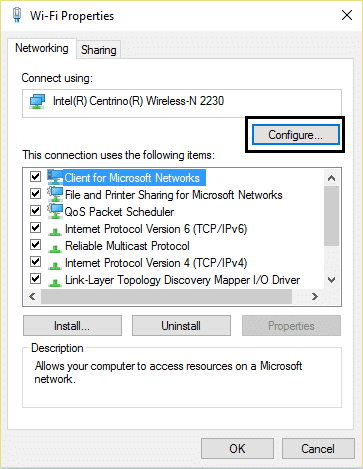
5. Go to the Power Management tab and uncheck “Дазвольце камп'ютару выключыць гэту прыладу для эканоміі энергіі."
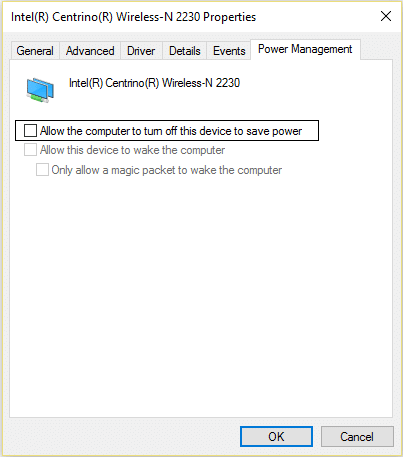
6. Перазагрузіце кампутар.
Спосаб 6: Выкарыстоўвайце Google DNS
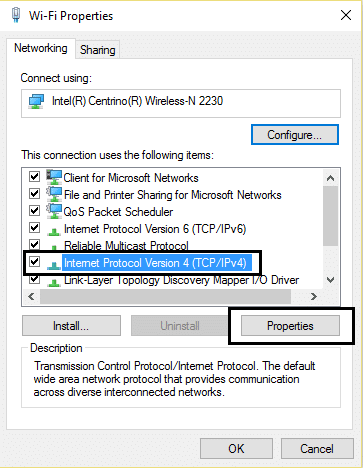
1. Again go to your Wi-Fi properties.
2. Зараз абярыце Internet Protocol Version 4 (TCP / IPv4) і націсніце Ўласцівасці.
3. Check the box saying “Выкарыстоўваць наступныя адрасы DNS-сервера” and enter the following:
Пераважны DNS-сервер: 8.8.8.8
Альтэрнатыўны DNS-сервер: 8.8.4.4
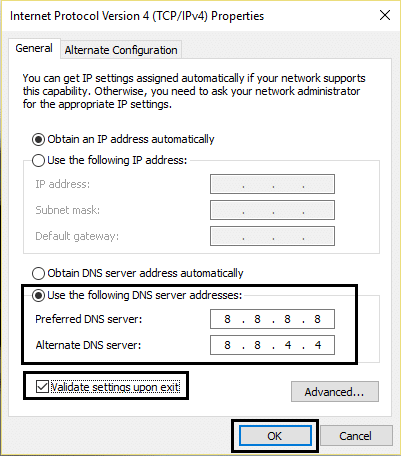
4. Click OK to save, then click close and перазапуск ваш кампутар.
Method 7: Reset TCP/IP Auto-tuning
1. Right-click on the Windows key and select “Камандны радок (адміністратар)."
2. Type the following commands:
netsh int tcp set heuristics disabled
netsh int tcp set global autotuninglevel=disabled
netsh int tcp set global rss=enabled
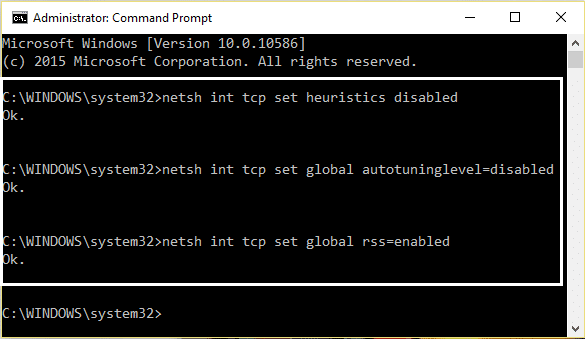
3. Перазагрузіце кампутар.
Method 8: Enable Download over metered connections
1. націсніце на ключ для Windows і абярыце Налады.
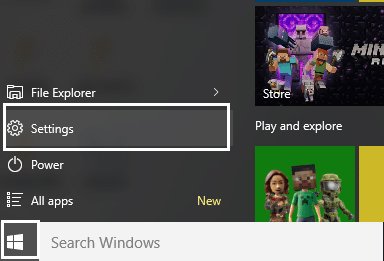
2. Now in settings click on Сетка і Інтэрнэт.

3. Here you will see Дадатковыя опцыі, націсніце на яго.
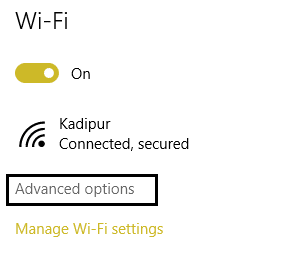
4. Пераканайцеся, што ваш Metered connection is set to ВКЛ.
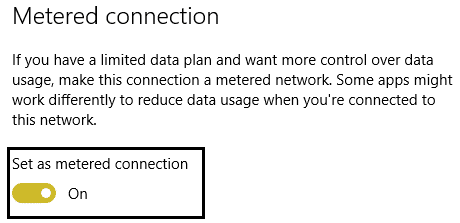
5. Перазагружаць каб прымяніць змены.
Yeah, I admit, this is a stupid step but hey for some people it worked out so why not try it and who knows your limited access or no connectivity WiFi issues may be fixed.
Method 9: Set Roaming Aggressiveness to Maximum
1. Пстрыкніце правай кнопкай мышы on the network icon in the notification area and select адкрыты Network & Internet Settings.
2. пад Змена налад сеткінацісніце на Change Adapter Options.
3. Цяпер абярыце свой Wi-Fi і націсніце на кнопку Ўласцівасці.
4. Inside Wi-Fi properties click on Наладзьце.
5. перайдзіце да the Advanced tab і знайсці Роўмінг Агрэсіўнасць ўстаноўка.
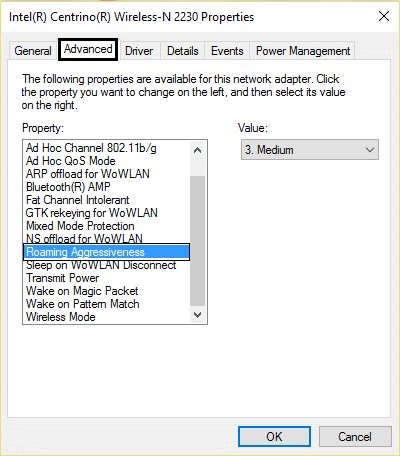
6. Change the value from Medium to Highest і націсніце кнопку OK.
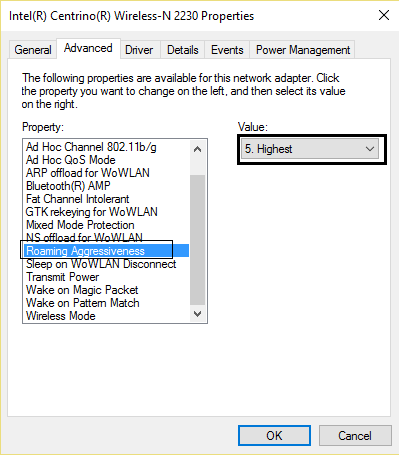
7. Перазагружаць каб прымяніць змены.
Спосаб 10: Абнавіце драйверы
1. Націсніце клавішу Windows + R і ўвядзіце «devmgmt.msc” in Run dialogue box to open the дыспетчар прылад.

2. Разгарнуць сеткавыя адаптары, затым пстрыкніце правай кнопкай мышы на вашым Wi-fi кантролер(напрыклад, Broadcom або Intel) і абярыце Абнавіць драйверы.

3. In the Update Driver Software Windows, select “Агляд майго кампутара праграмнае забеспячэнне драйвера."

4. Цяпер выберыце «Дазвольце мне выбраць спіс спісаў драйвераў прылад на маім кампутары."

5. Паспрабуйце абнавіць драйверы з пералічаных версій.
6. If the above didn’t work then go to the сайт вытворцы каб абнавіць драйверы: https://downloadcenter.intel.com/
7. Перазагружаць каб прымяніць змены.
Вам таксама можа спадабацца:
I hope by now any one of the methods must have worked for you to fix limited access or no connectivity WiFi issues. If you still have any queries regarding this guide please feel free to ask them in the comments.
![[SOLVED] keyboard has stopped working on Windows 10](https://lbsite.org/wp-content/uploads/2023/01/Solved-keyboard-has-stopped-working-on-Windows-10.png "[SOLVED] keyboard has stopped working on Windows 10")
