Process and Compressed Memory is a Windows 10 feature responsible for memory compression (also referred to as RAM compression and memory compression). This feature basically utilizes data compression to reduce the size or number of paging request to and from the auxiliary storage. In short, this feature is designed to take less amount of disk space and memory but in this case the System and Compressed Memory process start using 100% Disk and Memory, causing the affected PC to become slow.

In Windows 10, a compressions store is added to the concept of Memory Manager, which is an in-memory collection of compressed pages. So whenever the memory starts to fill up, the System and Compressed Memory process will compress the unused pages instead of writing them to the disk. The benefit of this is the amount of memory used per process is reduced, which allows Windows 10 to maintain more programs or apps in physical memory.
The problem appears to be incorrect Virtual Memory settings. Someone changed the paging file size from automatic to a particular value, virus or malware, Google Chrome or Skype, corrupt system files etc. So without wasting any time let’s see how to actually Fix 100% Disk Usage by System and Compressed Memory with the help of below-listed troubleshooting guide.
[SOLVED] 100% Disk Usage by System and Compressed Memory
Не забудзьцеся стварыць кропку аднаўлення, на той выпадак, калі нешта пойдзе не так.
Спосаб 1: Выпраўце пашкоджаныя сістэмныя файлы
1. Адкрыйце камандны радок. Карыстальнік можа выканаць гэты крок з дапамогай пошуку "cmd" і затым націсніце Enter.

2. Цяпер увядзіце наступнае ў cmd і націсніце Enter:
Sfc /scannow sfc /scannow /offbootdir=c: /offwindir=c:windows (Калі апісанае вышэй не дапамагае, паспрабуйце гэта)
![SFC scan now command prompt | [SOLVED] 100% Disk Usage by System and Compressed Memory](https://lbsite.org/wp-content/uploads/2023/01/SFC-scan-now-command-prompt.png)
3. Дачакайцеся завяршэння апісанага вышэй працэсу і пасля завяршэння перазагрузіце ПК.
4. Зноў адкрыйце cmd і ўвядзіце наступную каманду і націскайце Enter пасля кожнай:
Dism /Online /Cleanup-Image /CheckHealth Dism /Online /Cleanup-Image /ScanHealth Dism /Online /Cleanup-Image /RestoreHealth

5. Дайце выканаць каманду DISM і пачакайце, пакуль яна скончыцца.
6. Калі прыведзеная вышэй каманда не працуе, паспрабуйце наступную:
Dism /Image:C:offline /Cleanup-Image /RestoreHealth /Source:c:testmountwindows Dism /Online /Cleanup-Image /RestoreHealth /Source:c:testmountwindows /LimitAccess
нататка: Заменіце C:RepairSourceWindows на сваю крыніцу рамонту (дыск для ўстаноўкі або аднаўлення Windows).
7. Перазагрузіце кампутар, каб захаваць змены, і паглядзіце, ці зможаце вы гэта зрабіць Fix 100% Disk Usage by System and Compressed Memory Issue.
Method 2: Set Correct Paging File Size
1. Націсніце клавішу Windows + R, затым увядзіце sysdm.cpl і націсніце Enter, каб адкрыць Уласцівасці сістэмы.

2. Пераключыцеся на Укладка "Пашыраны" а затым націсніце на Налады ў раздзеле Прадукцыйнасць.

3. Again switch to the Advanced tab and click Change under Virtual Memory.

4. Checkmark “Аўтаматычнае кіраванне Памер файла падпампоўкі для ўсіх дыскаў."
![Checkmark Automatically manage paging file size for all drives | [SOLVED] 100% Disk Usage by System and Compressed Memory](https://lbsite.org/wp-content/uploads/2023/02/Checkmark-Automatically-manage-paging-file-size-for-all-drives.png)
5. Click OK, then click Apply followed by OK.
6. Select Yes to Restart your PC to save changes.
Спосаб 3: адключэнне хуткага запуску
1. Націсніце клавішу Windows + R, затым увядзіце control і націсніце Enter, каб адкрыць Панэль кіравання.

2. Націсніце на Абсталяванне і гук затым націсніце на электрасілкаванне.

3. Затым на левай панэлі акна абярыце "Выберыце тое, што робяць кнопкі харчавання."

4. Цяпер націсніце на кнопку "Змена параметраў, якія ў цяперашні час недаступныя."

5. Зніміце сцяжок "Уключыце хуткі запуск”І націсніце на Захаваць змены.
![Uncheck Turn on fast startup | [SOLVED] 100% Disk Usage by System and Compressed Memory](https://lbsite.org/wp-content/uploads/2023/01/Uncheck-Turn-on-fast-startup.png)
6. Restart your PC and see if you’re able to Fix 100% Disk Usage by System and Compressed Memory Issue.
Method 4: Disable Superfetch Service
1. Націсніце клавішу Windows + R, затым увядзіце services.msc і націсніце Enter.

2. Знайсці Супервыман service from the list then right-click on it and select Ўласцівасці.

3. Under Service status, if the service is running, click on Спыніцеся.
4. Цяпер, ад ст Увод у эксплуатацыю type drop-down select Disabled.

5. Націсніце Ужыць, а затым ОК.
6. Перазагрузіце кампутар, каб захаваць змены.
If the above method doesn’t disable Superfetch services then you can follow disable Superfetch using Registry:
1. Націсніце клавішу Windows + R, затым увядзіце Regedit і націсніце Enter, каб адкрыць рэдактар рэестра.

2. Перайдзіце да наступнага ключа рэестра:
HKEY_LOCAL_MACHINESYSTEMCurrentControlSetControlSession Manager ManagementMemoryPrefetchParameters
3. Make sure you have selected Папярэдняя выбарка параметраў затым двойчы пстрыкніце ў правым акне Уключыць Superfetch ключ і change it’s value to 0 in the Value data field.

4. Click OK and close the Registry Editor.
5. Перазагрузіце кампутар, каб захаваць змены, і паглядзіце, ці зможаце вы гэта зрабіць Fix 100% Disk Usage by System and Compressed Memory Issue.
Method 5: Adjust your PC for Best Performance
1. Націсніце клавішу Windows + R, затым увядзіце sysdm.cpl і націсніце Enter, каб адкрыць Уласцівасці сістэмы.
2. Пераключыцеся на прасунуты ўкладку, а затым націсніце на налады пры Прадукцыйнасць.
3. Under Visual Effects checkmark “Настройка для лепшай прадукцыйнасці».

4. Націсніце Ужыць, а затым ОК.
5. Перазагрузіце кампутар і паглядзіце, ці зможаце вы гэта зрабіць Fix 100% Disk Usage by System and Compressed Memory Issue.
Method 6: Kill the Speech Runtime Executable Process
1. прэс Ctrl + Shift + Esc каб запусціць дыспетчар задач.
2. у Укладка "Працэсы", знайсці Speech Runtime Executable.
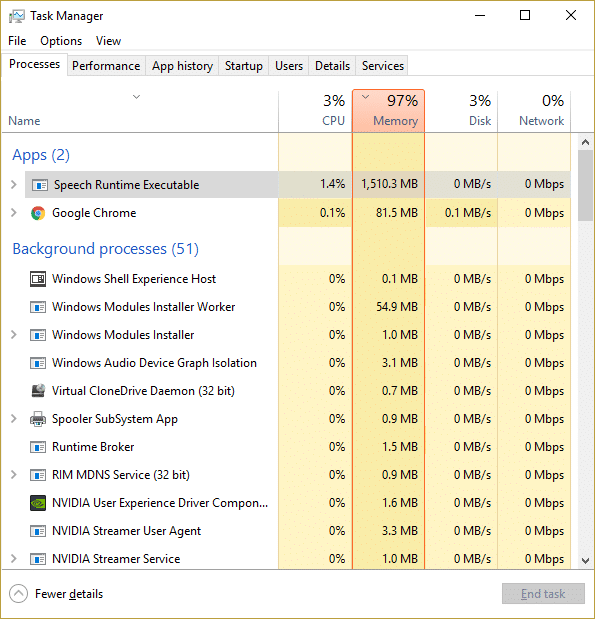
3. Пстрыкніце па ім правай кнопкай мышы і абярыце Заканчэнне задання.
Спосаб 7: запусціце CCleaner і Malwarebytes
1. Спампаваць і ўсталяваць CCleaner & Malwarebytes.
2. Запусціце Malwarebytes і дазвольце яму сканаваць вашу сістэму на наяўнасць шкодных файлаў. Пры выяўленні шкоднасных праграм яны будуць аўтаматычна выдалены.

3. Цяпер запусціце CCleaner і абярыце Нестандартная чысціня.
4. У раздзеле Карыстальніцкая ачыстка абярыце Укладка Windows і пастаўце галачку па змаўчанні і націсніце Аналізаваць.
![Select Custom Clean then checkmark default in Windows tab | [SOLVED] 100% Disk Usage by System and Compressed Memory](https://lbsite.org/wp-content/uploads/2023/01/Select-Custom-Clean-then-checkmark-default-in-Windows-tab.png)
5. Пасля завяршэння аналізу пераканайцеся, што вы выдалілі файлы, якія трэба выдаліць.

6. Нарэшце, націсніце на Запусціце Cleaner кнопку і дазвольце CCleaner працаваць сваім курсам.
7. Для далейшай ачысткі сістэмы, абярыце ўкладку Рэестрі пераканайцеся, што наступнае адзначана:

8. націсніце на Сканіраванне праблем кнопку і дазвольце CCleaner сканаваць, затым націсніце на Выправіць выбраныя праблемы кнопкі.
![Once scan for issues is completed click on Fix selected Issues | [SOLVED] 100% Disk Usage by System and Compressed Memory](https://lbsite.org/wp-content/uploads/2023/01/Once-scan-for-issues-is-completed-click-on-Fix-selected-Issues.png)
9. Калі CCleaner пытаецца «Вы жадаеце зрабіць рэзервовую копію змяненняў у рэестры?" абярыце Так.
10. Пасля завяршэння рэзервовага капіравання націсніце на Выправіць усе выбраныя праблемы кнопкі.
11. Перазагрузіце кампутар, каб захаваць змены.
Method 8: Change configuration of Google Chrome and Skype
Для Google Chrome: Navigate to the following under Chrome: Settings > Show Advanced Settings > Privacy > Use a prediction service to load pages more quickly. Disable the toggle next to “Use a prediction service to load pages.”

Change configuration For Skype
1. Make sure you have exited Skype, if not end task from Task Manager for Skype.
2. Press Windows Key + R then type the following and click OK:
C:Program Files (x86)SkypePhone
3. Пстрыкніце правай кнопкай мышы skype.exe і абярыце Ўласцівасці.

4. Перайсці на ўкладка Бяспека і націсніце Змяніць.

5. выбраць УСЕ ПАКАТЫ under Group or user names then checkmark Write пры Дазволіць.

6. Click Apply, followed by OK and see if you’re able to Fix 100% Disk Usage by System and Compressed Memory Issue.
Method 9: Set Correct Permission for System and Compressed Memory Process
1. Націсніце клавішу Windows + R, затым увядзіце Taskschd.msc and hit Enter to open Task Scheduler.

2. Перайдзіце па наступным шляху:
Task Scheduler Library > Microsoft > Windows > MemoryDiagnostic
![Double click on ProcessMemoryDiagnostic Events | [SOLVED] 100% Disk Usage by System and Compressed Memory](https://lbsite.org/wp-content/uploads/2023/02/Double-click-on-ProcessMemoryDiagnostic-Events.png)
3. Двойчы націсніце на ProcessMemoryDiagnostic Events а затым націсніце Змяніць карыстальніка або групу under Security Options.

4. пстрычка прасунуты а затым націсніце Find Now.

5. Абярыце свой уліковы запіс адміністратара from the list then click OK.

6. Зноў націсніце OK to add your administrator account.
7. Checkmark Запуск з найвышэйшымі правамі а затым націсніце OK.

8. Follow the same steps for RunFullMemoryDiagnostic and close everything.
9. Перазагрузіце кампутар, каб захаваць змены.
Method 10: Disable System and Compressed Memory Process
1. Націсніце клавішу Windows + R, затым увядзіце Taskschd.msc і націсніце Enter, каб адкрыць Планіроўшчык заданняў.
2. Перайдзіце па наступным шляху:
Task Scheduler Library > Microsoft > Windows > MemoryDiagnostic
3. Пстрыкніце правай кнопкай мышы Запусціце FullMemoryDiagnostic і абярыце Адключыць.
![Right-click on RunFullMemoryDiagnostic and select Disable | [SOLVED] 100% Disk Usage by System and Compressed Memory](https://lbsite.org/wp-content/uploads/2023/02/Right-click-on-RunFullMemoryDiagnostic-and-select-Disable.png)
4. Close Task Scheduler and restart your PC.
Рэкамендуецца:
Вось і ўсё ў вас атрымалася Fix 100% Disk Usage by System and Compressed Memory але калі ў вас ёсць якія-небудзь пытанні адносна гэтай публікацыі, не саромейцеся задаваць іх у раздзеле каментарыяў.

