Enable or Disable Secure Login in Windows 10: Secure Login is a security feature of Windows 10 which when enabled requires users to press Ctrl + Alt + delete on the lock screen before they can sign in using their username and password in Windows 10. Secure Sign just adds an extra layer of security to your sign-in screen which is always a good thing to make your PC is more secure. The main problem occurs when a virus or malware programs mimic a sign-in screen in order to retrieve username & password information from users. In such cases, Ctrl + Alt + delete ensures that you are seeing the authentic sign-in screen.

This security setting is disabled by default and thus you need to follow this tutorial in order to enable the secure logon. There are many additionals benefit of using secure logon so it’s recommended you enable it. So without wasting any time let’s see How to Enable or Disable Secure Login in Windows 10 which requires the user to press Ctrl+Alt+Delete on the lock screen before signing in to Windows 10.
Enable or Disable Secure Login in Windows 10
Не забравяйте да създадете точка за възстановяване, в случай че нещо се обърка.
Method 1: Enable or Disable Secure Sign-in in Netplwiz
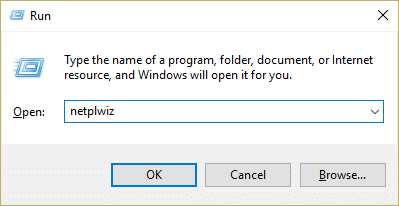
1. Натиснете клавиша Windows + R, след което въведете netplwiz и натиснете Enter, за да отворите Потребителски акаунти.
2. Преминете към Разширено раздела намлява checkmark “Require users to press Ctrl+Alt+Delete” box at the bottom under the Secure sign-in to enable secure login in Windows 10.
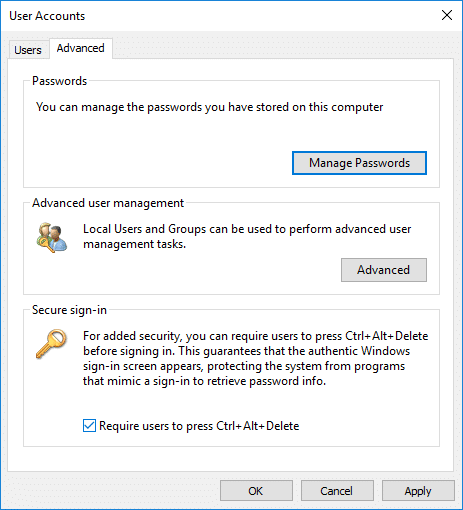
3. Щракнете върху Прилагане, последвано от OK.
4.If in future you need to disable secure login then simply премахнете отметката "Require users to press Ctrl+Alt+Delete" кутия.
Method 2: Enable or Disable Secure Login in Local Security Policy
Забележка: This method will only work for Windows Pro, Education and Enterprise edition. For Windows 10 Home users, you can follow skip tis method inseatd follow method 3.
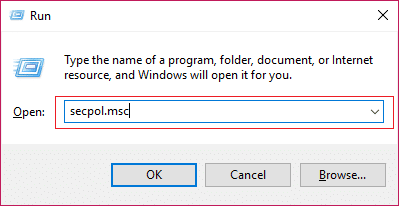
1. Натиснете клавиша Windows + R, след което въведете secpol.msc и натиснете Enter.
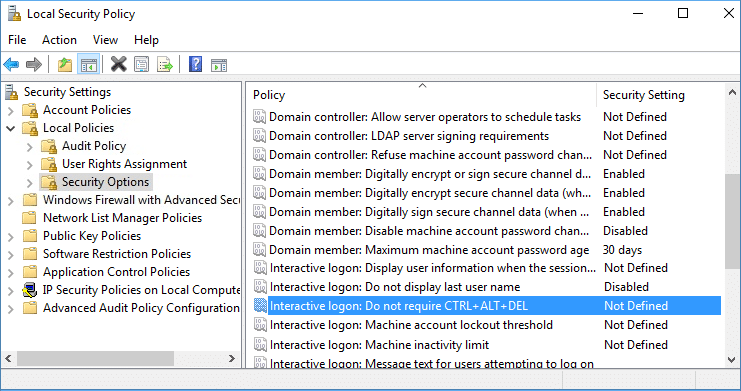
2.Navigate to the following policy:
Местни политики> Опции за сигурност
3. Уверете се, че сте избрали Настройки за сигурност след това в десния панел на прозореца щракнете двукратно върху „Interactive Logon: Do not require CTRL+ALT+DEL” to open its properties.
4.Now to enable secure login in Windows 10изберете инвалиди и след това щракнете върху Приложи, последвано от OK.
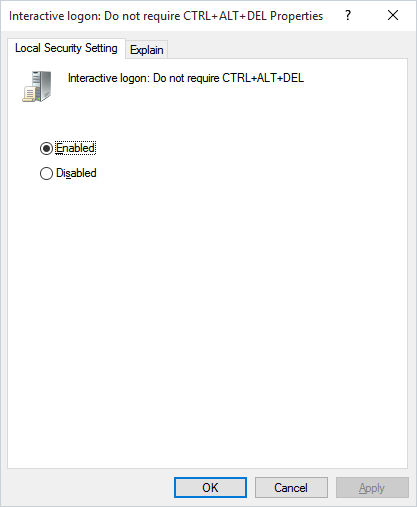
5.If you need to disable secure login then select Enabled and click OK.
6.Close Local Security Policy window and restart your PC.
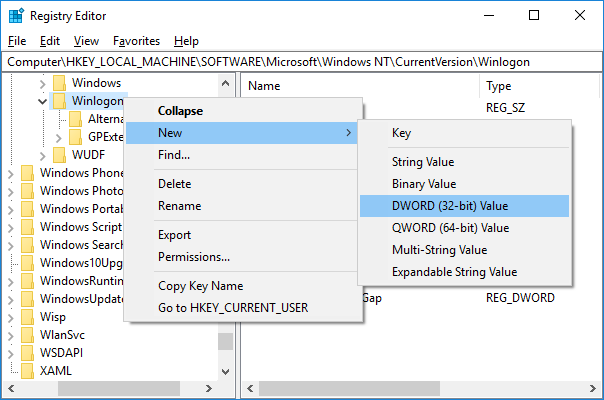
Method 3: Enable or Disable Secure Login in Windows 10 using Registry Editor
1. Натиснете клавиша Windows + R, след което въведете регентство и натиснете Enter.

2. Придвижете се до следния ключ на системния регистър:
HKEY_LOCAL_MACHINESOFTWAREMicrosoftWindows NTCurrentVersionWinlogon
3. Уверете се, че сте избрали Winlogon then in the right window pane double-click on DisableCAD.

Забележка: If you can’t find the DisableCAD then right-click on Winlogon then select Ново> DWORD (32-битова) Стойност and name this DWORD as DisableCAD.
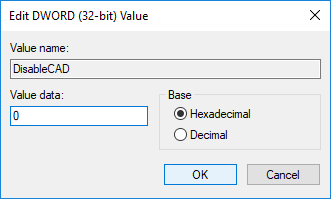
4.Now in the value data field type the following and click OK:
To Disable Secure Logon: 1
To Enable Secure Logon: 0
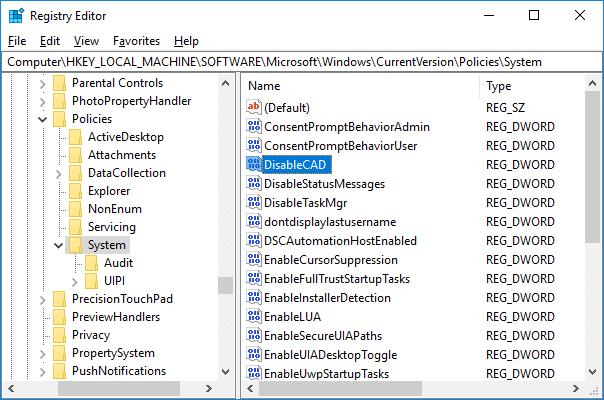
5.Next, navigate to the following registry key and follow the steps 3 & 4 here:
HKEY_LOCAL_MACHINESOFTWAREMicrosoftWindowsCurrentVersionPoliciesSystem
6.Close Registry Editor then restart your PC to save changes.
Препоръчва се:
Това е всичко, което успешно научихте How to Enable or Disable Secure Login in Windows 10 но ако все още имате някакви въпроси относно този урок, не се колебайте да ги зададете в секцията за коментари.

![Add a Printer in Windows 10 [GUIDE]](https://lbsite.org/wp-content/uploads/2023/02/Add-a-Printer-in-Windows-10.png "Add a Printer in Windows 10 [GUIDE]")