Fix The Service Couldn’t Be Started Windows Defender Error 0x80070422: Windows Defender is a malware protection software which is inbuilt into Windows 10. Now it is used widely by Windows users because it’s reliable, but in some cases, users also installed 3rd party Antivirus software such as Norton, Quick Heal etc which is not recommend because they corrupt the files of Windows Defender. Once you completely uninstall 3rd party antivirus you won’t be able to use Windows Defender properly because files required by it have already been corrupted and can no longer be used.
“The service couldn’t be started.
The service cannot be started, either because it is disabled or because it has no enabled devices associated with it.”
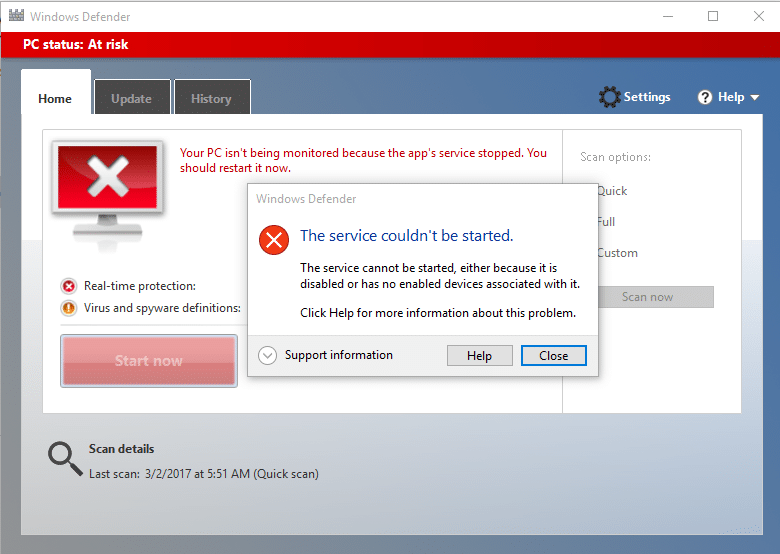
Windows Defender is turned off when you use a 3rd party Antivirus and once you uninstall the Antivirus software you won’t be able to turn ON Windows Defender. If you try to enable Windows Defender you will face the error “The Service Couldn’t Be Started” with error code 0x80070422. So without wasting any time let’s see how to actually Fix The Service Couldn’t Be Started Windows Defender Error 0x80070422 with the help of below-listed troubleshooting guide.
Fix The Service Couldn’t Be Started Windows Defender Error 0x80070422
Obavezno kreirajte tačku vraćanja u slučaju da nešto krene po zlu.
Metoda 1: Pokrenite SFC i CHKDSK
1. Pritisnite tipku Windows + X, a zatim kliknite na Komandni red (Admin).

2. Sada upišite sljedeće u cmd i pritisnite enter:
Sfc /scannow sfc /scannow /offbootdir=c: /offwindir=c:windows (Ako gore ne uspije, pokušajte s ovim)

3. Sačekajte da se gornji proces završi i kada završite ponovo pokrenite računar.
4. Dalje, pokrenite CHKDSK odavde Popravite greške u sistemu datoteka pomoću uslužnog programa za provjeru diska (CHKDSK).
5. Pustite da se gornji proces završi i ponovo pokrenite računar da biste sačuvali promene.
Method 2: Temporarily Disable 3rd party Antivirus
1. Desni klik na Ikona antivirusnog programa sa sistemske palete i izaberite Onemogući.

2.Sljedeće, odaberite vremenski okvir za koji se Antivirus će ostati onemogućen.

Napomena: Odaberite najmanji mogući vremenski period, na primjer 15 minuta ili 30 minuta.
3.Once done, again try to run Windows Defender and check if the error resolves or not.
4. Pritisnite tipku Windows + X, a zatim odaberite Kontrolna tabla.

5.Dalje, kliknite na Sistem i sigurnost.
6. Zatim kliknite na Windows zaštitni zid.

7. Sada u lijevom oknu prozora kliknite na Uključi ili isključi Windows zaštitni zid.

8.Odaberite Isključi Windows zaštitni zid i ponovo pokrenite računar. Again try to open Windows Defender and see if you’re able to Fix The Service Couldn’t Be Started Windows Defender Error 0x80070422.
Ako gornja metoda ne radi, obavezno slijedite iste korake da ponovo uključite svoj zaštitni zid.
Metod 3: Provjerite je li Windows ažuriran
1. Pritisnite tipku Windows + I, a zatim odaberite Ažuriranje i sigurnost.

2.Dalje, ponovo kliknite Proverite ažuriranja i obavezno instalirajte sva ažuriranja na čekanju.

3. Nakon što se ažuriranja instaliraju, ponovo pokrenite računar i vidite da li možete Fix The Service Couldn’t Be Started Windows Defender Error 0x80070422.
Method 4: Make sure Windows Defender service is set to Automatic
Bilješka: If Windows Defender service is grayed out in Services Manager then follow this post.
1. Pritisnite tipku Windows + R, a zatim otkucajte services.msc i pritisnite Enter.

2.Find the following services in the Services window:
Windows Defender Antivirus Network Inspection Service
Windows Defender Antivirus Service
Windows Defender Security Center Service
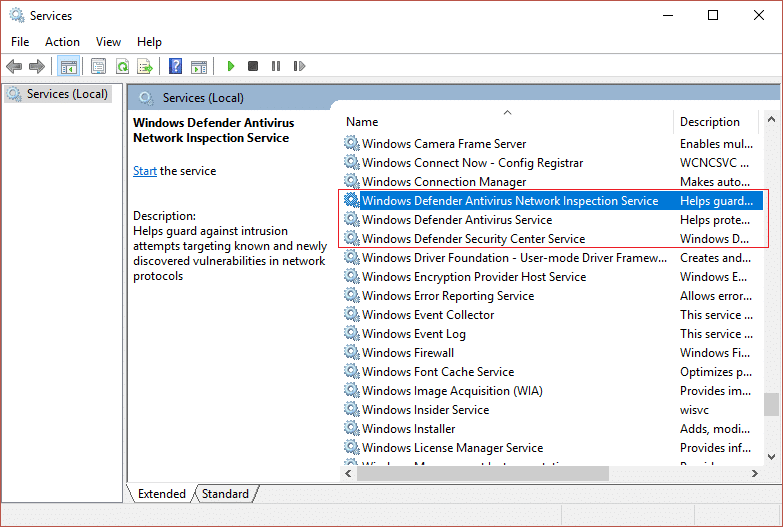
3.Double-click on each of them and make sure their Startup type is set to automatski and click Start if the services are not already running.
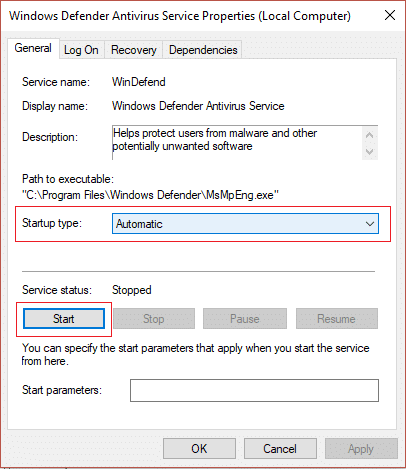
4. Kliknite na Primijeni, a zatim na OK.
5. Ponovo pokrenite računar da sačuvate promene i vidite da li ste u mogućnosti Fix The Service Couldn’t Be Started Windows Defender Error 0x80070422.
Method 5: Enable Windows Defender through Registry Editor
1. Pritisnite tipku Windows + R, a zatim otkucajte regedit i pritisnite Enter.

2. Idite do sljedećeg ključa registratora:
HKEY_LOCAL_MACHINESYSTEMCurrentControlSetServicesWinDefend
3. Sada kliknite desnim tasterom miša WinDefend i izaberite Dozvole.
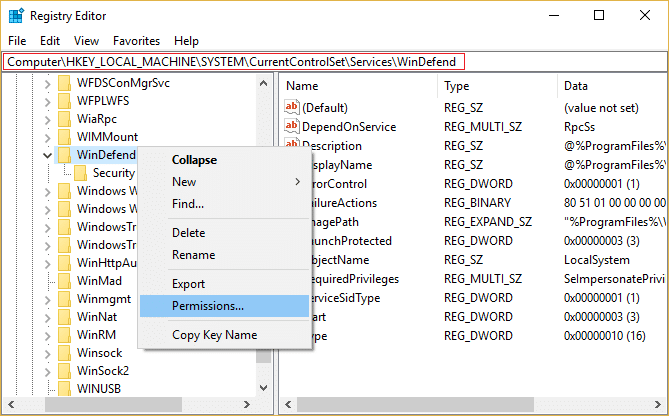
4.Follow this guide in order to take full control or ownership of the above registry key.
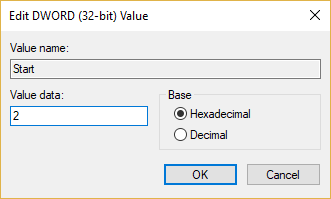
5.After that make sure you have selected WinDefend then in the right window double-click on Start DWORD.
6.Change the value to 2 in the value data field and click OK.
7.Close Registry Editor and reboot your PC.
8.Again try to enable Windows Defender and this time it should work.
Metoda 6: Pokrenite CCleaner i Malwarebytes
1.Preuzmite i instalirajte CCleaner & Malwarebytes.
2.Pokrenite Malwarebytes i neka skenira vaš sistem u potrazi za štetnim datotekama.
3. Ako se pronađe zlonamjerni softver, automatski će ih ukloniti.
4. Sada trči CCleaner a u odjeljku „Čistač“, na kartici Windows, predlažemo da provjerite sljedeće odabire za čišćenje:

5. Nakon što ste se uvjerili da su odgovarajuće točke provjerene, jednostavno kliknite Pokreni čistač, i neka CCleaner radi svojim tokom.
6. Da biste dodatno očistili svoj sistem, odaberite karticu Registry i provjerite je li označeno sljedeće:

7. Odaberite Skeniraj za problem i dopustite CCleaner-u da skenira, a zatim kliknite Popravite odabrane probleme.
8. Kada CCleaner pita “Želite li sigurnosne kopije promjena u registru?” izaberite Da.
9. Kada se vaša sigurnosna kopija završi, odaberite Popravi sve odabrane probleme.
10. Ponovo pokrenite računar da sačuvate promene i vidite da li možete Fix The Service Couldn’t Be Started Windows Defender Error 0x80070422.
Method 7: Refresh or Reset your PC
1.Press Windows Key + I to open Settings then select Ažuriranje i sigurnost.
2.From left-hand menu select oporavak i kliknite na "Počnite” under Reset this PC.

3.Odaberite opciju da Zadrži moje datoteke.

4.Follow the instructions on the screen to complete the process.
5.This will take some time and your computer will restart.
Metoda 8: Popravka Instalirajte Windows 10
Ova metoda je posljednje sredstvo jer ako ništa ne uspije onda će ova metoda sigurno popraviti sve probleme s vašim računalom. Popravka Instalirajte samo koristeći nadogradnju na mjestu da popravite probleme sa sistemom bez brisanja korisničkih podataka prisutnih na sistemu. Stoga slijedite ovaj članak da biste vidjeli kako lako popraviti, instalirajte Windows 10.
Preporučeno za vas:
To je to, uspješno ste Fix The Service Couldn’t Be Started Windows Defender Error 0x80070422 ali ako i dalje imate bilo kakvih pitanja u vezi s ovim vodičem, slobodno ih postavite u odjeljku za komentare.

