When you try to install apps on Windows Store, you may face Error Code 0x80073cf9, which can be very frustrating as Windows Store is a reliable source to install apps. If you try to install 3rd party apps from any other source, you risk your machine to malware or infections but what other option you have if you cannot install apps from Windows Store. Well, that’s where you’re wrong this error can be fixed, and that’s what exactly we are going to teach you in this article.
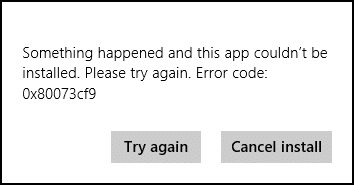
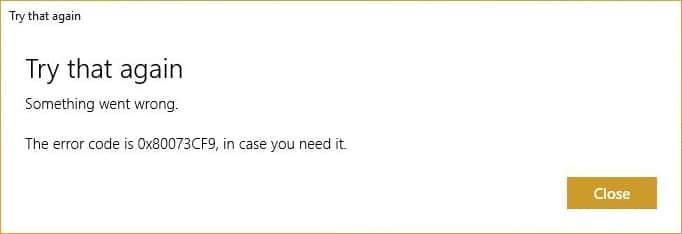
Something happened, and this app couldn’t be installed. Please try again. Error code: 0x80073cf9
There is no single cause as to why this error occurs so that various methods can fix this error. Most of the times it completely depends on the user machine configuration as to which method might work for them, so without wasting any time, let’s see how to fix this error.
Fix Windows 10 Store Error 0x80073cf9
Sørg for at oprette et gendannelsespunkt, hvis noget går galt.
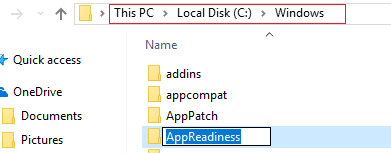
Method 1: Create A Folder AppReadiness
1. Tryk på Windows-tasten + R og skriv derefter C: Windows og tryk på Enter.
2. Find the folder AppReadniess in the Windows folder, if you can’t follow the next step.
3. Right-click in an empty area and select Ny > Mappe.
4. Name the newly created folder as App klarhed og tryk på Enter.
5. Reboot your PC to save changes. Again try to access the Store, and this time it might work perfectly.
Metode 2: Geninstaller Windows Store
1. Open Command Prompt as an administrator.

2. Run below PowerShell command
Get-AppxPackage -AllUsers | Foreach {Add-AppxPackage -DisableDevelopmentMode -Registrer “$ ($ _. InstallLocation) AppXManifest.xml”}

3. Once done, close command prompt and Restart your PC.
This step re-register Windows Store apps which should automatically Fix Windows 10 Store Error 0x80073cf9.
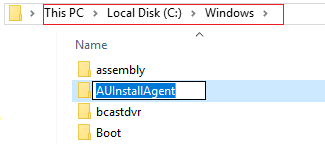
Method 3: Create a folder AUInstallAgent
1. Tryk på Windows-tasten + R og skriv derefter C: Windows og tryk på Enter.
2. Find the folder AUInstallAgent in the Windows folder, if you can’t then follow the next step.
3. Right-click in an empty area and select Ny > Mappe.
4. Name the newly created folder as AAUInstallAgent og tryk på Enter.
5. Reboot your PC to save changes. This step may fix Windows 10 Store Error 0x80D05001 or 0x80073cf9 but if it didn’t then continue.
Method 4: Allow Full System Access to Packages in AppRepository
1. Tryk på Windows-tasten + R og skriv derefter C: ProgramDataMicrosoftWindows og tryk på Enter.
2. Now double click on AppRepository folder to open it, but you will receive an error:
You have been denied permission to access this folder.
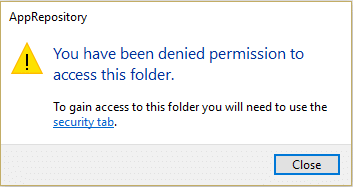
3. This means you need to take ownership of this folder before you can access it.
4. You can take ownership of the folder via the following method: How To Fix Destination Folder Access Denied Error.
5. Now you need to give the SYSTEM account, and the APPLICATION PACKAGES account full control on the folder C:ProgramDataMicrosoftWindowsAppRepositoryPackages. To this follow the next step.
6. Højreklik på Packages folder og vælg Egenskaber.
7. Vælg Fanen Sikkerhed og klik derefter på Avanceret.
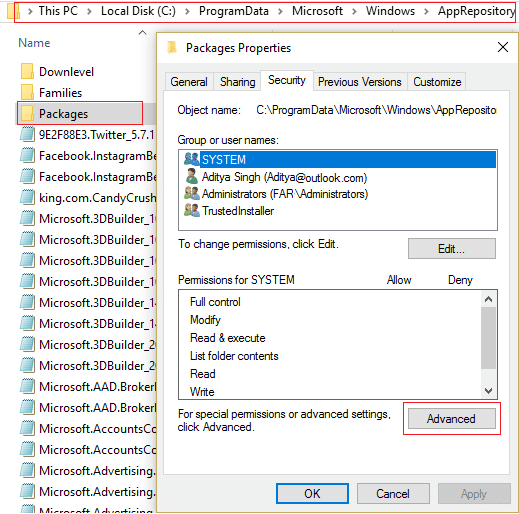
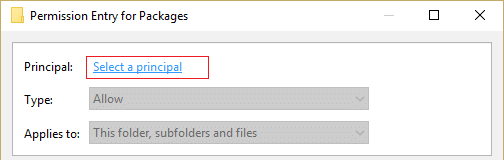
8. In Advanced Security Settings, click Tilføj and click on Select a main.
9. Skriv derefter "ALLE ANVENDELSESPAKKER” (without quote) in the field Enter the object name to select and click OK.
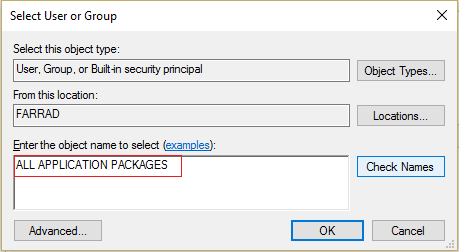
10. Now, on the next window check mark Full control and then click OK.
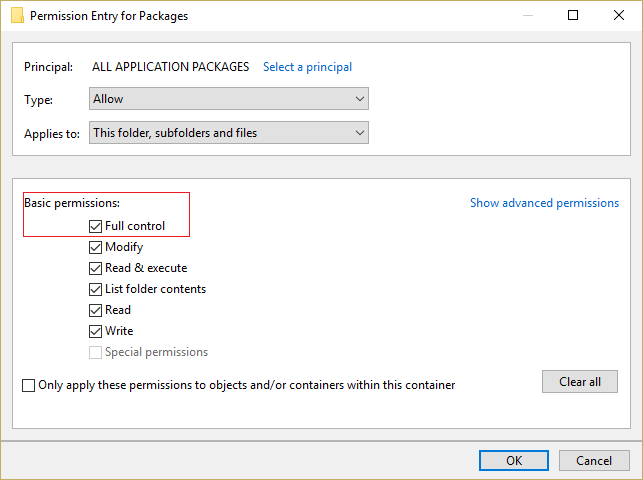
11. Do the same with the SYSTEM account. Reboot your PC to save changes.
Method 5: Rename Software Distribution Folder
1. Press Windows Key + Q to open Charms Bar and type cmd
2. Right-click on cmd and select Kør som administrator.
3. Type these commands and hit enter:
net stop wuauserv
ren c:windowsSoftwareDistribution softwaredistribution.old
net start wuauserv
exit
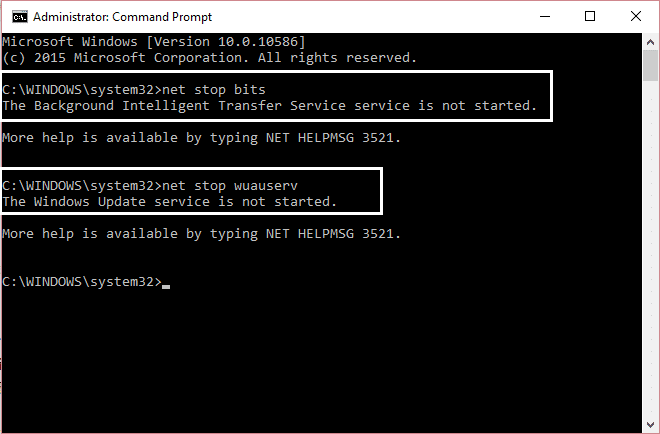
4. Reboot your PC to saves changes and again try to download updates.
Metode 6: Kør DISM (Deployment Image Servicing and Management)
1. Tryk på Windows-tasten + X og vælg derefter Kommandoprompt (Admin).

2. Enter the following command in cmd and hit enter:
Vigtig: When you DISM you need to have Windows Installation Media ready.
DISM.exe /Online /Cleanup-Image /RestoreHealth /Source:C:RepairSourceWindows /LimitAccess
Bemærk: Replace the C:RepairSourceWindows with the location of your repair source

3. Press enter to run the above command and wait for the process to complete; usually, it takes 15-20 minutes.
BEMÆRK VENLIGST: Hvis ovenstående kommando ikke virker, så prøv på nedenstående: Dism /Image:C:offline /Cleanup-Image /RestoreHealth /Source:c:testmountwindows Dism /Online /Cleanup-Image /RestoreHealth /Source:c:testmountwindows /LimitAccess
4. After the DISM process is complete, type the following in the cmd and hit Enter: sfc / scannow
5. Let System File Checker run and once it’s complete, restart your PC.
Metode 7: Kør CCleaner og Malwarebytes
1. Download og installer CCleaner & Malwarebytes.
2. Kør Malwarebytes og lad det scanne dit system for skadelige filer. Hvis der findes malware, vil den automatisk fjerne dem.

3. Kør nu CCleaner og vælg Brugerdefineret ren.
4. Vælg under Custom Clean Fanen Windows og marker standardindstillinger og klik Analyser.

5. Når analysen er færdig, skal du sørge for, at du er sikker på at fjerne de filer, der skal slettes.

6. Til sidst skal du klikke på Kør renere knappen og lad CCleaner køre sin gang.
7. For yderligere at rense dit system, vælg fanen Registrering, og sørg for, at følgende er kontrolleret:

8. Klik på Scan for problemer knappen og lad CCleaner scanne, og klik derefter på Løs udvalgte problemer .

9. Når CCleaner spørger "Vil du have backup ændringer til registreringsdatabasen?" vælg Ja.
10. Når din sikkerhedskopiering er fuldført, skal du klikke på Løs alle udvalgte problemer .
11. Genstart din pc for at gemme ændringer.
Metode 8: Ryd Windows Store-cache
1. Tryk på Windows-tasten + R og skriv derefter wsreset.exe og tryk Enter.
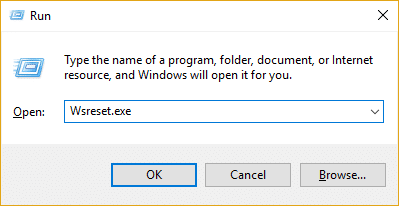
2. Når processen er færdig, genstart din pc.
Method 9: Run Windows Update and Windows Store Apps troubleshooter
1. Type fejlfinding i Windows-søgelinjen og klik på Fejlfinding.
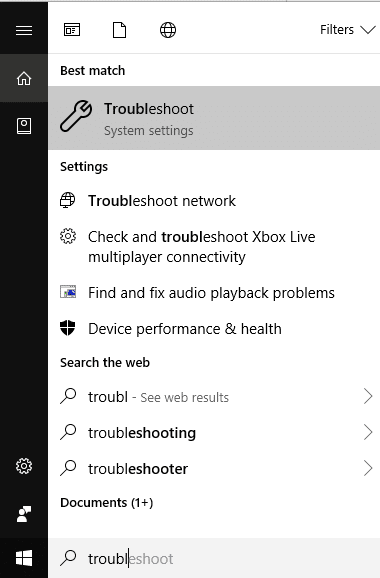
2. Vælg derefter rude fra venstre vindue Se alt.
3. Vælg derefter fra listen Fejlfind computerproblemer Windows Update.

4. Follow on-screen instruction and let the Windows Update Troubleshoot run.

5. Now again go back to the View all window but this time select Windows Store Apps. Run the troubleshooter and follow on-screen instructions.
6. Genstart din pc, og prøv igen at installere apps fra Windows Store.
Anbefalet:
Det er det du har med succes Fix Windows 10 Store Error 0x80073cf9 but if you still have any queries regarding this post feel free to ask them in comment’s section.

