Fix High Ping on Windows 10: It becomes really irritating for online gamers who use the internet for playing games to have a high ping on your system. And having a high ping is definitely not good for your system and while playing online having high ping doesn’t help at all. Sometimes, you will get such pings when you have high configuration system. Pingen can be defined as the computational speed of your connection or, more particularly, the Latenz of its connection. If you facing problems while playing the game due to the interruption of such above-mentioned issue, here is an article for you that will show some methods through which you can reduce ping latency on your Windows 10 system.
5 Möglichkeiten, einen hohen Ping unter Windows 10 zu beheben
Stellen Sie sicher, dass Sie einen Wiederherstellungspunkt erstellen, für den Fall, dass etwas schief geht.
Method 1: Disable Network Throttling using Registry
1.Press Windows Key + R to open Run then type regedit und drücken Sie die Eingabetaste, um zu öffnen Registrierungs-Editor.

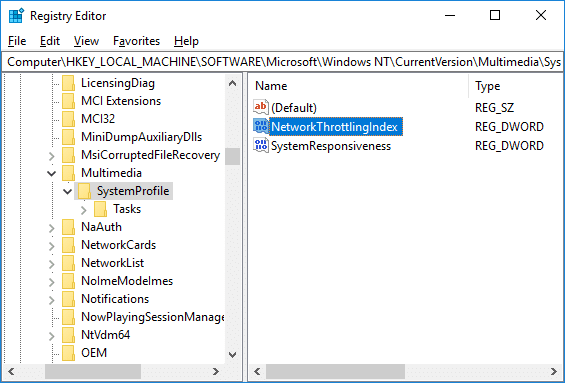
2. Navigieren Sie zum folgenden Registrierungsschlüssel:
HKEY_LOCAL_MACHINESOFTWAREMicrosoftWindows NTCurrentVersionMultimediaSystemProfile
3.Select SystemProfil then in the right window pane double-click on “NetzwerkThrottlingIndex".
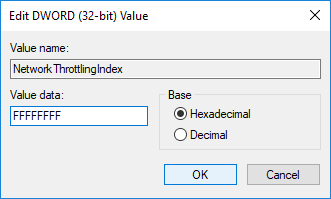
4.First, make sure the Base is selected as “Hexadecimal” then in the value data field type “FFFFFFFF"Und klicken Sie auf OK.
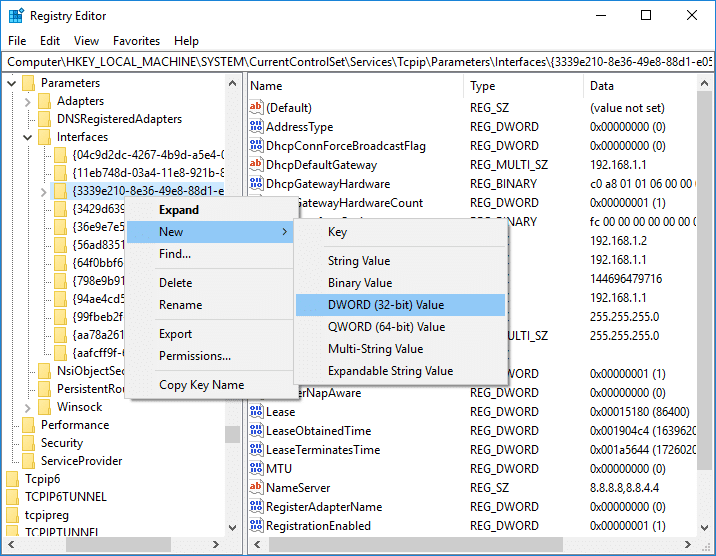
5. Navigieren Sie nun zum folgenden Registrierungsschlüssel:
HKEY_LOCAL_MACHINESYSTEMCurrentControlSetServicesTcpipParametersInterfaces
6.Here you need to select a Unterschlüssel (folder) which represents your Netzwerkverbindung. To identify the correct folder you need to check the subkey for your IP address, gateway, etc information.

7.Now right-click on the above subkey then select Neu > DWORD-Wert (32-Bit).
8.Name this newly created DWORD as “TCPackFrequency”Und drücken Sie die Eingabetaste.
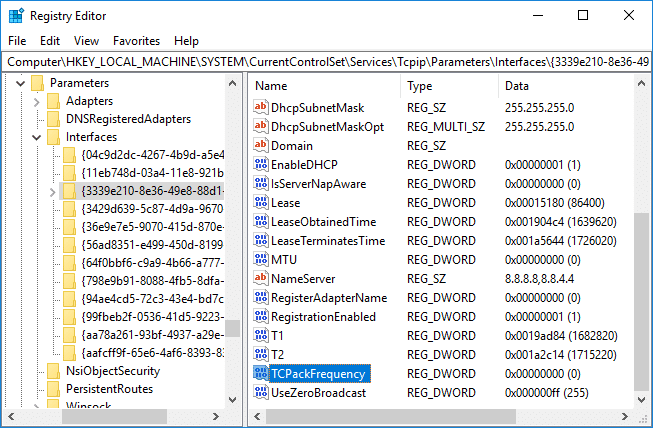
9.Similarly, again create a new DWORD and name it as “TCPNoDelay".
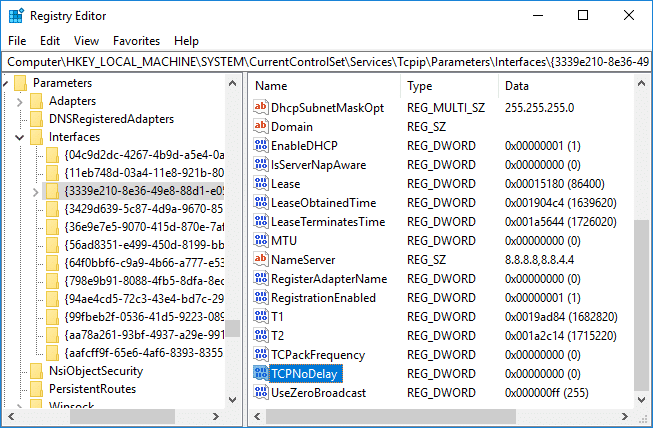
10.Set the Value of both “TCPackFrequency” & “TCPNoDelay” DWORD to 1 & click OK to save changes.

11. Navigieren Sie als Nächstes zum folgenden Registrierungsschlüssel:
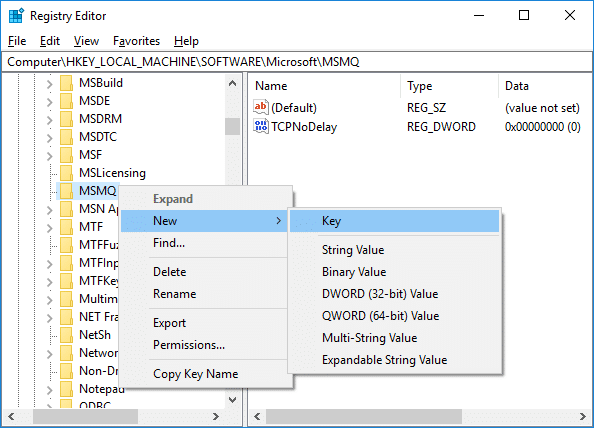
HKEY_LOCAL_MACHINESOFTWAREMicrosoftMSMQ
12.Right-click on MSMQ then select Neu > DWORD-Wert (32-Bit).
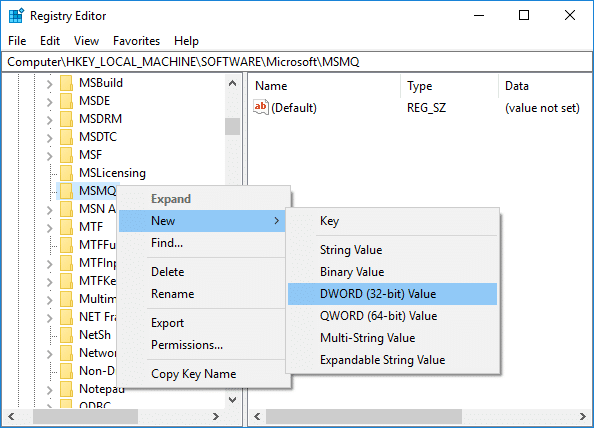
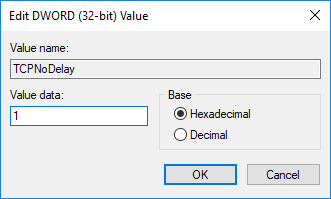
13.Name this DWORD as “TCPNoDelay”Und drücken Sie die Eingabetaste.
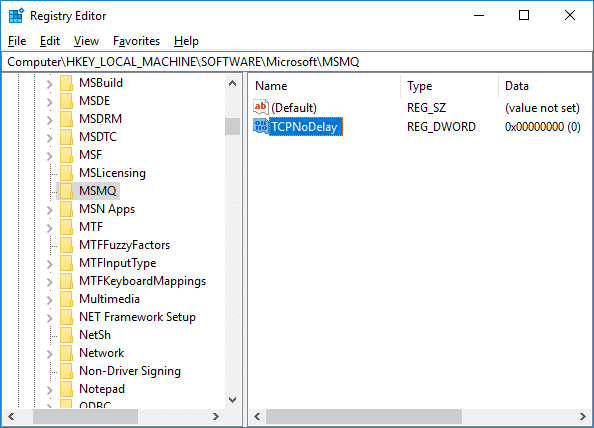
14.Double-click on “TCPNoDelay” then set the value as 1 für Wertstellung field and click OK.
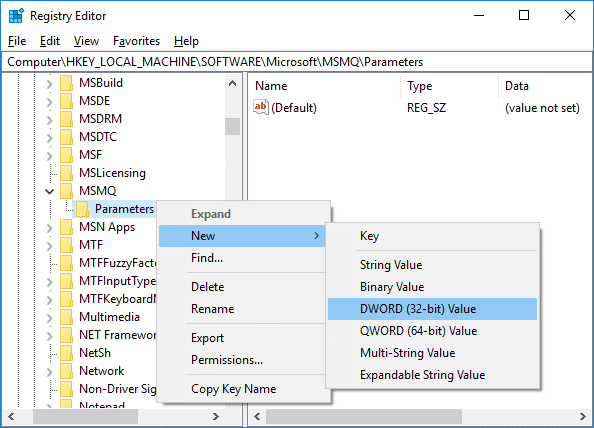
15.Erweitern MSMQ key and make sure it has Parameter Unterschlüssel
16.If you can’t find Parameter folder then right-click on MSMQ & wählen Neu > Schlüssel.
17. Benennen Sie diesen Schlüssel als Parameter & hit Enter.
18. Klicken Sie mit der rechten Maustaste auf Parameter & wählen Neu > DWORD-Wert (32-Bit).
19.Name this DWORD as “TCPNoDelay” and set it’s value to 1.
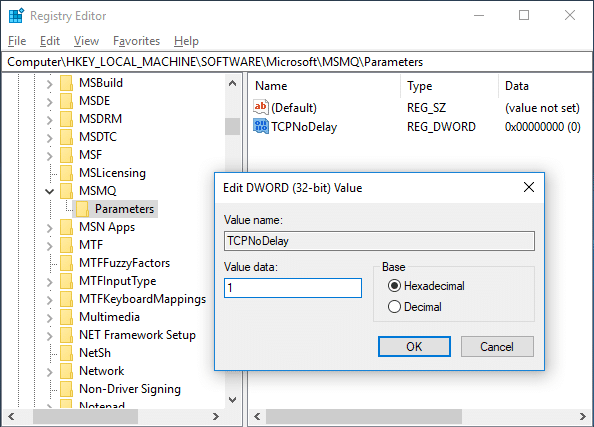
20.Click OK to save changes and reboot your PC.
Method 2: Disable Apps with High Network Usage using Task Manager
Usually, Windows 10 permits its users to observe which applications are employing or eating up the most network bandwidth in the background.
1.Drücken Sie Ctrl + Shift + Esc Schlüssel zusammen zu öffnen Task-Manager.

2.Klicken Sie auf “Mehr Infos” to expand Task Manager.
3.You can sort the “Netzwerk” column of Task Manager in descending order which will allow you to see those applications which are taking the most bandwidth.
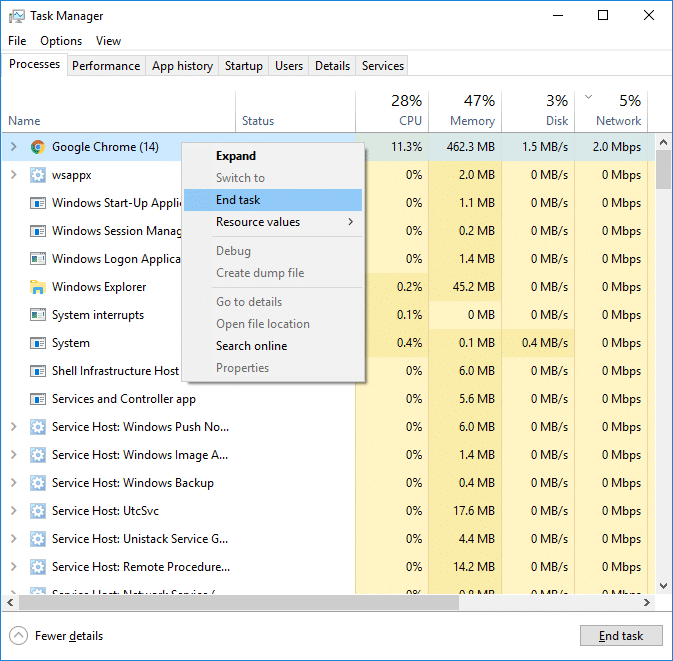
4.Close diese Anwendungen Das hat eating a high amount of bandwidth,
Hinweis: Don’t close the processes which are a system process.
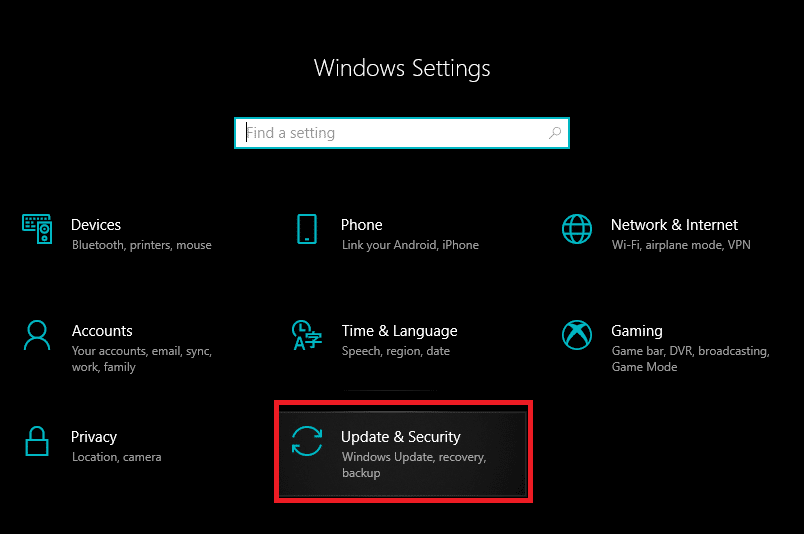
Method 3: Disable Windows Auto-Updates
Windows usually download system updates with no notification or permission. Hence it may eat up your internet with high ping & slow your game. That time you cannot hiatus an update which has already started; & may ruin your online game experience. So you can stop your Windows update so that it doesn’t eat up your internet bandwidth.
1.Press Windows Key + I to open Settings then click on “Update & Sicherheit" Symbol.
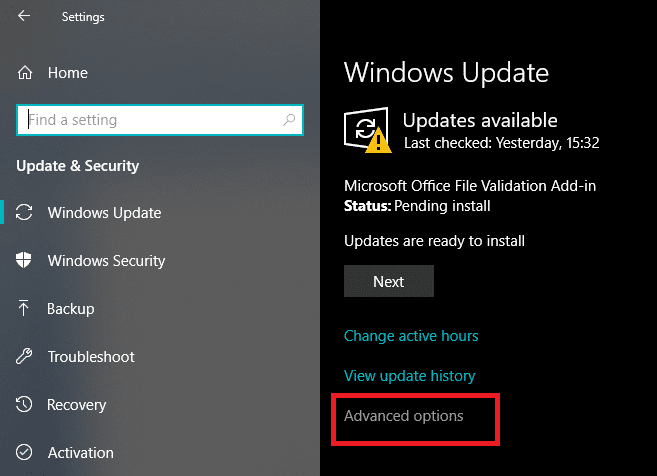
2.From the left-hand window select “Windows Update".
3.Now under Windows Update click on “Fortgeschrittener" Optionen.
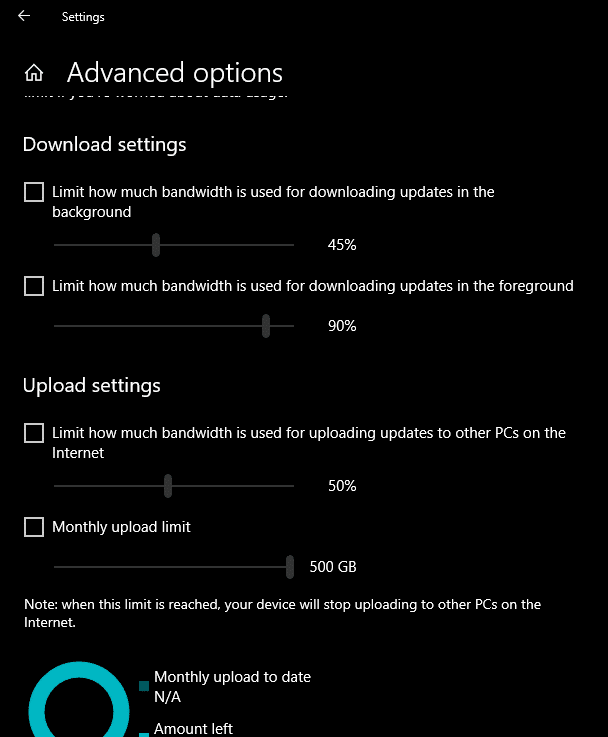
4.Now look for “Lieferoptimierung” option & click on it.

5.Again click on “Erweiterte Optionen".

6. Jetzt adjust your Download & Upload Bandwidth Prozentsatz.
If you don’t want to mess System updates then another way to Fix High Ping on Windows 10 issue is to set your network connection as Zählwerte. This will let system think that you’re on a metered connection and hence it will not download the Windows updates automatically.
1.Klicken Sie auf Start-Taste dann geh zu Einstellungen.
2.From Settings window click on “Netzwerk & Internet" Symbol.
![]()
3.Now make sure you select Ethernet option from the left window pane.
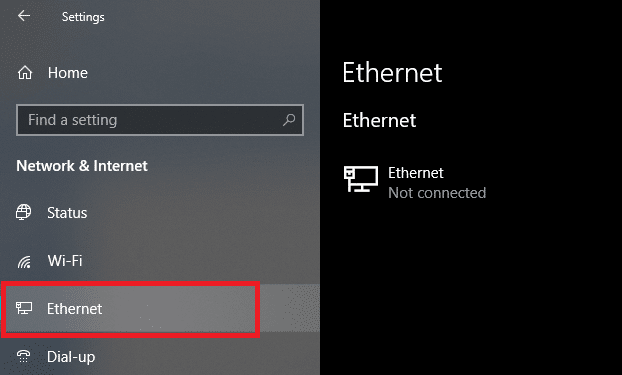
4.Choose the Network which you currently connected to.
5.Turn ON the toggle for “Als gemessene Verbindung festlegen".

Methode 4: Netzwerkverbindung zurücksetzen
1. Drücken Sie die Windows-Taste + I, um die Einstellungen zu öffnen, und klicken Sie dann auf Netzwerk & Internet.

2. Klicken Sie im linken Fensterbereich auf Status.
3.Scrollen Sie nach unten und klicken Sie auf Netzwerk-Reset.

4. Klicken Sie im nächsten Fenster auf Jetzt zurücksetzen.

5.Wenn Sie zur Bestätigung aufgefordert werden, wählen Sie „Ja“.
6.Starten Sie Ihren PC neu, um die Änderungen zu speichern und zu sehen, ob Sie dazu in der Lage sind Fix High Ping on Windows 10 Issue.
Method 5: Disable WiFi Sense
1. Drücken Sie die Windows-Taste + I, um die Einstellungen zu öffnen, und klicken Sie dann auf Netzwerk & Internet.
2.Klicken Sie nun auf Wi-Fi from the left window pane and make sure to Disable everything under Wi-Fi Sense.
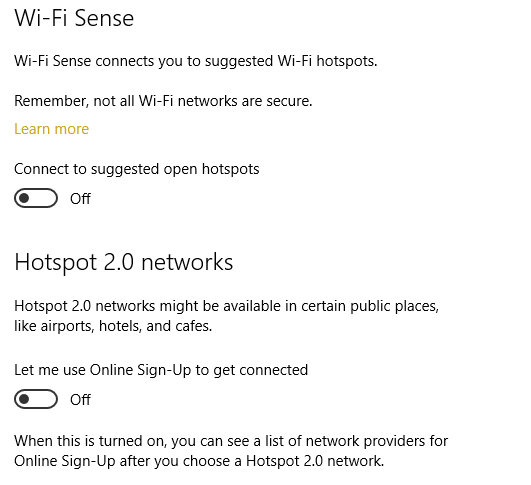
3.Also, make sure to disable Hotspot 2.0 networks and Paid Wi-Fi services.
Empfohlen:
Ich hoffe, dieser Artikel war hilfreich und Sie können es jetzt problemlos tun Fix High Ping on Windows 10, Wenn Sie jedoch noch Fragen zu diesem Leitfaden haben, können Sie diese gerne im Kommentarbereich stellen.
 löschen")
