Change Critical Battery Levels on Windows 10: Users are unable to change the critical & low battery levels below a specific point and if you got a big battery then you are not able to utilize your battery to the optimum levels. You won’t be able to change the critical battery levels below 5% on Windows 10 and 5% means close to 15 minutes of battery time. So in order to utilize that 5 %, users want to change the critical battery levels to 1%, because once the critical battery levels are met the system is automatically put into hibernation which just takes close to 30 seconds to complete.
By default the following battery levels are set by Windows:
Low Battery Level: 10%
Reserve Power: 7%
Critical Level: 5%
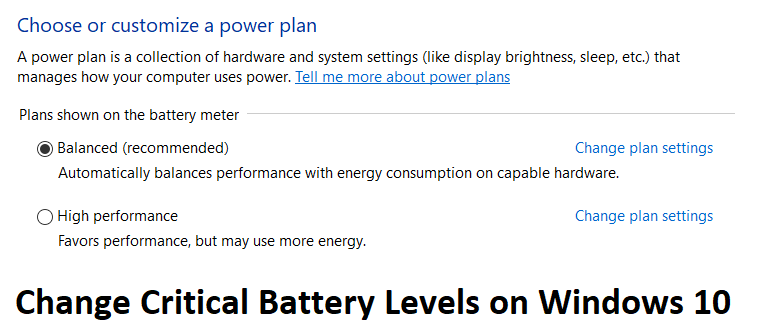
Once the battery is below 10% you will get a notification saying low battery levels accompanied by a beep sound. After that, once the battery is below 7% the Windows will flash a warning message to save your work and turn off your PC or plug in the charger. Now once the battery levels are at 5% then Windows will automatically get into hibernation. So without wasting any time let’s see How to Change Critical Battery Levels on Windows 10 with the help of the below-listed guide.
Change Critical Battery Levels on Windows 10
Φροντίστε να δημιουργήσετε ένα σημείο επαναφοράς, σε περίπτωση που κάτι πάει στραβά.
Method 1: Change Critical & Low Level Battery Levels
Σημείωση: This method doesn’t seem to work on all computers, but it’s worth a try.
1.Turn off your PC then remove battery from your laptop.
2.Plug in the power source and start your PC.
3.Log into Windows then right-click on Power icon και επιλέξτε Επιλογές ενέργειας.
4.Στη συνέχεια κάντε κλικ στο Αλλαγή ρυθμίσεων σχεδίου next to your currently active plan.
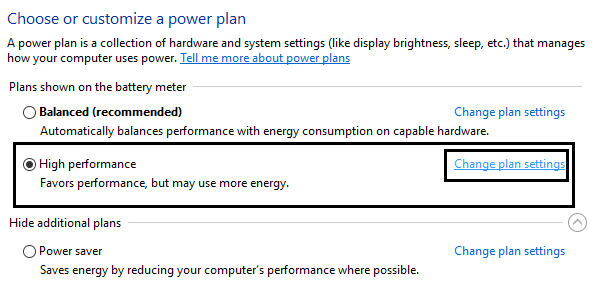
5.Επόμενο, κάντε κλικ στο Αλλάξτε τις ρυθμίσεις σύνθετης τροφοδοσίας.
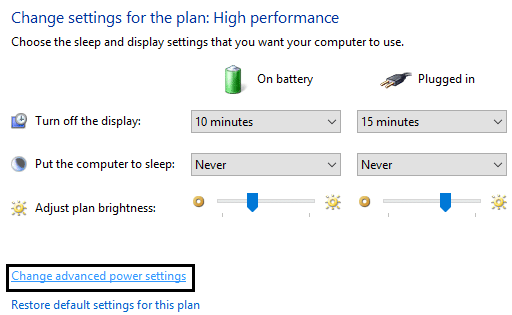
6. Κάντε κύλιση προς τα κάτω μέχρι να βρείτε Μπαταρία, click the plus icon to expand it.
7.Now if you want to then you can change the actions which computer takes on reaching a specific battery level by expanding Critical battery actions.
8.Next, expand Κρίσιμο επίπεδο μπαταρίας και να αλλάξετε το settings to 1% for both Plugged in and On battery.
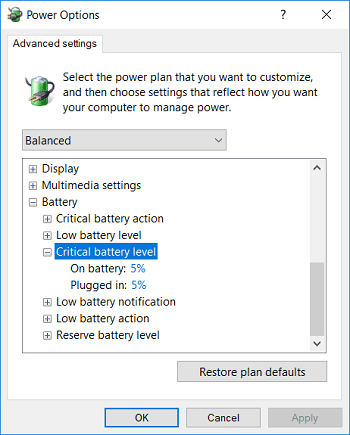
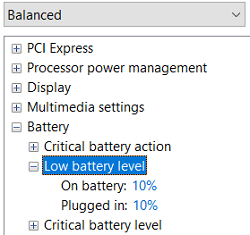
10.If you want then do the same for Χαμηλό επίπεδο μπαταρίας just make sure to set it to 5%, not below it.
11. Κάντε κλικ στο Apply και στη συνέχεια στο OK.
12.Επανεκκινήστε τον υπολογιστή σας για να αποθηκεύσετε τις αλλαγές.
Method 2: Use Powercfg.exe to change battery levels
1.Πατήστε Windows Key + X και μετά επιλέξτε Γραμμή εντολών (διαχειριστής).

2. Πληκτρολογήστε την ακόλουθη εντολή στο cmd και πατήστε Enter:
powercfg -setdcvalueindex SCHEME_CURRENT SUB_BATTERY BATLEVELCRIT <percentage>
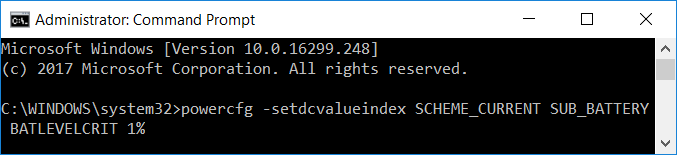
Σημείωση: If you want to set the critical battery level to 1% then the above command will be:
powercfg -setdcvalueindex SCHEME_CURRENT SUB_BATTERY BATLEVELCRIT 1%
3.Now if you want to set the critical battery level for plugged into 1% then the command will be:
powercfg -setacvalueindex SCHEME_CURRENT SUB_BATTERY BATLEVELCRIT 1%

4.Επανεκκινήστε τον υπολογιστή σας για να αποθηκεύσετε τις αλλαγές.
In addition to above, you could learn more about troubleshooting power plans from εδώ.
Συνιστάται:
Αυτό είναι που έχεις με επιτυχία Change Critical Battery Levels on Windows 10 αλλά αν εξακολουθείτε να έχετε απορίες σχετικά με αυτόν τον οδηγό, μη διστάσετε να τις ρωτήσετε στην ενότητα των σχολίων.

