WmiPrvSE is the acronym for Windows Management Instrumentation Provider Service. Windows Management Instrumentation (WMI) is a component of the Microsoft Windows operating system that provides management information and control in an enterprise environment. Many people believe it’s a virus as sometimes WmiPrvSE.exe causes high CPU usage, but it’s not a virus or malware instead WmiPrvSE.exe is manufactured by Microsoft itself.
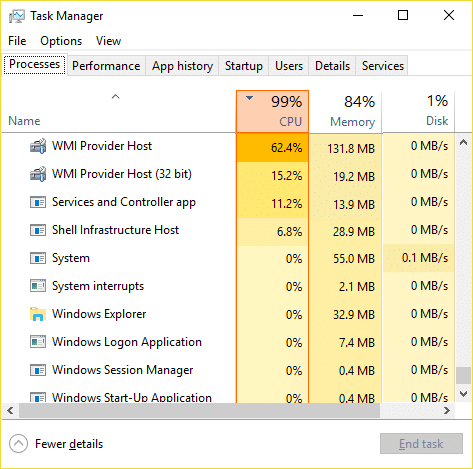
The main problem is that the Windows freezes or stuck when WmiPrvSE.exe is taking many system resources, and all the other apps or programs are left with a little or no resources at all. This will cause your PC to become sluggish, and you won’t be able to use it all, at last, you will have to reboot your PC. Even after a reboot, sometimes this issue will not be resolved, and you will again face the same problem. So without wasting any time let’s see how to actually Fix High CPU Usage by WmiPrvSE.exe with the below-listed troubleshooting guide.
Fix High CPU Usage by WmiPrvSE.exe
Φροντίστε να δημιουργήσετε ένα σημείο επαναφοράς σε περίπτωση που κάτι πάει στραβά.
Method 1: Restart Windows Management Instrumentation Service
1. Πατήστε Windows Key + R και μετά πληκτρολογήστε services.msc και πατήστε Enter.

2. Εύρημα Windows Management Instrumentation Service in the list then right-click on it and select Κάντε επανεκκίνηση.
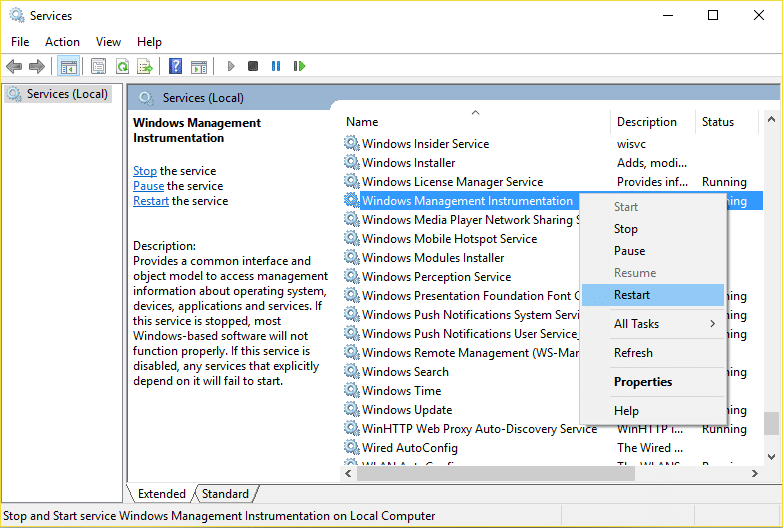
3. This will restart all the service associated with WMI services and Fix High CPU Usage by WmiPrvSE.exe.
Method 2: Restart Other Services associated with WMI
1. Press Windows Key + X then select Γραμμή εντολών (διαχειριστής).

2. Type the following into cmd and hit Enter after each one:
καθαρή στάση iphlpsvc
καθαρή στάση wscsvc
net stop winmgmt
net start winmgmt
καθαρή εκκίνηση wscsvc
καθαρή εκκίνηση iphlpsvc
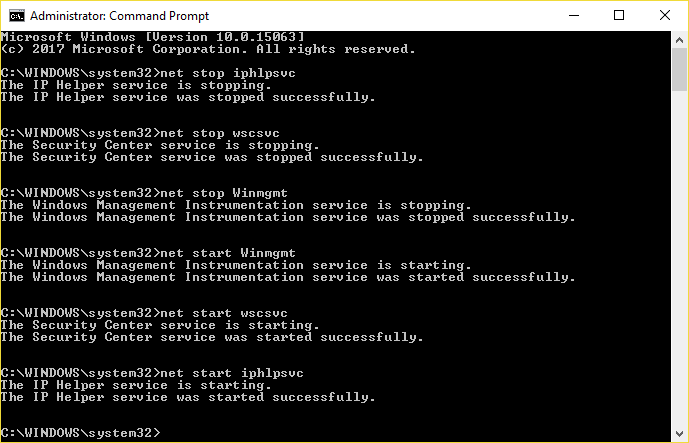
3. Επανεκκινήστε τον υπολογιστή σας για να αποθηκεύσετε τις αλλαγές.
Μέθοδος 3: Εκτελέστε το CCleaner και το Malwarebytes
1. Λήψη και εγκατάσταση CCleaner & Malwarebytes.
2. Εκτελέστε το Malwarebytes και αφήστε το να σαρώσει το σύστημά σας για επιβλαβή αρχεία. Εάν εντοπιστεί κακόβουλο λογισμικό, θα το αφαιρέσει αυτόματα.

3. Τώρα τρέξτε το CCleaner και επιλέξτε Προσαρμοσμένο καθαρισμό.
4. Στην περιοχή Προσαρμοσμένος καθαρισμός, επιλέξτε το καρτέλα Windows then make sure to checkmark defaults and click Αναλύστε.

5. Μόλις ολοκληρωθεί η ανάλυση, βεβαιωθείτε ότι θα αφαιρέσετε τα αρχεία που πρόκειται να διαγραφούν.

6. Τέλος, κάντε κλικ στο Εκτελέστε καθαριστικό κουμπί και αφήστε το CCleaner να εκτελέσει την πορεία του.
7. Για να καθαρίσετε περαιτέρω το σύστημά σας, επιλέξτε την καρτέλα Μητρώοκαι βεβαιωθείτε ότι έχουν ελεγχθεί τα ακόλουθα:

8. Κάντε κλικ στο Σάρωση για ζητήματα και αφήστε το CCleaner να σαρώσει και, στη συνέχεια, κάντε κλικ στο Διορθώστε επιλεγμένα προβλήματα κουμπί.

9. Όταν το CCleaner ρωτά "Θέλετε αλλαγές αντιγράφων ασφαλείας στο μητρώο;" επιλέξτε Ναι.
10. Μόλις ολοκληρωθεί η δημιουργία αντιγράφων ασφαλείας, κάντε κλικ στο Διορθώστε όλα τα επιλεγμένα προβλήματα κουμπί.
11. Επανεκκινήστε τον υπολογιστή σας για να αποθηκεύσετε τις αλλαγές.
Method 4: Run System Maintenance Troubleshooter
1. Πατήστε Windows Key + X και κάντε κλικ στο Πίνακας Ελέγχου.

2. Search Troubleshoot and click on Αντιμετώπιση προβλημάτων.

3. Next, click on view all in the left pane.
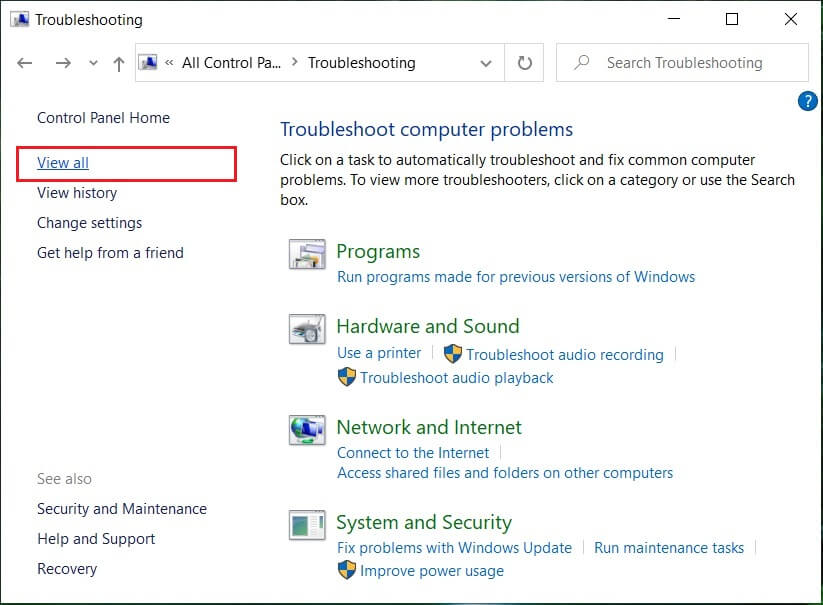
4. Click and run the Troubleshooter for System Maintenance.

5. The Troubleshooter may be able to Fix High CPU Usage by WmiPrvSE.exe.
Method 5: Locate the process manually using Event Viewer
1. Πατήστε Windows Key + R και μετά πληκτρολογήστε eventvwr.msc και πατήστε Enter για άνοιγμα Πρόγραμμα προβολής συμβάντων.

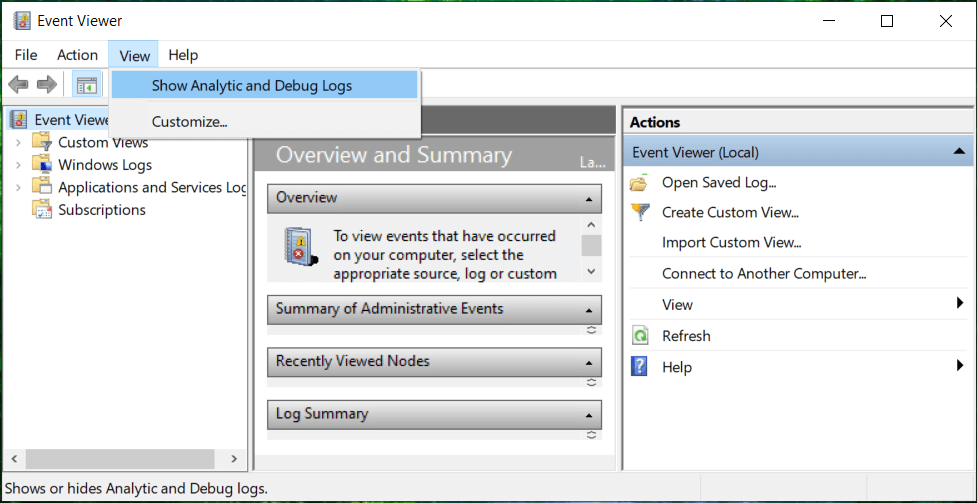
2. From the top menu, click on Δες και στη συνέχεια επιλέξτε Show Analytic and Debug Logs option.
3. Now, from the left pane navigate to the following by double-clicking on each of them:
Applications and Services Logs > Microsoft > Windows > WMI-Activity
4. Once you are under WMI-Activity folder (make sure you have expanded it by double-clicking on it) select Operationally.
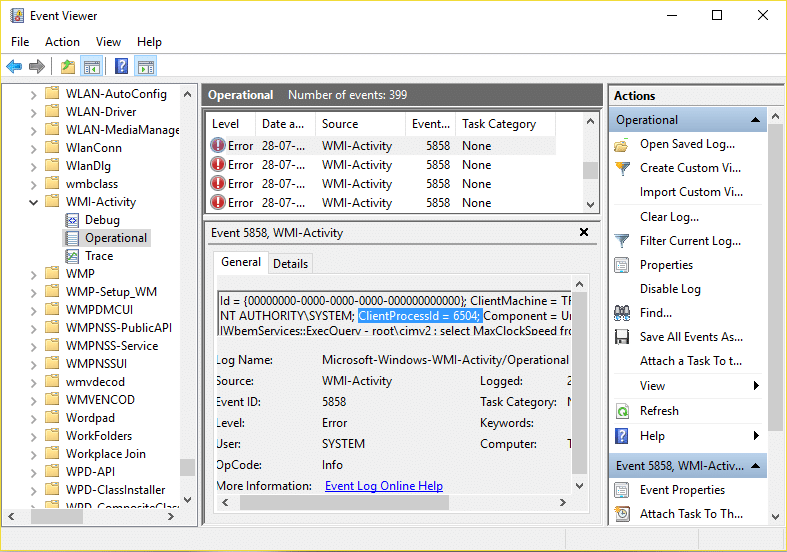
5. In the right window pane select Λάθος under Operational and General tab look for the ClientProcessId for that particular service.
6. Now we have the Process Id of the particular service causing High CPU usage, we need to disable this particular service για να διορθώσετε αυτό το ζήτημα.
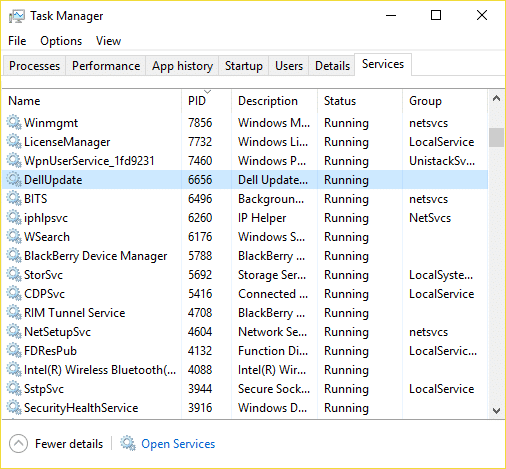
7. Τύπος Ctrl + Shift + Esc together to open Task Manager.

8. Μεταβείτε στο Καρτέλα Service και αναζητήστε το Process Id which you noted above.
9. The service with the corresponding Process ID is the culprit, so once you find it go to Control Panel > Uninstall a Program.
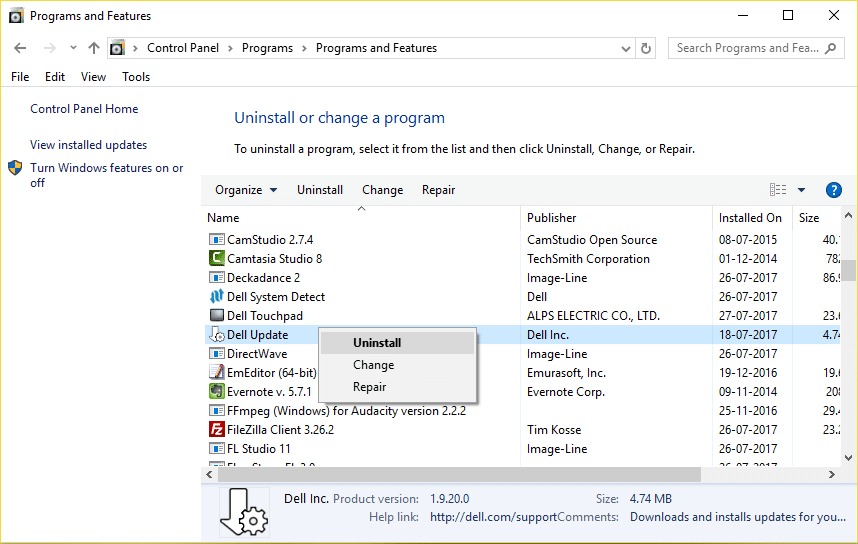
10. Uninstall the particular program or service associated with above Process ID then reboot your PC.
Συνιστάται:
Αυτό είναι που έχεις με επιτυχία Fix High CPU Usage by WmiPrvSE.exe αλλά αν εξακολουθείτε να έχετε ερωτήσεις σχετικά με αυτήν την ανάρτηση, μην διστάσετε να τις ρωτήσετε στην ενότητα των σχολίων.

