If you don’t see Wireless Adapter under Network Connections neither there is a Network adapter tab under device manager then it seems like your Network Adapter is missing or not detected on your Windows 10 which is a serious issue because you won’t be able to access the Internet until the issue is resolved. In short, when you click on the Wireless icon on the system tray there won’t be any device listed in order to connect to the Internet and if you open Device Manager then you won’t see the Network Adapter tab.
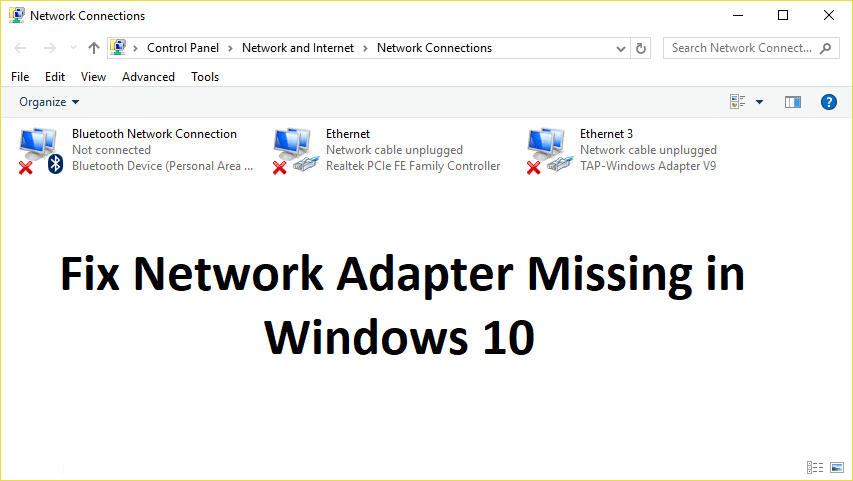
These are the reasons behind the Network Adapter missing issue:
- Network adapter missing in Device manager
- No Network Adapters showing in Device Manager
- Network Adapter Not Detected
- Network Adapter Not Found Windows 10
- No Network Adapter In Device Manager
The main cause of this issue seems to be outdated, incompatible or corrupted Network Adapter drivers. If you have recently upgraded from previous versions of Windows then it’s possible that the old drivers will not work with the new Windows and hence the issue. So without wasting any time let’s see how to actually Fix Network Adapter Missing in Windows 10 issue with the below-listed troubleshooting steps.
Note: Just make sure to uninstall any VPN software on your PC before continuing.
Διορθώστε τον προσαρμογέα δικτύου που λείπει στα Windows 10
Φροντίστε να δημιουργήσετε ένα σημείο επαναφοράς σε περίπτωση που κάτι πάει στραβά.
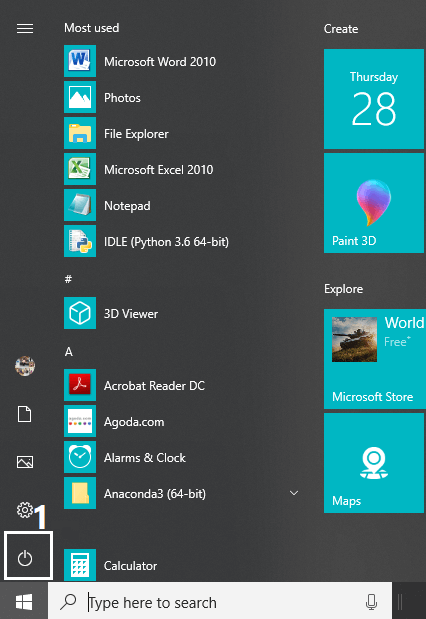
Method 1: Reboot your Computer
Most of us know about this very basic trick. Rebooting your computer can sometimes fix any software conflict by giving it a fresh start. So if you are someone who would rather put their computer on sleep, restarting your computer is a good idea.
1. Κάντε κλικ στο Μενού Έναρξη και, στη συνέχεια, κάντε κλικ στο κουμπί τροφοδοσίας διαθέσιμο στην κάτω αριστερή γωνία.
2. Στη συνέχεια, κάντε κλικ στο επανεκκίνηση και ο υπολογιστής σας θα επανεκκινήσει μόνος του.
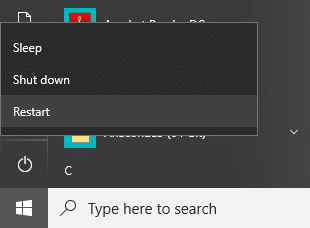
Μετά την επανεκκίνηση του υπολογιστή, ελέγξτε εάν το πρόβλημά σας έχει επιλυθεί ή όχι.
Method 2: Flush DNS and Reset Winsock Components
1. Open elevated Command Prompt.
2. Τώρα πληκτρολογήστε την ακόλουθη εντολή και πατήστε Enter μετά από κάθε μία:
ipconfig / release
ipconfig / flushdns
ipconfig / ανανέωση

3. Again open Command Prompt and type the following command one by one and hit enter after each one:
ipconfig /flushdns nbtstat –r netsh int ip reset netsh winsock reset
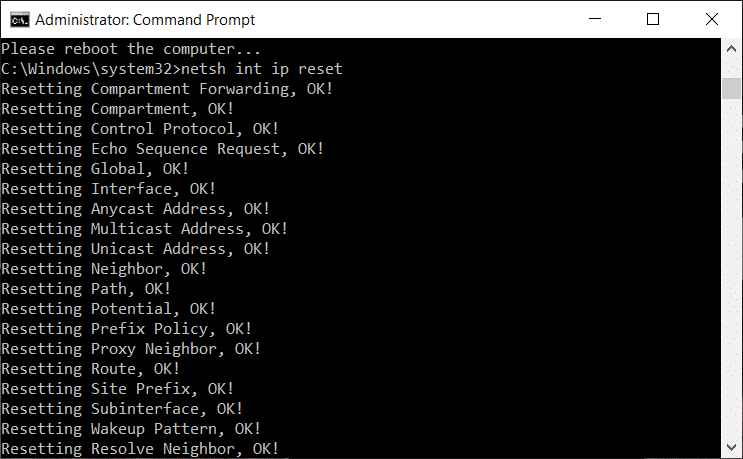
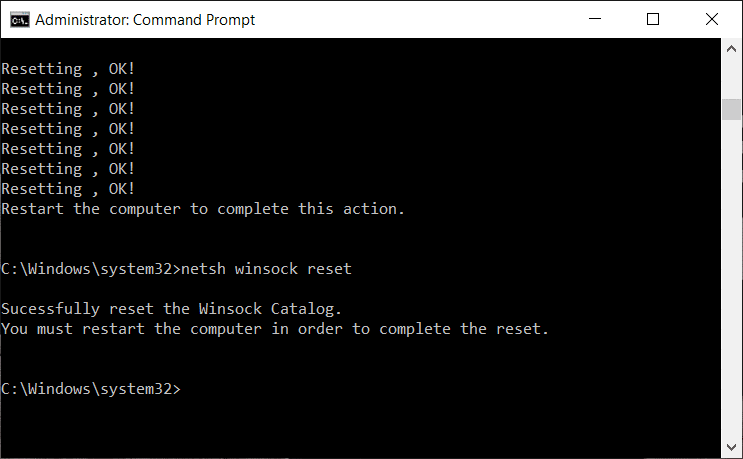
4. Κάντε επανεκκίνηση για να εφαρμόσετε αλλαγές. Το flushing DNS φαίνεται να Fix Network Adapter Driver Issues on Windows 10.
Method 3: Run WWAN AutoConfig Service
1. Πατήστε Windows Key + R και μετά πληκτρολογήστε services.msc και πατήστε Enter.

2. Εύρημα WWAN AutoConfig Service in the list (press W to reach to the end of the list quickly).
3. Κάντε διπλό κλικ στο WWAN AutoConfig Service.
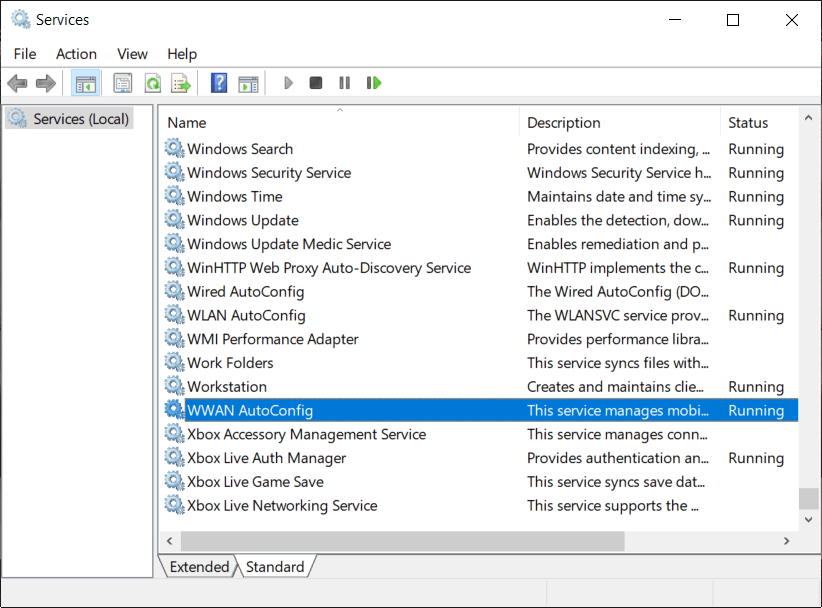
4. If the service is already running then click on Stop, then from the Startup type drop-down select Αυτόματο.
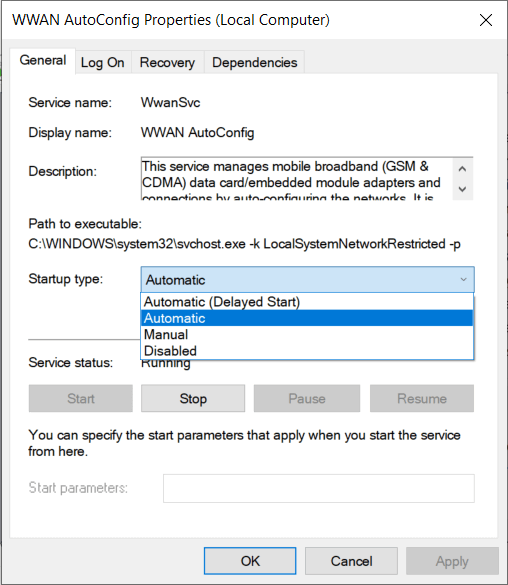
5. Click Apply followed by OK.
6. Κάντε δεξί κλικ στο WWAN AutoConfig Service και επιλέξτε Αρχή.
Μέθοδος 4: Ενημέρωση προγραμμάτων οδήγησης προσαρμογέα δικτύου
1. Πατήστε το πλήκτρο Windows + R και πληκτρολογήστε "devmgmt.msc” in Run dialogue box to open διαχειριστή της συσκευής.

2. Αναπτύξτε προσαρμογείς δικτύου, μετά κάντε δεξί κλικ στο δικό σας Ελεγκτής Wi-Fi (για παράδειγμα Broadcom ή Intel) και επιλέξτε Ενημέρωση λογισμικού προγράμματος οδήγησης.

3. Τώρα επιλέξτε "Αυτόματη αναζήτηση για ενημερωμένο λογισμικό προγραμμάτων οδήγησης".
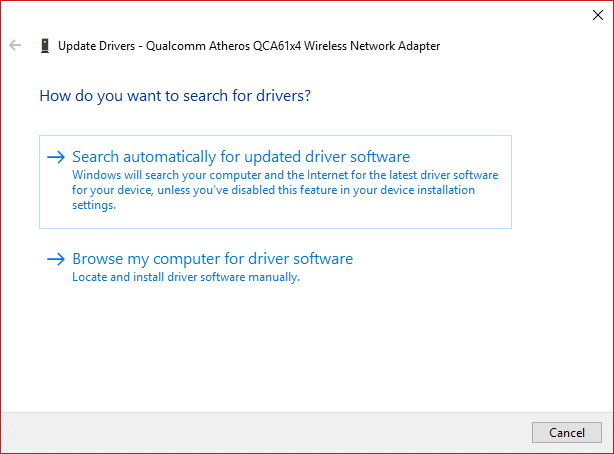
4. Τώρα Windows will automatically search for the Network driver update and if new update is found, it will automatically download and install it.
5. Once finished, close everything and reboot your PC.
6. If you’re still facing the Network Adapter Missing in Windows 10 issue, then again right-click on your WiFi controller and select Ενημέρωση προγράμματος οδήγησης στη Διαχείριση Συσκευών.
7. Now, in the Update Driver Software Windows, select “Περιηγηθείτε στον υπολογιστή μου για λογισμικό προγράμματος οδήγησης."

8. Τώρα επιλέξτε "Επιτρέψτε μου να επιλέξω από μια λίστα διαθέσιμων προγραμμάτων οδήγησης στον υπολογιστή μου."

9. Προσπαθήστε να update drivers from the listed versions (make sure to checkmark compatible hardware).
10. If the above didn’t work then go to ιστοσελίδα του κατασκευαστή για ενημέρωση προγραμμάτων οδήγησης.

11. Download and install the latest driver from the manufacturer’s website then restart your PC.
Method 5: Uninstall Network Adapter Drivers
1. Πατήστε Windows Key + R και μετά πληκτρολογήστε "devmgmt.msc” και πατήστε Enter για να ανοίξετε τη Διαχείριση Συσκευών.
2. Αναπτύξτε το Network Adapters και βρείτε το όνομα του προσαρμογέα δικτύου σας.
3. Βεβαιωθείτε ότι σημειώστε το όνομα του προσαρμογέα μόνο σε περίπτωση που κάτι πάει στραβά.
4. Right-click on your network adapter and uninstall it.

5. It will ask for confirmation επιλέξτε Ναι.
6. Restart your PC and Windows will automatically install the network adapter drivers again.
7. If the drivers are not installed automatically then again open the Device Manager.
8. From the Device Manager menu, click on Ενέργειες μετά κάντε κλικ στο «Σάρωση για αλλαγές υλικού".

Μέθοδος 6: Βεβαιωθείτε ότι τα Windows είναι ενημερωμένα
1. Τύπος Windows Key+ Για να ανοίξω τις Ρυθμίσεις και μετά κάντε κλικ στο Ενημέρωση και ασφάλεια.
![]()
2. From the left-hand side, menu click on Το Windows Update.
3. Τώρα κάντε κλικ στο «Έλεγχος για ενημερώσειςκουμπί ” για να ελέγξετε για τυχόν διαθέσιμες ενημερώσεις.

4. If any updates are pending then click on Λήψη και εγκατάσταση ενημερώσεων.

5. Once the updates are downloaded, install them and your Windows will become up-to-date.
6. After the updates are installed reboot your PC to save changes.
Method 7: Run Network Adapter Troubleshooter
1. Πατήστε Windows Key + I για να ανοίξετε τις Ρυθμίσεις και, στη συνέχεια, κάντε κλικ στο Ενημέρωση και ασφάλεια.
![]()
2. From the left-hand menu select Αντιμετώπιση προβλημάτων.
3. Under Troubleshoot click on Συνδέσεις Διαδικτύου Και στη συνέχεια κάντε κλικ στο κουμπί Εκτελέστε το εργαλείο αντιμετώπισης προβλημάτων.

4. Ακολουθήστε περαιτέρω οδηγίες στην οθόνη για να εκτελέσετε το πρόγραμμα αντιμετώπισης προβλημάτων.
5. If the above didn’t fix the issue then from the Troubleshoot window, click on Προσαρμογέας Δικτύου και έπειτα κάντε κλικ στο Εκτελέστε το εργαλείο αντιμετώπισης προβλημάτων.
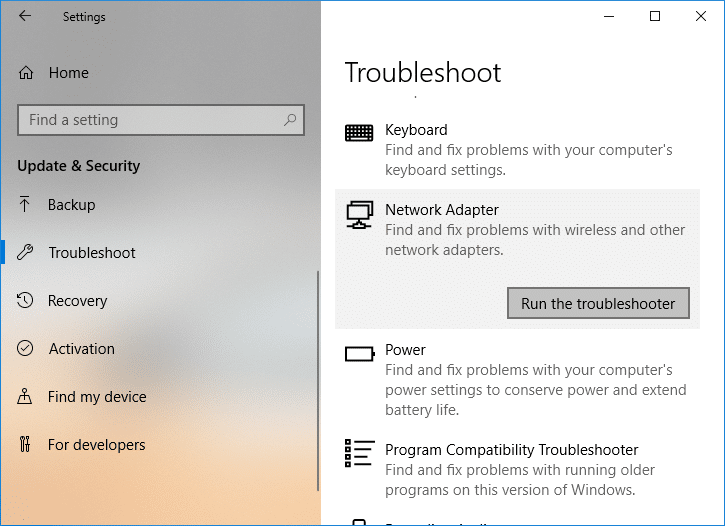
5. Επανεκκινήστε τον υπολογιστή σας για να αποθηκεύσετε τις αλλαγές και να δείτε αν μπορείτε fix the Network Adapter Missing issue.
Μέθοδος 8: Εγκαταστήστε το λογισμικό Intel PROSet/Wireless
Μερικές φορές το πρόβλημα προκαλείται λόγω ξεπερασμένου λογισμικού Intel PROSet, επομένως φαίνεται να γίνεται ενημέρωση fix Network Adapter Missing in Windows 10 issue. Επομένως, πηγαίνετε εδώ και κατεβάστε την πιο πρόσφατη έκδοση του PROSet/Wireless Software και εγκαταστήστε το. Αυτό είναι λογισμικό τρίτου κατασκευαστή που διαχειρίζεται τη σύνδεσή σας WiFi αντί για Windows και εάν το λογισμικό PROset/Wireless είναι παλιό μπορεί να προκαλέσει προβλήματα με τα προγράμματα οδήγησης Προσαρμογείς ασύρματου δικτύου. Hence, read How to Update Network Adapter Drivers on Windows 10.
Μέθοδος 9: Επαναφορά σύνδεσης δικτύου
1. Πατήστε Windows Key + I για να ανοίξετε τις Ρυθμίσεις και, στη συνέχεια, κάντε κλικ στο Δίκτυο & Διαδίκτυο.

2. From the left-hand menu select Κατάσταση.
3. Now scroll down and click on Επαναφορά δικτύου στον πάτο.

4. Κάντε ξανά κλικ στο «Επαναφορά τώρα” under Network reset section.

5. This will successfully reset your network adapter and once it is complete the system will be restarted.
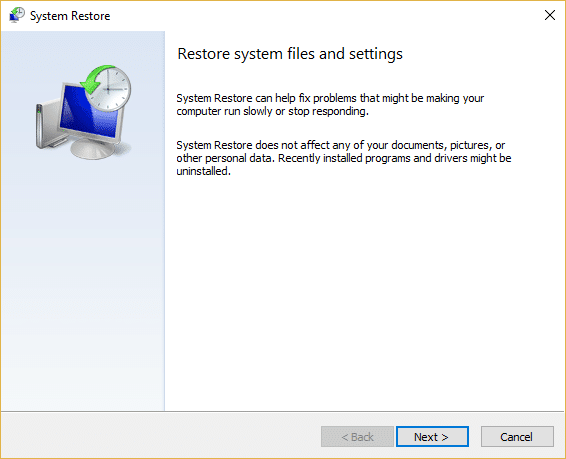
Μέθοδος 10: Εκτελέστε επαναφορά συστήματος
System Restore always works in resolving the error, therefore System Restore can definitely help you in fixing this error. So without wasting any time run system restore in order to resolve Network Adapter Missing issue.
Method 11: Using elevated Command Prompt
1. Πατήστε Windows Key + X και μετά επιλέξτε Γραμμή εντολών (διαχειριστής).

2. Πληκτρολογήστε την ακόλουθη εντολή στο cmd και πατήστε Enter:
netcfg -sn
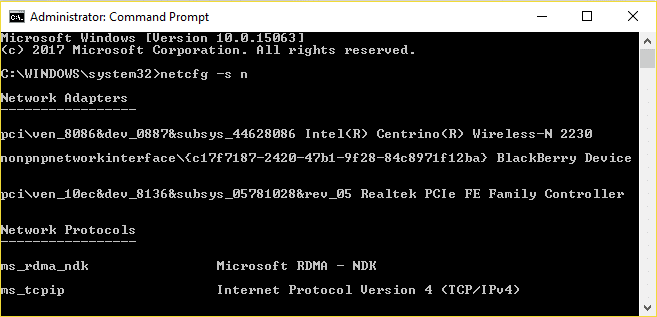
3. This will display a list of networking protocols and in that list find DNI_DNE.
4. If DNI_DNE is listed then type the following command into cmd:
reg διαγραφή HKCRCLSID {988248f3-a1ad-49bf-9170-676cbbc36ba3} / va / f
netcfg -v -u ημέρες_ημέρα
5. If you don’t see DNI_DNE listed then only run the command netcfg -v -u dni_dne.
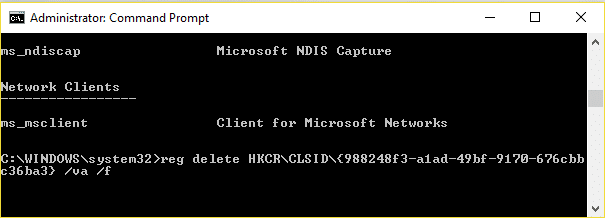
6. Now if you receive the error 0x80004002 after trying to run the above command then you need to delete the above key manually.
7. Πατήστε Windows Key + R και μετά πληκτρολογήστε regedit και πατήστε Enter.

8. Navigate to the following Registry Key:
HKEY_CLASSES_ROOTCLSID{988248f3-a1ad-49bf-9170-676cbbc36ba3}
9. Delete this key and then again type netcfg -v -u ημέρες_ημέρα command in cmd.
10. Επανεκκινήστε τον υπολογιστή σας για να αποθηκεύσετε τις αλλαγές.
Συνιστάται για εσένα:
Αυτό είναι που έχεις με επιτυχία Διορθώστε τον προσαρμογέα δικτύου που λείπει στα Windows 10 αλλά αν εξακολουθείτε να έχετε ερωτήσεις σχετικά με αυτήν την ανάρτηση, μην διστάσετε να τις ρωτήσετε στην ενότητα των σχολίων.

