Process and Compressed Memory is a Windows 10 feature responsible for memory compression (also referred to as RAM compression and memory compression). This feature basically utilizes data compression to reduce the size or number of paging request to and from the auxiliary storage. In short, this feature is designed to take less amount of disk space and memory but in this case the System and Compressed Memory process start using 100% Disk and Memory, causing the affected PC to become slow.

In Windows 10, a compressions store is added to the concept of Memory Manager, which is an in-memory collection of compressed pages. So whenever the memory starts to fill up, the System and Compressed Memory process will compress the unused pages instead of writing them to the disk. The benefit of this is the amount of memory used per process is reduced, which allows Windows 10 to maintain more programs or apps in physical memory.
The problem appears to be incorrect Virtual Memory settings. Someone changed the paging file size from automatic to a particular value, virus or malware, Google Chrome or Skype, corrupt system files etc. So without wasting any time let’s see how to actually Fix 100% Disk Usage by System and Compressed Memory with the help of below-listed troubleshooting guide.
[SOLVED] 100% Disk Usage by System and Compressed Memory
Nepre kreu restarigin punkton, por se io misfunkcias.
Metodo 1: Ripari Korruptajn Sistemajn Dosierojn
1. Malfermu Komandon. La uzanto povas plenumi ĉi tiun paŝon serĉante 'cmd' kaj tiam premu Eniri.

2. Nun tajpu la jenon en la cmd kaj premu enen:
Sfc /scannow sfc /scannow /offbootdir=c: /offwindir=c:windows (Se supre malsukcesas, provu ĉi tiun)
![SFC scan now command prompt | [SOLVED] 100% Disk Usage by System and Compressed Memory](https://lbsite.org/wp-content/uploads/2023/01/SFC-scan-now-command-prompt.png)
3. Atendu, ke la ĉi-supra procezo finiĝos kaj post tio, rekomencu vian komputilon.
4. Denove malfermu cmd kaj tajpu la jenan komandon kaj premu eniron post ĉiu:
Dism /Enreta /Puriga-Bildo /CheckHealth Dism /Enreta /Puriga-Bildo /ScanHealth Dism /Enreta /Puriga-Bildo /RestoreHealth

5. Lasu la DISM-komandon kuri kaj atendu, ke ĝi finiĝos.
6. Se la supra komando ne funkcias, provu la sube:
Dism /Bildo:C:senrete /Cleanup-Image /RestoreHealth /Source:c:testmountwindows Dism /Enreta /Cleanup-Image /RestoreHealth /Source:c:testmountwindows /LimitAccess
Noto: Anstataŭigu la C:RepairSourceWindows per via riparfonto (Vindoza Instalado aŭ Reakira Disko).
7. Rekomencu vian komputilon por konservi ŝanĝojn kaj vidi ĉu vi kapablas Fix 100% Disk Usage by System and Compressed Memory Issue.
Method 2: Set Correct Paging File Size
1. Premu Vindozan Ŝlosilon + R tiam tajpu sysdm.cpl kaj premu Enter por malfermi Sistemaj Propraĵoj.

2. Ŝanĝu al la Altnivela langeto kaj poste alklaku Agordoj sub Performance.

3. Again switch to the Advanced tab and click Change under Virtual Memory.

4. Checkmark “Pagi administras aŭtomate grandecon de paĝaj dosieroj por ĉiuj diskoj."
![Checkmark Automatically manage paging file size for all drives | [SOLVED] 100% Disk Usage by System and Compressed Memory](https://lbsite.org/wp-content/uploads/2023/02/Checkmark-Automatically-manage-paging-file-size-for-all-drives.png)
5. Click OK, then click Apply followed by OK.
6. Select Yes to Restart your PC to save changes.
Metodo 3: Malebligu Rapidan Komencon
1. Premu Vindozan Ŝlosilon + R tiam tajpu kontrolon kaj premu Enter por malfermi Kontrola Panelo.

2. Alklaku Aparataro kaj Sono tiam alklaku Potencaj opcioj.

3. Tiam, de la maldekstra fenestro panelo elektu "Elektu kion faras la potencajn butonojn."

4. Nun alklaku "Ŝanĝi agordojn, kiuj nun ne estas disponeblaj."

5. Malmarku "Enŝaltu rapidan starton”Kaj alklaku Konservu ŝanĝojn.
![Uncheck Turn on fast startup | [SOLVED] 100% Disk Usage by System and Compressed Memory](https://lbsite.org/wp-content/uploads/2023/01/Uncheck-Turn-on-fast-startup.png)
6. Restart your PC and see if you’re able to Fix 100% Disk Usage by System and Compressed Memory Issue.
Method 4: Disable Superfetch Service
1. Premu Vindozan Ŝlosilon + R tiam tajpu servoj.msc kaj batis Enter.

2. Trovu Super alporto service from the list then right-click on it and select Propraĵoj.

3. Under Service status, if the service is running, click on Ĉesu.
4. Now, from the Komenco type drop-down select Malebligita.

5. Klaku Apliki, sekvita de OK.
6. Rekomencu vian komputilon por konservi ŝanĝojn.
If the above method doesn’t disable Superfetch services then you can follow disable Superfetch using Registry:
1. Premu Vindozan Ŝlosilon + R tiam tajpu regado kaj alklaku Enter por malfermi Registroredaktilon.

2. Iru al la sekva registra ŝlosilo:
HKEY_LOCAL_MACHINESYSTEMCurrentControlSetControlSession ManagerMemory ManagementPrefetchParameters
3. Make sure you have selected PrefetchParameters tiam en la dekstra fenestro duoble alklaku EbligiSuperfetch ŝlosilo kaj change it’s value to 0 in the Value data field.

4. Click OK and close the Registry Editor.
5. Restart your PC to save changes and see if you’re able to Fix 100% Disk Usage by System and Compressed Memory Issue.
Method 5: Adjust your PC for Best Performance
1. Premu Vindozan Ŝlosilon + R tiam tajpu sysdm.cpl kaj premu Enter por malfermi Sistemaj Propraĵoj.
2. Ŝanĝu al la Altnivelaj langeto kaj poste alklaku Agordoj sub Rendimento.
3. Under Visual Effects checkmark “Alĝustigu plej bonan rendimenton".

4. Klaku Apliki, sekvita de OK.
5. Reboot your PC and see if you’re able to Fix 100% Disk Usage by System and Compressed Memory Issue.
Method 6: Kill the Speech Runtime Executable Process
1. Premu Ctrl + Shift + Esc por lanĉi Task-Administranton.
2. En la Langeto Procezoj, trovi Speech Runtime Executable.
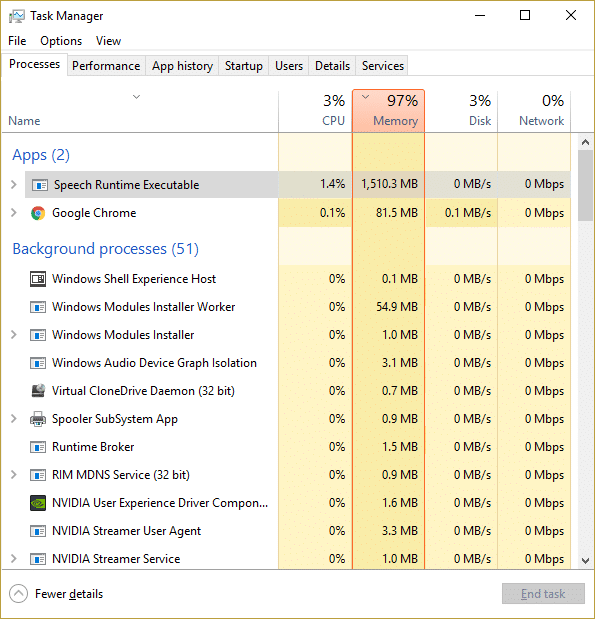
3. Dekstre alklaku ĝin kaj elektu Fini Taskon.
Metodo 7: Rulu CCleaner kaj Malwarebytes
1. Elŝuti kaj instali CCleaner & Malwarebytes.
2. Rulu Malwarebytes kaj lasu ĝin skani vian sistemon por damaĝaj dosieroj. Se trovos malware, ĝi aŭtomate forigos ilin.

3. Nun rulu CCleaner kaj elektu Propra Pura.
4. Sub Propra Pura, elektu la Vindoza langeto kaj marko defaŭltoj kaj klaku analizi.
![Select Custom Clean then checkmark default in Windows tab | [SOLVED] 100% Disk Usage by System and Compressed Memory](https://lbsite.org/wp-content/uploads/2023/01/Select-Custom-Clean-then-checkmark-default-in-Windows-tab.png)
5. Post kiam Analizo estas kompleta, certigu, ke vi certe forigos la dosierojn por esti forigitaj.

6. Fine alklaku la Kuru Purigilon butonon kaj lasu CCleaner kuri sian kurson.
7. Por plu purigi vian sistemon, elektu la langeton Registro, kaj certigu, ke la jenaj estas kontrolitaj:

8. Alklaku la Skanu por Problemoj butonon kaj permesu al CCleaner skani, tiam alklaku la Ripari Elektitajn Problemojn butonon.
![Once scan for issues is completed click on Fix selected Issues | [SOLVED] 100% Disk Usage by System and Compressed Memory](https://lbsite.org/wp-content/uploads/2023/01/Once-scan-for-issues-is-completed-click-on-Fix-selected-Issues.png)
9. Kiam CCleaner demandas "Ĉu vi volas rezervajn ŝanĝojn al la registro?" elektu Jes.
10. Post kiam via sekurkopio finiĝis, alklaku la Ripari Ĉiuj Elektitaj Problemoj butonon.
11. Rekomencu vian komputilon por konservi ŝanĝojn.
Method 8: Change configuration of Google Chrome and Skype
Por Google Chrome: Navigate to the following under Chrome: Settings > Show Advanced Settings > Privacy > Use a prediction service to load pages more quickly. Disable the toggle next to “Use a prediction service to load pages.”

Change configuration For Skype
1. Make sure you have exited Skype, if not end task from Task Manager for Skype.
2. Press Windows Key + R then type the following and click OK:
C:Program Files (x86)SkypePhone
3. Dekstre alklaku skype.exe kaj elektu Propraĵoj.

4. Ŝanĝu al Sekureca langeto kaj klaku Redakti.

5. Elektu ALL APPLICATION PACKAGES under Group or user names then checkmark Write sub Permesu.

6. Click Apply, followed by OK and see if you’re able to Fix 100% Disk Usage by System and Compressed Memory Issue.
Method 9: Set Correct Permission for System and Compressed Memory Process
1. Premu Vindozan Ŝlosilon + R tiam tajpu Taskschd.msc and hit Enter to open Task Scheduler.

2. Iru al la sekva vojo:
Task Scheduler Library > Microsoft > Windows > MemoryDiagnostic
![Double click on ProcessMemoryDiagnostic Events | [SOLVED] 100% Disk Usage by System and Compressed Memory](https://lbsite.org/wp-content/uploads/2023/02/Double-click-on-ProcessMemoryDiagnostic-Events.png)
3. Duoble klaku sur ProcessMemoryDiagnostic Events kaj poste klaku Ŝanĝi Uzanton aŭ Grupon under Security Options.

4. Klako Altnivelaj kaj poste klaku Find Now.

5. Elektu vian Konto pri administranto from the list then click OK.

6. Denove alklaku al Akcepti to add your administrator account.
7. Checkmark Kuru kun plej altaj privilegioj kaj tiam alklaku OK.

8. Follow the same steps for RunFullMemoryDiagnostic and close everything.
9. Rekomencu vian komputilon por konservi ŝanĝojn.
Method 10: Disable System and Compressed Memory Process
1. Premu Vindozan Ŝlosilon + R tiam tajpu Taskschd.msc kaj premu Enter por malfermi Taska Planilo.
2. Iru al la sekva vojo:
Task Scheduler Library > Microsoft > Windows > MemoryDiagnostic
3. Dekstre alklaku RunFullMemoryDiagnostic kaj elektu Malebligu.
![Right-click on RunFullMemoryDiagnostic and select Disable | [SOLVED] 100% Disk Usage by System and Compressed Memory](https://lbsite.org/wp-content/uploads/2023/02/Right-click-on-RunFullMemoryDiagnostic-and-select-Disable.png)
4. Close Task Scheduler and restart your PC.
rekomendita:
Tion vi sukcese havas Fix 100% Disk Usage by System and Compressed Memory sed se vi ankoraŭ havas demandojn pri ĉi tiu afiŝo, bonvolu demandi ilin en la sekcio de komentoj.

