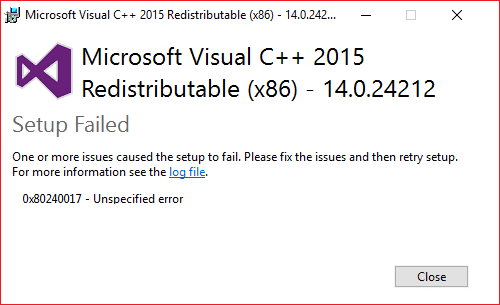
Fix Microsoft Visual C++ 2015 Redistributable Setup Fails Error 0x80240017: If you are facing the error code “0x80240017 – Undefined error” when trying to install Microsoft Visual C++ 2015 Redistributable Setup then don’t worry as today we are going to see how to fix this error. Visual C++ 2015 Redistributable is required for various app or programs to run, and if you don’t have the Redistributable package installed on your PC then you might not be able to access those apps. So without wasting any time let’s see How to Fix Microsoft Visual C++ 2015 Redistributable Setup Fails Error 0x80240017 with the help of the below-listed guide.
Reparar el error de configuración redistribuible de Microsoft Visual C++ 2015 falla 0x80240017
Asegúrate de crear un punto de restauración en caso de que algo salga mal.
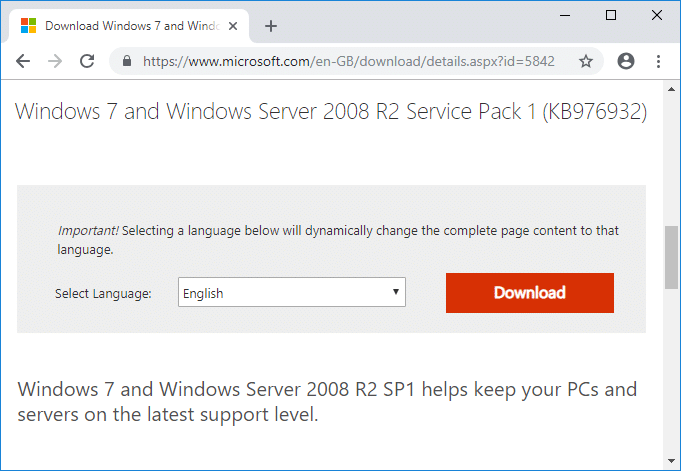
Method 1: Download Windows 7 Service Pack (SP1) Update
Select your Language then click on Descargar el botón. On the next page either select “windows6.1-KB976932-X64"O"windows6.1-KB976932-X86” according to your system architecture.
windows6.1-KB976932-X64 – For 64-bit System
windows6.1-KB976932-X86 – For 32-bit System
Once you have downloaded and install the Windows 7 Service Pack (SP1) Update, simply restart your PC to save changes. Now from Programs and Features window, make sure to completely remove Microsoft Visual C++ 2015 Redistributable package and then follow the below-guide.

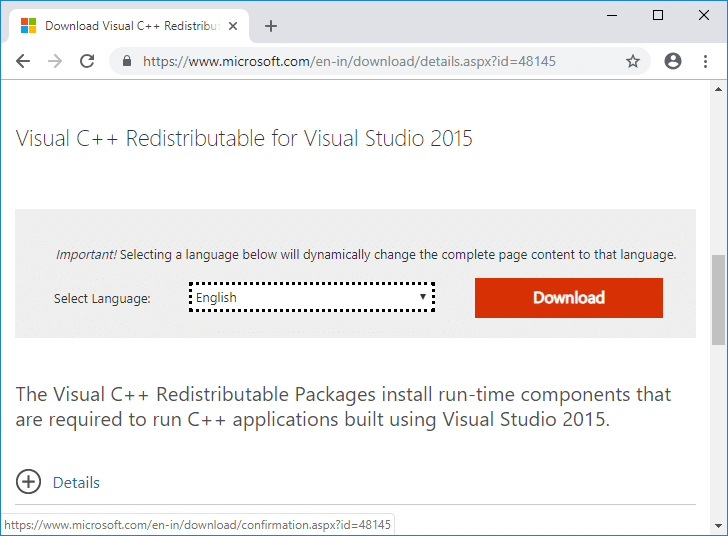
1.Download Visual C++ Redistributable for Visual Studio 2015 from Microsoft Website.
2.Seleccione su Idioma from the drop-down and click on Descargar.
3.Seleccione el vc-redist.x64.exe (for 64-bit Windows) or vc_redis.x86.exe (for 32-bit Windows) according to your system architecture and click Siguiente.
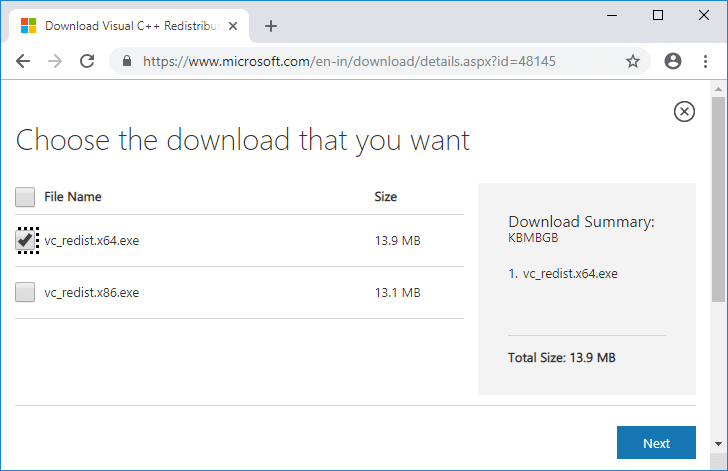
4.Once you click Siguiente the file should start downloading.
5.Double-click on the download file and follow the on-screen instruction to completar la instalación.
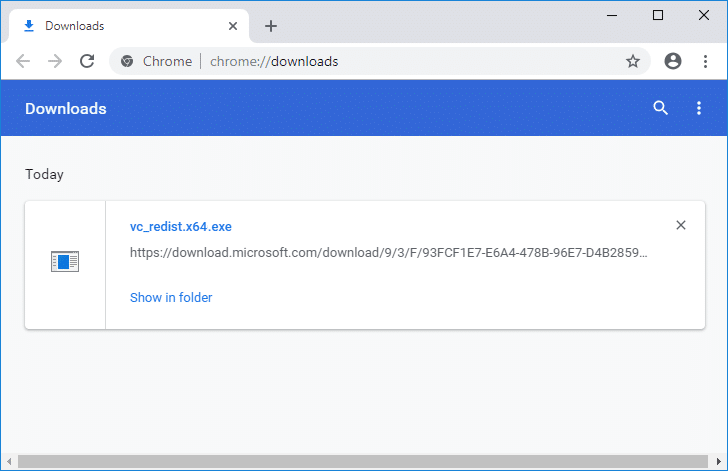
6.Reinicie su PC para guardar los cambios y ver si puede Fix Microsoft Visual C++ 2015 Redistributable Setup Fails Error 0x80240017.
If you’re still facing the error message then install Microsoft Visual C++ Redistributable Update:
If repairing or re-installing Visual C++ Redistributable for Visual Studio 2015 didn’t fix the problem then you should try to install this Microsoft Visual C++ 2015 Redistributable Update 3 RC from Microsoft website.

Método 2: realizar un inicio limpio
Sometimes 3rd party software can conflict with Microsoft Visual C++ and therefore, you may face Setup Fails Error 0x80240017. In order to Reparar el error de configuración redistribuible de Microsoft Visual C++ 2015 falla 0x80240017, you need to perform a clean boot in your PC and diagnose the issue step by step.

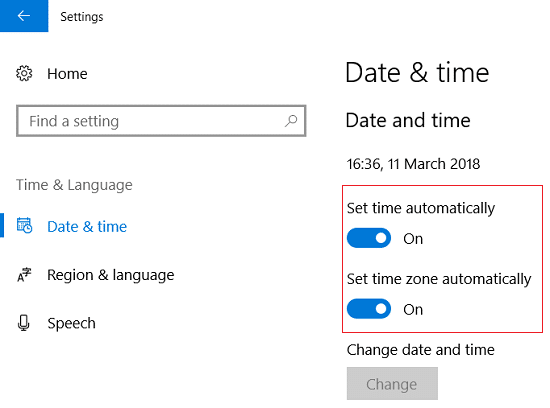
Method 3: Make sure Date and Time of your PC is Correct
1.Haga clic derecho en fecha y hora en la barra de tareas y luego seleccione "Ajustar fecha / hora".
2.Make sure to Turn on the toggle for "Set Time Automatically”.
3.For Windows 7, click on “Hora de Internet” and tick mark on “Sincronizar con un servidor de hora de Internet."
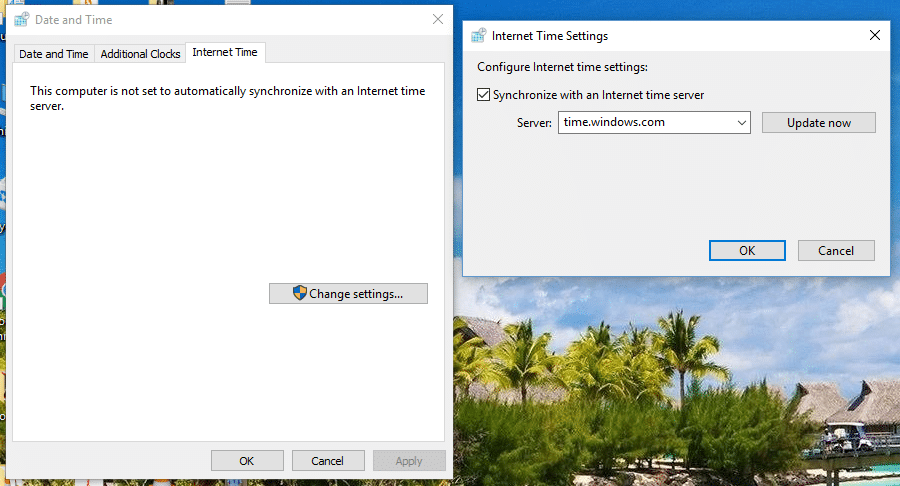
4.Seleccione Servidor “time.windows.com”Y haga clic en Actualizar y “Aceptar”. No es necesario completar la actualización. Simplemente haga clic en Aceptar.
Configurar la fecha y hora correctas debería Fix Microsoft Visual C++ 2015 Redistributable Setup Fails Error 0x80240017, if not then continue.
Method 4: Delete Temporary Files from your PC
1.Presione la tecla Windows + R y luego escriba temp y presiona Enter.
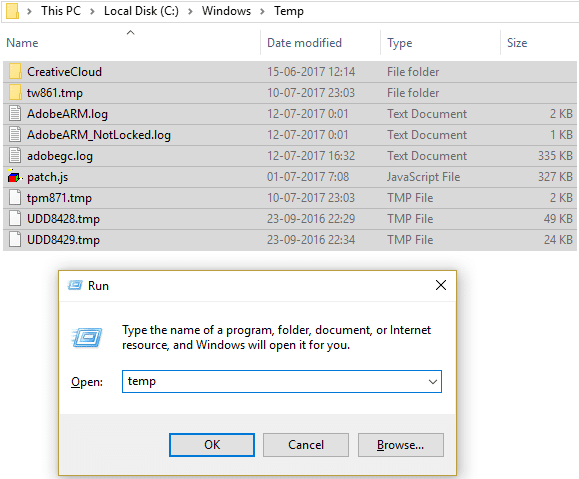
2.Haga clic en Continúar to open the Temp folder.
3.Select all the files or folders present inside the Temp folder and permanently delete them.
Nota: To permanently delete any file or folder, you need to press Shift + Del button.
Method 5: Re-register Windows Installer service
1.Presione la tecla Windows + R, luego escriba lo siguiente y presione Enter:
msiexec / unregister
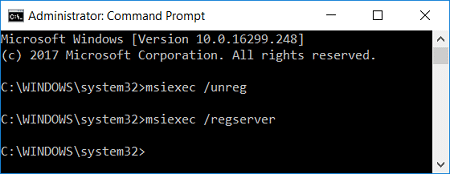
Nota: When you hit Enter, it won’t show anything so don’t worry.
2.Again open Run dialog box and then type “msiexec / regserver” (sin comillas) y presiona Enter.
3.This would successfully Re-register Windows Installer service and should fix your issue.
Método 6: ejecutar la herramienta DISM
1.Press Windows Key + X and select Símbolo del sistema (Administrador).

2.Escriba el siguiente comando en cmd y presione enter después de cada uno:
Dism /Online /Cleanup-Image /CheckHealth Dism /Online /Cleanup-Image /ScanHealth Dism /Online /Cleanup-Image /RestoreHealth

3.Deje que se ejecute el comando DISM y espere a que finalice.
4. Si el comando anterior no funciona, intente con lo siguiente:
Dism /Image:C:offline /Cleanup-Image /RestoreHealth /Source:c:testmountwindows Dism /Online /Cleanup-Image /RestoreHealth /Source:c:testmountwindows /LimitAccess
Nota: Reemplace C:RepairSourceWindows con la ubicación de su fuente de reparación (Disco de instalación o recuperación de Windows).
5.Reinicie su PC para guardar los cambios y ver si puede Fix Microsoft Visual C++ 2015 Redistributable Setup Fails Error 0x80240017.
Method 7: Install Windows8.1-KB2999226-x64.msu
1.Make sure to uninstall Visual C++ Redistributable for Visual Studio 2015 from your system.
2.Navegue hasta la siguiente ruta:
C:ProgramDataPackage Cache
3.Now here you need to find the path which would resemble something like this:
FC6260C33678BB17FB8B88536C476B4015B7C5E9packagesPatchx64Windows8.1-KB2999226-x64.msu
2.Once you find file, open Command Prompt (Admin) and type the following command one by one and hit Enter after each one:
C:
mkdir tmp
mkdir tmptmp
move C:ProgramDataPackage CacheFC6260C33678BB17FB8B88536C476B4015B7C5E9packagesPatchx64Windows8.1-KB2999226-x64.msu c:tmp
expand -F:* c:tmpWindows8.1-KB2999226-x64.msu c:tmptmp
dism /online /add-package /packagepath:c:tmptmpWindows8.1-KB2999226-x64.cab
Nota: Make sure to Replace “FC6260C33678BB17FB8B88536C476B4015B7C5E9” and file name “Windows8.1-KB2999226-x64.msu” according to your system.
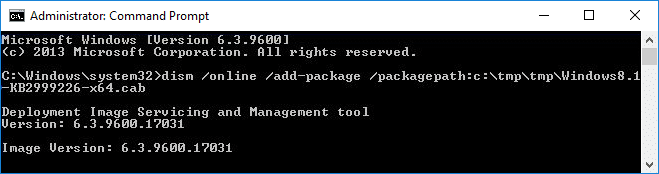
3.Once finished, reboot your PC to save changes.
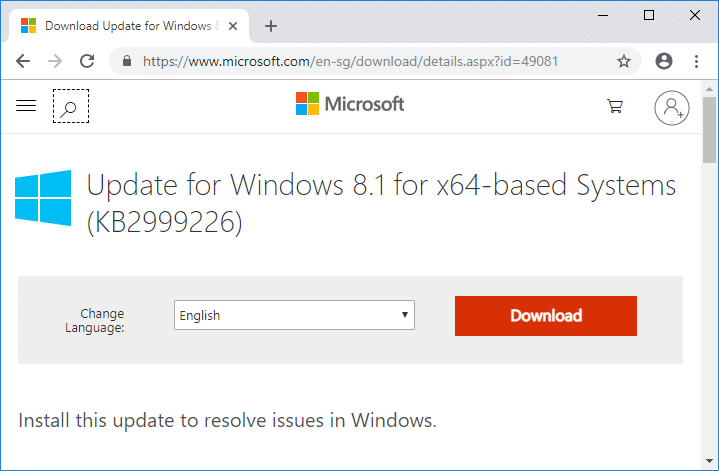
If you’re still facing the issue then you can manually download and install the Windows8.1-KB2999226-x64.msu directly from Microsoft website.
Recomendado:
Eso es todo lo que has aprendido con éxito. How to Fix Microsoft Visual C++ 2015 Redistributable Setup Fails Error 0x80240017 pero si todavía tienes alguna pregunta sobre este tutorial, no dudes en hacerla en la sección de comentarios.
")
")