If you don’t see Wireless Adapter under Network Connections neither there is a Network adapter tab under device manager then it seems like your Network Adapter is missing or not detected on your Windows 10 which is a serious issue because you won’t be able to access the Internet until the issue is resolved. In short, when you click on the Wireless icon on the system tray there won’t be any device listed in order to connect to the Internet and if you open Device Manager then you won’t see the Network Adapter tab.
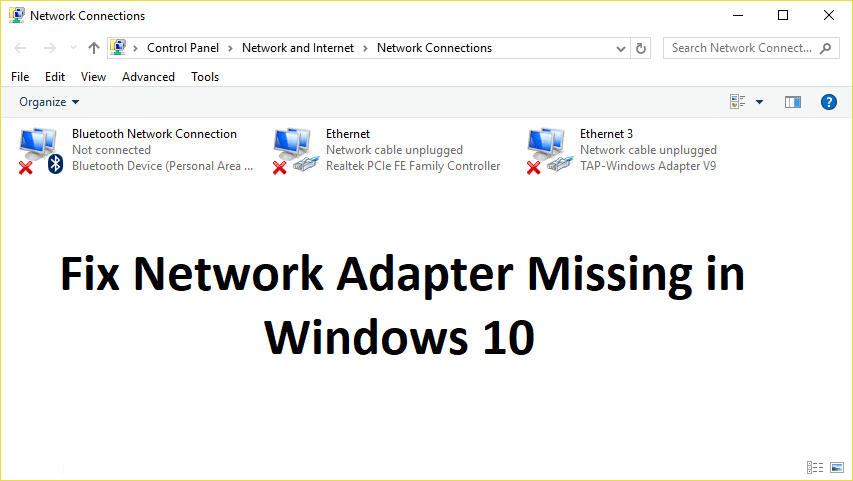
These are the reasons behind the Network Adapter missing issue:
- Network adapter missing in Device manager
- No Network Adapters showing in Device Manager
- Network Adapter Not Detected
- Network Adapter Not Found Windows 10
- No Network Adapter In Device Manager
The main cause of this issue seems to be outdated, incompatible or corrupted Network Adapter drivers. If you have recently upgraded from previous versions of Windows then it’s possible that the old drivers will not work with the new Windows and hence the issue. So without wasting any time let’s see how to actually Fix Network Adapter Missing in Windows 10 issue with the below-listed troubleshooting steps.
Note: Just make sure to uninstall any VPN software on your PC before continuing.
Fix Network Adapter Missing in Windows 10
Asegúrate de crear un punto de restauración en caso de que algo salga mal.
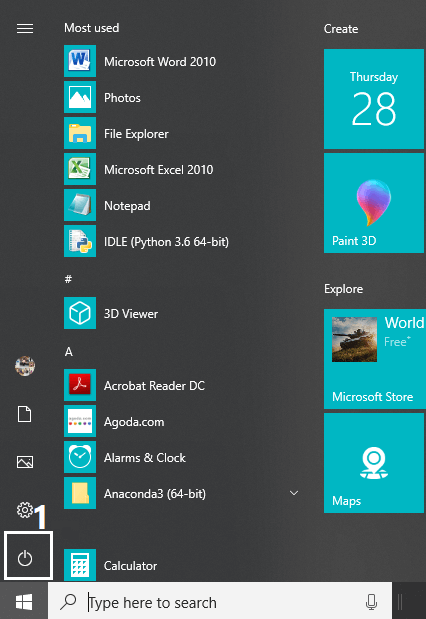
Method 1: Reboot your Computer
La mayoría de nosotros conocemos este truco tan básico. Reiniciar su computadora a veces puede solucionar cualquier conflicto de software dándole un nuevo comienzo. Entonces, si usted es alguien que prefiere poner su computadora en modo de suspensión, reiniciarla es una buena idea.
1. Haga clic en el menú de inicio y luego haga clic en el El botón de encendido disponible en la esquina inferior izquierda.
2. A continuación, haga clic en el Reanudar opción y su computadora se reiniciará sola.
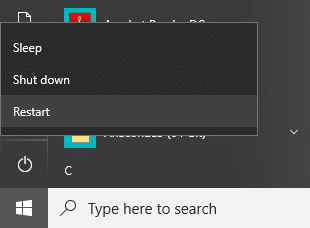
Después de que la computadora se reinicie, verifique si su problema está resuelto o no.
Method 2: Flush DNS and Reset Winsock Components
1. Open elevated Command Prompt.
2. Ahora escriba el siguiente comando y presione Entrar después de cada uno:
ipconfig / release
ipconfig / flushdns
ipconfig / renew

3. Vuelva a abrir el símbolo del sistema y escriba el siguiente comando uno por uno y presione Intro después de cada uno:
ipconfig /flushdns nbtstat –r netsh int restablecimiento de ip restablecimiento de netsh winsock
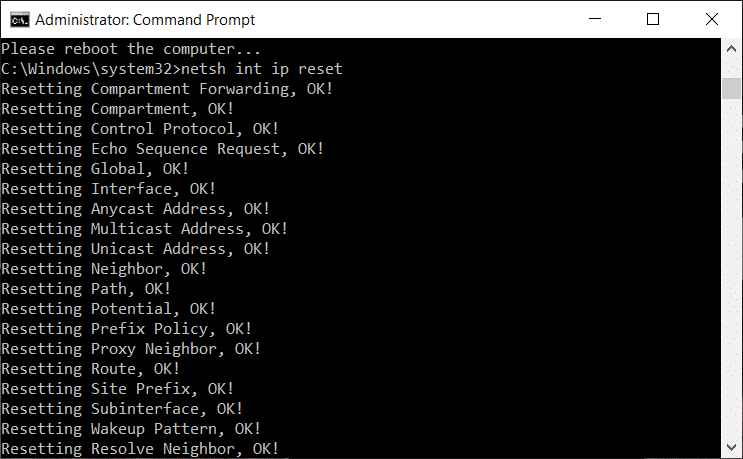
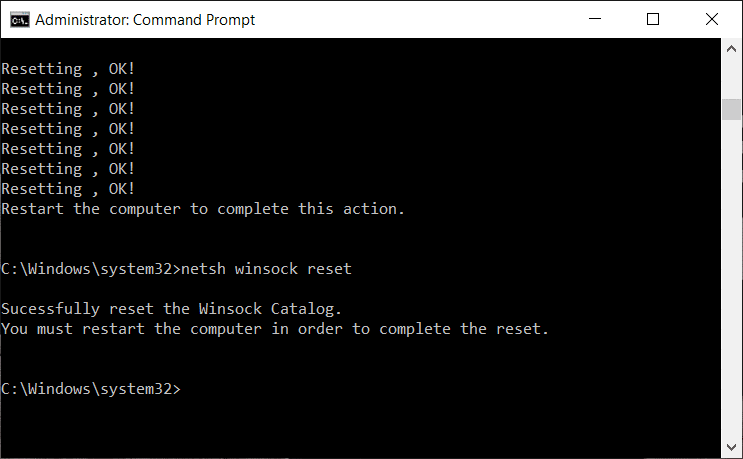
4. Reinicie para aplicar los cambios. Limpiar el DNS parece Fix Network Adapter Driver Issues on Windows 10.
Method 3: Run WWAN AutoConfig Service
1. Presione la tecla Windows + R y luego escriba services.msc y presiona Enter.

2. Encontrar WWAN AutoConfig Service in the list (press W to reach to the end of the list quickly).
3. Haga doble clic en WWAN AutoConfig Service.
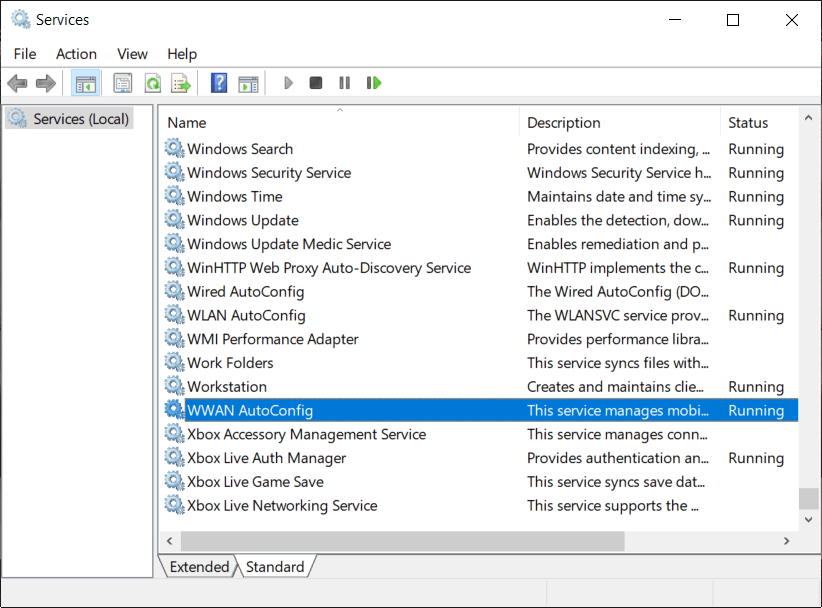
4. If the service is already running then click on Stop, then from the Startup type drop-down select Automático.
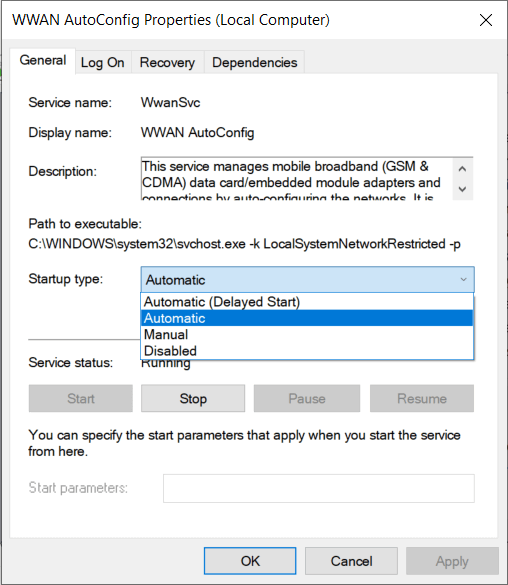
5. Haga clic en Aplicar seguido de Aceptar.
6. Haga clic derecho en el WWAN AutoConfig Service y seleccionar Start.
Método 4: actualizar los controladores del adaptador de red
1. Presione la tecla Windows + R y escriba "devmgmt.msc”en el cuadro de diálogo Ejecutar para abrir administrador de dispositivos.

2. Expandir Los adaptadores de red, luego haga clic derecho en su controlador wifi (por ejemplo Broadcom o Intel) y seleccione Actualización del software del controlador.

3. Ahora selecciona “Busque automáticamente el software del controlador actualizado".
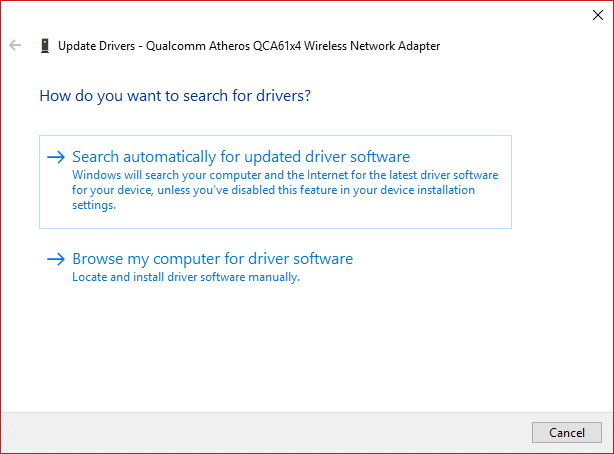
4. Ahora Windows will automatically search for the Network driver update and if new update is found, it will automatically download and install it.
5. Una vez terminado, cierra todo y reinicia tu PC.
6. Si todavía estás enfrentando el Network Adapter Missing in Windows 10 issue, then again right-click on your WiFi controller and select Actualizar controlador en el Administrador de dispositivos.
7. Ahora, en Actualizar software del controlador de Windows, seleccione "Buscar mi computadora para el software del controlador."

8. Ahora selecciona “Permítanme elegir de una lista de controladores disponibles en mi computadora."

9. Intenta actualice los controladores de las versiones enumeradas (asegúrese de marcar hardware compatible).
10. Si lo anterior no funcionó, vaya a el sitio web del fabricante para actualizar los controladores.

11. Descargue e instale el controlador más reciente desde el sitio web del fabricante y luego reinicie su PC.
Method 5: Uninstall Network Adapter Drivers
1. Presione la tecla Windows + R y luego escriba "devmgmt.msc”Y presione Enter para abrir el Administrador de dispositivos.
2. Expanda Adaptadores de red y busque el nombre de su adaptador de red.
3.Asegúrate de anote el nombre del adaptador solo en caso de que algo salga mal.
4. Right-click on your network adapter and uninstall it.

5. It will ask for confirmation seleccione Sí.
6. Restart your PC and Windows will automatically install the network adapter drivers again.
7. If the drivers are not installed automatically then again open the Device Manager.
8. From the Device Manager menu, click on la columna Acción luego haga clic en "Buscar cambios de hardware".

Método 6: asegúrese de que Windows esté actualizado
1. Prensa Tecla de Windows + Para abrir Configuración y luego hacer clic en Actualización y seguridad.
![]()
2. Desde el lado izquierdo, haga clic en el menú Windows Update.
3. Ahora haga clic en "Buscar actualizaciones”Para comprobar si hay actualizaciones disponibles.

4. Si hay actualizaciones pendientes, haga clic en Descargue e instale actualizaciones.

5. Una vez descargadas las actualizaciones, instálelas y su Windows estará actualizado.
6. After the updates are installed reboot your PC to save changes.
Método 7: ejecutar el solucionador de problemas del adaptador de red
1. Presione la tecla Windows + I para abrir Configuración y luego haga clic en Actualización y seguridad.
![]()
2. En el menú de la izquierda seleccione Solucionar problemas
3. En Solucionar problemas, haga clic en Enlaces a Internet y haga clic en Ejecute el solucionador de problemas.

4. Siga más instrucciones en pantalla para ejecutar el solucionador de problemas.
5. Si lo anterior no solucionó el problema, desde la ventana Solucionar problemas, haga clic en Adaptador de red y luego haga clic en Ejecute el solucionador de problemas.
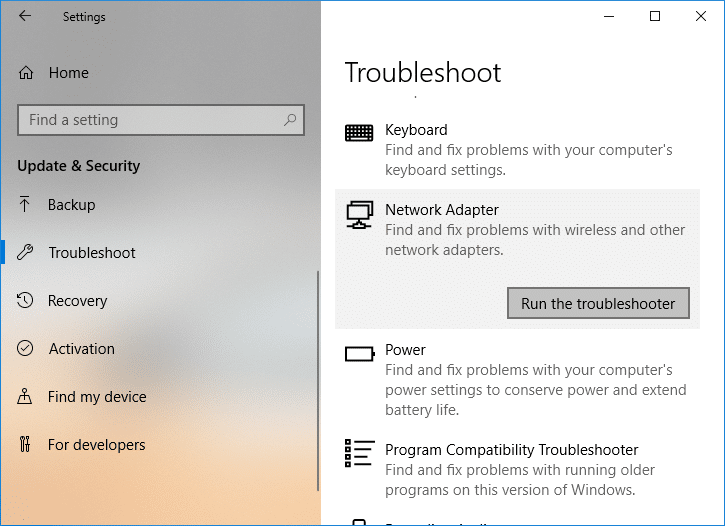
5. Reinicie su PC para guardar los cambios y ver si puede fix the Network Adapter Missing issue.
Method 8: Install Intel PROSet/Wireless Software
A veces, el problema se debe a que el software Intel PROSet está desactualizado, por lo que parece que actualizarlo fix Network Adapter Missing in Windows 10 issue. Por lo tanto, el haga clic aquí and download the latest version of PROSet/Wireless Software and install it. This is a third party software which manages your WiFi connection instead of Windows and if PROset/Wireless Software is outdated is can cause drivers issue in Adaptador de red inalámbrica. Hence, read How to Update Network Adapter Drivers on Windows 10.
Método 9: restablecer la conexión de red
1. Presione la tecla Windows + I para abrir Configuración y luego haga clic en Red e Internet.

2. En el menú de la izquierda seleccione Estado.
3. Ahora desplácese hacia abajo y haga clic en Reinicio de red en la parte inferior.

4. Vuelva a hacer clic en "Restablecer ahora”en la sección Restablecimiento de red.

5. This will successfully reset your network adapter and once it is complete the system will be restarted.
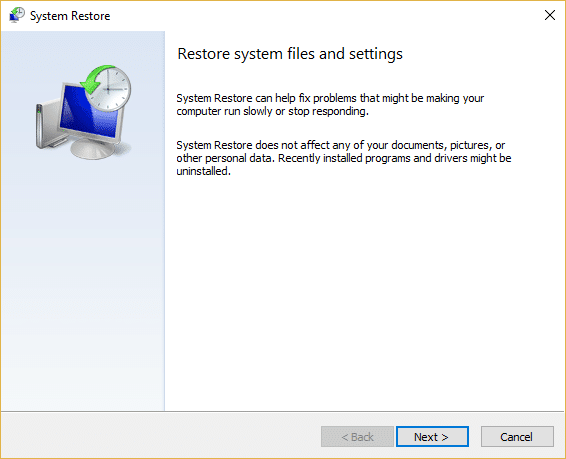
Método 10: realizar una restauración del sistema
System Restore always works in resolving the error, therefore System Restore can definitely help you in fixing this error. So without wasting any time run system restore in order to resolve Network Adapter Missing issue.
Method 11: Using elevated Command Prompt
1. Presione la tecla Windows + X y luego seleccione Símbolo del sistema (Admin).

2. Escriba el siguiente comando en cmd y presione Enter:
netcfg-sn
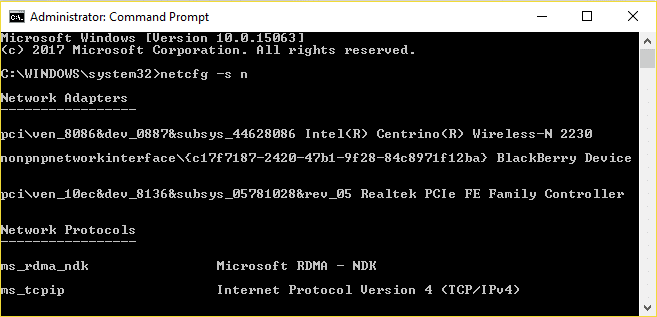
3. This will display a list of networking protocols and in that list find DNI_DNE.
4. If DNI_DNE is listed then type the following command into cmd:
reg delete HKCRCLSID {988248f3-a1ad-49bf-9170-676cbbc36ba3} / va / f
netcfg -v -u dni_dne
5. If you don’t see DNI_DNE listed then only run the command netcfg -v -u dni_dne.
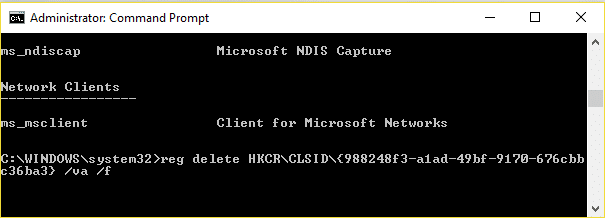
6. Now if you receive the error 0x80004002 after trying to run the above command then you need to delete the above key manually.
7. Presione la tecla Windows + R y luego escriba regedit y presiona Enter.

8. Navegue hasta la siguiente clave de registro:
HKEY_CLASSES_ROOTCLSID{988248f3-a1ad-49bf-9170-676cbbc36ba3}
9. Delete this key and then again type netcfg -v -u dni_dne comando en cmd.
10. Reinicie su PC para guardar los cambios.
Recomendado para ti:
Eso es todo lo que has logrado Fix Network Adapter Missing in Windows 10 pero si todavía tienes alguna pregunta sobre esta publicación, no dudes en hacerla en la sección de comentarios.

