Process and Compressed Memory is a Windows 10 feature responsible for memory compression (also referred to as RAM compression and memory compression). This feature basically utilizes data compression to reduce the size or number of paging request to and from the auxiliary storage. In short, this feature is designed to take less amount of disk space and memory but in this case the System and Compressed Memory process start using 100% Disk and Memory, causing the affected PC to become slow.

In Windows 10, a compressions store is added to the concept of Memory Manager, which is an in-memory collection of compressed pages. So whenever the memory starts to fill up, the System and Compressed Memory process will compress the unused pages instead of writing them to the disk. The benefit of this is the amount of memory used per process is reduced, which allows Windows 10 to maintain more programs or apps in physical memory.
The problem appears to be incorrect Virtual Memory settings. Someone changed the paging file size from automatic to a particular value, virus or malware, Google Chrome or Skype, corrupt system files etc. So without wasting any time let’s see how to actually Fix 100% Disk Usage by System and Compressed Memory with the help of below-listed troubleshooting guide.
[SOLUCIONADO] 100% de uso del disco por sistema y memoria comprimida
Asegúrate de crear un punto de restauración, en caso de que algo salga mal.
Método 1: reparar archivos de sistema corruptos
1. Abra el símbolo del sistema. El usuario puede realizar este paso buscando 'cmd' Y luego presione Enter.

2. Ahora escribe lo siguiente en el cmd y presiona enter:
Sfc /scannow sfc /scannow /offbootdir=c: /offwindir=c:windows (Si lo anterior falla, intente con este)
![SFC scan now command prompt | [SOLVED] 100% Disk Usage by System and Compressed Memory](https://lbsite.org/wp-content/uploads/2023/01/SFC-scan-now-command-prompt.png)
3. Espere a que finalice el proceso anterior y una vez hecho, reinicie su PC.
4. Vuelva a abrir cmd, escriba el siguiente comando y presione Intro después de cada uno:
Dism /Online /Cleanup-Image /CheckHealth Dism /Online /Cleanup-Image /ScanHealth Dism /Online /Cleanup-Image /RestoreHealth

5. Deje que se ejecute el comando DISM y espere a que finalice.
6. Si el comando anterior no funciona, intente con lo siguiente:
Dism /Image:C:offline /Cleanup-Image /RestoreHealth /Source:c:testmountwindows Dism /Online /Cleanup-Image /RestoreHealth /Source:c:testmountwindows /LimitAccess
Nota: Reemplace C:RepairSourceWindows con su fuente de reparación (disco de instalación o recuperación de Windows).
7. Reinicie su PC para guardar los cambios y ver si puede Fix 100% Disk Usage by System and Compressed Memory Issue.
Method 2: Set Correct Paging File Size
1. Presione la tecla Windows + R y luego escriba sysdm.cpl y presione Enter para abrir Propiedades del sistema.

2. Cambiar a la Ficha Opciones avanzadas y luego haga clic en Configuración en Rendimiento.

3. Again switch to the Advanced tab and click Change under Virtual Memory.

4. Marca de verificación "Administre automáticamente el tamaño del archivo de paginación para todas las unidades."
![Checkmark Automatically manage paging file size for all drives | [SOLVED] 100% Disk Usage by System and Compressed Memory](https://lbsite.org/wp-content/uploads/2023/02/Checkmark-Automatically-manage-paging-file-size-for-all-drives.png)
5. Click OK, then click Apply followed by OK.
6. Select Yes to Restart your PC to save changes.
Método 3: deshabilitar el inicio rápido
1. Presione la tecla Windows + R, luego escriba control y presione Enter para abrir Panel de control.

2. Hacer clic en Hardware y sonido a continuación, haga clic en Opciones de energía.

3. Luego, desde el panel de la ventana izquierda, seleccione "Elija lo que hacen los botones de encendido."

4. Ahora haga clic en "Cambiar la configuración que actualmente no está disponible."

5. Desmarque "Encienda el inicio rápido"Y haga clic en Guardar cambios.
![Uncheck Turn on fast startup | [SOLVED] 100% Disk Usage by System and Compressed Memory](https://lbsite.org/wp-content/uploads/2023/01/Uncheck-Turn-on-fast-startup.png)
6. Restart your PC and see if you’re able to Fix 100% Disk Usage by System and Compressed Memory Issue.
Método 4: deshabilitar el servicio Superfetch
1. Presione la tecla Windows + R y luego escriba services.msc y presiona Enter.

2. Encontrar SuperFetch servicio de la lista, luego haga clic derecho sobre él y seleccione Propiedades.

3. Under Service status, if the service is running, click on Detener.
4. Ahora, desde el Inicio tipo menú desplegable seleccione Discapacitado.

5. Haga clic en Aplicar, seguido de DE ACUERDO.
6. Reinicie su PC para guardar los cambios.
Si el método anterior no desactiva los servicios Superfetch, entonces puedes seguir deshabilite Superfetch usando el Registro:
1. Presione la tecla Windows + R y luego escriba regedit y presione Enter para abrir el Editor del Registro.

2. Navegue a la siguiente clave de registro:
HKEY_LOCAL_MACHINESYSTEMCurrentControlSetControlSession ManagerGestión de memoriaPrefetchParameters
3. Make sure you have selected Parámetros de captación previa luego en la ventana derecha haga doble clic en Activar Superfetch clave y change it’s value to 0 in the Value data field.

4. Click OK and close the Registry Editor.
5. Reinicie su PC para guardar los cambios y ver si puede Fix 100% Disk Usage by System and Compressed Memory Issue.
Method 5: Adjust your PC for Best Performance
1. Presione la tecla Windows + R y luego escriba sysdm.cpl y presione Enter para abrir Propiedades del sistema.
2. Cambiar a la Avanzado pestaña y luego haga clic en Ajustes bajo Rendimiento.
3. Under Visual Effects checkmark “Ajustar para obtener el mejor rendimiento".

4. Haga clic en Aplicar, seguido de DE ACUERDO.
5. Reinicie su PC y vea si puede Fix 100% Disk Usage by System and Compressed Memory Issue.
Method 6: Kill the Speech Runtime Executable Process
1. Prensa Ctrl + Shift + Esc para iniciar el Administrador de tareas.
2. En el Pestaña Procesos, busca Speech Runtime Executable.
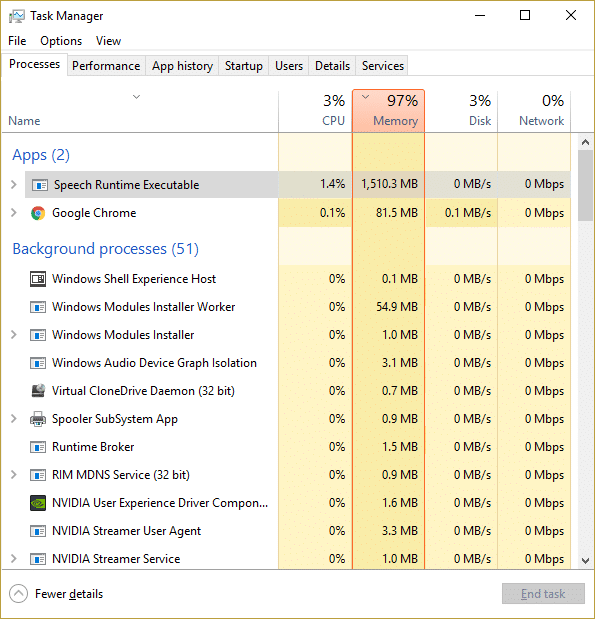
3. Haga clic derecho sobre él y seleccione Tarea final.
Método 7: ejecutar CCleaner y Malwarebytes
1. Descargar e instalar Ccleaner Y Malwarebytes.
2. Ejecute Malwarebytes y deje que escanee su sistema en busca de archivos dañinos. Si se encuentra malware, lo eliminará automáticamente.

3. Ahora ejecute CCleaner y seleccione Limpieza personalizada.
4. En Limpieza personalizada, seleccione el Pestaña de Windows y marque los valores predeterminados y haga clic Analizar.
![Select Custom Clean then checkmark default in Windows tab | [SOLVED] 100% Disk Usage by System and Compressed Memory](https://lbsite.org/wp-content/uploads/2023/01/Select-Custom-Clean-then-checkmark-default-in-Windows-tab.png)
5. Una vez que se complete el Análisis, asegúrese de eliminar los archivos que desea eliminar.

6. Finalmente, haga clic en el Run Cleaner y deje que CCleaner siga su curso.
7. Para limpiar aún más su sistema, seleccione la pestaña Registroy asegúrese de que se compruebe lo siguiente:

8. Haga clic en el Escanear en busca de problemas y permita que CCleaner escanee, luego haga clic en el Arregla los problemas seleccionados del botón.
![Once scan for issues is completed click on Fix selected Issues | [SOLVED] 100% Disk Usage by System and Compressed Memory](https://lbsite.org/wp-content/uploads/2023/01/Once-scan-for-issues-is-completed-click-on-Fix-selected-Issues.png)
9. Cuando CCleaner pregunta "¿Quieres hacer una copia de seguridad de los cambios en el registro?" seleccione Sí.
10. Una vez que se haya completado la copia de seguridad, haga clic en el Solucionar todos los problemas seleccionados del botón.
11. Reinicie su PC para guardar los cambios.
Method 8: Change configuration of Google Chrome and Skype
Para Google Chrome: Navigate to the following under Chrome: Settings > Show Advanced Settings > Privacy > Use a prediction service to load pages more quickly. Disable the toggle next to “Use a prediction service to load pages.”

Change configuration For Skype
1. Make sure you have exited Skype, if not end task from Task Manager for Skype.
2. Press Windows Key + R then type the following and click OK:
C:Program Files (x86)SkypePhone
3. Haga clic derecho en Skype.exe y seleccionar Propiedades.

4. Cambiar a Pestaña de seguridad y haga clic Editar.

5. Seleccionar TODOS LOS PAQUETES DE APLICACIÓN under Group or user names then checkmark Write bajo Permitir.

6. Click Apply, followed by OK and see if you’re able to Fix 100% Disk Usage by System and Compressed Memory Issue.
Method 9: Set Correct Permission for System and Compressed Memory Process
1. Presione la tecla Windows + R y luego escriba Taskschd.msc and hit Enter to open Task Scheduler.

2. Navegue a la siguiente ruta:
Task Scheduler Library > Microsoft > Windows > MemoryDiagnostic
![Double click on ProcessMemoryDiagnostic Events | [SOLVED] 100% Disk Usage by System and Compressed Memory](https://lbsite.org/wp-content/uploads/2023/02/Double-click-on-ProcessMemoryDiagnostic-Events.png)
3. Haga doble clic en ProcessMemoryDiagnostic Events y haga clic en Cambiar usuario o grupo under Security Options.

4. Hacer clic en Avanzado y haga clic en Encuentra ahora.

5. Selecciona tu Cuenta de administrador from the list then click OK.

6. Otra vez haga clic en Aceptar to add your administrator account.
7. Marca de verificación MÁS ALTO ejecución con privilegios y luego haz clic en OK.

8. Follow the same steps for RunFullMemoryDiagnostic and close everything.
9. Reinicie su PC para guardar los cambios.
Method 10: Disable System and Compressed Memory Process
1. Presione la tecla Windows + R y luego escriba Taskschd.msc y presione Enter para abrir Programador de tareas.
2. Navegue a la siguiente ruta:
Task Scheduler Library > Microsoft > Windows > MemoryDiagnostic
3. Haga clic derecho en RunFullMemoryDiagnostic y seleccionar Inhabilitar.
![Right-click on RunFullMemoryDiagnostic and select Disable | [SOLVED] 100% Disk Usage by System and Compressed Memory](https://lbsite.org/wp-content/uploads/2023/02/Right-click-on-RunFullMemoryDiagnostic-and-select-Disable.png)
4. Close Task Scheduler and restart your PC.
Recomendado:
Eso es todo lo que has logrado Fix 100% Disk Usage by System and Compressed Memory pero si todavía tienes alguna pregunta sobre esta publicación, no dudes en hacerla en la sección de comentarios.

