If you have 2 in 1 Windows device such as Tablets, you would be familiar with the importance of the screen rotation feature. Users report that the screen rotation feature has stopped working & the Screen Rotation Lock option is greyed out. If you’re facing this issue, then don’t worry as this is just a setting issue which means it can be easily fixed. This guide will walk you through the steps to fix rotation lock greyed out in Windows 10.
Here are issues which can be resolved using this guide:
- Rotation lock missing
- Auto Rotate not working
- Rotation lock greyed out.
- Screen rotation not working
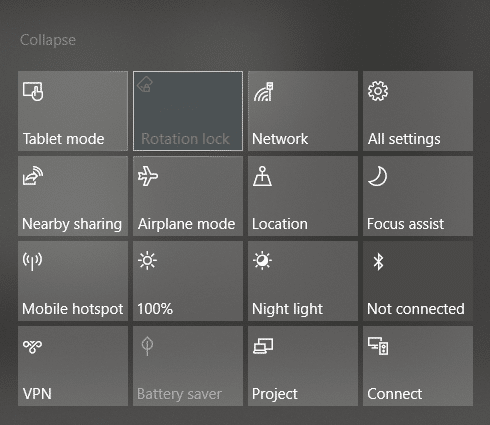
Fix Rotation Lock greyed out in Windows 10
Looge kindlasti taastepunkt juhuks, kui midagi läheb valesti.
Method – 1: Enable Portrait Mode
One of the methods to fix this problem is to rotate your screen in portrait mode. Once you rotate it to portrait mode, most probably your rotation lock would start working, i.e. clickable again. In case your device is not rotating into portrait mode automatically, try to do it manually.
1. press Windowsi klahv + I to open Settings then click on the süsteem ikoon.

2. Make sure to select Ekraan vasakpoolsest menüüst.
3. Leidke Orientation section where you need to choose Portree rippmenüüst.
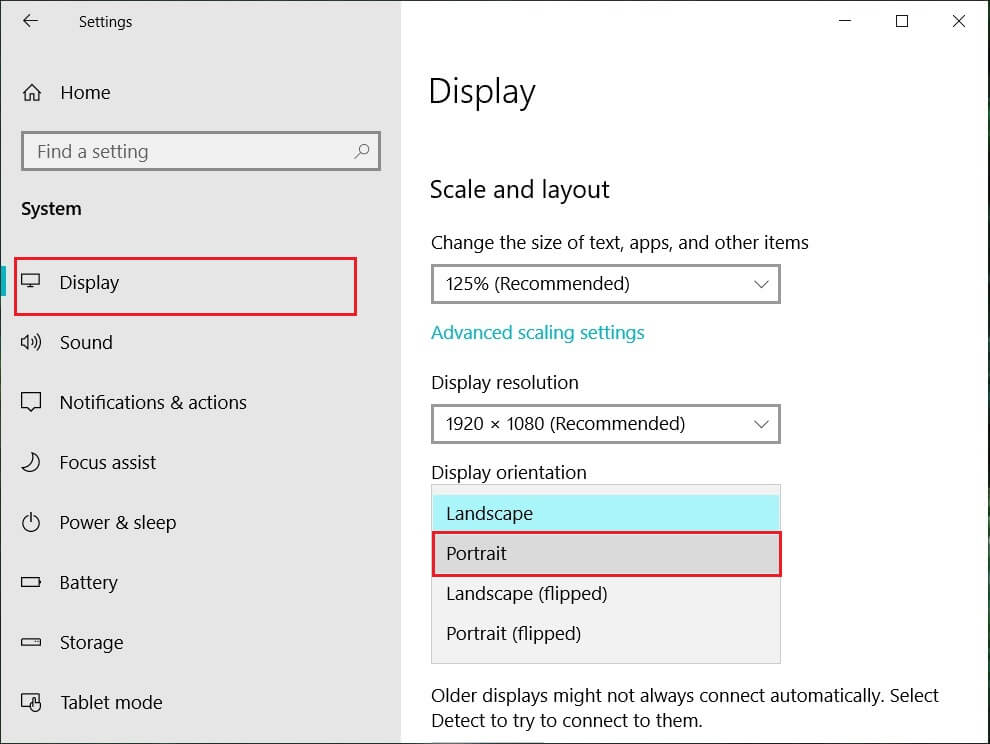
4. Your device will automatically turn into portrait mode.
Method – 2: Use your device in tent mode
Some users, particularly Dell Inspiron, experienced that when their rotation lock is greyed out, the only way to solve this problem is to put your device in Tent Mode.
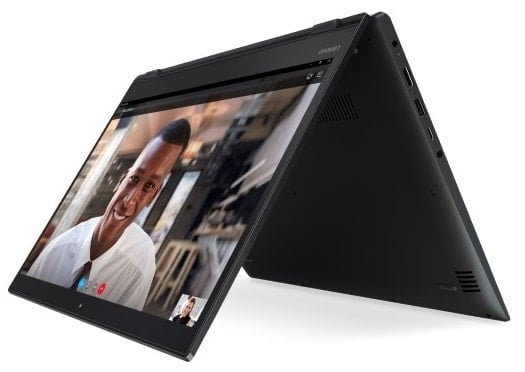
Image Credit: Microsoft
1. You need to put your device in Tent Mode. If your display is upside down, you need not worry.
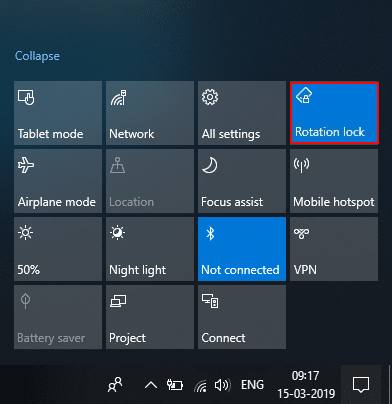
2. Nüüd klõpsake nuppu Windows Action Center, Pöörlemise lukk will be working. Here you need to turn it off if you want so that your device rotate properly.
Method – 3: Disconnect your keyboard
If rotation lock is greyed in your Dell XPS and Surface Pro 3 (2-in-1 device), you need to disconnect your keyboard, and many users reported that disconnecting the keyboard solves the rotation lock problem. If you own different devices, you can still use this method to fix rotation lock greyed out in Windows 10 issue.
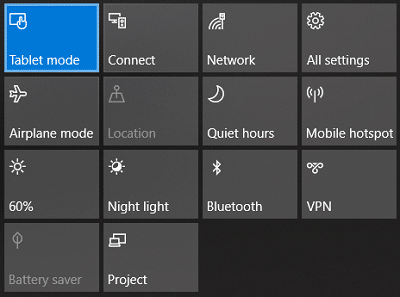
Method – 4: Switch to Tablet Mode
Many users experienced that this rotation greyed out the problem by switching their device into Tablet Mode. If it is switched automatically, it is good; otherwise, you can do it manually.
1. Klõpsake nupul Windowsi tegevuskeskus.
2. Here, you will find Tahvelarvuti režiim option, Click on It.
OR
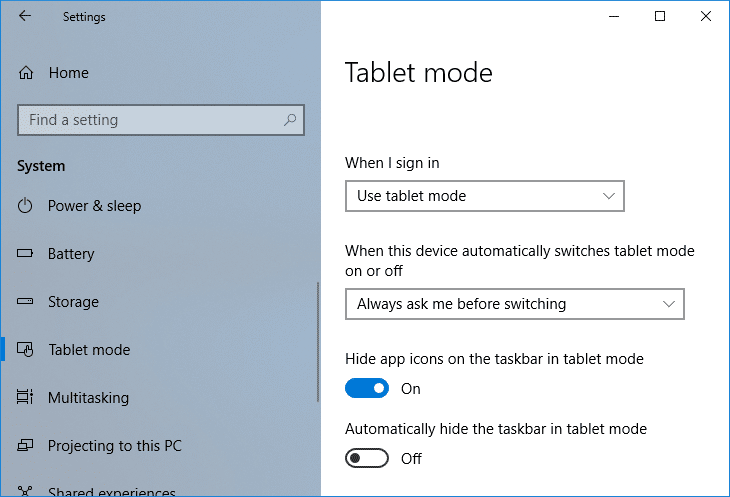
1. Avamiseks vajutage klahvikombinatsiooni Windows Key + I Seaded siis klõpsake süsteem ikoon.
2. Here it would help if you located Tahvelarvuti režiim option under the left window pane.
3. Now from the “When I sign in” drop-down, select “Kasutage tahvelarvuti režiimi".
Method – 5: Change LastOrientation Registry Value
If you still experience a problem, you can solve it by changing some registry values.
1. Press Windows +R and enter regedit siis vajuta Enter.

2. Once registry editor opens, you need to navigate to the below path:
HKEY_LOCAL_MACHINESOFTWAREMicrosoftWindowsCurrentVersionAutoRotation
Märge: Follow the above folders one by one to locate Auto Rotation.
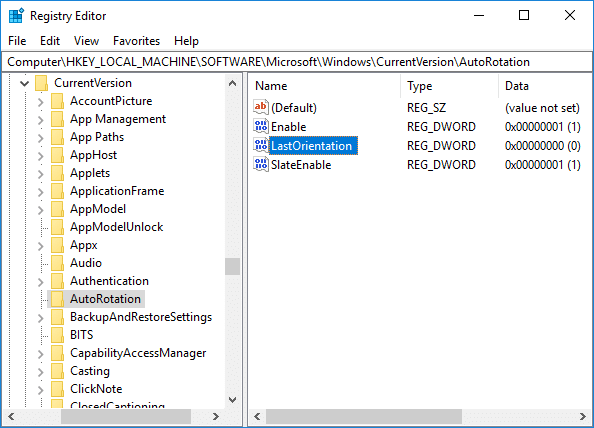
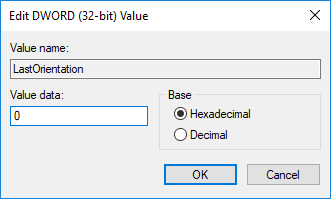
3. Kindlasti select AutoRotation seejärel topeltklõpsake paremal aknapaanil Last Orientation DWORD.
4. Now enter 0 under Value data field ja klõpsake nuppu OK.
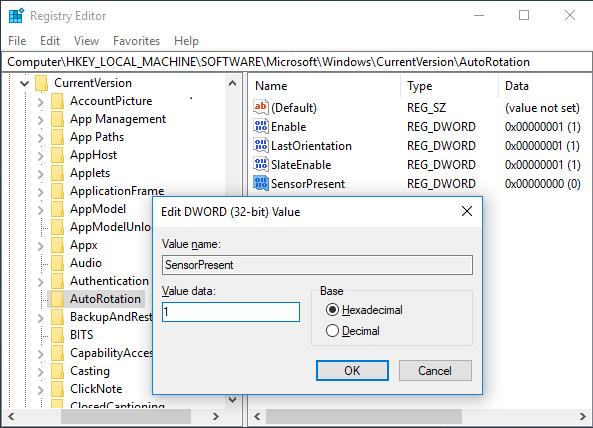
5. Kui on SensorPresent DWORD, double-click on it and set its väärtus 1-ni.
Method – 6: Check Sensor Monitoring Service
Sometimes services of your device can cause a rotation lock problem. Therefore, we can get it sorted with Windows Monitoring services feature.
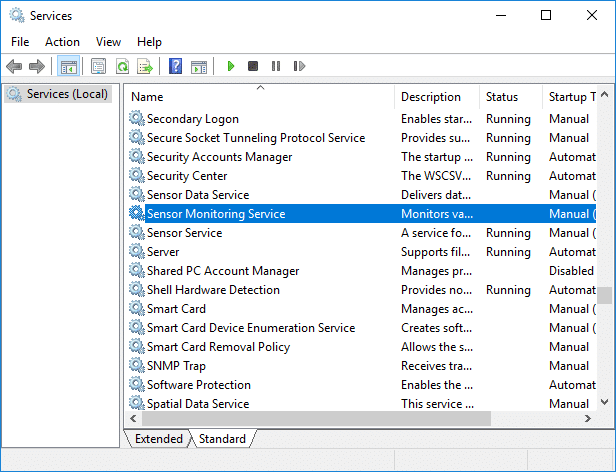
1. Vajutage Windows + R ja tippige services.msc ja vajuta Enter.

2. Once the services window opens, find the Sensor Monitoring services option ja topeltklõpsake seda.
3. Now, from the Startup type drop-down select Automaatne ja siis klõpsa Start-nupp to start the service.
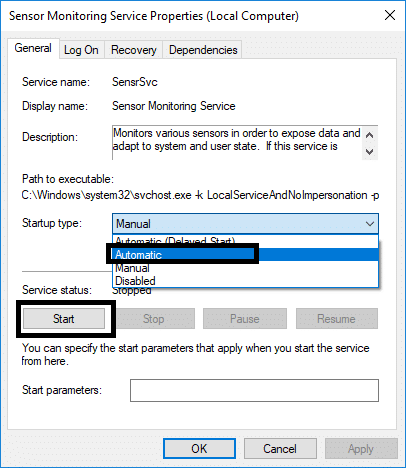
4. Finally, click Apply followed by OK to save the settings, and you can reboot the system to apply the changes.
Method – 7: Disable YMC service
If you are using a Lenovo Yoga device and experiencing this problem, you can fix rotation lock grayed out in the Windows 10 issue by disabling YMC service.
1. Windows + R type services.msc ja vajuta Enter.
2. Otsige üles YMC services ja topeltklõpsake seda.
3. Set the Startup type to invaliidistunud and click Apply, followed by OK.
Method – 8: Update Display Drivers
One reason for this problem could be the driver update. If your respective driver for the monitor is not updated, it can cause the Rotation Lock greyed out in Windows 10 Issue.
Värskendage graafikadraivereid käsitsi seadmehalduri abil
1. Vajutage Windowsi klahvi + R ja seejärel tippige käsk devmgmt.msc ja avamiseks vajutage sisestusklahvi Seadmehaldus.

2. Järgmisena laiendage Ekraani adapterid ja paremklõpsake oma graafikakaardil ja valige Luba

3. Kui olete seda uuesti teinud, paremklõpsake oma graafikakaardil ja valige "Update Driver".

4. Valige „Värskendatud draiveritarkvara saab automaatselt otsida” ja laske sellel protsess lõpule viia.

5. If the above steps helped fix the issue then very good, if not then continue.
6. Paremklõpsake uuesti oma graafikakaardil ja valige "Update Driver", kuid seekord valige järgmisel ekraanil "Sirvige arvutit draiveri tarkvara jaoks."

7. Nüüd valige "Lubage mul valida arvutis saadaolevate draiverite loendist. "

8. Lõpuks valige uusim draiver loendist ja klõpsake nuppu Järgmine.
9. Laske ülaltoodud protsessil lõppeda ja muudatuste salvestamiseks taaskäivitage arvuti.
Järgige samu samme integreeritud graafikakaardi (antud juhul Intel) puhul, et värskendada selle draivereid. Vaata, kas suudad Fix Rotation Lock greyed out Issue, kui mitte, siis jätkake järgmise sammuga.
Värskendage graafikadraivereid automaatselt tootja veebisaidilt
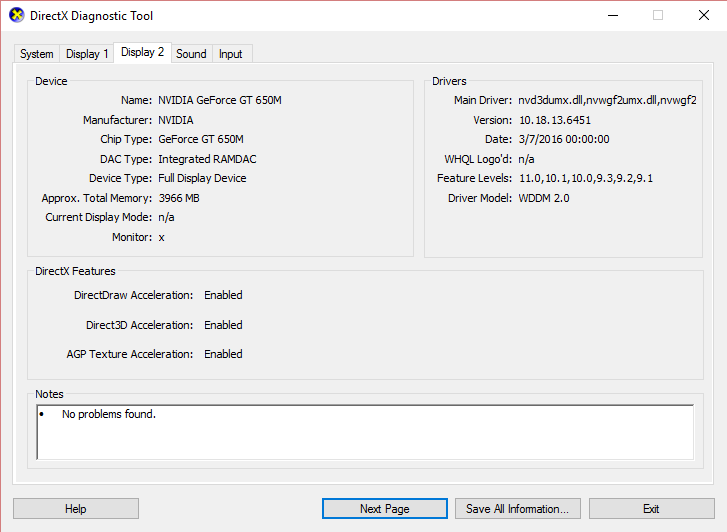
1. Vajutage Windowsi klahvi + R ja tippige dialoogiboksi "dxdiag” ja vajuta sisestusklahvi.

2. Pärast seda otsige ekraani vahekaarti (seal on kaks kuvakaarti, millest üks on integreeritud graafikakaardi jaoks ja teine on Nvidia oma) klõpsake vahekaardil Display ja leidke oma graafikakaart.
3. Nüüd minge Nvidia draiveri juurde veebisaidi allalaadimine ja sisestage toote üksikasjad, mille saame teada.
4. Otsige pärast teabe sisestamist oma draiverid, klõpsake nuppu Nõustun ja laadige draiverid alla.

5. Pärast edukat allalaadimist installige draiver ja olete edukalt oma Nvidia draivereid käsitsi värskendanud.
Method – 9: Remove Intel Virtual Buttons Driver
Some users reported that Intel Virtual button drivers cause rotation lock problem on your device. To solve this problem, you can uninstall the driver.
1. Open Device manager on your device by pressing Windows + R and type käsk devmgmt.msc and hit Enter or press Windows X and choose Device Manager from the options list.
2. Once Device manager box is opened locate Intel virtual buttons driver.
3. Right-click on it and choose Desinstalli.
Soovitan:
Loodan, et see artikkel oli kasulik ja nüüd saate seda hõlpsalt teha Fix Rotation Lock greyed out in Windows 10, but if you still have any questions regarding this tutorial then feel free to ask them in the comment’s section.
")
