Process and Compressed Memory is a Windows 10 feature responsible for memory compression (also referred to as RAM compression and memory compression). This feature basically utilizes data compression to reduce the size or number of paging request to and from the auxiliary storage. In short, this feature is designed to take less amount of disk space and memory but in this case the System and Compressed Memory process start using 100% Disk and Memory, causing the affected PC to become slow.

In Windows 10, a compressions store is added to the concept of Memory Manager, which is an in-memory collection of compressed pages. So whenever the memory starts to fill up, the System and Compressed Memory process will compress the unused pages instead of writing them to the disk. The benefit of this is the amount of memory used per process is reduced, which allows Windows 10 to maintain more programs or apps in physical memory.
The problem appears to be incorrect Virtual Memory settings. Someone changed the paging file size from automatic to a particular value, virus or malware, Google Chrome or Skype, corrupt system files etc. So without wasting any time let’s see how to actually Fix 100% Disk Usage by System and Compressed Memory with the help of below-listed troubleshooting guide.
[SOLVED] 100% Disk Usage by System and Compressed Memory
Ziurtatu leheneratzeko puntu bat sortzen duzula, zerbait gaizki aterako balitz.
1. metodoa: Konpondu sistema hondatutako fitxategiak
1. Ireki komando-gonbita. Erabiltzaileak urrats hau egin dezake bilatuz 'cmd' eta sakatu Sartu.

2. Orain idatzi hau cmd-en eta sakatu Sartu:
Sfc /scannow sfc /scannow /offbootdir=c: /offwindir=c:windows (Goian huts egiten badu, saiatu hau)
![SFC scan now command prompt | [SOLVED] 100% Disk Usage by System and Compressed Memory](https://lbsite.org/wp-content/uploads/2023/01/SFC-scan-now-command-prompt.png)
3. Wait for the above process to finish and once done, restart your PC.
4. Again open cmd and type the following command and hit enter after each one:
Dism /Online /Cleanup-Image /CheckHealth Dism /Online /Cleanup-Image /ScanHealth Dism /Online /Cleanup-Image /RestoreHealth

5. Utzi DISM komandoa exekutatzen eta itxaron amaitu arte.
6. Goiko komandoak ez badu funtzionatzen, saiatu behean:
Dism /Image:C:offline /Cleanup-Image /RestoreHealth /Source:c:testmountwindows Dism /Online /Cleanup-Image /RestoreHealth /Source:c:testmountwindows /LimitAccess
Ohar: Ordeztu C:RepairSourceWindows zure konponketa iturriarekin (Windows Instalazio edo Berreskuratze Disko).
7. Reboot your PC to save changes and see if you’re able to Fix 100% Disk Usage by System and Compressed Memory Issue.
Method 2: Set Correct Paging File Size
1. Sakatu Windows tekla + R eta ondoren idatzi sysdm.cpl eta sakatu Sartu irekitzeko System Properties.

2. Aldatu Aurreratua fitxa eta egin klik gainean Errendimenduan ezarpenak.

3. Again switch to the Advanced tab and click Change under Virtual Memory.

4. Checkmark “Kudeatu automatikoki iragazteko fitxategien tamaina unitate guztientzat."
![Checkmark Automatically manage paging file size for all drives | [SOLVED] 100% Disk Usage by System and Compressed Memory](https://lbsite.org/wp-content/uploads/2023/02/Checkmark-Automatically-manage-paging-file-size-for-all-drives.png)
5. Click OK, then click Apply followed by OK.
6. Select Yes to Restart your PC to save changes.
3. metodoa: desgaitu abiarazte azkarra
1. Sakatu Windows tekla + R, ondoren idatzi kontrola eta sakatu Sartu irekitzeko Kontrol-panela.

2. Egin klik Hardware eta Soinua ondoren egin klik Power Aukerak.

3. Ondoren, ezkerreko leiho-paneletik hautatu "Aukeratu botoi botoiak zer egin."

4. Orain egin klik "Unean erabilgarri ez dauden ezarpenak aldatu."

5. Desmarkatu "Abiarazte azkarra aktibatu”Eta egin klik gainean Aldaketak gorde.
![Uncheck Turn on fast startup | [SOLVED] 100% Disk Usage by System and Compressed Memory](https://lbsite.org/wp-content/uploads/2023/01/Uncheck-Turn-on-fast-startup.png)
6. Restart your PC and see if you’re able to Fix 100% Disk Usage by System and Compressed Memory Issue.
Method 4: Disable Superfetch Service
1. Sakatu Windows tekla + R eta ondoren idatzi services.msc eta sakatu Sartu.

2. Aurkitu Super eskuratzea service from the list then right-click on it and select Propietateak.

3. Under Service status, if the service is running, click on Gelditu.
4. Now, from the Startup type drop-down select Desgaituta.

5. Sakatu Aplikatu, eta ondoren Ados.
6. Berrabiarazi ordenagailua aldaketak gordetzeko.
If the above method doesn’t disable Superfetch services then you can follow disable Superfetch using Registry:
1. Sakatu Windows tekla + R eta ondoren idatzi regedit eta sakatu Sartu Erregistro-editorea irekitzeko.

2. Nabigatu erregistro-gako honetara:
HKEY_LOCAL_MACHINESYSTEMCcurrentControlSetControlSaio-kudeatzaileaMemoriaren kudeaketaPrefetchParameters
3. Make sure you have selected Aurrez jaso parametroak gero eskuineko leihoan klik bikoitza gainean GaituSuperfetch gakoa eta change it’s value to 0 in the Value data field.

4. Click OK and close the Registry Editor.
5. Restart your PC to save changes and see if you’re able to Fix 100% Disk Usage by System and Compressed Memory Issue.
Method 5: Adjust your PC for Best Performance
1. Sakatu Windows tekla + R eta ondoren idatzi sysdm.cpl eta sakatu Sartu irekitzeko System Properties.
2. Aldatu Aurreratua fitxa eta gero egin klik Ezarpenak pean Performance.
3. Under Visual Effects checkmark “Egokitu errendimendu onena lortzeko".

4. Sakatu Aplikatu, eta ondoren Ados.
5. Reboot your PC and see if you’re able to Fix 100% Disk Usage by System and Compressed Memory Issue.
Method 6: Kill the Speech Runtime Executable Process
1. Prentsa Ktrl + Maius + Esc Task Manager abiarazteko.
2. In the Prozesuen fitxaaurkitu Speech Runtime Executable.
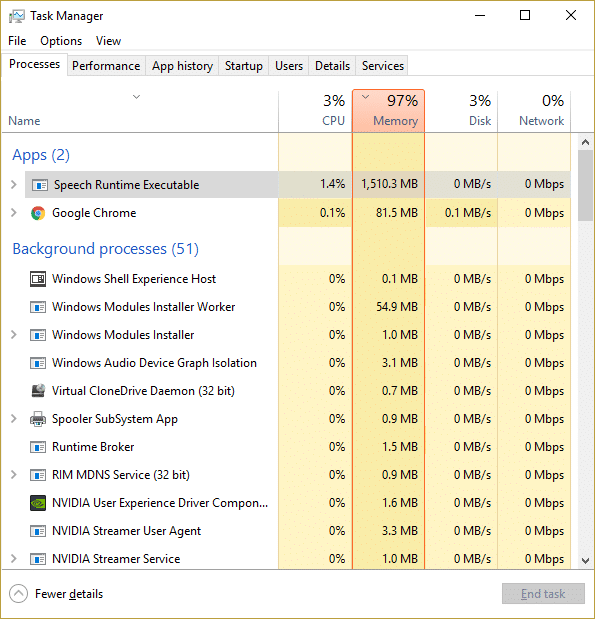
3. Egin klik eskuineko botoiarekin eta hautatu Amaitu zeregina.
7. metodoa: Exekutatu CCleaner eta Malwarebytes
1. Deskargatu eta instalatu CCleaner & Malwarebytes.
2. Exekutatu Malwarebytes eta utzi zure sistema eskaneatzen fitxategi kaltegarrien bila. Malwarea aurkitzen bada, automatikoki kenduko ditu.

3. Orain exekutatu CCleaner eta hautatu Garbiketa pertsonalizatua.
4. Garbiketa pertsonalizatua atalean, hautatu Windows fitxa eta marka lehenetsiak eta egin klik Aztertzea.
![Select Custom Clean then checkmark default in Windows tab | [SOLVED] 100% Disk Usage by System and Compressed Memory](https://lbsite.org/wp-content/uploads/2023/01/Select-Custom-Clean-then-checkmark-default-in-Windows-tab.png)
5. Azterketa amaitutakoan, ziurtatu ezabatu beharreko fitxategiak kenduko dituzula ziur.

6. Azkenean, egin klik Exekutatu Cleaner botoia eta utzi CCleaner-ek bere ibilbidea egiten.
7. Zure sistema gehiago garbitzeko, hautatu Erregistroa fitxa, eta ziurtatu honako hauek egiaztatuta daudela:

8. Egin klik gainean Bilatu arazoak bilatzeko botoia eta baimendu CCleaner-i eskaneatzea, eta egin klik botoian Konpondu Hautatutako Arazoak botoia.
![Once scan for issues is completed click on Fix selected Issues | [SOLVED] 100% Disk Usage by System and Compressed Memory](https://lbsite.org/wp-content/uploads/2023/01/Once-scan-for-issues-is-completed-click-on-Fix-selected-Issues.png)
9. CCleaner-ek "Erregistroan babeskopiak egin nahi dituzu?" hautatu Bai.
10. Zure babeskopia amaitutakoan, egin klik botoian Konpondu Hautatutako Arazo guztiak botoia.
11. Berrabiarazi ordenagailua aldaketak gordetzeko.
Method 8: Change configuration of Google Chrome and Skype
Google Chrome-rako: Navigate to the following under Chrome: Settings > Show Advanced Settings > Privacy > Use a prediction service to load pages more quickly. Disable the toggle next to “Use a prediction service to load pages.”

Change configuration For Skype
1. Make sure you have exited Skype, if not end task from Task Manager for Skype.
2. Press Windows Key + R then type the following and click OK:
C:Program Files (x86)SkypePhone
3. Egin klik eskuineko botoiaz gainean skype.exe eta hautatu Propietateak.

4. Aldatu hona Segurtasun fitxa eta sakatu Editatu.

5. Aukeratu ALL APPLICATION PACKAGES under Group or user names then checkmark Write pean Onartu.

6. Click Apply, followed by OK and see if you’re able to Fix 100% Disk Usage by System and Compressed Memory Issue.
Method 9: Set Correct Permission for System and Compressed Memory Process
1. Sakatu Windows tekla + R eta ondoren idatzi Taskschd.msc and hit Enter to open Task Scheduler.

2. Nabigatu bide honetara:
Task Scheduler Library > Microsoft > Windows > MemoryDiagnostic
![Double click on ProcessMemoryDiagnostic Events | [SOLVED] 100% Disk Usage by System and Compressed Memory](https://lbsite.org/wp-content/uploads/2023/02/Double-click-on-ProcessMemoryDiagnostic-Events.png)
3. Egin klik bikoitza gainean ProcessMemoryDiagnostic Events eta egin klik Aldatu erabiltzailea edo taldea under Security Options.

4. klik Aurreratua eta egin klik Find Now.

5. Aukeratu zure Administratzaile kontua from the list then click OK.

6. Berriz Egin klik Ados botoian to add your administrator account.
7. Checkmark Exekutatu pribilegio altuekin eta egin klik Ados botoian.

8. Follow the same steps for RunFullMemoryDiagnostic and close everything.
9. Berrabiarazi ordenagailua aldaketak gordetzeko.
Method 10: Disable System and Compressed Memory Process
1. Sakatu Windows tekla + R eta ondoren idatzi Taskschd.msc eta sakatu Sartu irekitzeko Zereginen programatzailea.
2. Nabigatu bide honetara:
Task Scheduler Library > Microsoft > Windows > MemoryDiagnostic
3. Egin klik eskuineko botoiaz gainean ExekutatuFullMemoryDiagnostic eta hautatu Desgaitu.
![Right-click on RunFullMemoryDiagnostic and select Disable | [SOLVED] 100% Disk Usage by System and Compressed Memory](https://lbsite.org/wp-content/uploads/2023/02/Right-click-on-RunFullMemoryDiagnostic-and-select-Disable.png)
4. Close Task Scheduler and restart your PC.
Gomendatzen da:
Hori da arrakastaz lortu duzuna Fix 100% Disk Usage by System and Compressed Memory baina oraindik argitalpen honi buruzko galderarik baduzu, galdetu lasai iruzkinen atalean.

