Fix Desktop Icons keep getting rearranged after Windows 10 Creators Update: After installing the latest Windows 10 Creators Update users are complaining about a new strange issue where the desktop icons keep getting rearranged automatically. Every time the user hits refresh the desktop icons arrangement is changed or messed up. In short whatever you do from saving a new file on the desktop, to rearranging icons on the desktop, to renaming files or shortcuts on the desktop affects the icon arrangement in some way or other.
![]()
In some cases, in addition to above issues, users are also complaining about the icon spacing issue as before the update the space between icons was different and after the Creators Update, the icon spacing is also messed up. Below is the official Windows announcement of a new feature being introduced in Creators Update called Desktop Icon Placement Improvements:
Windows now more intelligently rearranges and scales desktop icons when you switch between different monitors and scaling settings, seeking to preserve your custom icon layout rather than scrambling them.
Now the main issue about this feature is you can’t disable it and this time Microsoft has really messed up by introducing this feature which is causing more harm than good. Anyway without wasting any more time let’s see how to actually Fix Desktop Icons keep getting rearranged after Windows 10 Creators Update with the below-listed troubleshooting guide.
Korjaa työpöydän kuvakkeet järjestyvät jatkuvasti uudelleen Windows 10 Creators -päivityksen jälkeen
Varmista luo palautuspiste vain siinä tapauksessa, että jokin menee pieleen.
Tapa 1: Vaihda kuvakenäkymää
1. Napsauta työpöytää hiiren kakkospainikkeella ja valitse sitten Näytä ja muuta näkymä valitusta näkymästä mihin tahansa muuhun. Jos esimerkiksi "Keskitaso" on valittuna, napsauta "Pieni".

2. Valitse nyt uudelleen sama näkymä, joka valittiin aiemmin, esimerkiksi valitsisimme Taas keskikokoinen.
3. Valitse seuraavaksi "Pieni” Näytä-vaihtoehdossa ja näet heti muutokset työpöydän kuvakkeessa.
![]()
4. Tämän jälkeen kuvake ei järjesty automaattisesti uudelleen.
Method 2: Enable Align icons to grid
1.Right-click on an empty space on the desktop then select View ja poista valinta Align icons to grid.
![]()
2.Now again from the view option enable Align icons to grid and see if you are able to fix the issue.
3. Jos ei, niin Näytä-vaihtoehdosta poista valinta kohdasta Automaattinen järjestele kuvakkeet ja kaikki järjestyy.
Tapa 3: Poista valinta Salli teemojen muuttaa työpöydän kuvakkeita
1.Press Windows Key + I to open Settings then click Personointi.
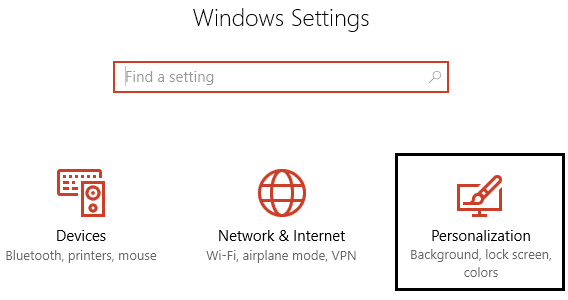
2. Valitse vasemmasta valikosta Teemat Ja napsauta sitten Työpöydän kuvakeasetukset.
![]()
3. Poista nyt työpöydän kuvakeasetukset -ikkunassa valinta "Salli teemojen vaihtaa työpöydän kuvakkeita" pohjalla.
![]()
4. Napsauta Käytä ja sitten OK.
5.Käynnistä tietokoneesi uudelleen tallentaaksesi muutokset ja katsoaksesi pystytkö siihen Fix Desktop Icons keep getting rearranged automatically issue.
Tapa 4: Poista kuvakevälimuisti
1.Make sure to save all the work which you are currently doing on your PC and close all the present applications or folder windows.
2. Avaa painamalla Ctrl + Shift + Esc yhdessä Task Manager.
3. Napsauta hiiren kakkospainikkeella Windows Explorer ja valitse Lopeta tehtävä.

4.Click filee napsauta Suorita uusi tehtävä.

5.Type cmd.exe arvokentässä ja napsauta OK.

6. Kirjoita nyt seuraava komento cmd:hen ja paina Enter jokaisen jälkeen:
CD /d %userprofile%AppDataLocal
DEL IconCache.db / a
EXIT
![]()
7. Kun kaikki komennot on suoritettu onnistuneesti, sulje komentokehote.
8. Avaa nyt uudelleen Tehtävienhallinta, jos olet sulkenut ja napsauta sitten Tiedosto > Suorita uusi tehtävä.
9. Kirjoita explorer.exe ja napsauta OK. Tämä käynnistää Windowsin Resurssienhallinnan uudelleen ja Fix Desktop Icons keep getting rearranged issue.

Method 5: Roll back to the previous Windows 10 build
1.First, go to the Login screen then click on virtapainike sitten pidä Shift painettuna ja napsauta sitten Käynnistä.
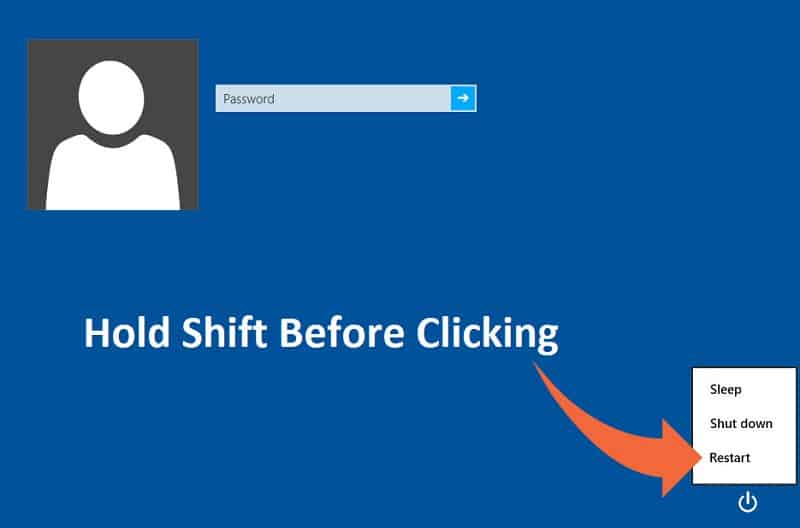
2.Make sure you don’t let go of the Shift button until you see the Palautuksen lisäasetukset -valikko.

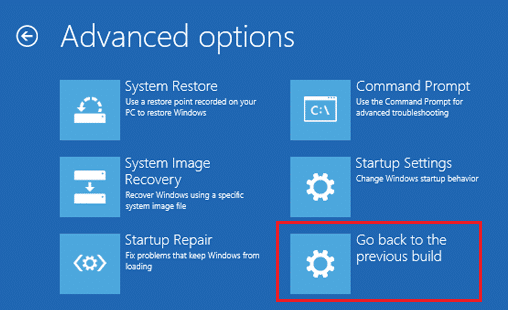
3.Now Navigate to the following in Advanced Recovery Options menu:
Vianmääritys > Lisäasetukset > Palaa edelliseen koontiversioon.
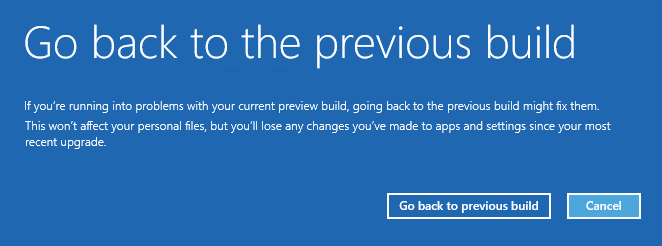
3.After a few seconds, you will be asked to choose your User Account. Click on the User Account, type in your password and click Continue. Once done, choose the option Go Back to the Previous Build again.
Suositeltu sinulle:
Siinä se onnistuu Korjaa työpöydän kuvakkeet järjestyvät jatkuvasti uudelleen Windows 10 Creators -päivityksen jälkeen mutta jos sinulla on vielä kysyttävää tästä oppaasta, voit kysyä niitä kommenttiosiossa.
![Fix WMI Provider Host High CPU Usage [Windows 10]](https://lbsite.org/wp-content/uploads/2023/02/Fix-WMI-Provider-Host-High-CPU-Usage-on-Windows-10.png "Fix WMI Provider Host High CPU Usage [Windows 10]")
