If you have 2 in 1 Windows device such as Tablets, you would be familiar with the importance of the screen rotation feature. Users report that the screen rotation feature has stopped working & the Screen Rotation Lock option is greyed out. If you’re facing this issue, then don’t worry as this is just a setting issue which means it can be easily fixed. This guide will walk you through the steps to fix rotation lock greyed out in Windows 10.
Here are issues which can be resolved using this guide:
- Rotation lock missing
- Auto Rotate not working
- Rotation lock greyed out.
- Screen rotation not working
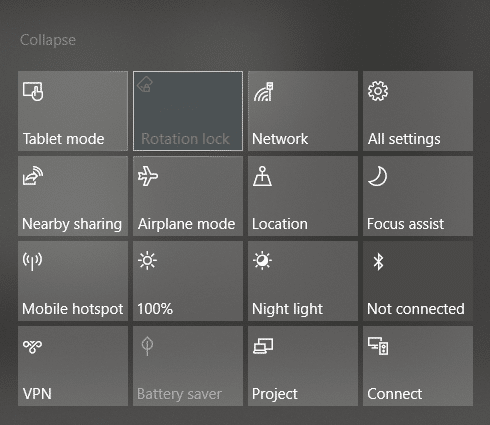
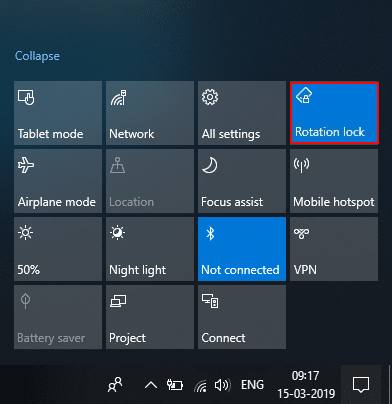
Fix Rotation Lock greyed out in Windows 10
Muista luoda palautuspiste siltä varalta, että jokin menee pieleen.
Method – 1: Enable Portrait Mode
One of the methods to fix this problem is to rotate your screen in portrait mode. Once you rotate it to portrait mode, most probably your rotation lock would start working, i.e. clickable again. In case your device is not rotating into portrait mode automatically, try to do it manually.
1. Lehdistö Windowsin avain + I to open Settings then click on the järjestelmä kuvaketta.

2. Make sure to select näyttö vasemmasta valikosta.
3. Etsi Orientation section where you need to choose Muotokuva Pudotusvalikosta.
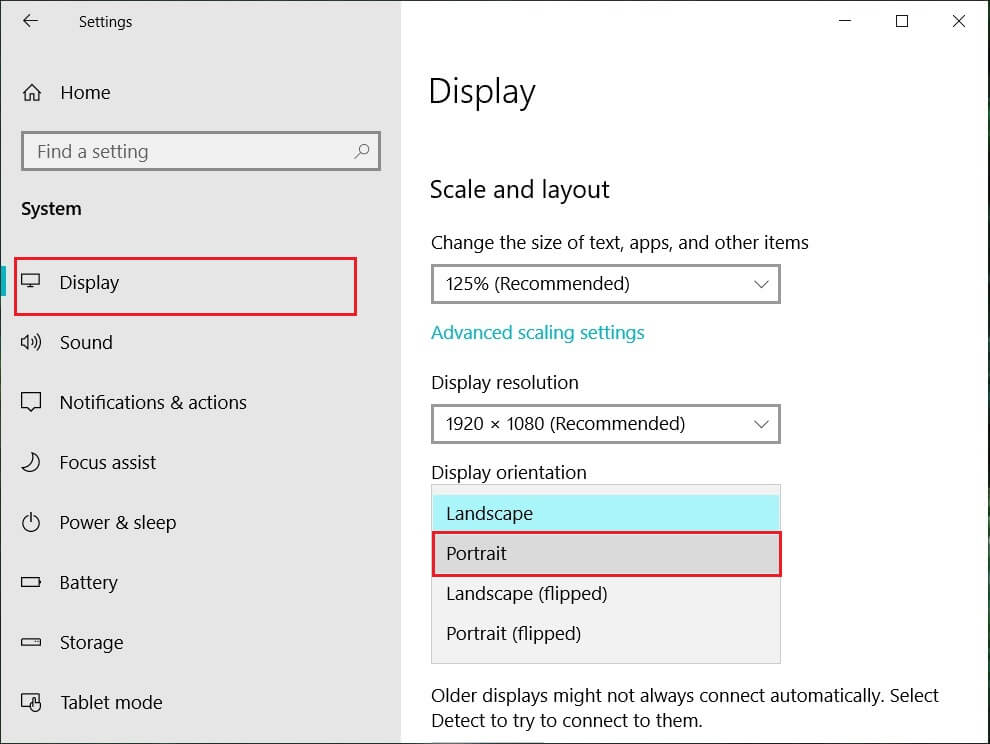
4. Your device will automatically turn into portrait mode.
Method – 2: Use your device in tent mode
Some users, particularly Dell Inspiron, experienced that when their rotation lock is greyed out, the only way to solve this problem is to put your device in Tent Mode.
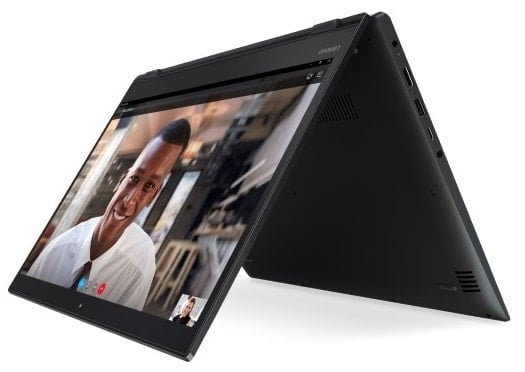
Kuva pistetilanne: Microsoft
1. You need to put your device in Tent Mode. If your display is upside down, you need not worry.
2. Napsauta nyt Windowsin toimintakeskus, Kääntölukko will be working. Here you need to turn it off if you want so that your device rotate properly.
Method – 3: Disconnect your keyboard
If rotation lock is greyed in your Dell XPS and Surface Pro 3 (2-in-1 device), you need to disconnect your keyboard, and many users reported that disconnecting the keyboard solves the rotation lock problem. If you own different devices, you can still use this method to fix rotation lock greyed out in Windows 10 issue.
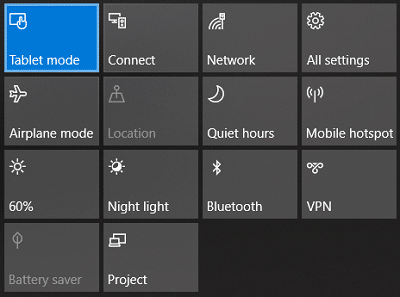
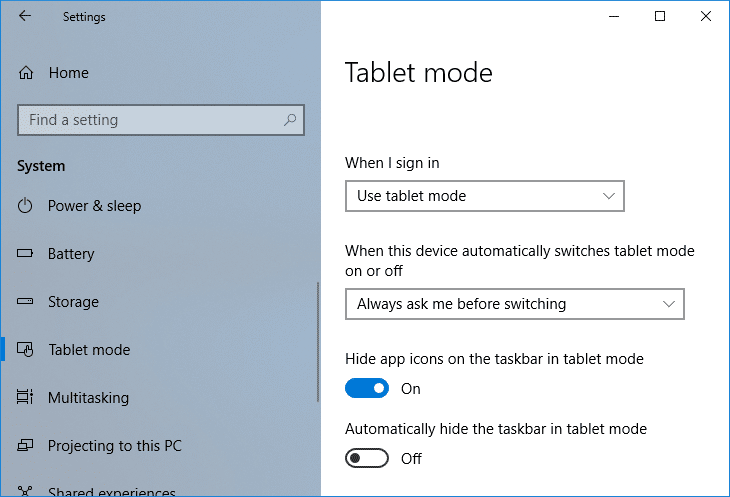
Method – 4: Switch to Tablet Mode
Many users experienced that this rotation greyed out the problem by switching their device into Tablet Mode. If it is switched automatically, it is good; otherwise, you can do it manually.
1. Klikkaa Windowsin toimintakeskus.
2. Täältä löydät Tabletitila option, Click on It.
OR
1. Avaa painamalla Windows Key + I Asetukset napsauta sitten järjestelmä kuvaketta.
2. Here it would help if you located Tabletitila option under the left window pane.
3. Now from the “Kun kirjaudun sisään” drop-down, select “Käytä tablet-tilaa".
Method – 5: Change LastOrientation Registry Value
If you still experience a problem, you can solve it by changing some registry values.
1. Press Windows +R and enter regedit sitten paina Enter.

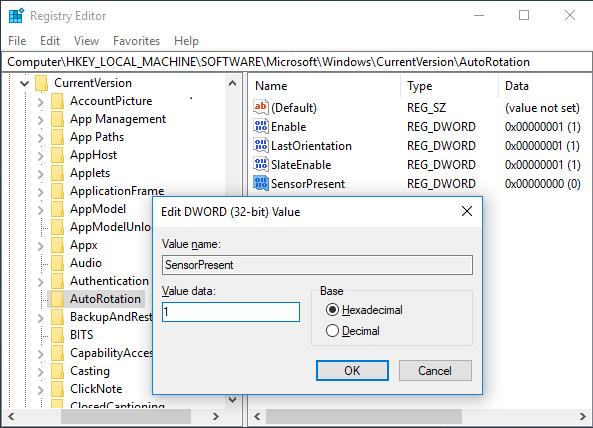
2. Once registry editor opens, you need to navigate to the below path:
HKEY_LOCAL_MACHINESOFTWAREMicrosoftWindowsCurrentVersionAutoRotation
Huomautus: Follow the above folders one by one to locate Auto Rotation.
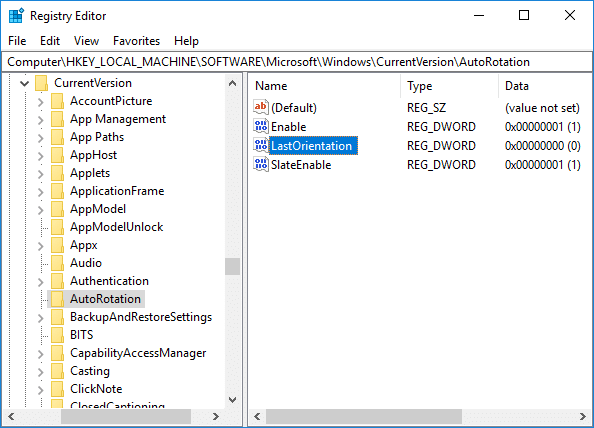
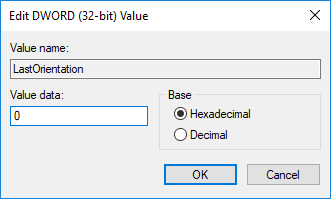
3. Varmista select AutoRotation kaksoisnapsauta sitten oikeanpuoleisessa ikkunaruudussa Last Orientation DWORD.
4. Anna nyt 0 under Value data field ja napsauta OK.
5. Jos on SensorPresent DWORD, double-click on it and set its arvoksi 1.
Method – 6: Check Sensor Monitoring Service
Sometimes services of your device can cause a rotation lock problem. Therefore, we can get it sorted with Windows Monitoring services feature.
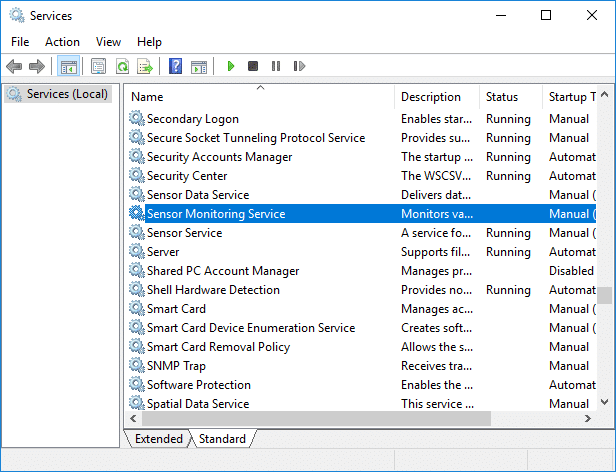
1. Paina Windows + R ja kirjoita services.msc ja paina Enter.

2. Once the services window opens, find the Sensor Monitoring services option ja kaksoisnapsauta sitä.
3. Now, from the Startup type drop-down select automaattisesti ja napsauta käynnistyspainike aloittaa palvelun.
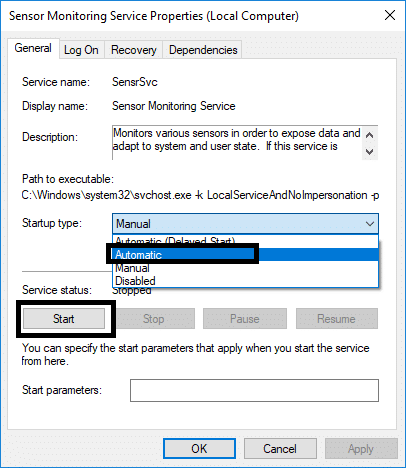
4. Finally, click Apply followed by OK to save the settings, and you can reboot the system to apply the changes.
Method – 7: Disable YMC service
If you are using a Lenovo Yoga device and experiencing this problem, you can fix rotation lock grayed out in the Windows 10 issue by disabling YMC service.
1. Windows + R type services.msc ja paina Enter.
2. Etsi YMC services ja kaksoisnapsauta sitä.
3. Aseta käynnistystyypiksi Vammaiset and click Apply, followed by OK.
Method – 8: Update Display Drivers
One reason for this problem could be the driver update. If your respective driver for the monitor is not updated, it can cause the Rotation Lock greyed out in Windows 10 Issue.
Manually Update Graphics Drivers using Device Manager
1. Paina Windows Key + R ja kirjoita devmgmt.msc ja paina Enter avataksesi Laitehallinta.

2. Laajenna seuraavaksi Näyttösovittimet and right-click on your Graphics Card and select Ota käyttöön.

3. Once you have done this again right-click on your graphics card and select “Päivitä ohjain".

4. Valitse ”Etsi automaattisesti päivitetty ohjainohjelmisto" ja anna sen päättää prosessi.

5. If the above steps helped fix the issue then very good, if not then continue.
6. Again right-click on your graphics card and select “Päivitä ohjain" mutta tällä kertaa seuraavalla näytöllä valitse "Selaa tietokonettani ohjainohjelmistoa varten."

7. Valitse nyt "Anna minun valita tietokoneen käytettävissä olevista ajureista"

8. Lopuksi valitse uusin ohjain luettelosta ja napsauta Seuraava.
9. Let the above process finish and restart your PC to save changes.
Follow the same steps for the integrated graphics card (Intel in this case) to update its drivers. See if you’re able to Fix Rotation Lock greyed out Issue, if not then continue with the next step.
Automatically Update Graphics Drivers from Manufacturer Website
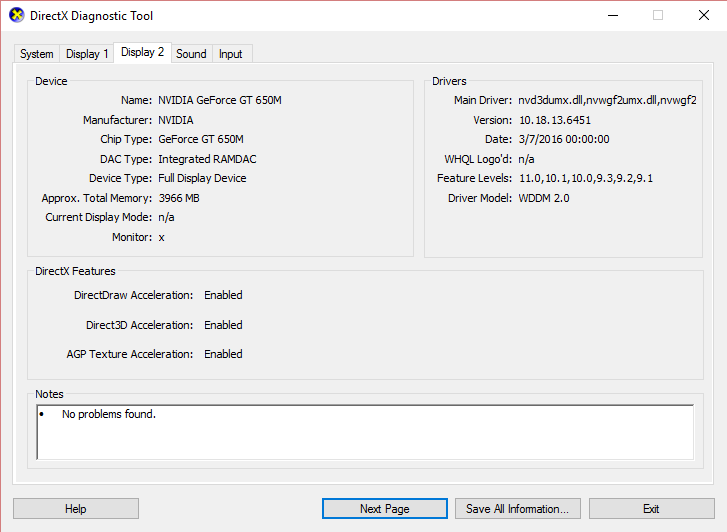
1. Press Windows Key + R and in the dialog box type “dxdiag” ja paina Enter.

2. After that search for the display tab (there will be two display tabs one for the integrated graphics card and another one will be of Nvidia’s) click on the Display tab and find out your graphics card.
3. Now go to the Nvidia driver Lataa verkkosivusto and enter the product details which we find out.
4. Search your drivers after inputting the information, click Agree and download the drivers.

5. After successful download, install the driver, and you have successfully updated your Nvidia drivers manually.
Method – 9: Remove Intel Virtual Buttons Driver
Some users reported that Intel Virtual button drivers cause rotation lock problem on your device. To solve this problem, you can uninstall the driver.
1. Open Device manager on your device by pressing Windows + R and type devmgmt.msc and hit Enter or press Windows X and choose Laitehallinta vaihtoehtoluettelosta.
2. Once Device manager box is opened locate Intel virtual buttons driver.
3. Napsauta sitä hiiren kakkospainikkeella ja valitse Uninstall.
Suositus:
Toivon, että tämä artikkeli oli hyödyllinen ja nyt voit helposti Fix Rotation Lock greyed out in Windows 10, but if you still have any questions regarding this tutorial then feel free to ask them in the comment’s section.
")
