Install Software Without Admin Rights
Trying to install new software, driver, or program, and you are unable to do so? Did your operating system ask for the Administrator’s permission and make you pause your installation? If the questions state your exact position, let go of your worry. You might be just a normal PC user, and the installation might require administrative privileges. This article will help you on how to install software or program without admin rights in Windows 10.

How to Install Software Without Admin Rights in Windows 10
Before getting to know the methods that can be adopted to solve the issue of installation without admin rights in Windows 10, it is important to have a clear understanding of the terms: drivers, programs, and software. This section attempts to give you an understanding of the same.
- In simple words, a program is a set of instructions written for the PC.
- Software is the compilation of programs.
- A driver is a program that communicates between software and the PC.
So, all three are interlinked with each other.
Below are listed methods of how to install software without admin rights. It is advisable to implement these methods only if you trust the source of the installation file.
Huomautus: Moreover, in order to do so, you will need to make changes for future installations using administrator account access only.
Method 1: Use Installation File and Command in Notepad
In this method, we will copy the installation file and command the PC to bypass the Run as Administrator command. The User Account Control or UAC prompt is skipped, making the installation process simple.
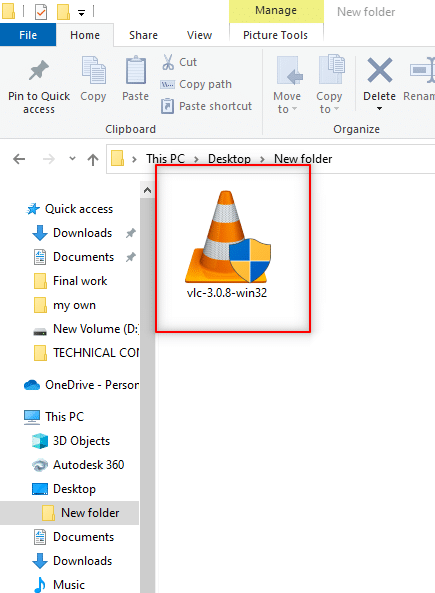
Huomautus: For explanatory purposes, VLC Media Player software is considered, and the files are placed in a Uusi kansio vuonna pöytä- folder. Also, this method may or may work on your system.
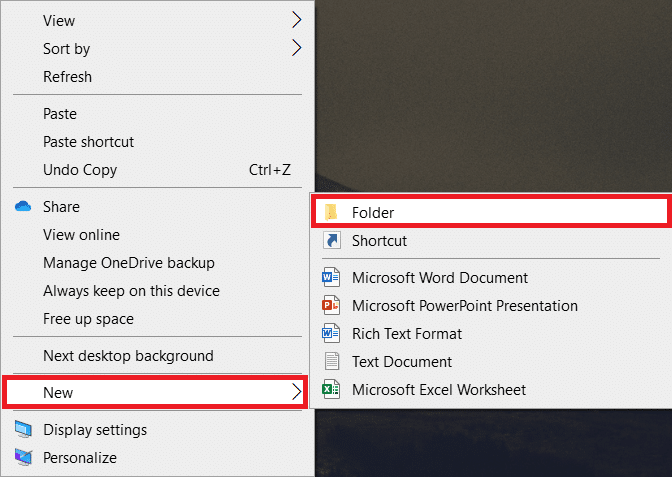
1. Napsauta hiiren kakkospainikkeella pöytä- ja valitse Uusi. Napsauta sitten Kansio.
2. Copy the installation file of VLC Media Player että Uusi kansio sinun pöytä-.
Huomautus: The file with the . Exe extension is the file that is used to install the software.
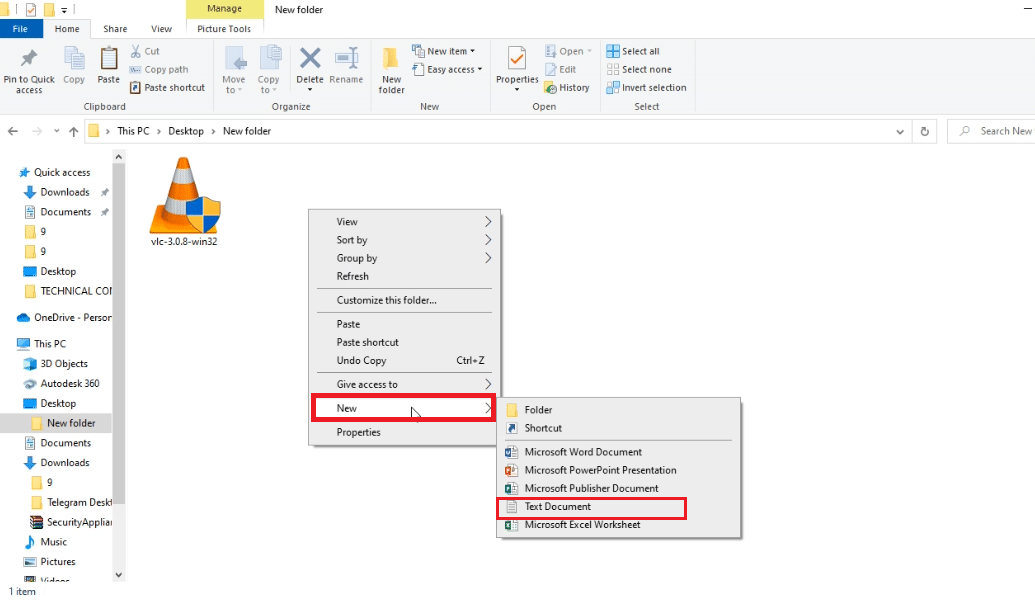
3. Vuonna Uusi kansio, napsauta hiiren kakkospainikkeella tyhjä alue, ja valitse Uusi pudotusvalikosta.
4. In the following menu, select tekstiasiakirja.
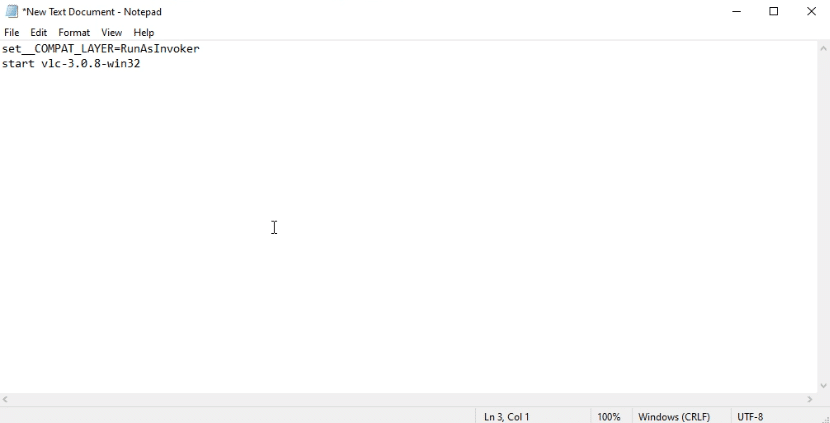
5. Open that muistilehtiö file, and enter the following command.
set _COMPAT_LAYER = RunAsInvoker
Start vlc-3.0.8-win32
Huomautus: Here, you have to replace vlc-3.0.8-win32 with the name of the software installer.
6. Lehdistö Ctrl + Shift + S keys samanaikaisesti avataksesi Tallenna nimellä -valintaikkuna.
7. Save the file in the format software_installer_name.bat file extension, that is, vlc-3.0.8-win32.bat.
8. valita Kaikki tiedostot avattavassa valikossa Asiakirjan tyyppi the file. Click on the Säästä -painiketta tiedoston tallentamiseksi.
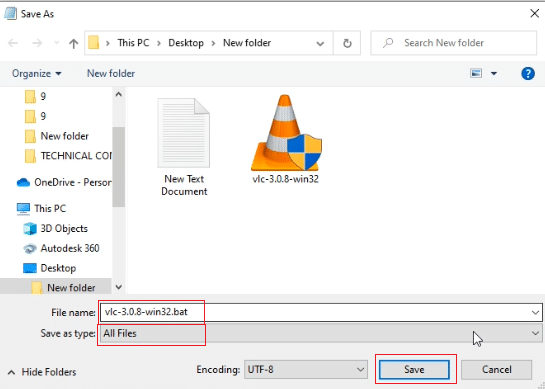
9. Kaksoisnapsauta kohtaa vlc-3.0.8-win32.bat file to install the software.
Why Does Installation Require Admin Rights?
Vaikka User Account Control or UAC prompts at every step of installation are frustrating, the reasons for requiring admin rights for installation could be:
- Security purposes: If there is no admin right for a software installation, anyone can install the malware on your PC. To prevent this action, it requires admin rights.
- Decision time: As the UAC prompts keeps appearing, the admin has the time required to decide on the installation of the particular software. He can reconsider his decision in installation.
- Safety for PC: Sometimes, the programs can disrupt your PC. To stop this, admin rights are required to ensure that the software installed doesn’t disrupt the PC.
How to Use Admin Account to Install Software
The process of how to install software without admin rights without bypassing the Administrator permissions can be tedious. We recommend to convert your own account as admin account or use current admin account to disable such restrictions. The same is explained in subsequent sections.
Method 1: Bypass UAC Prompts and Install Software
In this case, you can alter the UAC prompts and then install the software on your User account.
Step I: Set Password for Administrator Account
This method allows you to exclusively set a password for the Administrator so that you can bypass the UAC prompts and work as an Administrator.
Huomautus: This method may lead to loss of data in the PC, so it is advisable to use it after backing up all the PC data.
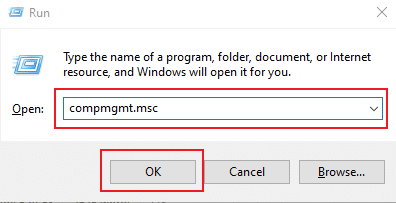
1. Avaa ajaa valintaikkuna painamalla Windows + R-näppäimet samanaikaisesti.
2. Tyyppi compmgmt.msc in the bar and click OK avaa tietokoneen hallinta ikkunassa.
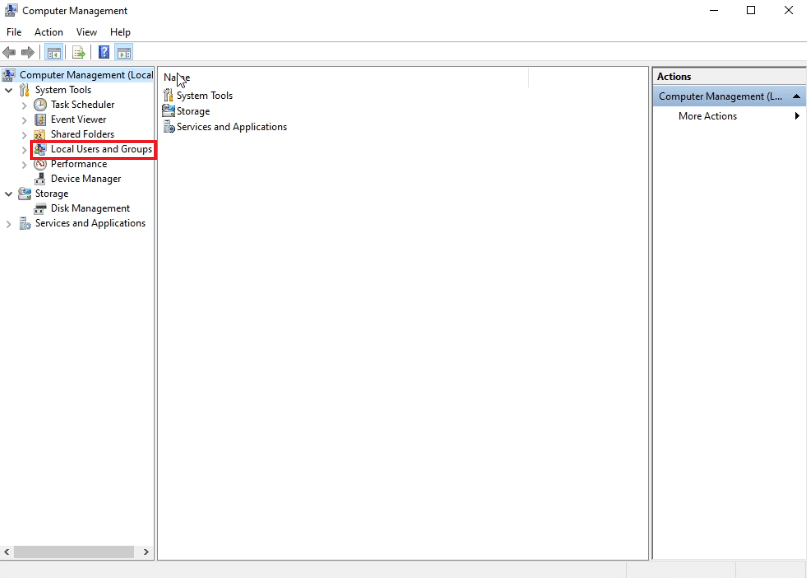
3. Laajenna Paikalliset käyttäjät ja ryhmät kansio.
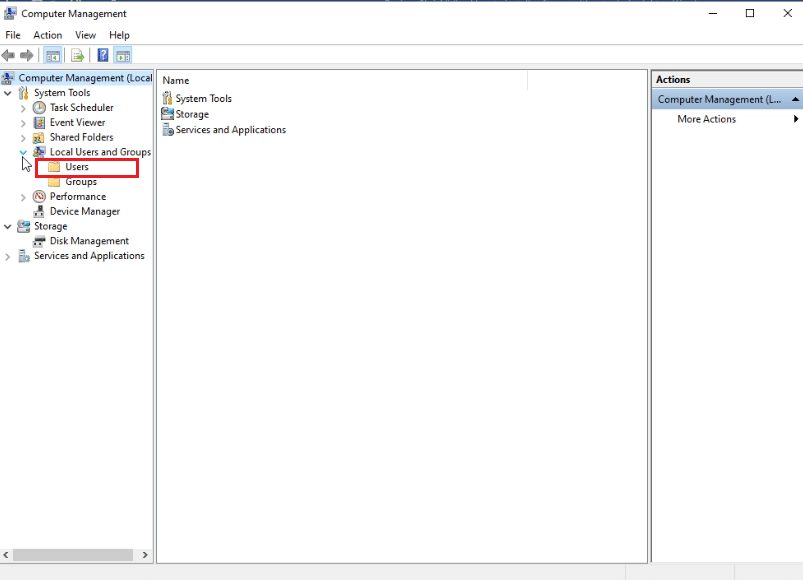
4. Klikkaa käyttäjät kansio.
5. Napsauta hiiren kakkospainikkeella ylläpitäjä ja valitse Aseta salasana… vaihtoehto.
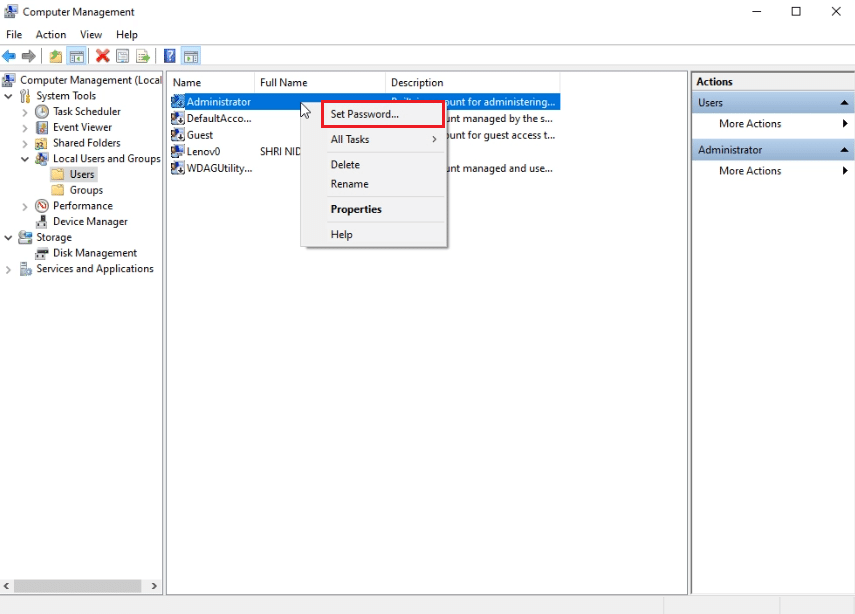
6. Valitse Jatkaa and follow the instructions on the Windows wizard.

Lue myös: C:windowssystem32configsystemprofileDesktop is Unavailable: Fixed
Step II: Turn Off Download Restrictions Set by Administrator
In this method, you will be able to disable all the UAC prompts of the PC. In other words, you will not receive any UAC prompt for any activity on the PC. This allows you to install any application without responding to the download restrictions set by the Administrator.
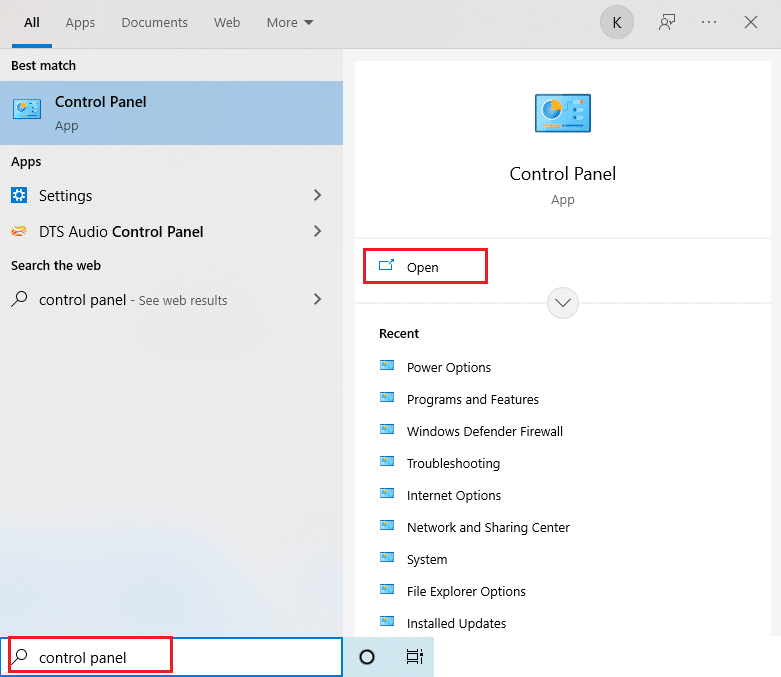
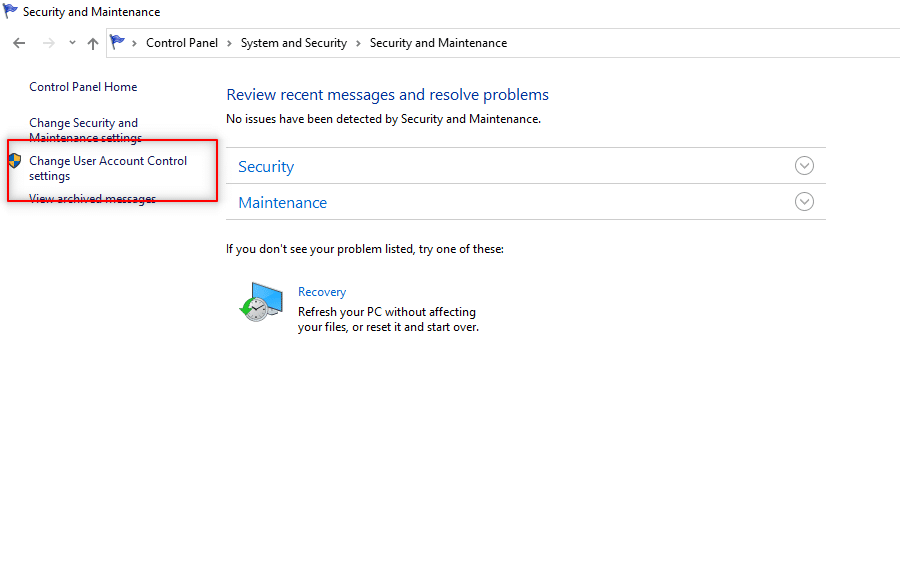
1. Paina Windows-näppäin ja tyyppi Ohjauspaneelin in the search bar. Open the best results.
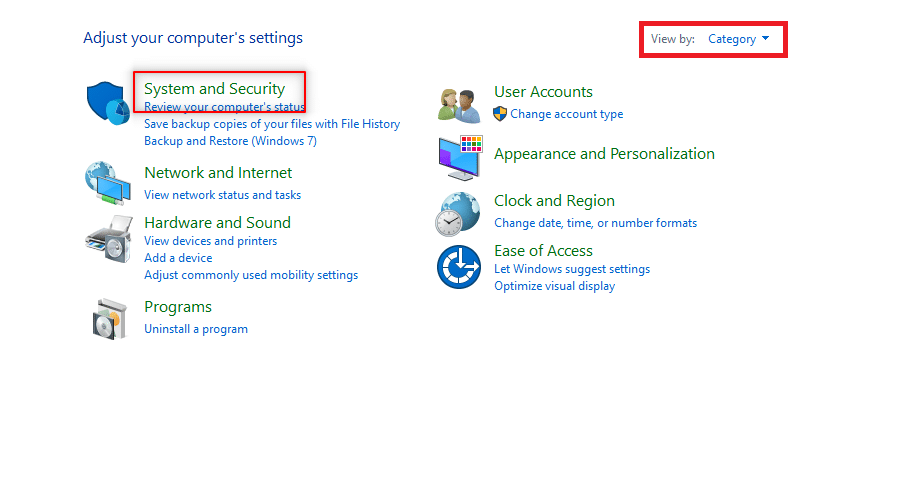
2. Sarja Näytä by as Kategoria. Valitse Järjestelmä ja suojaus vaihtoehto valikossa.
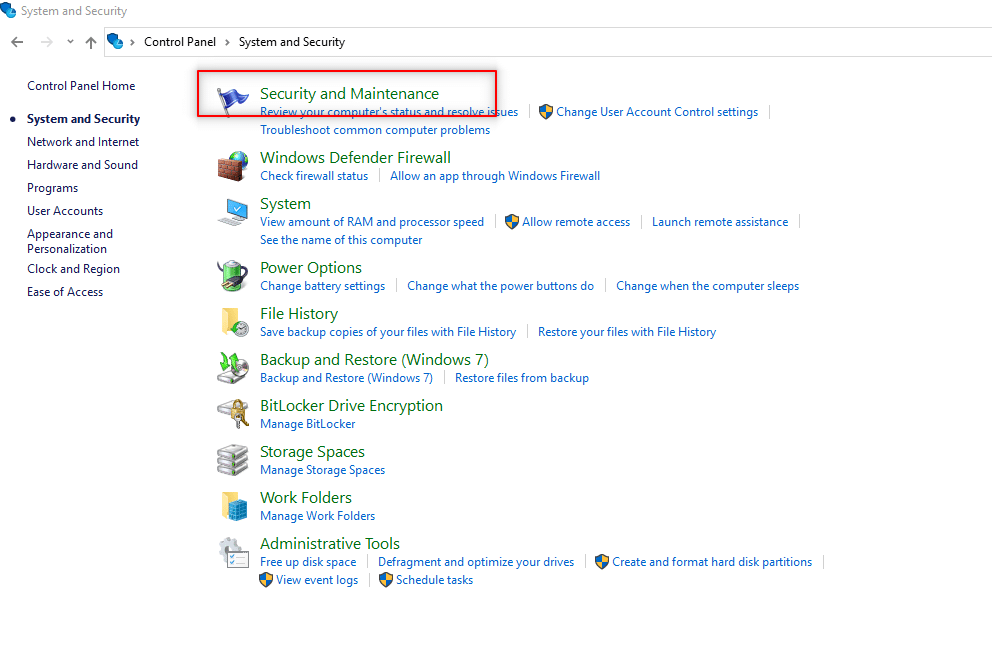
3. napsauttaa Turvallisuus ja ylläpito.
4. Valitse Muuta käyttäjätilien valvonnan asetuksia.
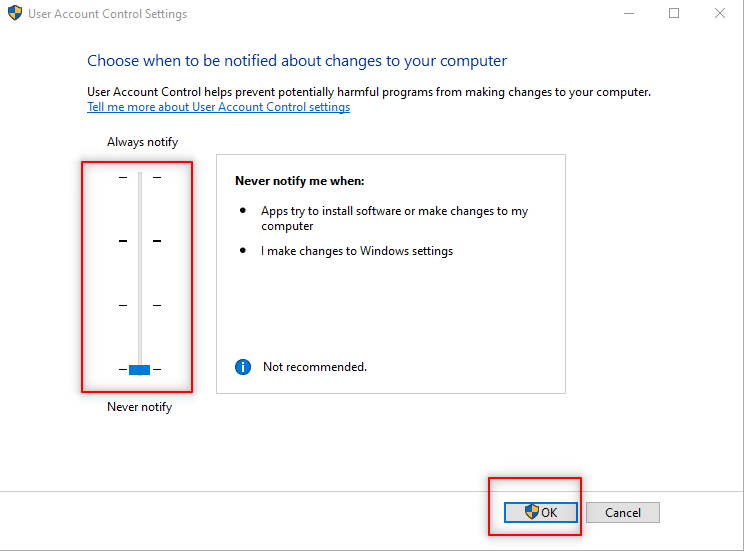
5. Drag the selector in the screen to the bottom to the Älä koskaan ilmoita Vaihtoehto ja napsauta OK.
Huomautus: This setting will modify the PC and will never ask for Admin permission until you reset the preference using the selector.
Method 2: Make Your User Account An Admin Account
As you cannot skip the UAC prompt commands, you can make your user account as an Admin account and then install the software on the account. You will learn the method of making your existing User account an Administrator account so that you wouldn’t have to skip the UAC prompts. This will allow you to install the program, and this method answers how to install a program without admin rights Windows 10.
Option I: Using Command Prompt
This method in how to install software without admin rights allows you to make an Admin account for yourself so that you can have a different account that is completely under your control.
Huomautus: The software you are trying to install has to be installed in this Administrator account and not in your existing User account.
1. Tyyppi Komento nopea vuonna Windowsin hakupalkki ja valitse Suorita järjestelmänvalvojana.

2. napsauttaa Kyllä kehotteessa.
3. Kirjoita komento Net user järjestelmänvalvoja / aktiivinen: kyllä ja osuma Syötä.
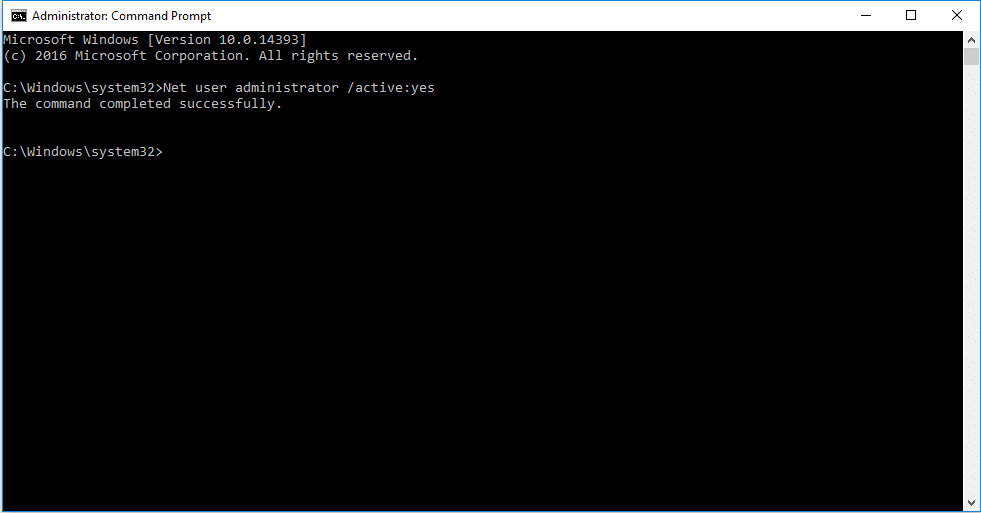
4. Käynnistä tietokone uudelleen, and you will see an Administrator account.
Now, you can install a program in Windows 10
Lue myös: Oletusohjelmien muuttaminen Windows 10:ssä
Option II: Using Group Membership Properties
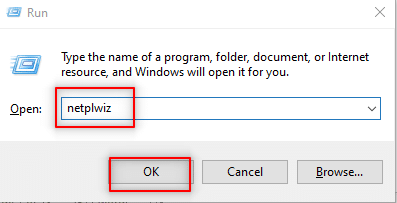
1. Lehdistö Windows+ R-näppäimet samanaikaisesti avataksesi ajaa valintaikkuna.
2. Tyyppi netplwiz ja klikkaa OK.
Huomautus: netplwiz is a command line that removes the security password set for the PC.
3. Vuonna käyttäjät tab, select your account.
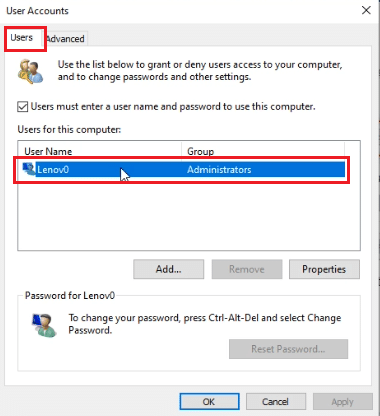
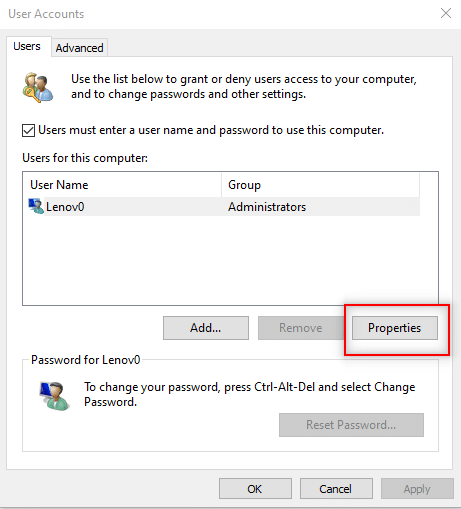
4. Valitse Kiinteistöt.
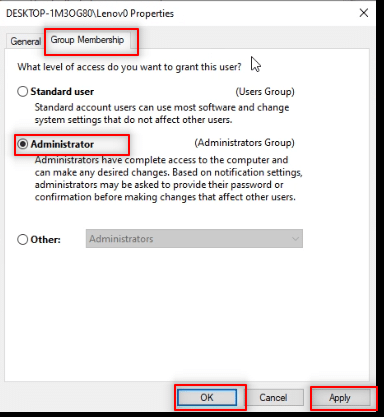
5. Siirry Ryhmän jäsenyys -välilehti ja valitse ylläpitäjä to make this an Admin account.
6. napsauttaa käyttää ja sitten OK.
Option III: Using Control Panel
This method allows you to make your User account an Administrator account to install any application without having to ask the admin.
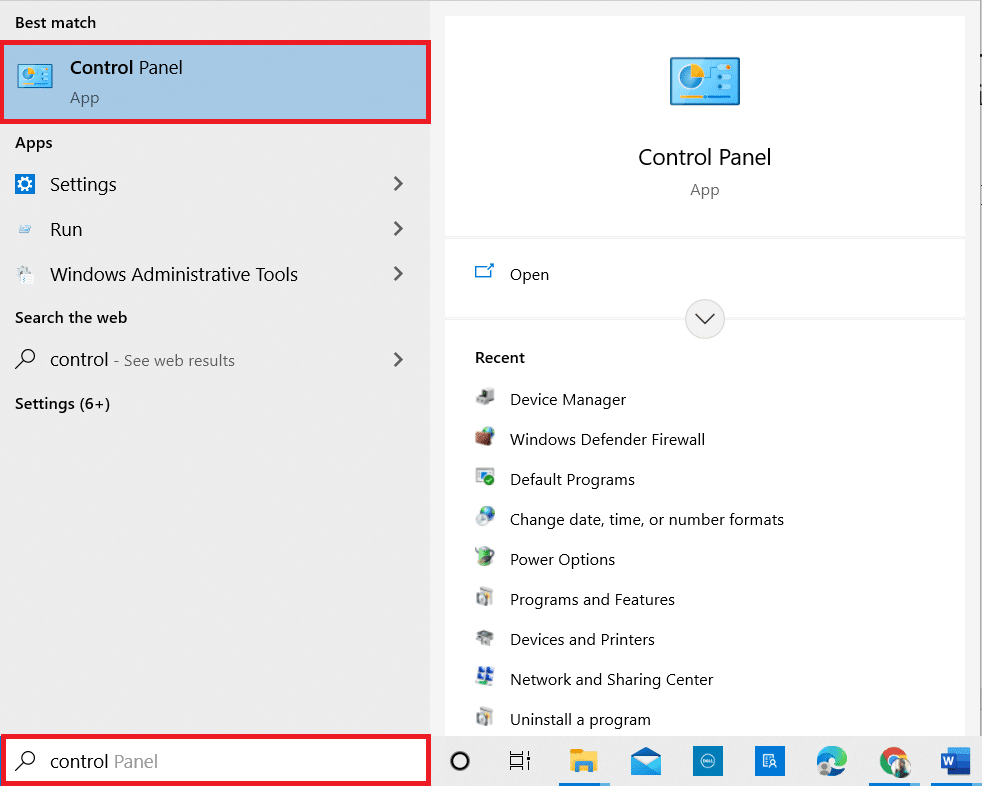
1. Tyyppi Ohjauspaneelin vuonna Windowsin hakupalkki and launch it on your PC.
2. Sarja Näytä by as Kategoria. Valitse Käyttäjätilit.
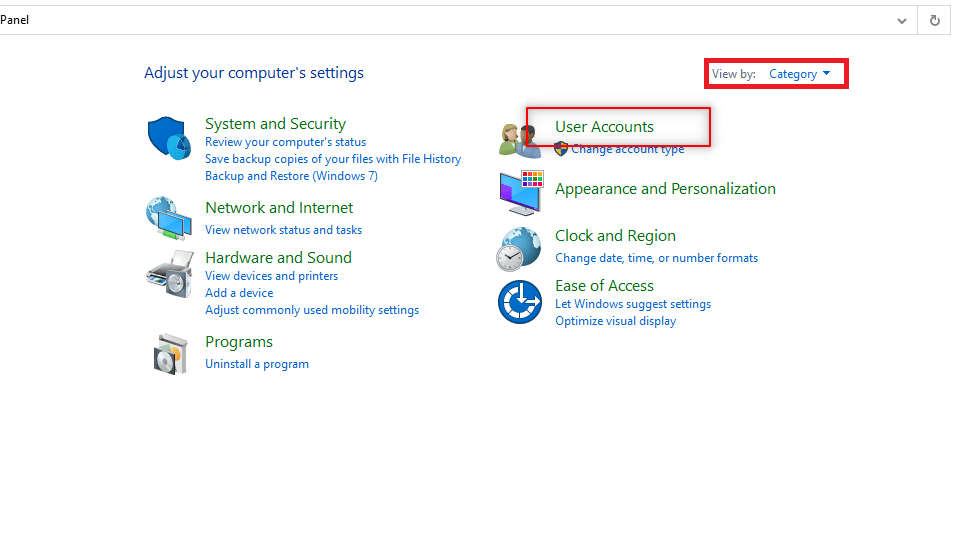
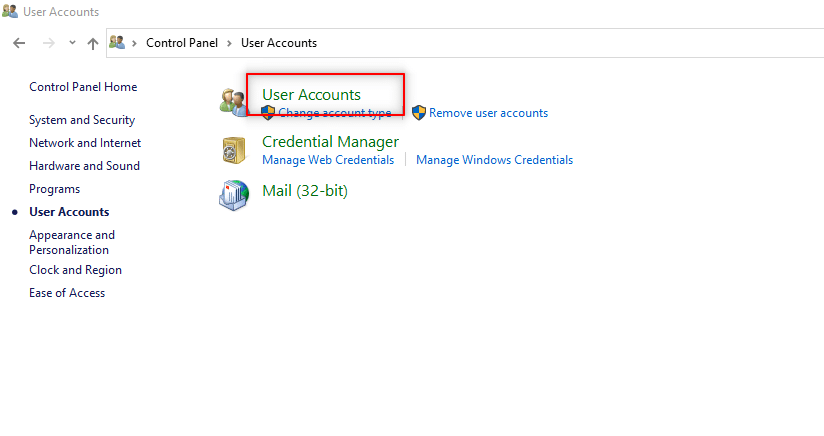
3. valita Käyttäjätilit huipulla.
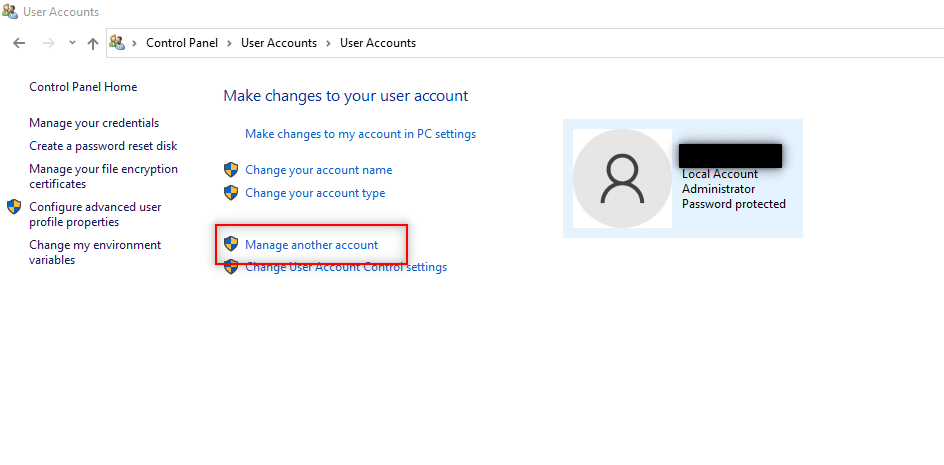
4. valita Hallinnoi toista tiliä.
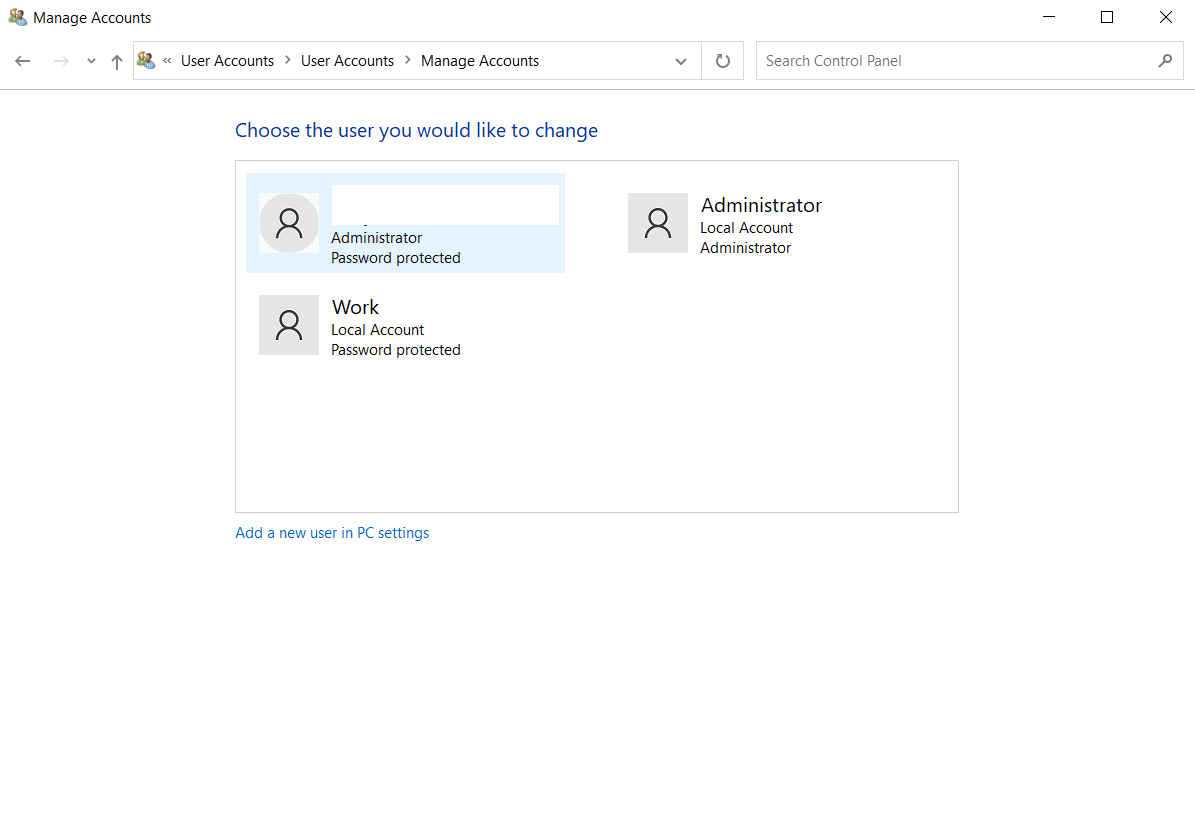
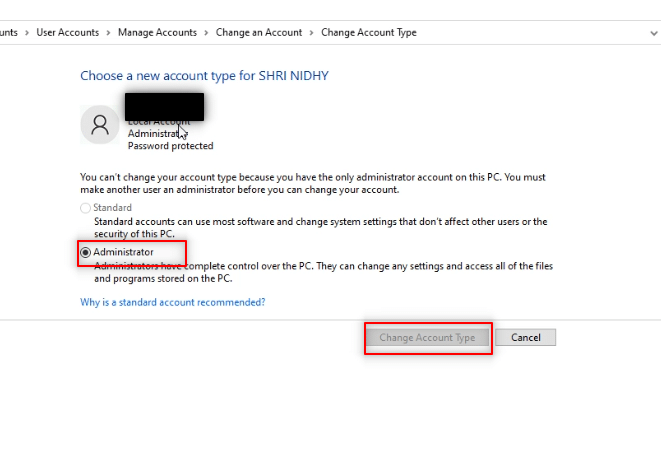
5. Valitse tavallinen käyttäjä on the PC by clicking on it.
6. valita change the account type vasemmalla paneelilla.
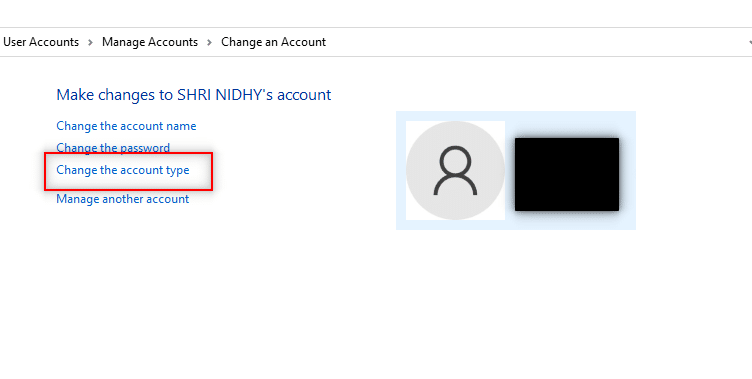
7. Valita ylläpitäjä ja klikkaa Muuta tilin tyyppiä.
8. Reboot the PC and install a program without admin rights Windows 10.
Lue myös: Käynnistysohjelmien muuttaminen Windows 10:ssä
Menetelmä 3: Modify User Account Settings
This method allows you to update the settings of your PC and makes it easy for you to install drivers on your PC at ease. To do this, we will use Group Policy Editor. The steps in the method are divided into three phases for your better understanding. This method is mainly focused on explaining how to install drivers without admin rights Windows 10.
Huomautus: You can access Group Policy Editor only if you use Windows 10 Pro, Enterpriseja koulutus painokset.
Step I: Modify Local Users and Groups
The steps mentioned below allow you to permit the non-administrator to install printer drivers. Hence, it is advisable to install only trusted printer drivers.
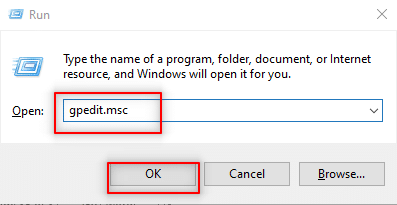
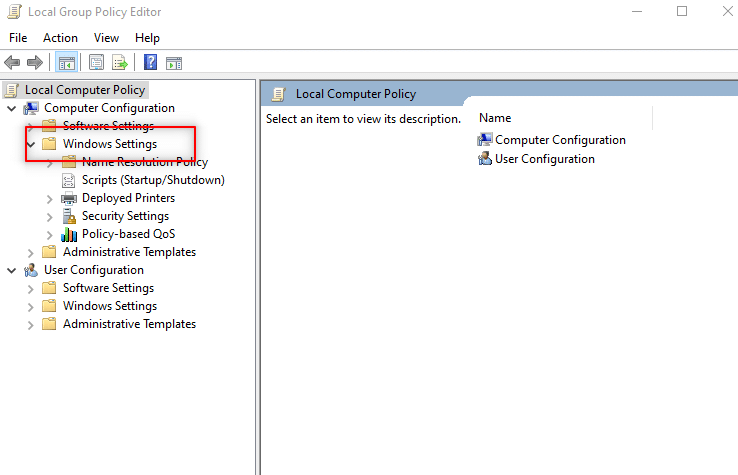
1. Avaa Suorita valintaikkuna painamalla Windows + R-näppäimet samanaikaisesti.
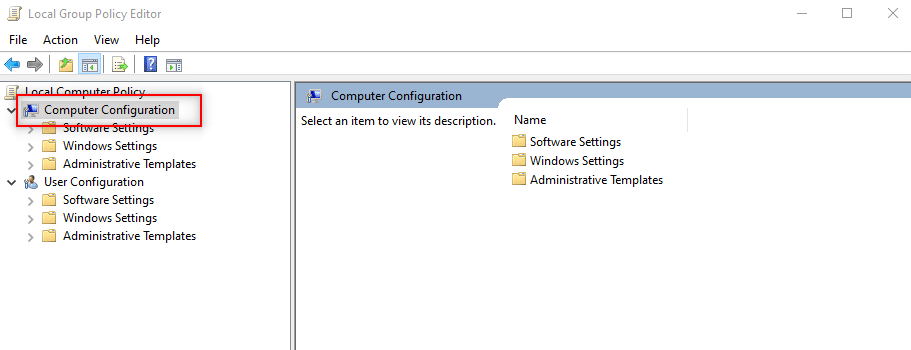
2. Tyyppi gpedit.msc ja valitse OK avaa Ryhmäkäytäntöeditorin.
3. In the left pane, expand the Tietokoneasetukset vaihtoehto.
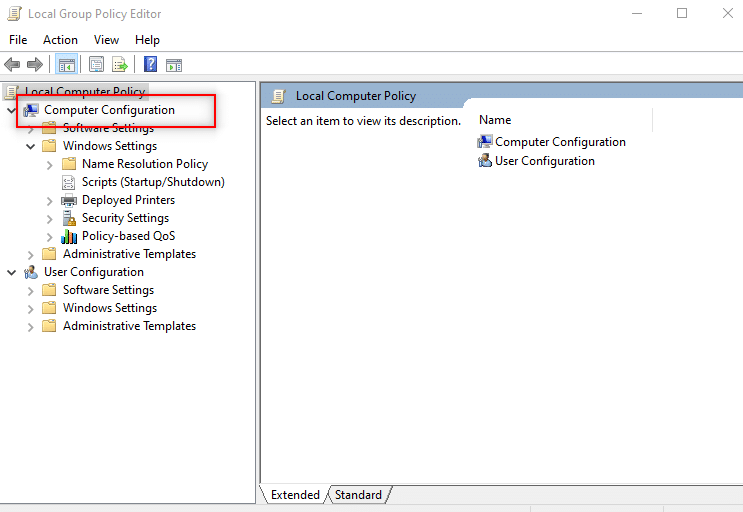
4. Valitse Windows-asetukset ja laajenna sitä.
5. Laajenna Turva-asetukset luettelossa.
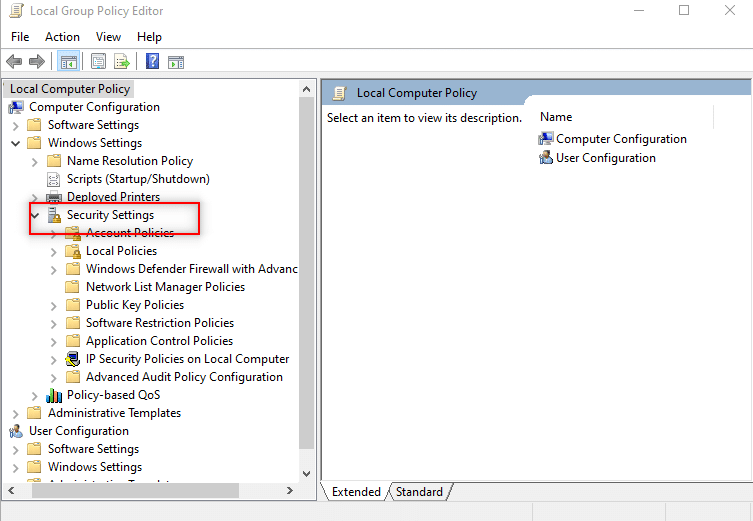
6. Valita Paikalliset käytännöt ja laajenna sitä.
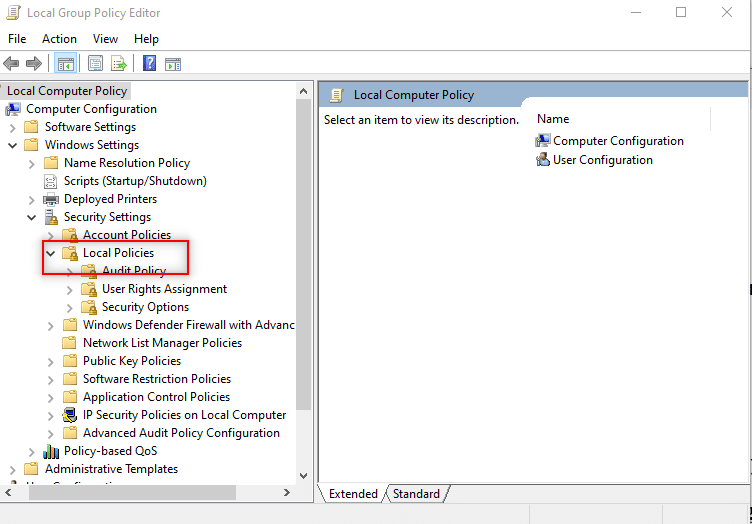
7. Select and expand Suojausasetukset in the list available.
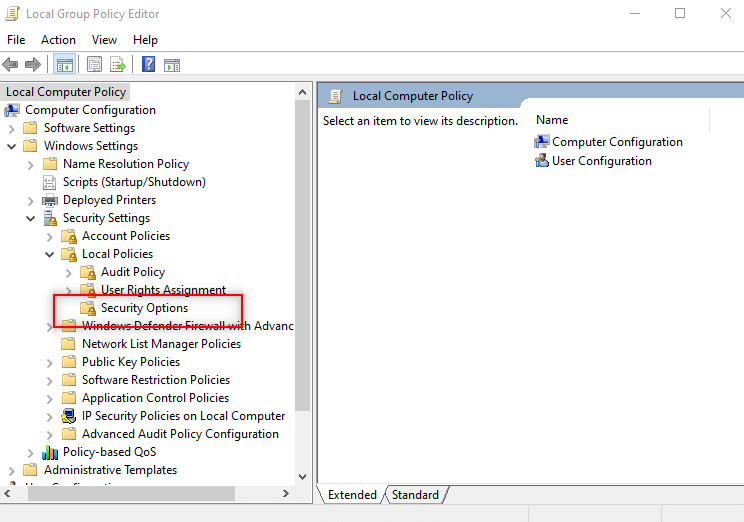
8. valita Devices: Prevent users from installing printer drivers oikeanpuoleisessa ruudussa.
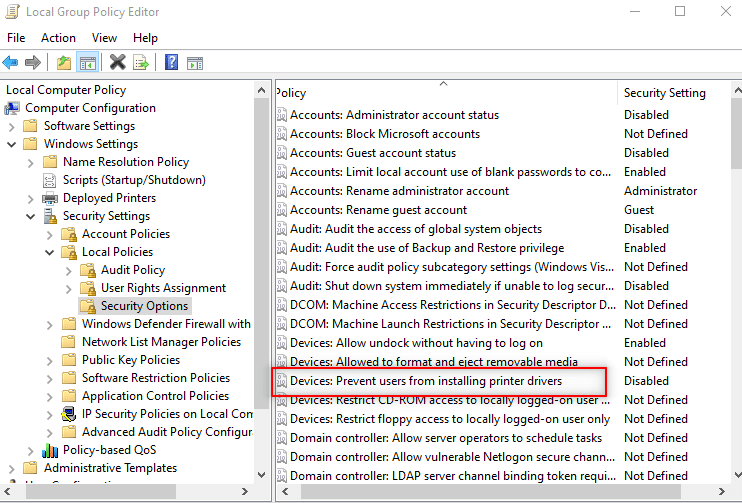
9. Right-click on the option and choose Kiinteistöt luettelossa.
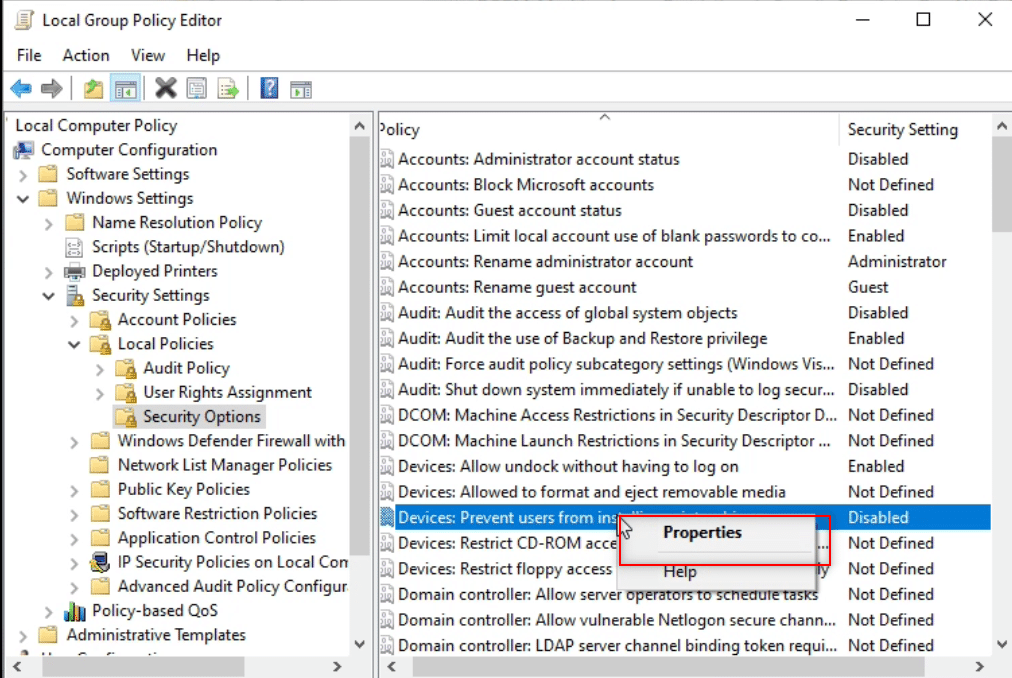
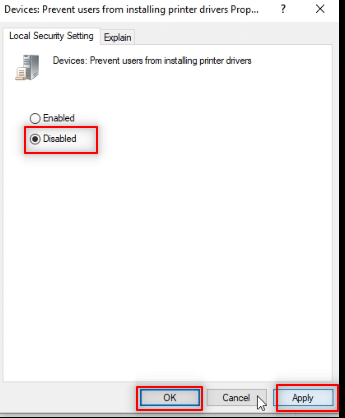
10. Valitse Vammaiset ja napsauta käyttää ja sitten OK.
Lue myös: Install Group Policy Editor (gpedit.msc) on Windows 10 Home
Step II: Install Printer Driver
As an answer to the question of how to install software without admin rights, you can install the Printer Driver. The following steps will help you install the printer driver on your PC.
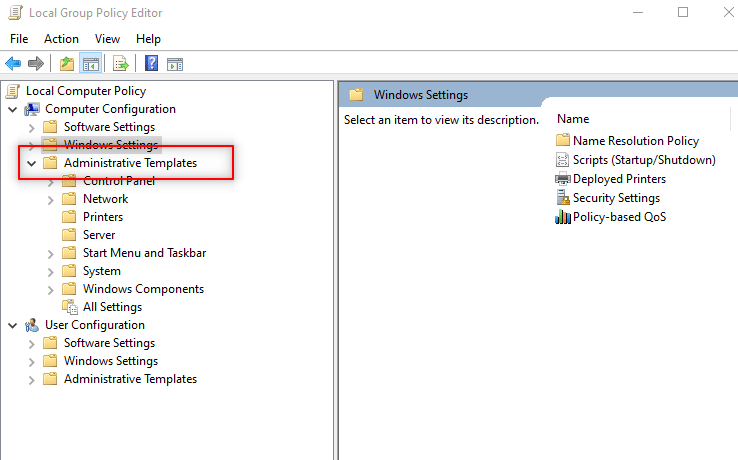
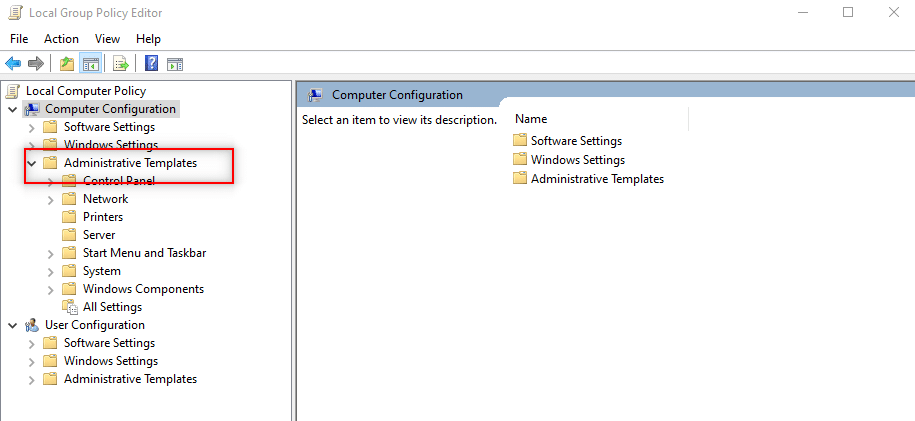
1. Samassa Ryhmäkäytäntöeditorin ikkuna, laajenna Tietokoneasetukset.

2. Valita hallinnolliset Mallit ja laajenna sitä.
3. From the list available, select järjestelmä and expand the folder.
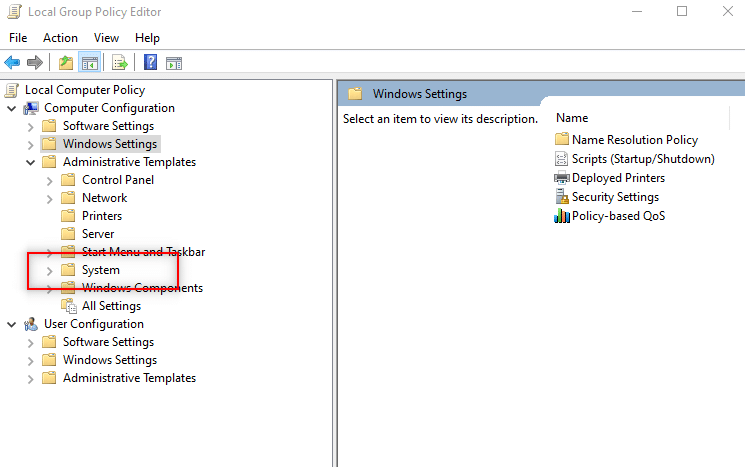
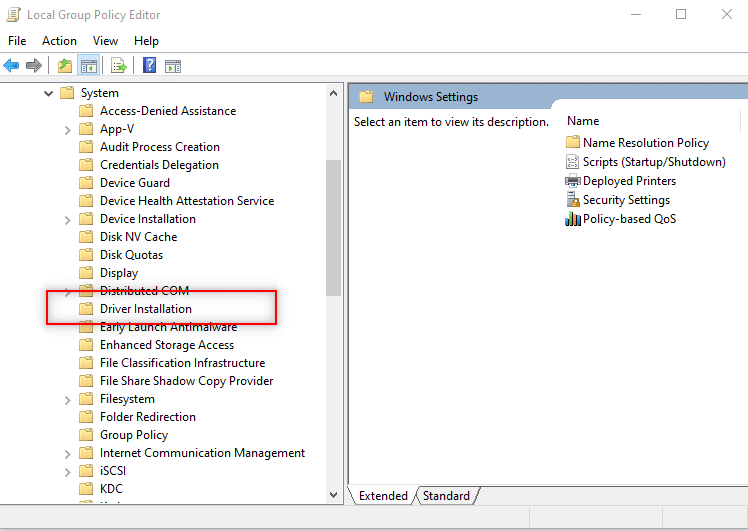
4. Valitse Ohjaimen asennus ikkunan vasemmassa ruudussa.
5. Next, right-click Allow non-administrators to install drivers for these device setup classes Ja valitse muokata vaihtoehto.
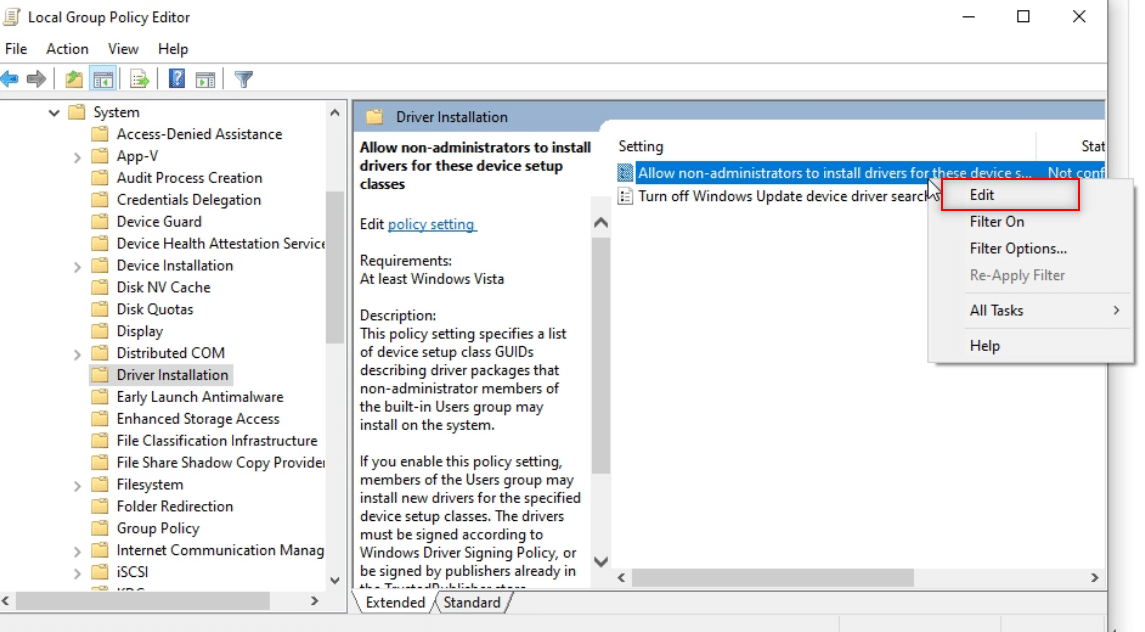
6. Valitse vaihtoehto käytössä ja napsauta Näytä… painiketta.
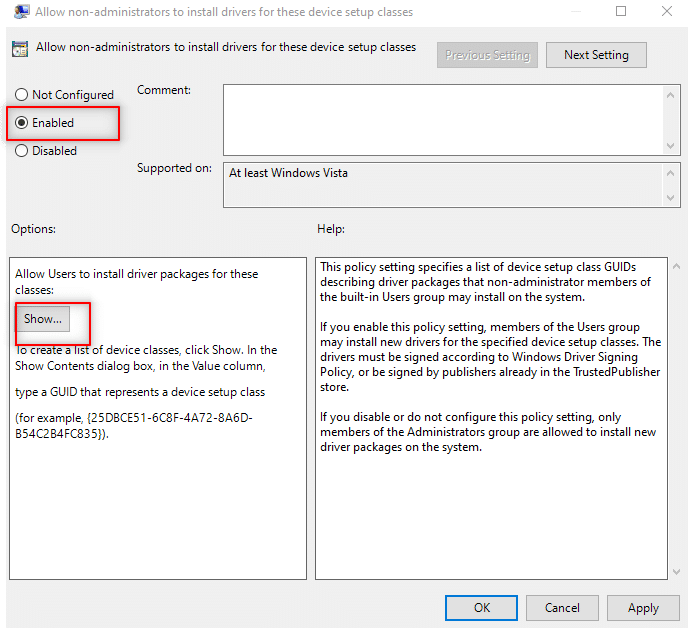
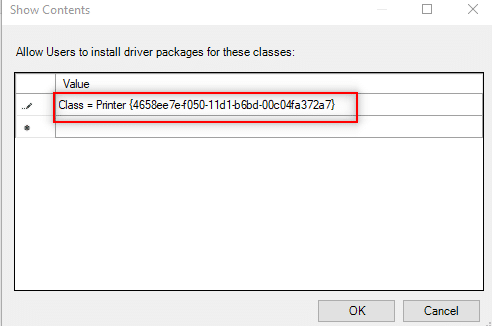
7. Vuonna Näytä sisältö window, type in the following GUID.
Class = Printer {4658ee7e-f050-11d1-b6bd-00c04fa372a7}
Huomautus: GUID is a Globally Unique Identifier used to provide unique reference numbers to software applications.
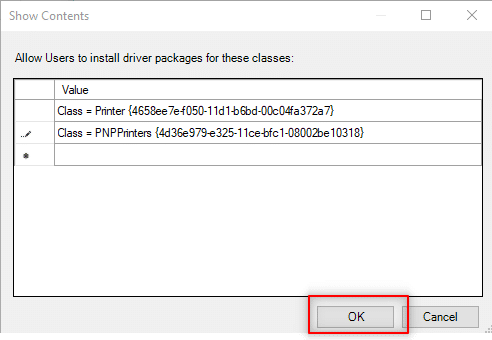
8. Napsauta nyt next entry and type in the given GUID
Class = PNPPrinters {4d36e979-e325-11ce-bfc1-08002be10318}

9. Valitse OK to apply the changes to your PC.
Step III: Give Windows Access to Driver
The following steps are done to give Windows access to the driver you wish to install on your PC.
1. Käynnistä Ryhmäkäytäntöeditorin window on your PC.
2. Expand the folder Tietokoneasetukset.
3. Laajenna hallinnolliset Mallit kansio.
4. valita Tulostimet in the list available.
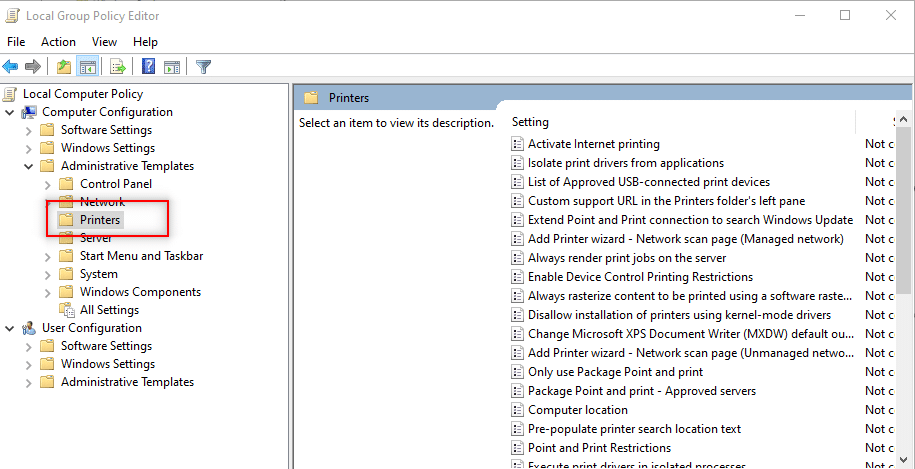
5. Next, right-click Piste- ja tulostusrajoitukset ja valitse muokata.
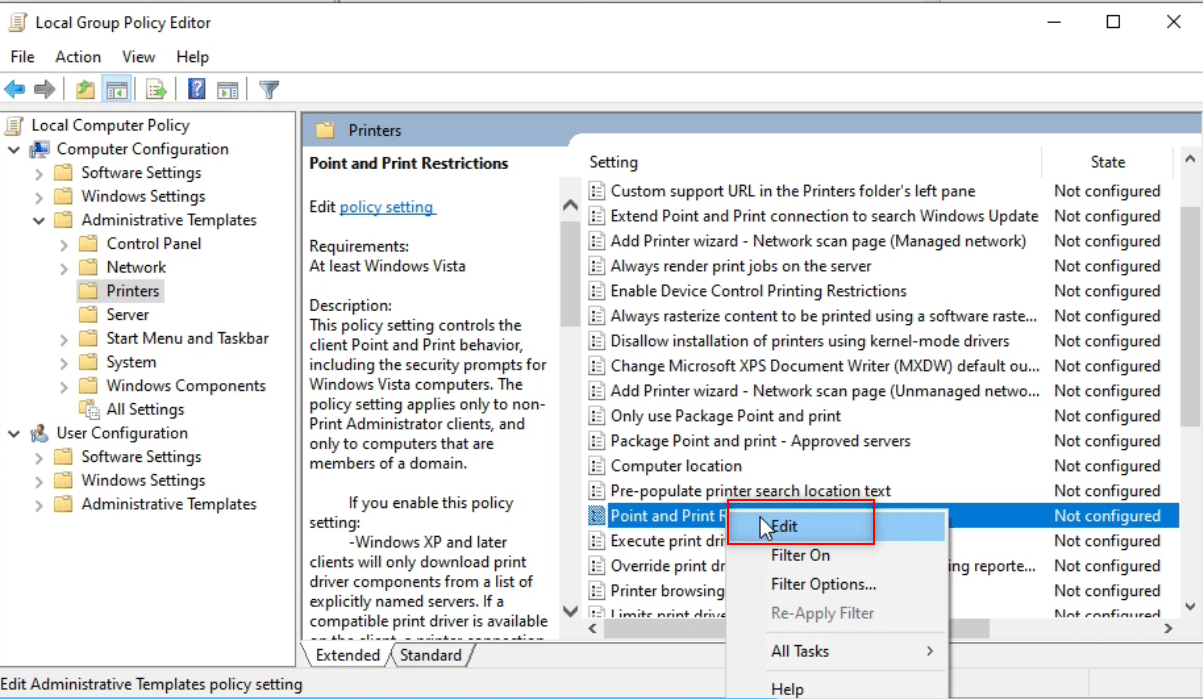
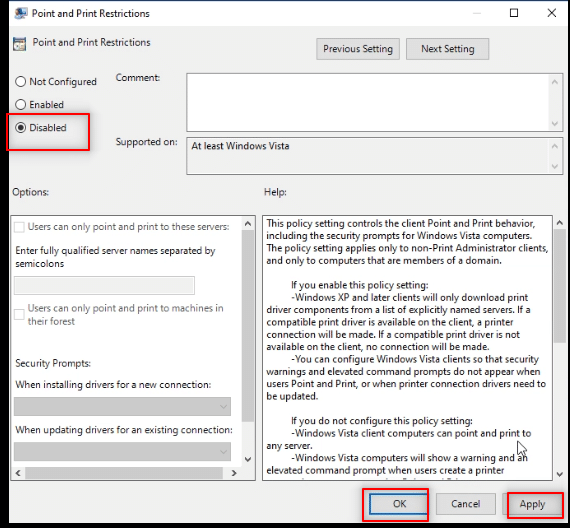
6. valita Vammaiset ikkunassa ja napsauta käyttää ja sitten OK.
7. Now, in the same Ryhmäkäytäntöeditorin window, expand the folder Käyttäjäasetukset.
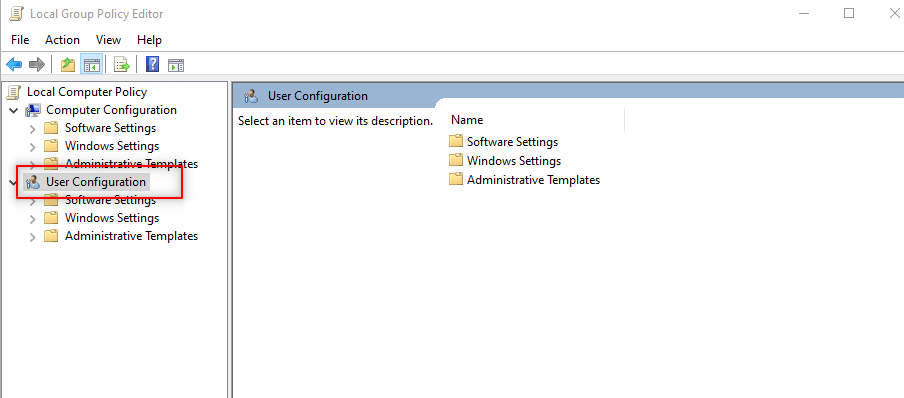
8. Valitse hallinnolliset Mallit ja laajenna sitä.
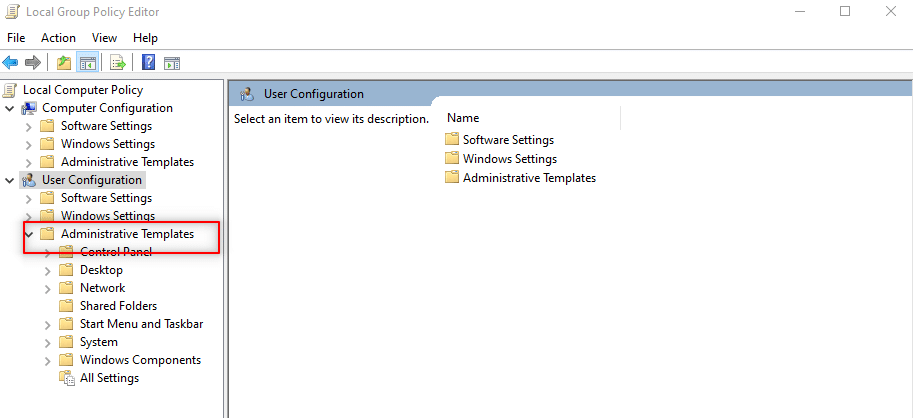
9. valita Ohjauspaneelin luettelossa ja laajenna sitä.
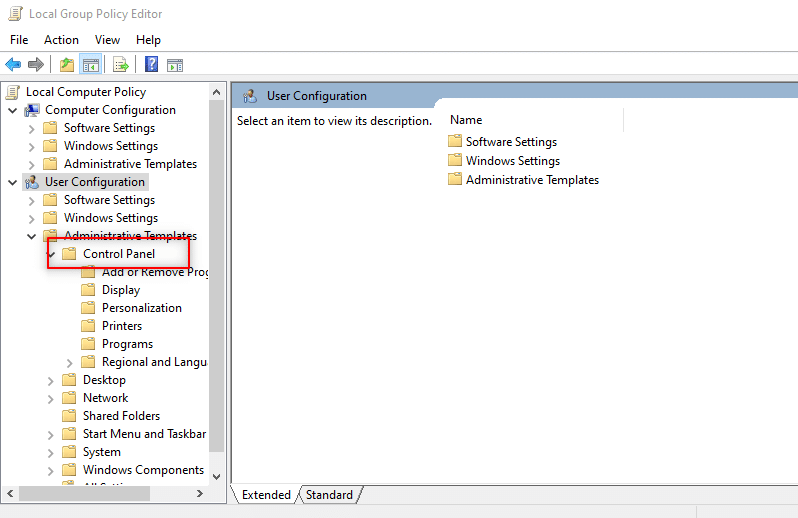
10. valita Tulostimet in the list displayed.
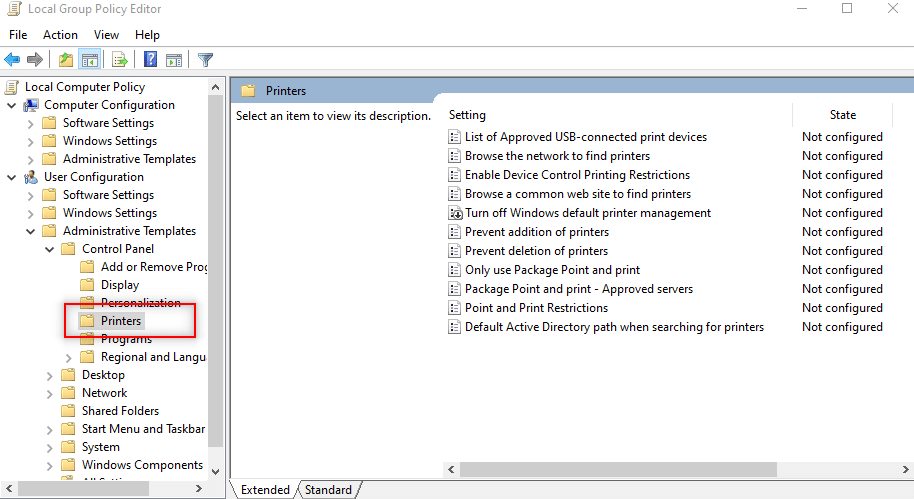
11. Oikealla painikkeella Point and Printer restrictions. Valitse muokata vaihtoehto avattavasta valikosta.
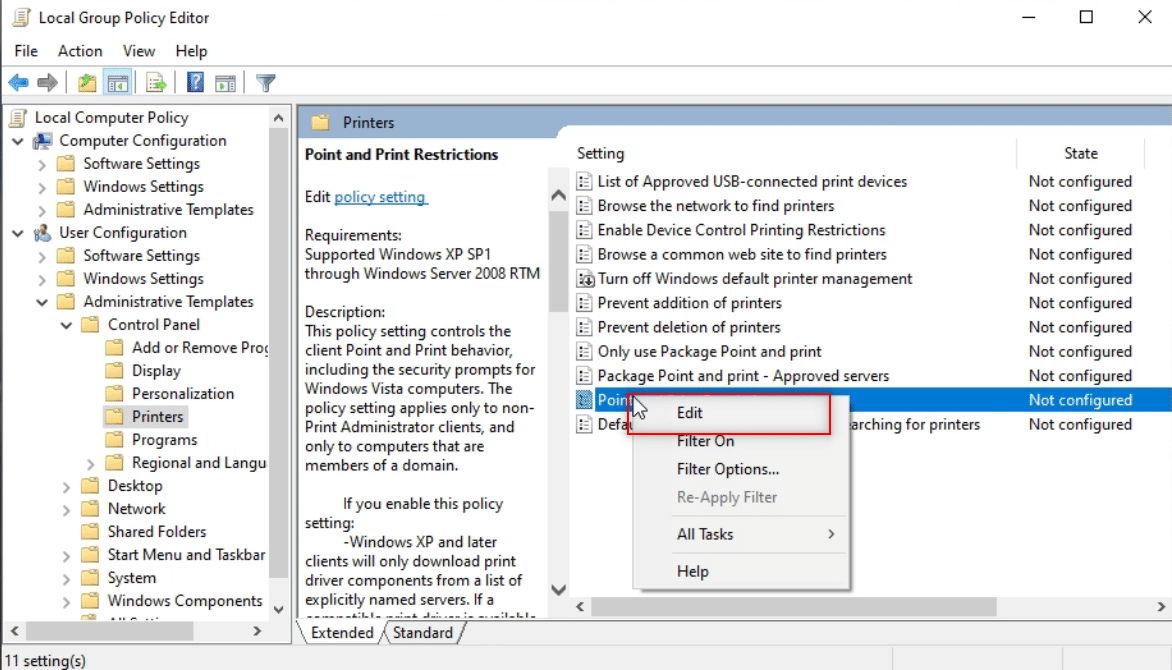
12. Set it as Vammaiset, Klikkaa Käytä, ja sitten OK.
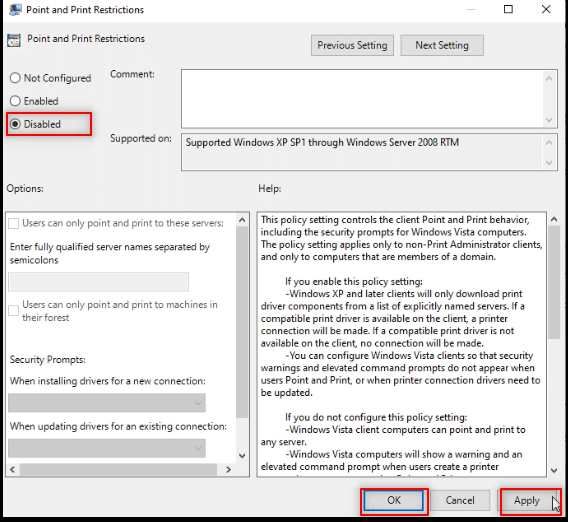
13. Sulje Ryhmäkäytäntöeditorin window to end the process.
14. Käynnistä uudelleen tietokone ja asenna ohjain tietokoneellesi.
Lue myös: Korjaa juuttunut Windows 10 Windowsin valmistelussa
Method 4: Add An Administrator Account
You can do so in two ways as explained below, in detail.
Option I: Using Command Prompt
In this method, you can add another Administrator account in addition to the existing Administrator account. This will allow you to install the software on your other account.
1. Paina Windows-näppäin, tyyppi Komento nopea vuonna hakupalkki ja valitse Suorita järjestelmänvalvojana kuten on esitetty.
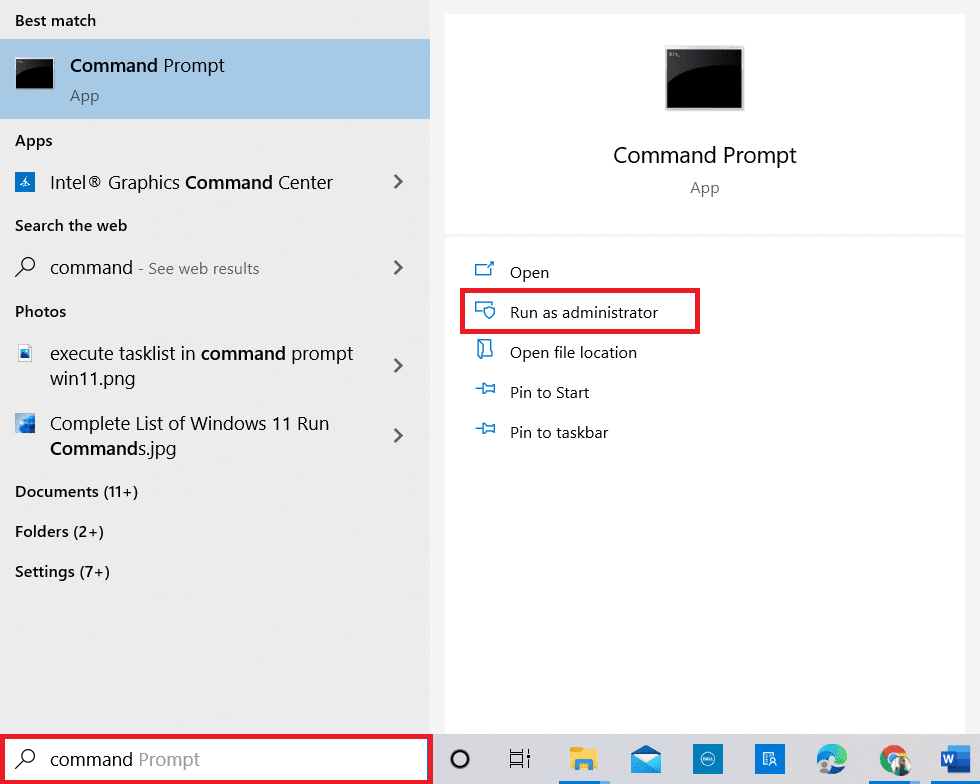
2. napsauttaa Kyllä vuonna User Account Control nopeaa.
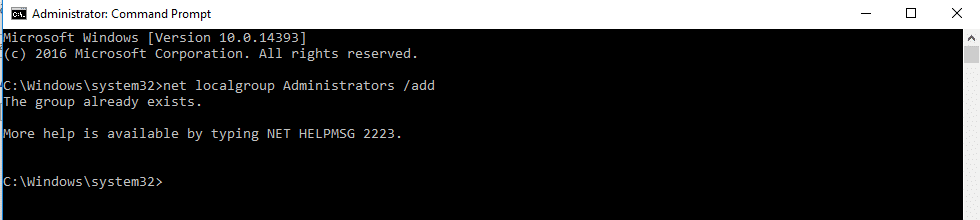
3. Kirjoita net localgroup Administrators /add komento ja lyö Enter-näppäin.
Huomautus: Space should be left between Administrators and slash.
Option II: Choose Built-In Administrator in Safe Mode
This method allows you to open your PC in safe mode and configure your settings on the PC to install the application at ease.
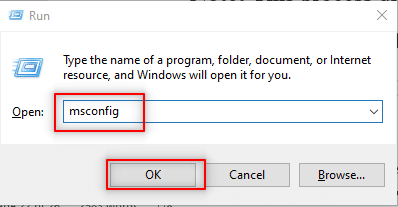
1. Avaa ajaa valintaikkunasta painamalla Windows + R-näppäimet samanaikaisesti.
2. Kirjoita msconfig ja klikkaa OK avaa järjestelmän kokoonpano ikkunassa.
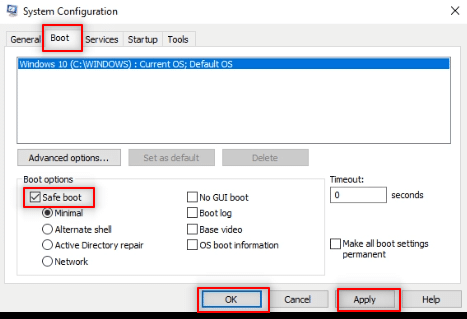
3. Siirry Boot välilehti ja tarkista Safe Boot vaihtoehto.
4. Valitse käyttää ja sitten OK prosessin lopettamiseksi.
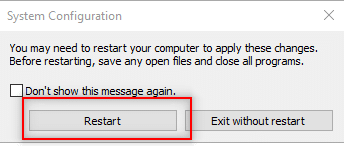
5. Valitse Käynnistä uudelleen to end the process on the next screen.
6. After the PC starts in Vikasietotila, choose a built-in ylläpitäjä account and enter without password to install the software.
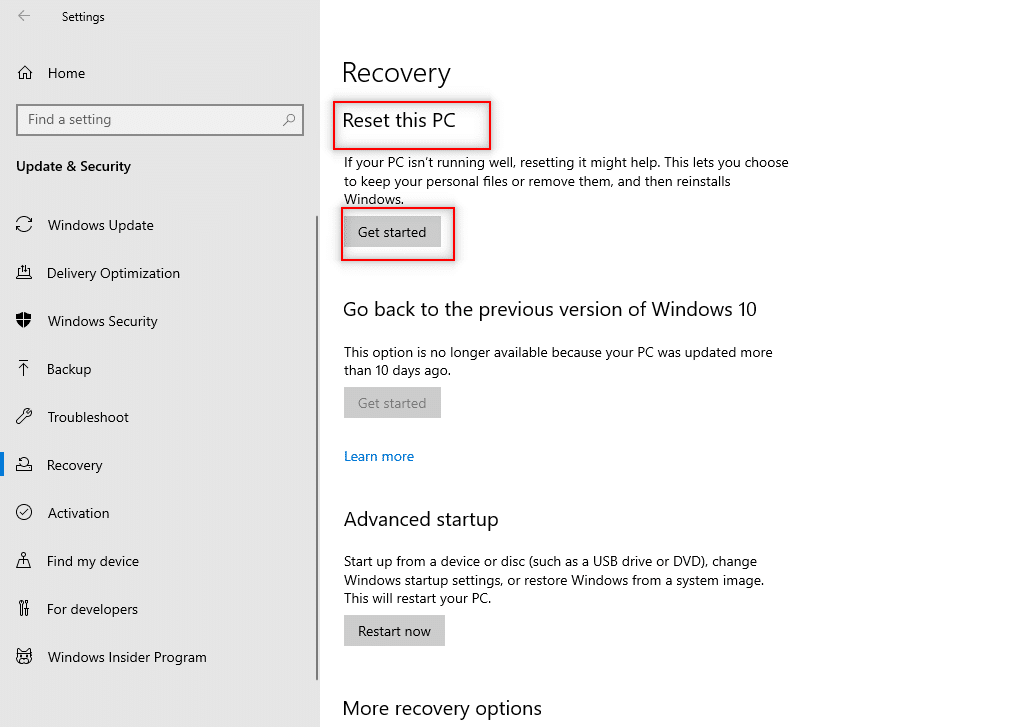
Additional Method: Reset PC (Not Recommended)
To answer your question about how to install software without administrator rights, you can reset your PC. This method will treat your PC as a new PC. You can use this method to set a user account to your PC and set a password. This way, you can gain access by making yourself the Administrator.
Huomautus: This method will lead to the deletion of all data in the PC. This method will reset all the data and settings on your PC. You may have to re-install Windows on your PC.
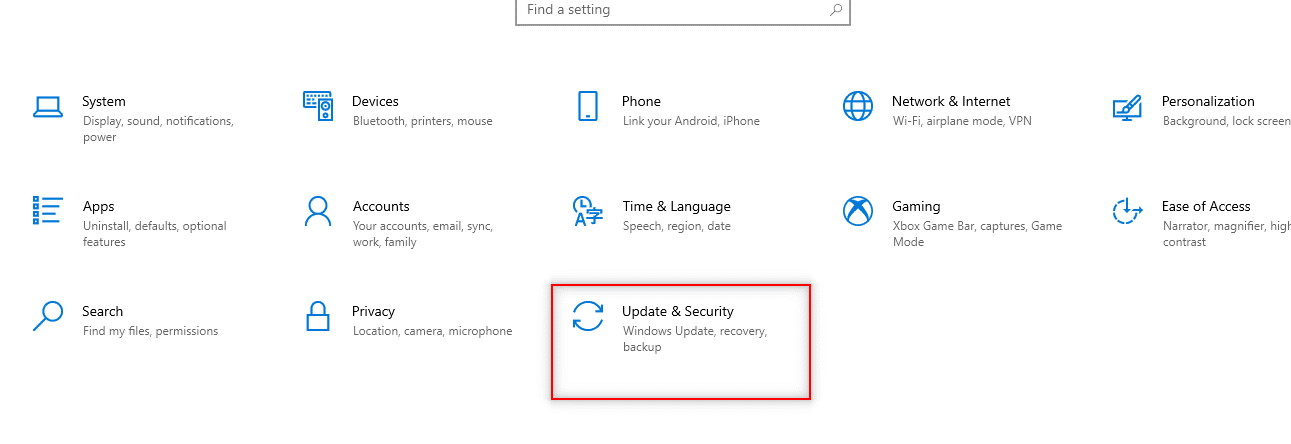
1. paina Windows + I -näppäimet yhdessä avataksesi Asetukset App.
2. Valitse Päivitys ja suojaus vaihtoehto valikossa.
3. valita Elpyminen ikkunan vasemmassa ruudussa.
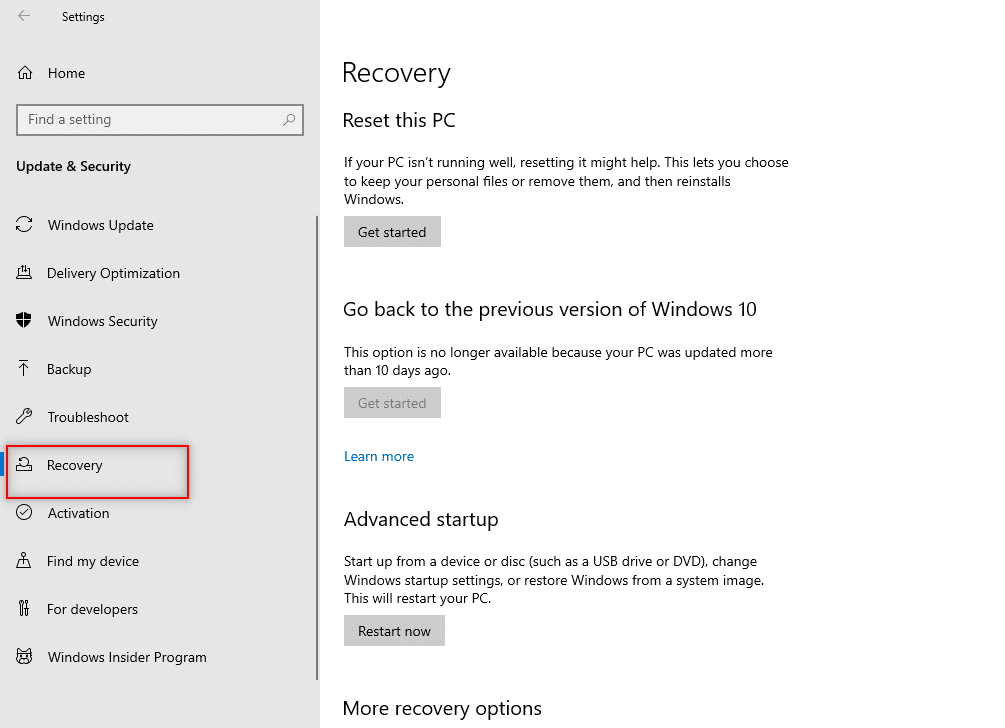
4. Alla Nollaa tämä tietokone uudelleen vaihtoehto, napsauta Aloita painiketta.
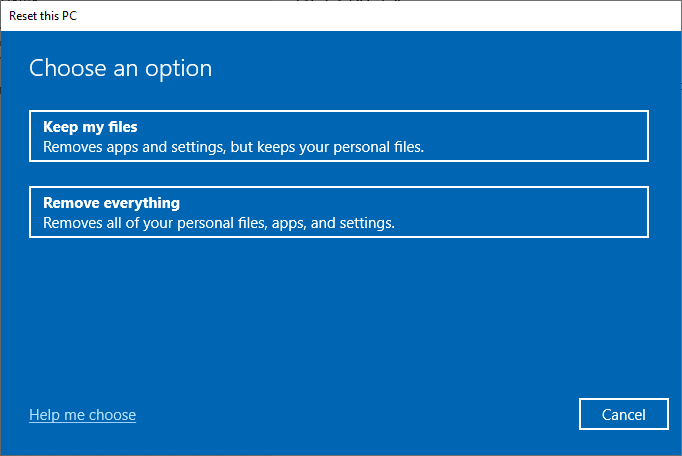
5A. If you want to remove apps and settings but keep your personal files, select the Pidä tiedostoni vaihtoehto.
5B. If you want to remove all your personal files, apps, and settings, select the Poista kaikki vaihtoehto.
6. Finally, follow the on-screen instructions to complete the reset process.
7. Käynnistä uudelleen tietokone and install a program without admin rights Windows 10.
Suositus:
We hope that this article was helpful and you have learned the answer to how to install software without admin rights. The article has aimed to give information about the methods that can be used to install software on your PC by bypassing admin rights on your PC. Please drop your valuable suggestions and queries in the comments section.

