Windows repeatedly waking up PC from sleep mode can be irritating and cause several issues. MoUSO Core Worker Process is responsible for this error. It is a program that coordinates Windows Update operation. It exclusively works in the back end and doesn’t hinder regular processes. But, sometimes in sleep mode it often wakes your system without permission. We bring to a perfect guide to fix MoUsoCoreWorker.exe process issue in Windows 10.
How to Fix MoUSO Core Worker Process in Windows 10
Here are some plausible reasons why MoUSO Core Worker Process may wake up your PC from sleep.
- Outdated Windows
- Incorrect Power Settings
- Interference by third party applications
- Orchestrator Service issues
After understanding why MoUsoCoreWorker.exe keeps waking up your PC from sleep, let us go to into the method for resolving this MoUsoCoreWorker.exe process error in Windows 10.
Method 1: Uninstall GoodSync
Syncing third-party applications can keep your PC engaged causing MoUSO Core Worker Process to run continuously. They may cause this MoUsoCoreWorker.exe process error. GoodSync app is well-known for causing such issues. You can fix this by disabling or uninstalling such programs using the steps below.
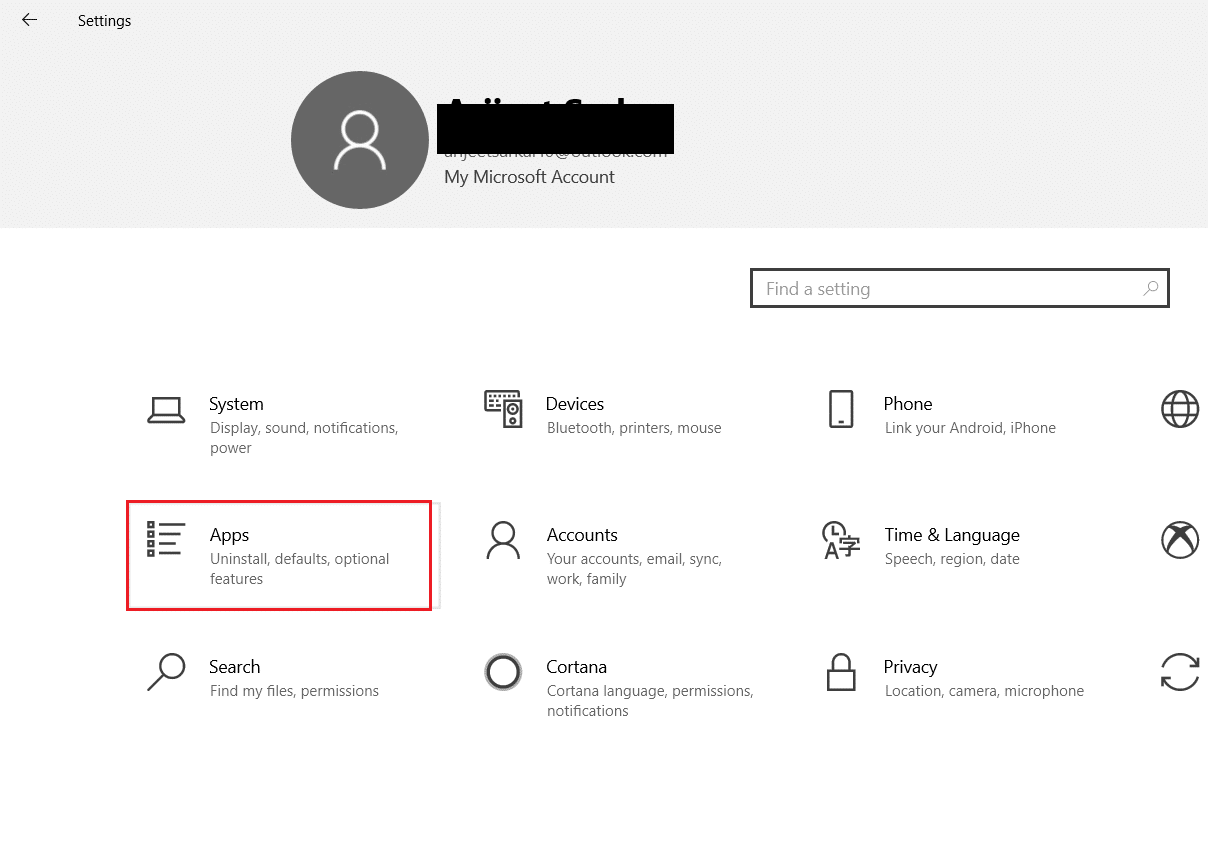
1. Brúigh an Eochracha Windows + I le chéile a oscailt Socruithe.
2. Roghnaigh apps rogha ó Socruithe fhuinneog.
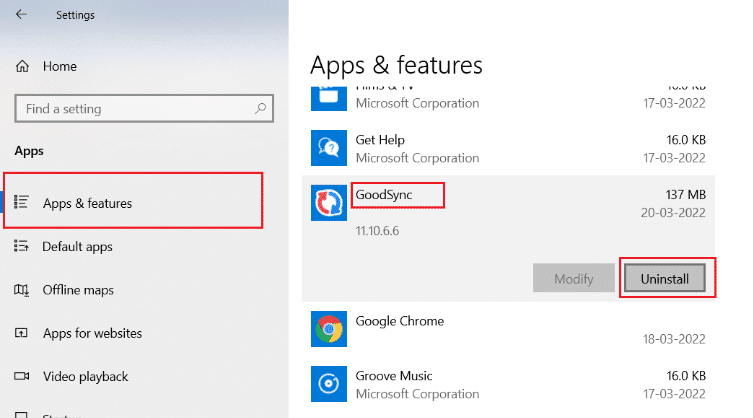
3. Roghnaigh Aipeanna agus gnéithe on the left pane. After that, scroll down in the right pane and select GoodSync aip agus cliceáil ar Díshuiteáil cnaipe.
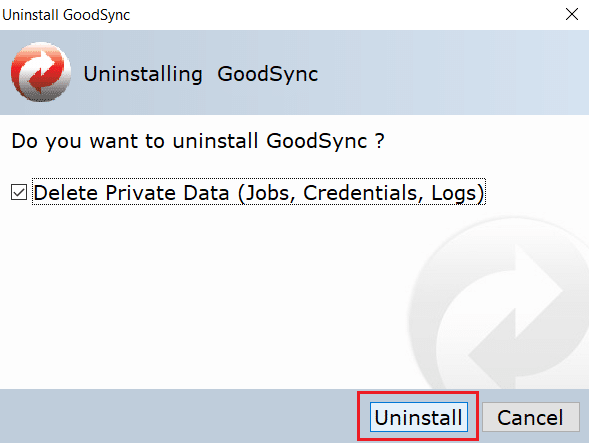
4. cliceáil Díshuiteáil ar an leid deimhnithe.

5. Again, click Díshuiteáil on Uninstall GoodSync fhuinneog.
Nóta: You can check the box marked Delete Private Data (Jobs, Credentials, Logs) if you have a backup of your private data.
6. cliceáil Is ea on GoodSync Runner aníos.

7. After uninstallation is complete, atosú PC.
Chomh maith leis sin Léigh: Fix the Trust Relationship Between This Workstation and the Primary Domain Failed
Method 2: Disable Wake Timers
Wake timers are used for waking your PC automatically to complete specified tasks at a certain time. Sometimes they can disturb PC when it is on Sleep mode, thus causing this MoUsoCoreWorker.exe process error. Follow the steps given below and disable them.
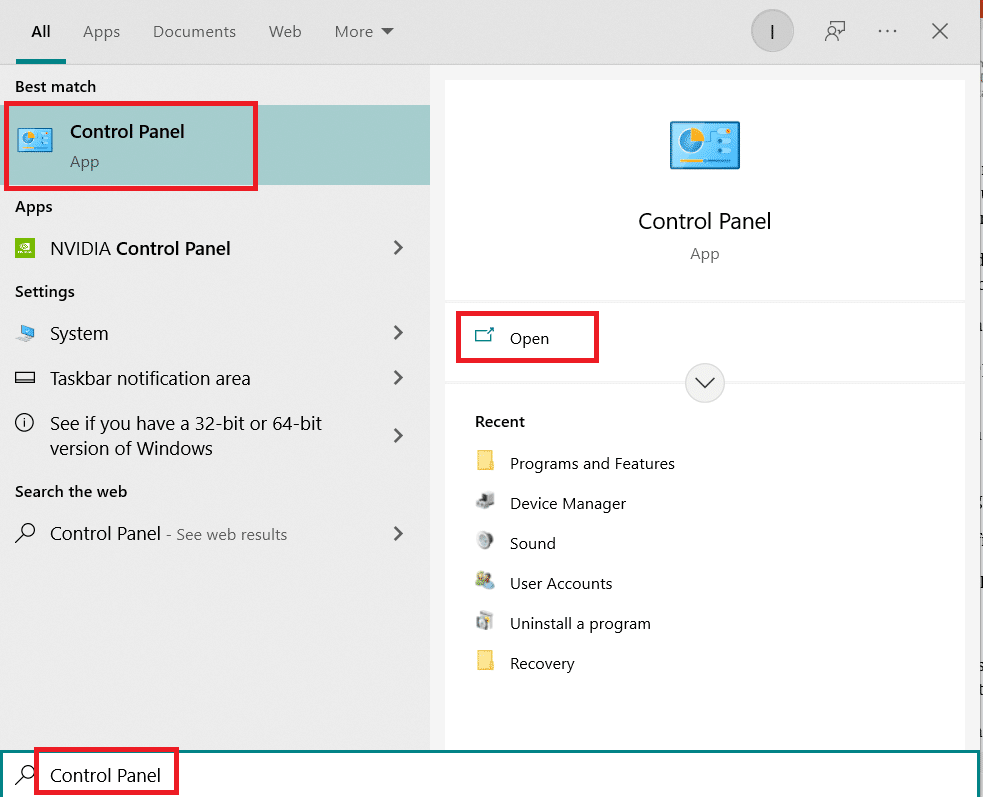
1. Brúigh an Windows eochair agus cineál painéal rialú, agus cliceáil ar Oscail.
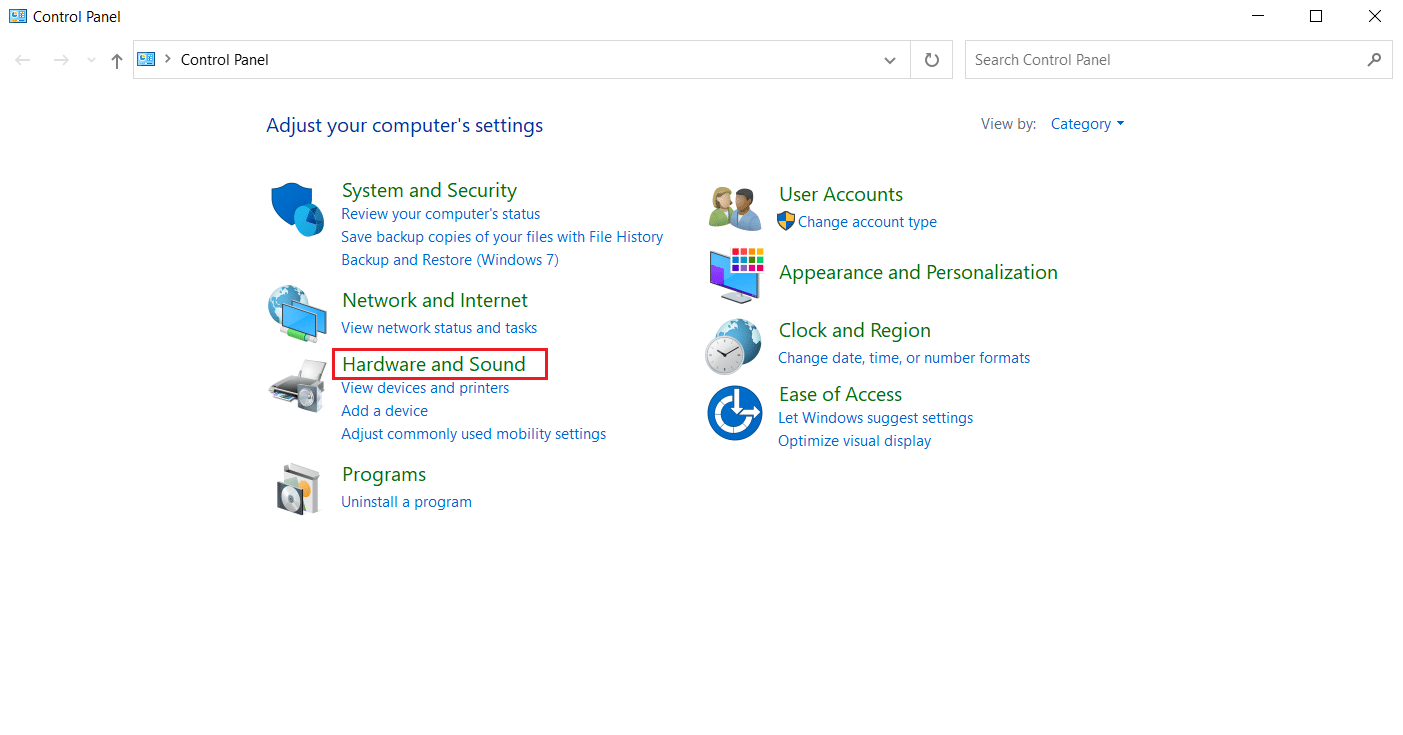
2. Roghnaigh Crua-earraí agus Fuaim rogha.
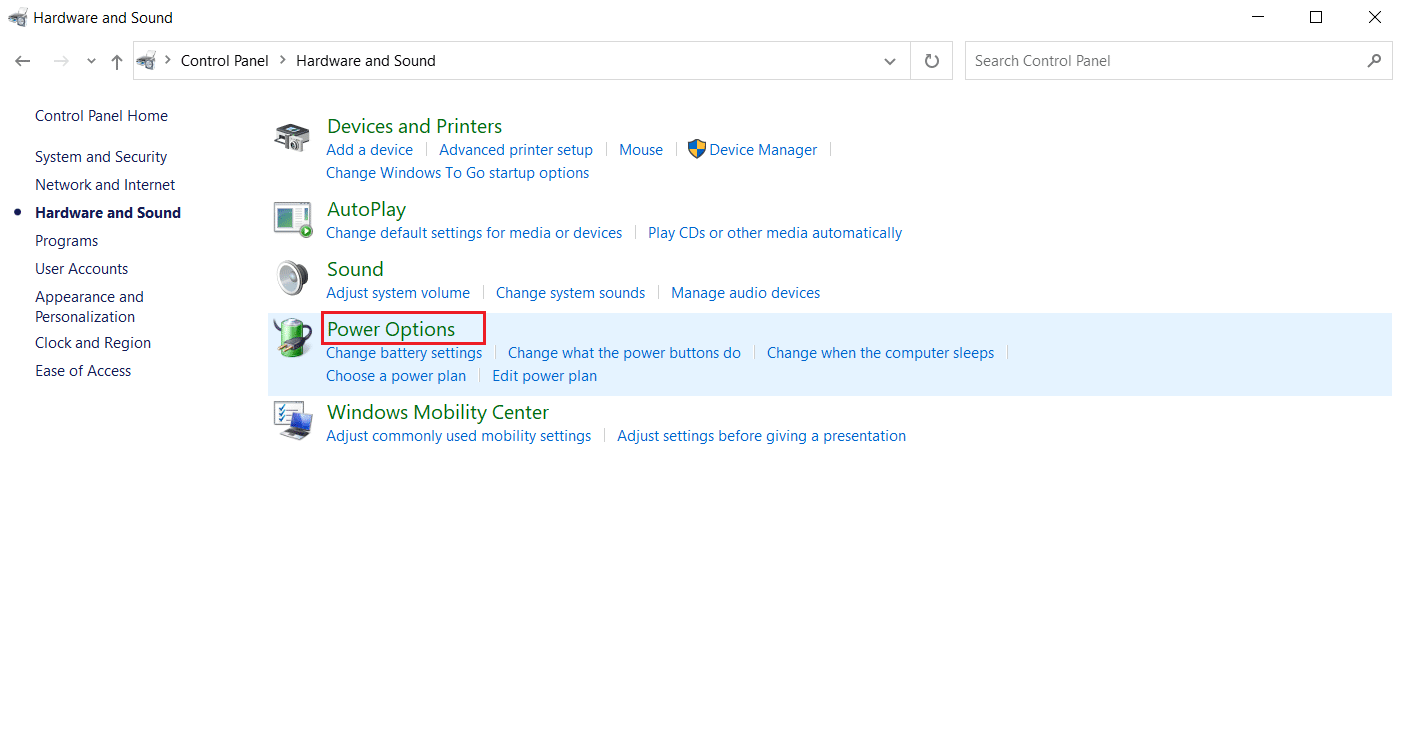
3. Roghnaigh Roghanna Power on Crua-earraí agus Fuaim leathanach.
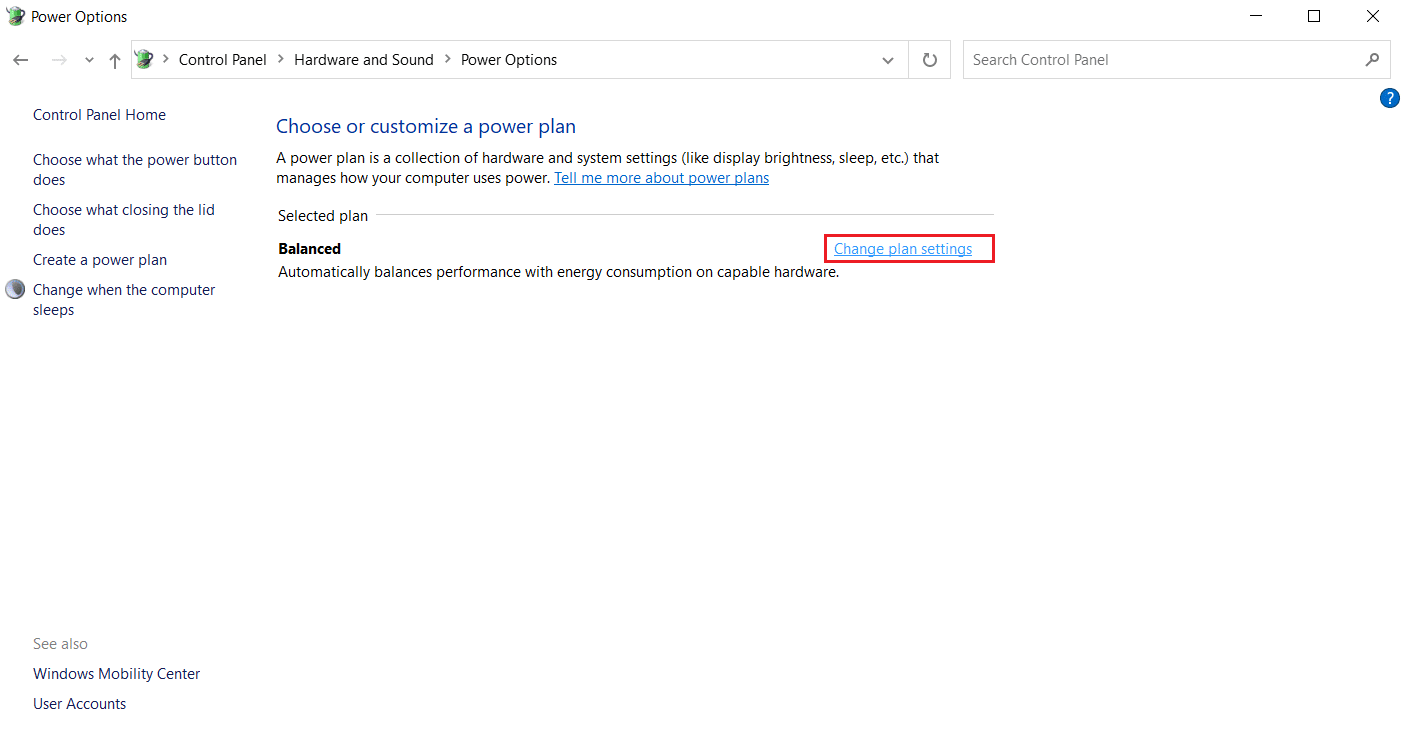
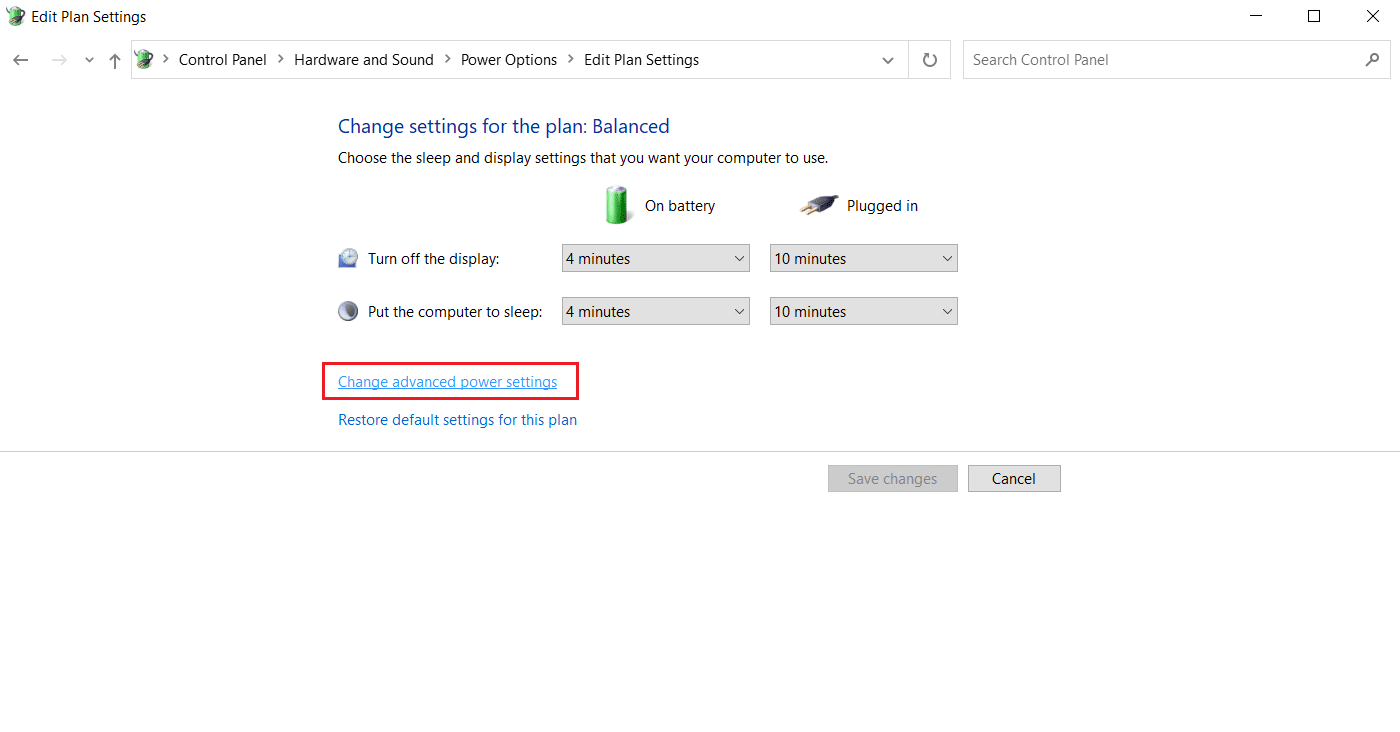
4. cliceáil Athraigh socruithe an phlean mar a thaispeántar.
5. cliceáil Athraigh socruithe cumhacht chun cinn. Roghanna Power beidh an fhuinneog oscailte.
Nóta: You can directly open Roghanna Power from Desktop by running control.exe powercfg.cpl,,3 ordú i Rith dialóg.
6. Aimsigh Codladh agus cliceáil ar an + deilbhín to expand it. You will see Allow Wake Timers rogha.
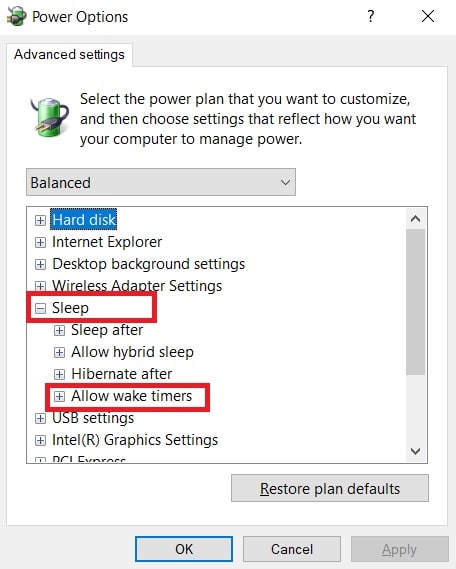
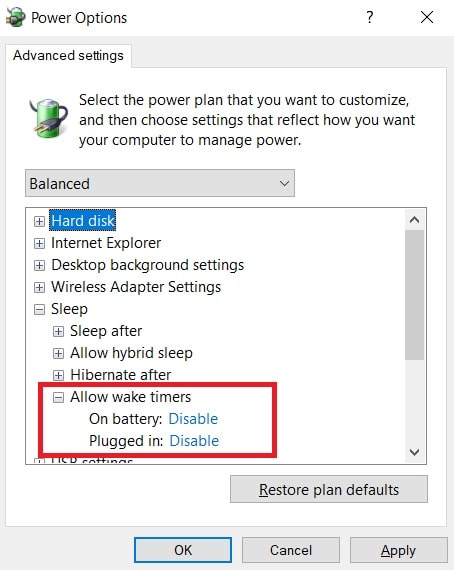
7. Arís cliceáil ar an + deilbhín a leathnú Allow Wake Timers agus roghnaigh díchumasaigh an dá Ar Battery agus Plugáilte i.
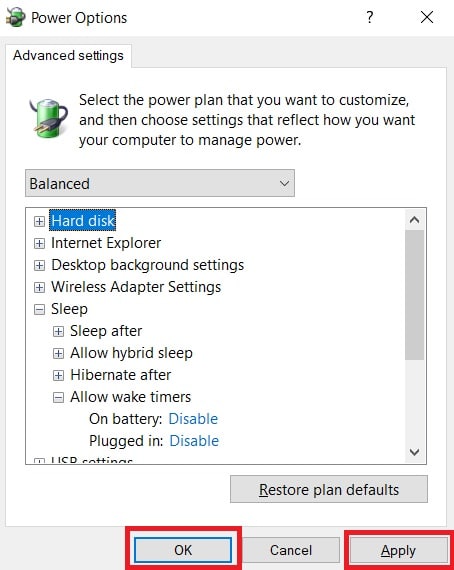
8. cliceáil Cuir iarratas isteach agus OK chun athruithe a shábháil.
9. Ina dhiaidh sin, atosaigh an ríomhaire.
Check if this MoUsoCoreWorker.exe process error is fixed.
Chomh maith leis sin Léigh: Fix Multiple Google Chrome Processes Running
Method 3: Stop Update Orchestrator Service
UsoSVC or Update Orchestrator Service organises updates released by Windows and does tasks like downloading, verifying and installing updates. It may trigger MoUSO Core Worker Process and could be the cause behind this error. To fix this issue, you can disable UsoSVC by following these steps.
Nóta: You will need to enable update orchestrator service whenever you update your PC.
1. Buail an Windows eochair, cineál seirbhísí, agus cliceáil ar Rith mar riarthóir.

2. Aimsigh agus deaschliceáil ar Nuashonraigh Seirbhís Orchestrator agus roghnaigh Airíonna.
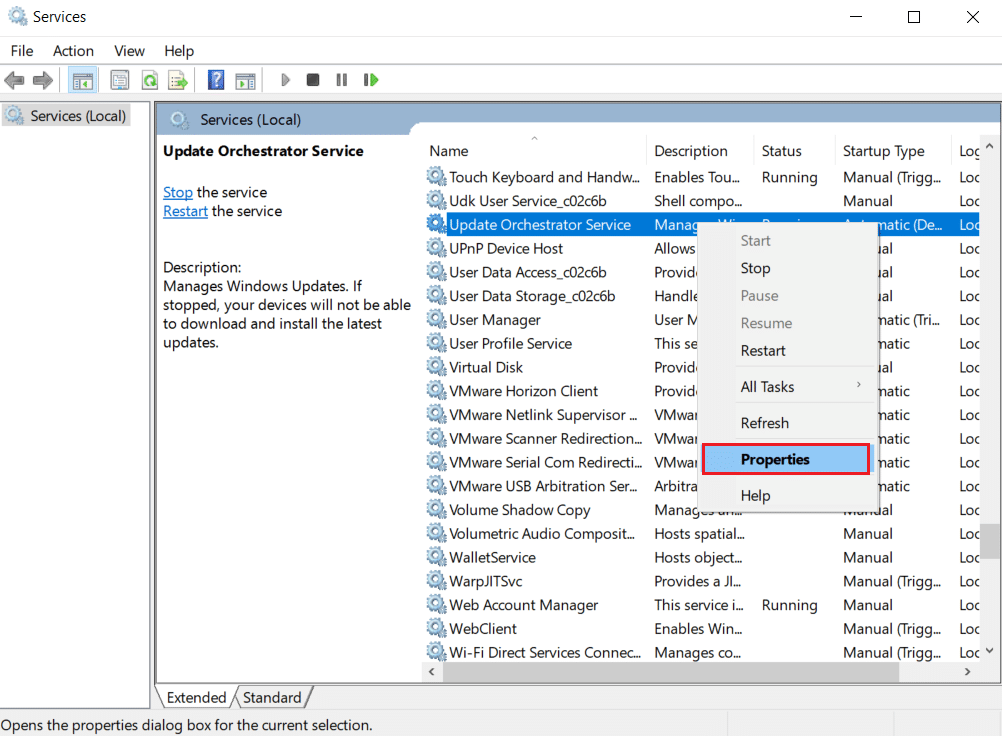
3. Sa Go ginearálta cluaisín, athrú Tosaithe cineál chun Faoi mhíchumas.
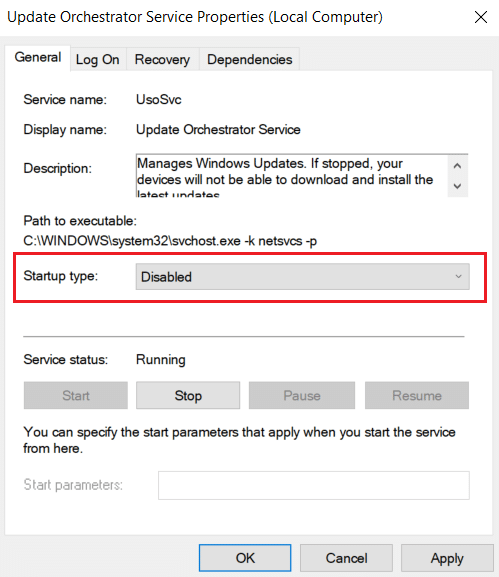
4. cliceáil Cuir iarratas isteach agus OK chun athruithe a dhearbhú.
Method 4: Disable Task Scheduler
Task Scheduler is a service that enables you to schedule and perform any task on your PC without manual intervention at any specific time. Sometimes a planned automated task can wake PC from sleep, causing this MoUsoCoreWorker.exe process issue. Follow the instructions below to turn off Task Scheduler.
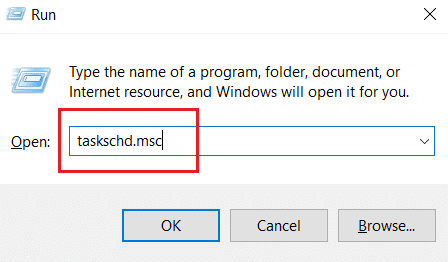
1. Brúigh Windows + R eochracha ag an am céanna chun an Rith dialóg.

2. cineál taskschd.msc on Run Dialog Box agus brúigh Iontráil a sheoladh tasc Sceidealóir.
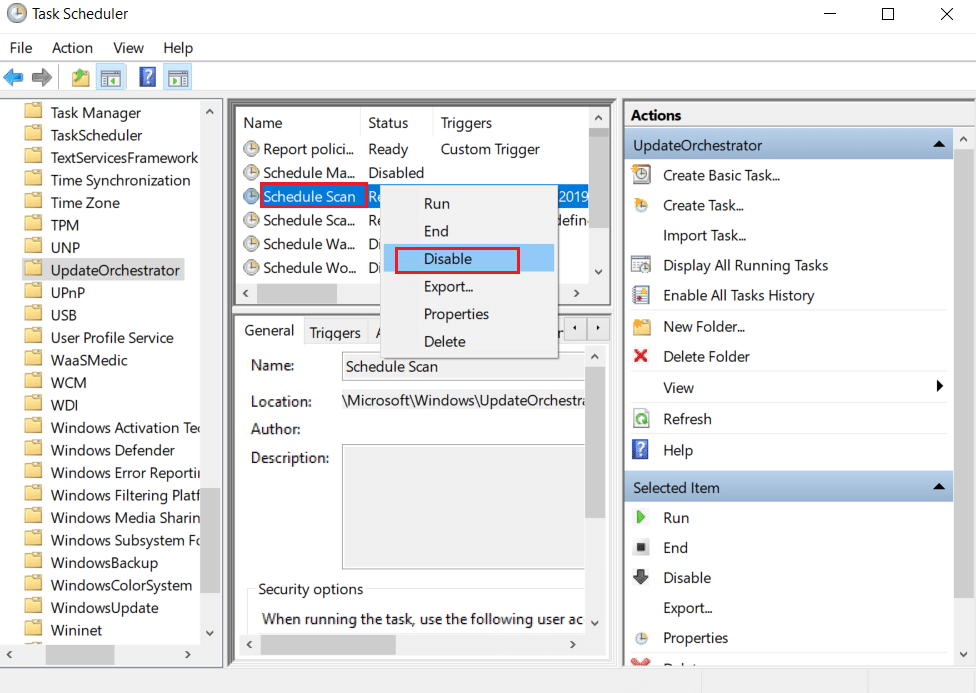
3. I tasc Sceidealóir Window, navigate to the Task Scheduler Library > Microsoft > Windows > UpdateOrchestrator folder on the left pane.
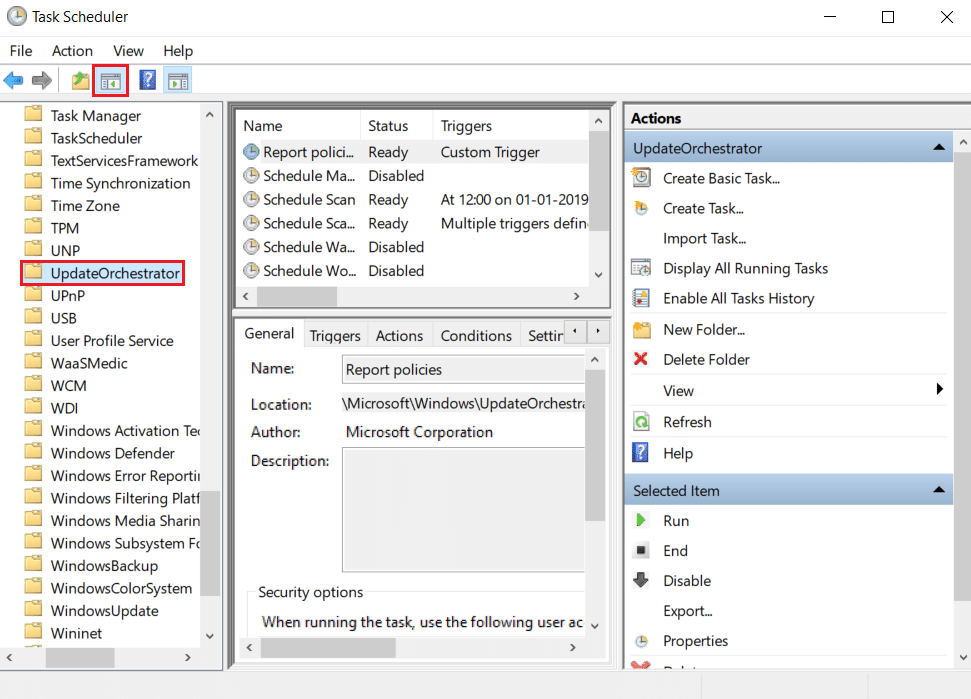
4. Sa UpdateOrchestrator folder, find and right-click Schedule scan task agus roghnaigh díchumasaigh.
5. Exit Task Scheduler and atosú an ríomhaire.
Chomh maith leis sin Léigh: How to Check How Much VRAM Do I Have on Windows 10
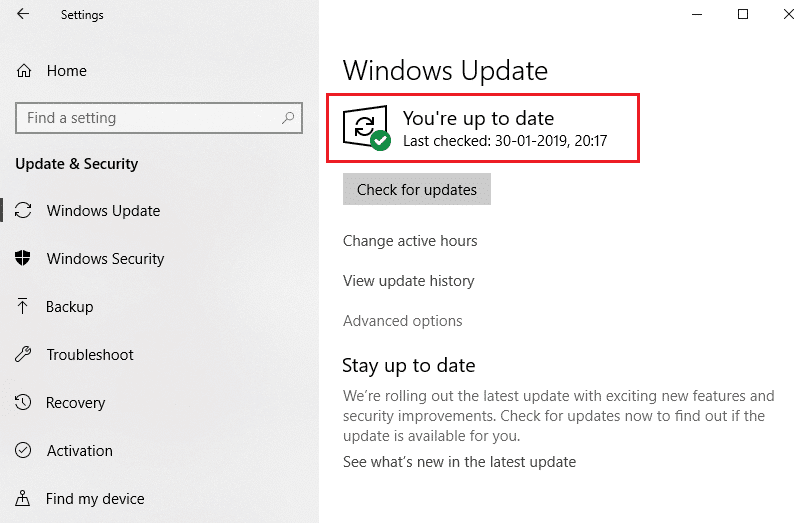
Modh 5: Nuashonraigh Windows
Outdated Windows PC can create compatibility issues. Microsoft team releases updates to fix bugs and add other useful features. Updating Windows may fix this MoUsoCoreWorker.exe process issue. Follow these to do so.
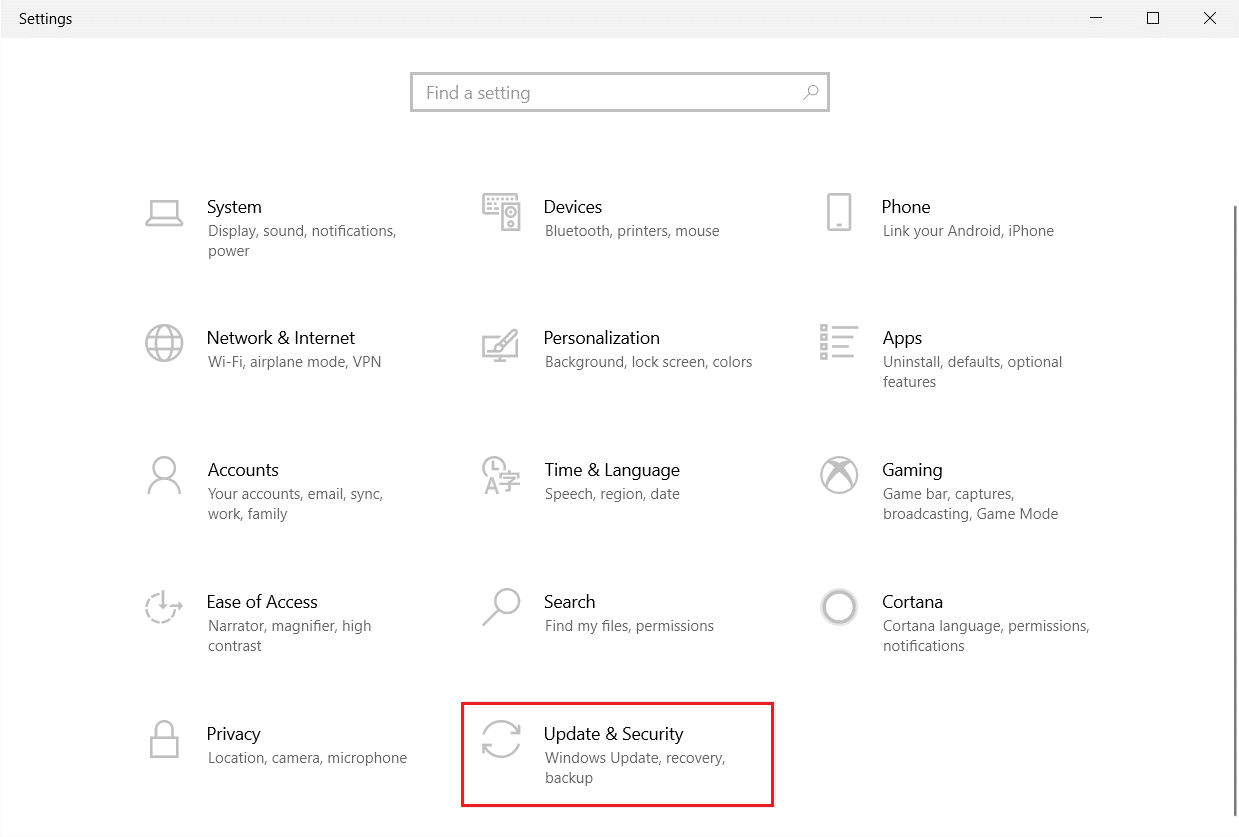
1. Brúigh an Eochracha Windows + I ag an am céanna a sheoladh Socruithe.
2. Cliceáil ar an Nuashonrú & Slándáil tíl, mar a thaispeántar.
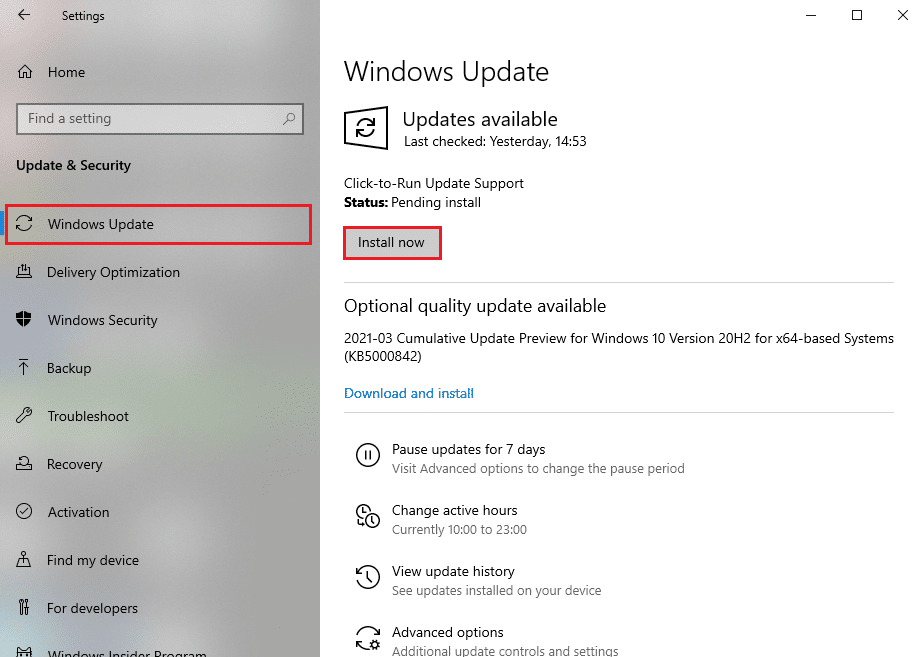
3. Sa Windows Update tab, cliceáil ar Seiceáil do nuashonruithe cnaipe.
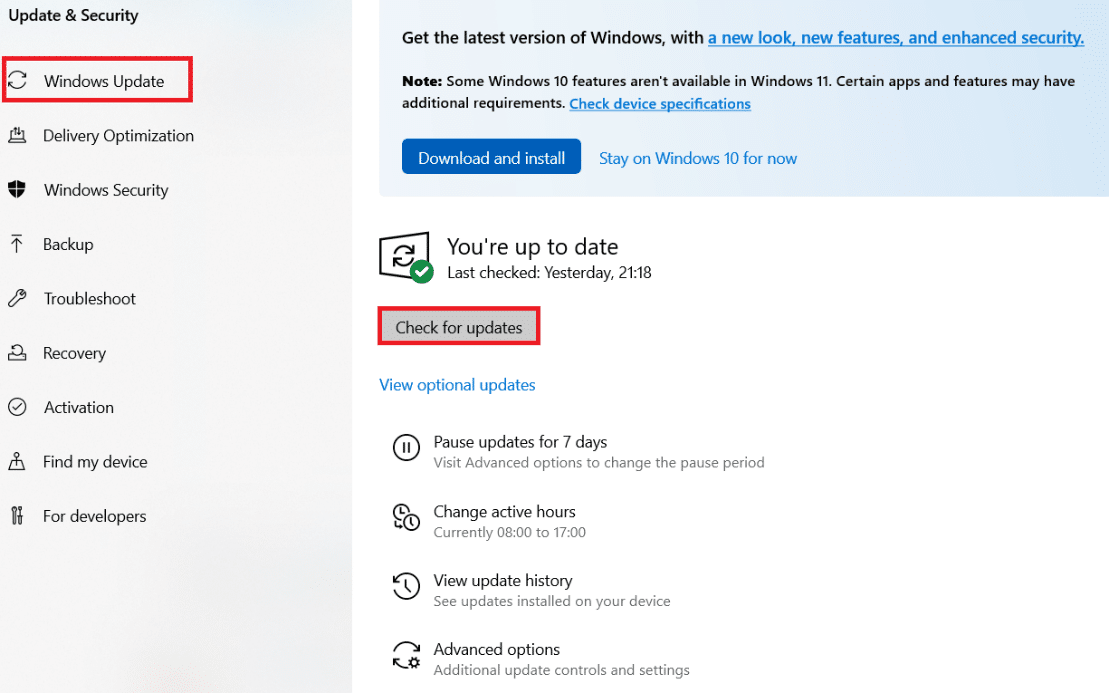
4A. Má tá nuashonrú nua ar fáil, ansin cliceáil Suiteáil Anois agus lean na treoracha chun nuashonrú a dhéanamh.
4B. Seachas sin, má tá an Windows cothrom le dáta, ansin beidh sé a thaispeáint Tá tú suas chun dáta teachtaireacht.
Modh 6: Úsáid Eagarthóir Clárlainne
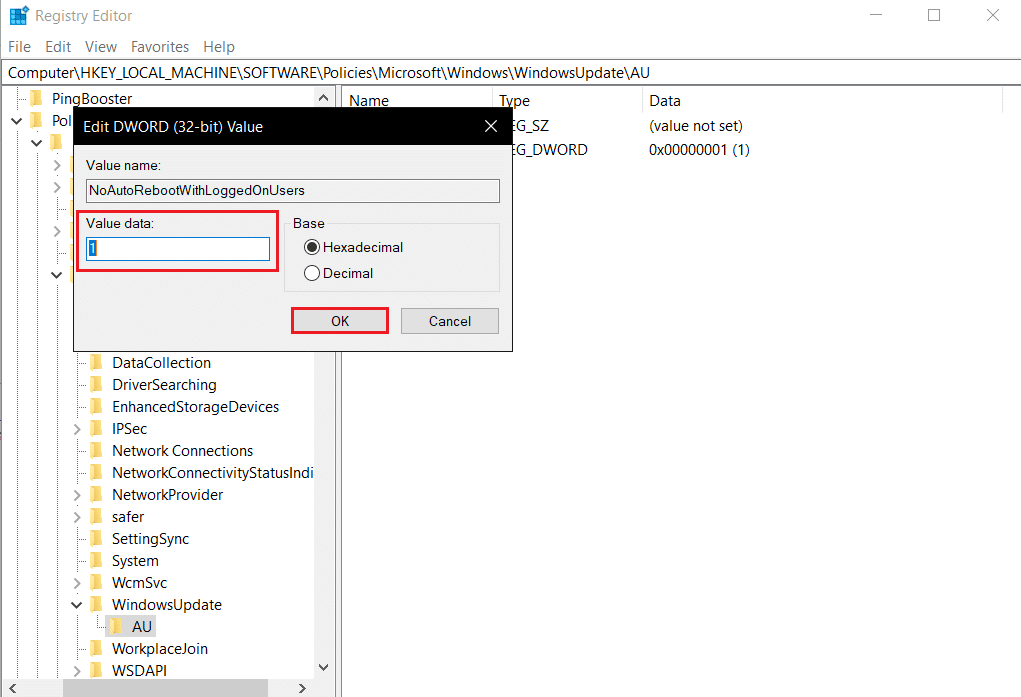
Registry Editor is a repository containing all configurations, values and settings for Windows. We can use it to create NoAutoRebootWithLoggedOnUsers DWORD which will stop PC from auto rebooting and may fix this MoUsoCoreWorker.exe MoUSO Core Worker process error. Follow the below-mentioned steps to do it.
Nóta: Modifying Registry Editor may cause issues. Create Registry backup before following this method as shown below.
1. Brúigh Windows + R eochracha le chéile chun an Rith dialóg.

2. cineál regedit agus cliceáil OK a sheoladh Eagarthóir Chlárlann.

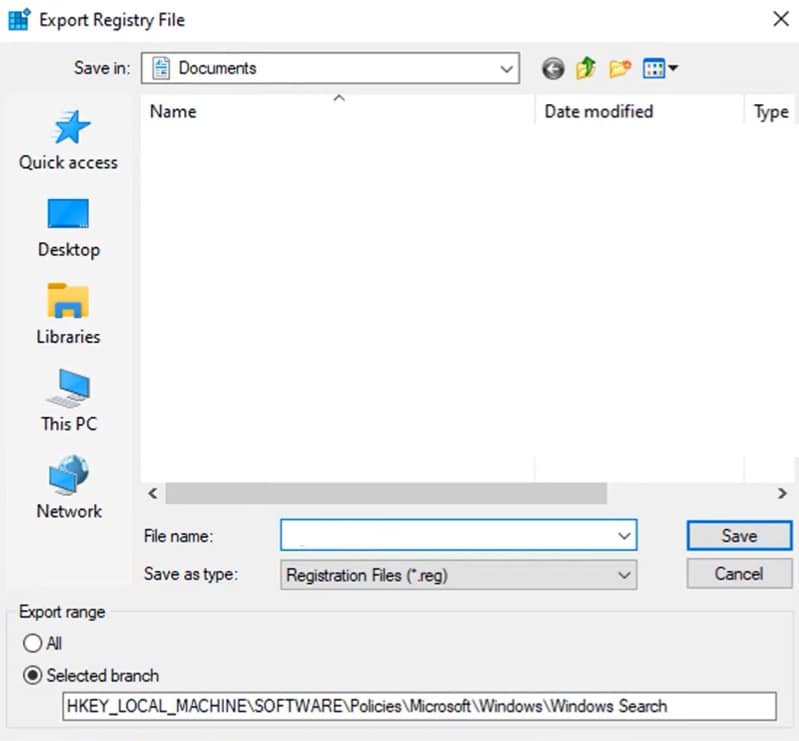
3. Cliceáil ar Comhad agus roghnaigh an Easpórtáil… option. It will open Comhad na Clárlainne Easpórtála fhuinneog.
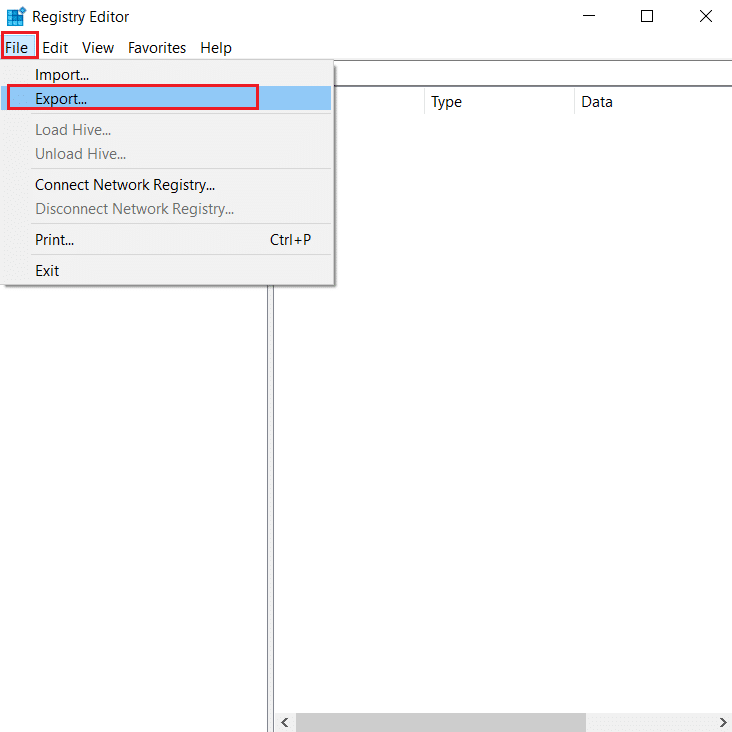
4. Name it accordingly and click on Sábháil. Registry Backup will be created which you can import if things go wrong.
5. After creating backup, navigate to the following path in Eagarthóir Chlárlann.
HKEY_LOCAL_MACHINESOFTWAREPoliciesMicrosoftWindowsWindowsUpdateAU
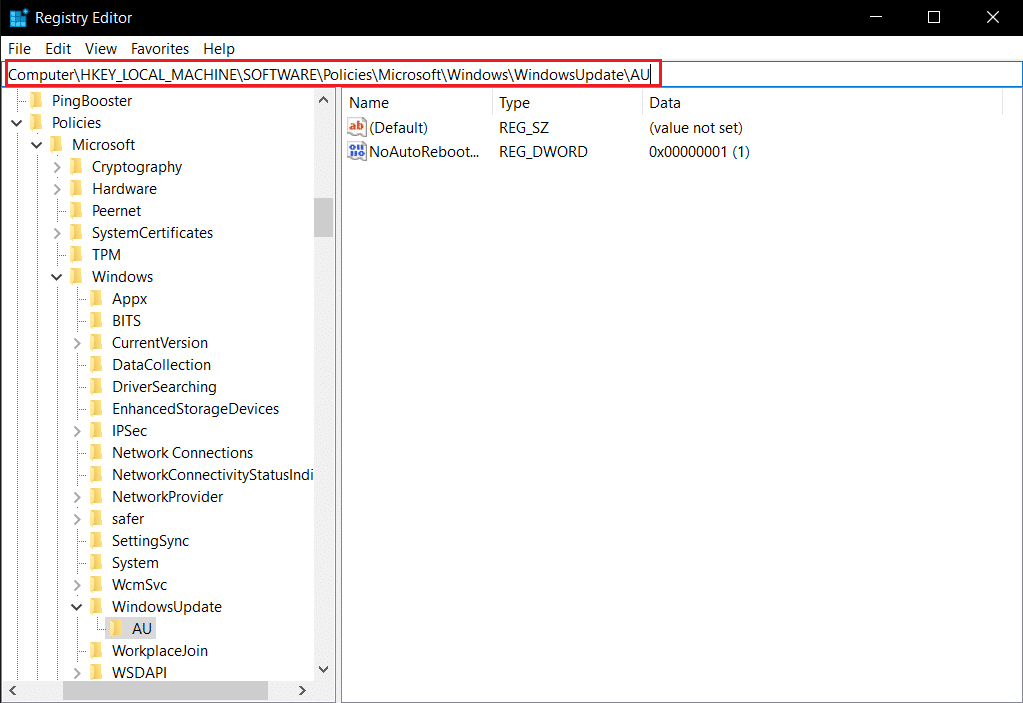
6. In the right pane, locate and double click NoAutoRebootWithLoggedOnUsers eochair.
7. Socraigh Dáta Luach as 1 on the popup and click OK chun athruithe a shábháil.
8. Exit Registry Editor and atosú an ríomhaire.
Chomh maith leis sin Léigh: How to Fix hkcmd High CPU Usage
Modh 7: Atosaigh Seirbhís Nuashonraithe Windows
If your PC is unable to Sleep it may be because Windows Update service not working properly because of various errors. To resolve this, restart Windows Update service by following these steps.
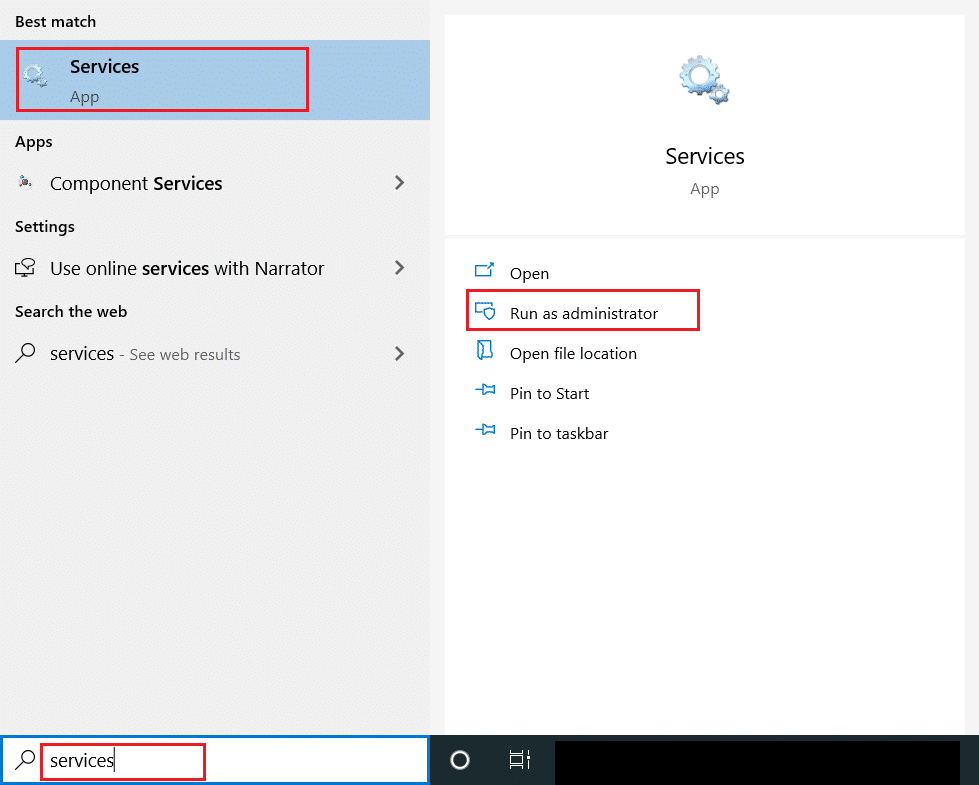
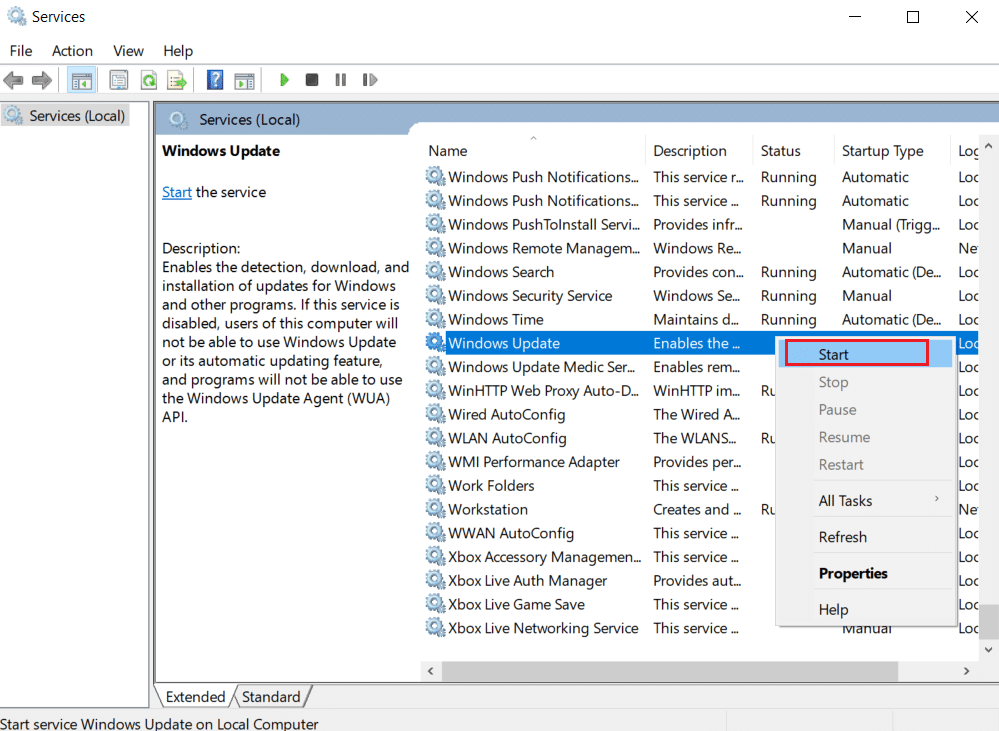
1. Brúigh an Windows eochair agus cineál seirbhísí agus cliceáil ar Rith mar riarthóir a sheoladh Seirbhísí fhuinneog.
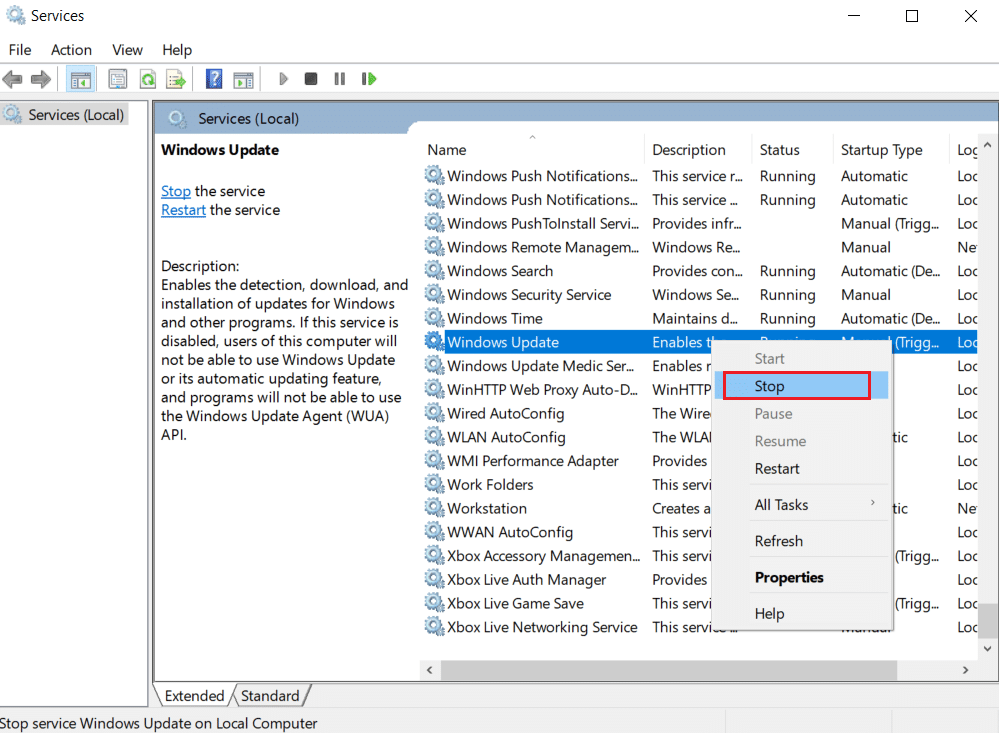
2. Aimsigh agus deaschliceáil ar Windows Update seirbhís agus roghnaigh stad.
3. After that, minimize seirbhís fhuinneog.
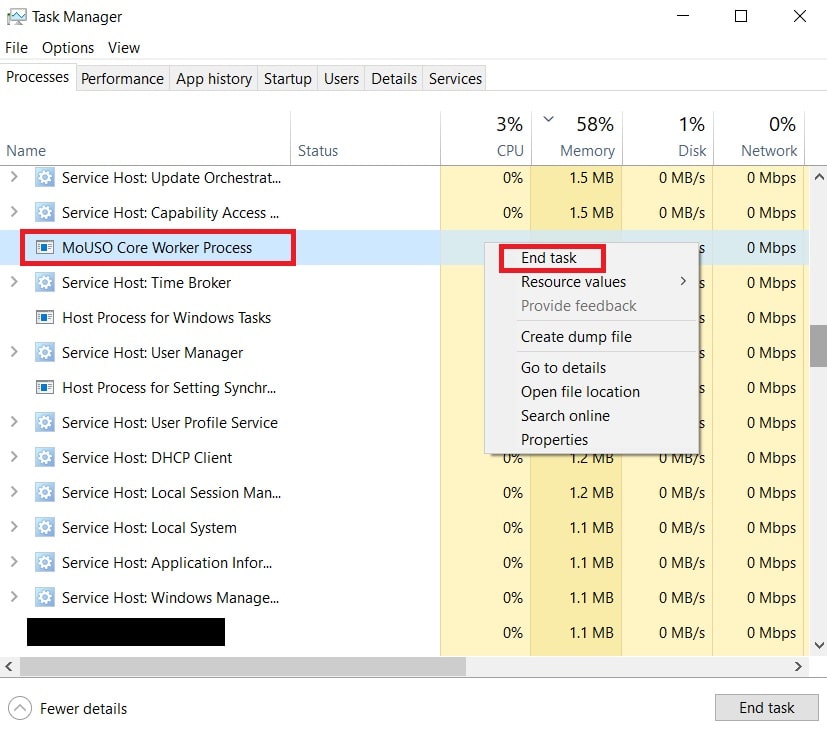
4. Brúigh Eochracha Ctrl + Shift + Esc ag an am céanna a oscailt Bainisteoir tasc.
5. Cliceáil ar Tá níos mó sonraí.

6. Aimsigh agus deaschliceáil ar MoUSO Core Worker Process agus roghnaigh Tasc deireadh.
7. Close Task Manager and maximize Seirbhísí fhuinneog.
8. Deaschliceáil ar Windows Update agus roghnaigh Tòisich.
After restarting Windows Update service, check if this MoUsoCoreWorker.exe process error is resolved.
Method 8: Change Windows Update Service Startup Mode
If the Windows Update service is set as manual in Startup type, it can sometimes freeze during its processes which may trigger PC to wake up from sleep. You can fix this issue by changing its Startup type to Automatic and to do that follow the steps below.
1. Lean 1 Céim ó Modh 7 a oscailt Seirbhísí.
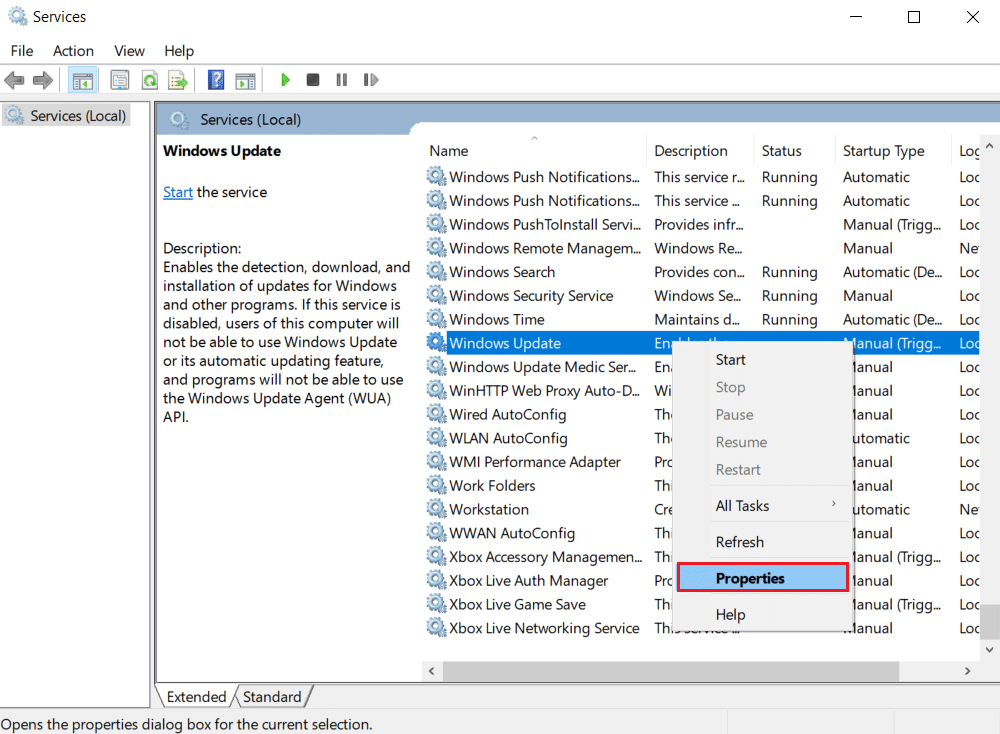
2. Aimsigh agus deaschliceáil Windows Update seirbhís agus roghnaigh Airíonna to open Properties window.
3. I Go ginearálta cluaisín, athrú Cineál Tosaithe chun Uathoibríoch ón liosta anuas.
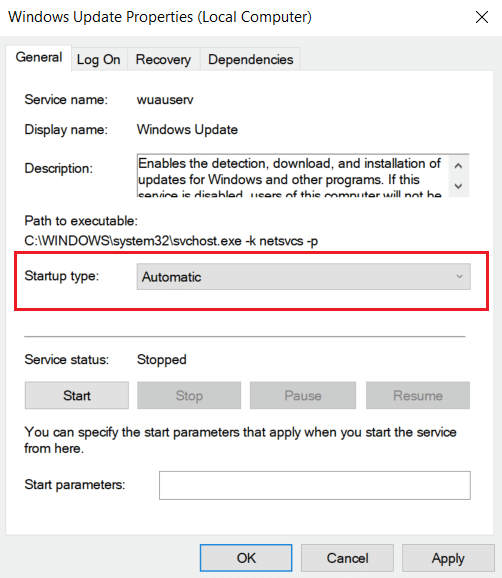
4. cliceáil Cuir iarratas isteach agus OK chun athruithe a shábháil.
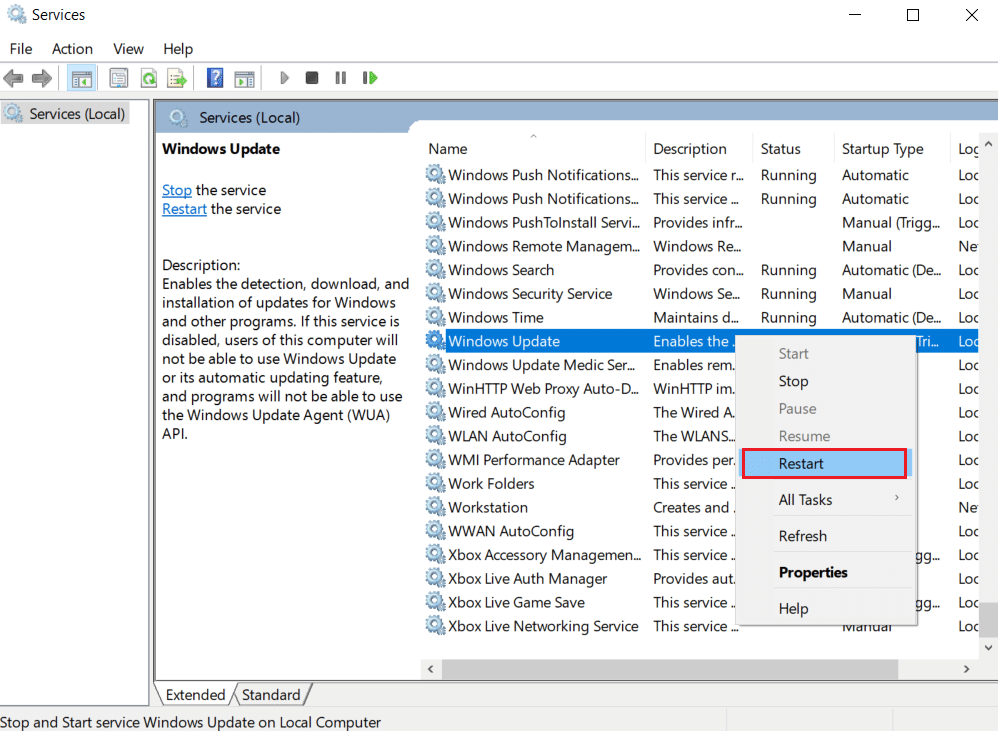
5. I Seirbhísí window right-click on Windows Update seirbhís arís agus roghnaigh Atosaigh.
6. When Windows update has restarted, close Seirbhísí fhuinneog.
Nóta: If the error persists, try to stop automatic updates and check if it works for you.
Method 9: Run Windows Update Troubleshooter and Power
Troubleshooting detects and resolves any problem present within a program. As MoUSO Core Worker Process is related to Windows updates, running Windows update troubleshooter can resolve the error. You can do it by following our guide to Run Windows Update Troubleshooter.
Chomh maith leis sin Léigh: Deisigh .NET Runtime Optimization Service Úsáid Ard LAP
Method 10: Run Power Troubleshooter
If you are still facing this issue after running Windows Update Troubleshooter, try running Power troubleshooter to see if it resolves it. Follow the steps to do the same.
1. Buail an Eochracha Windows + I le chéile a oscailt Socruithe.
2. Roghnaigh Nuashonruithe agus Slándáil on Socruithe leathanach.

3. Cliceáil ar an Troubleshoot menu on the left pane.
4. Ansin, roghnaigh an Cumhacht rogha faoi Fadhbanna eile a aimsiú agus a shocrú alt agus cliceáil ar an Rith an fabhtcheartaitheoir cnaipe.
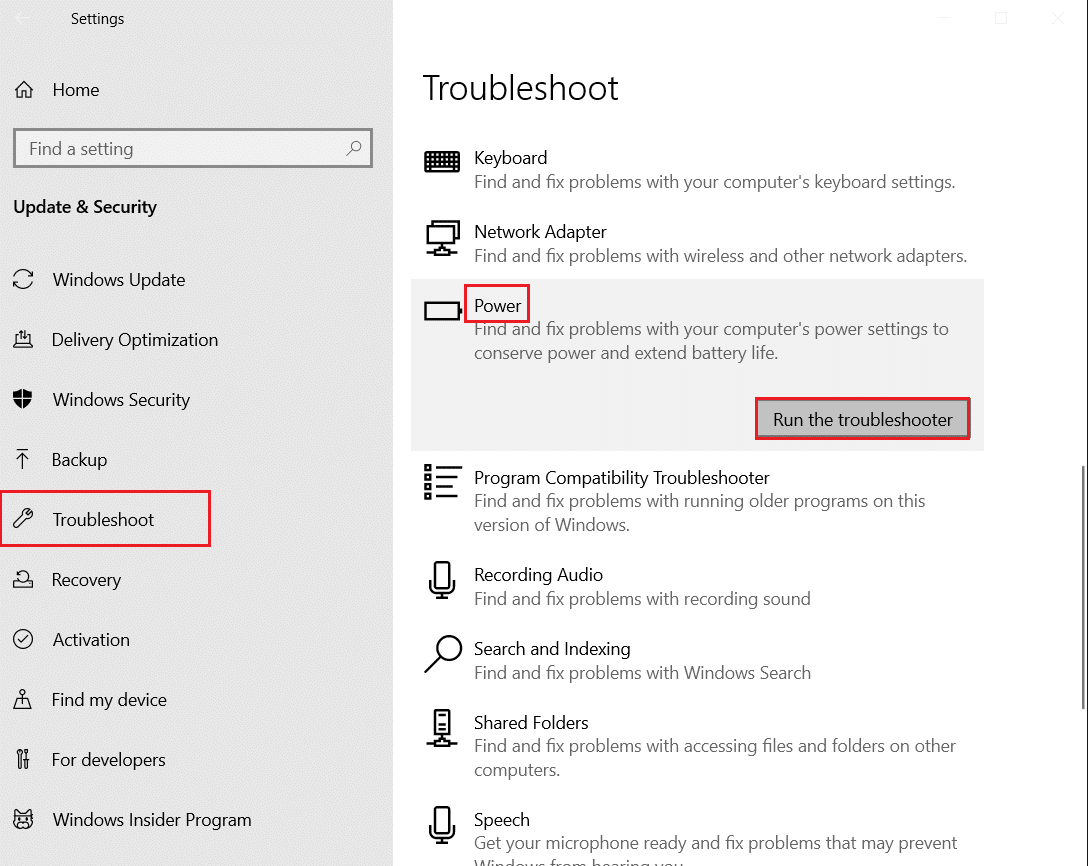
5. Wait for the troubleshooting process to complete and Atosaigh do ríomhaire.
Method 11: Restore Default Power Settings
If power settings are misconfigured, then can affect functioning of sleep mode on PC. Try changing power settings to default and see if it fixes this MoUsoCoreWorker.exe process issue. To do so, follow the given steps.
1. Brúigh an Windows eochair agus cineál ordú go pras agus roghnaigh Rith mar riarthóir a sheoladh Ordú Pras.
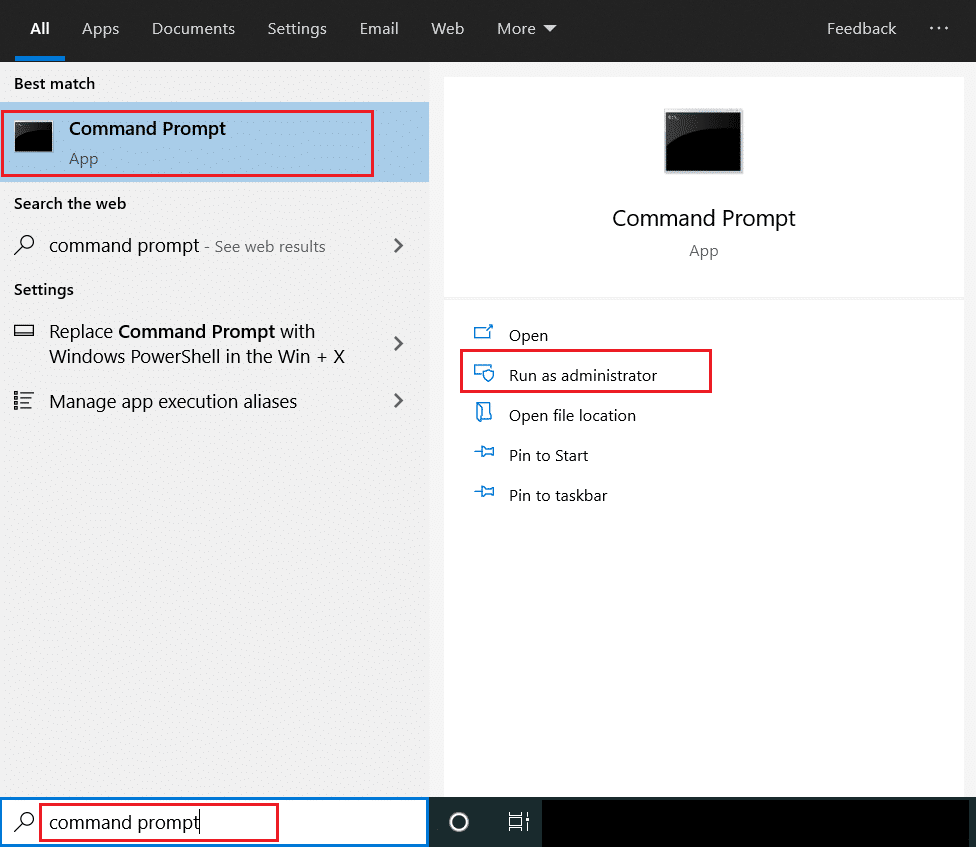
2. Type the following command in Ordú Pras agus brúigh Iontráil eochair to execute it. Once command is executed, power settings will revert to default settings.
powercfg -restoredefaultschemes
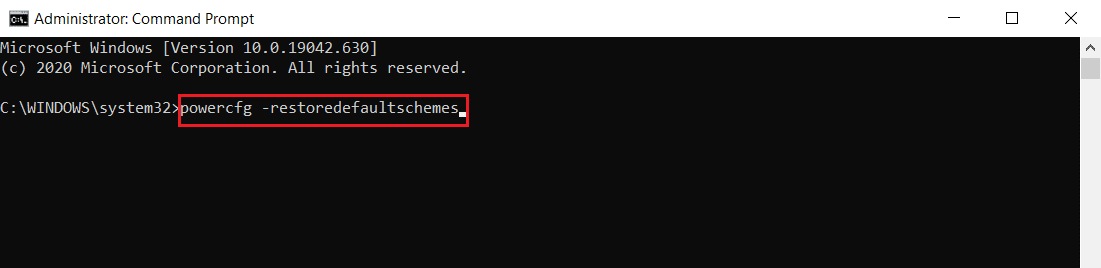
3. Exit Command Prompt and atosaigh an ríomhaire.
Method 12: Overrule MoUSO Core Worker Process Request
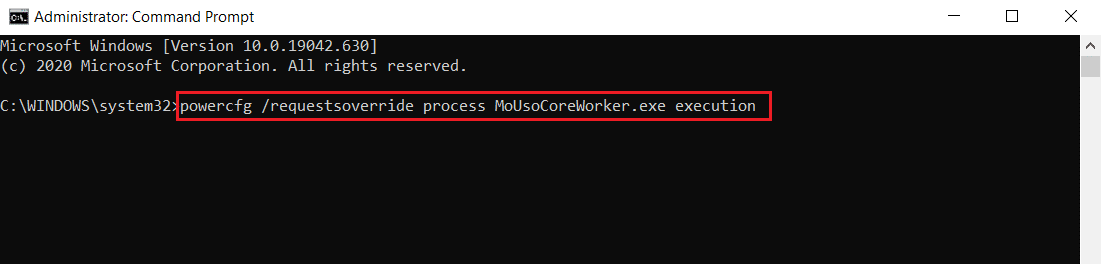
Another way to fix this issue is by modifying your power settings to overrule MoUSO Core Worker Process request. To do it, follow these instructions carefully.
1. Lean 1 Céim ó Modh 11 a oscailt Ordú Pras mar riarthóir.
2. Type the following command to overrule MoUSO Core Worker Process request and press the Iontráil eochair.
powercfg /requestsoverride process MoUsoCoreWorker.exe execution
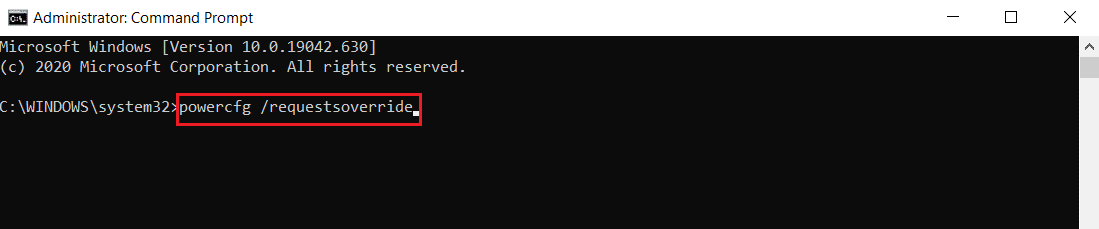
3. After executing the previous command, type the following command to verify the overrule process and press the Iontráil eochair.
powercfg /requestsoverride
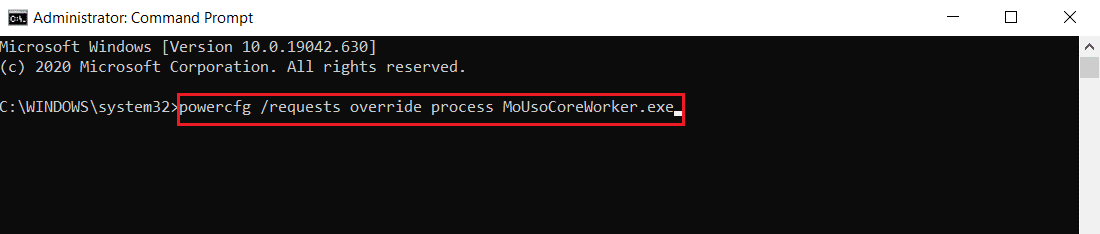
Nóta: In case you want to stop overruling MoUSO Core Worker Process request, simply execute this command in Ordú Pras.
powercfg /requests override process MoUsoCoreWorker.exe
Chomh maith leis sin Léigh: Deisigh Próiseas Seirbhísithe Óstach DISM Úsáid Ard-LAP
Method 13: Disable Troublesome Hardware Components
MoUSO Core Worker Process may stay if it is unable to power off certain hardware components. It can be fixed by disconnecting such hardware devices by enabling PC to power them off. Follow the steps below do the same
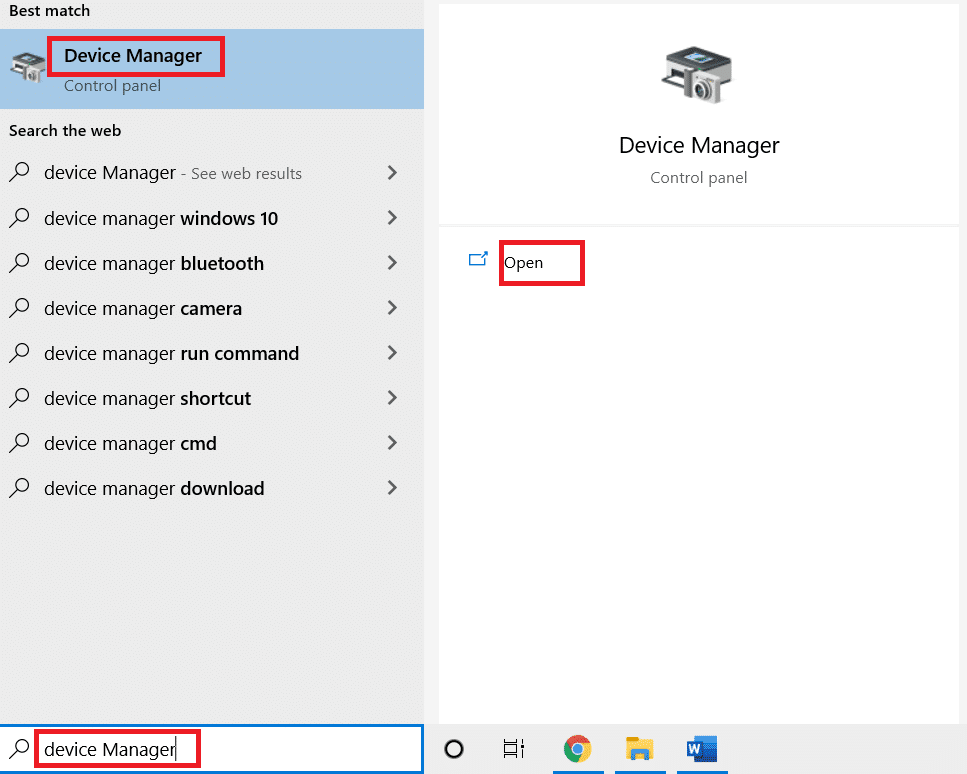
1. Brúigh an Windows eochair, cineál Bainisteoir gléas agus cliceáil ar Oscail.
2. Roghnaigh agus leathnaigh Rialaitheoirí Sraithuimhreacha Bus Uilíoch. Choose a device, right-click on it and select Airíonna. It will open Properties window.
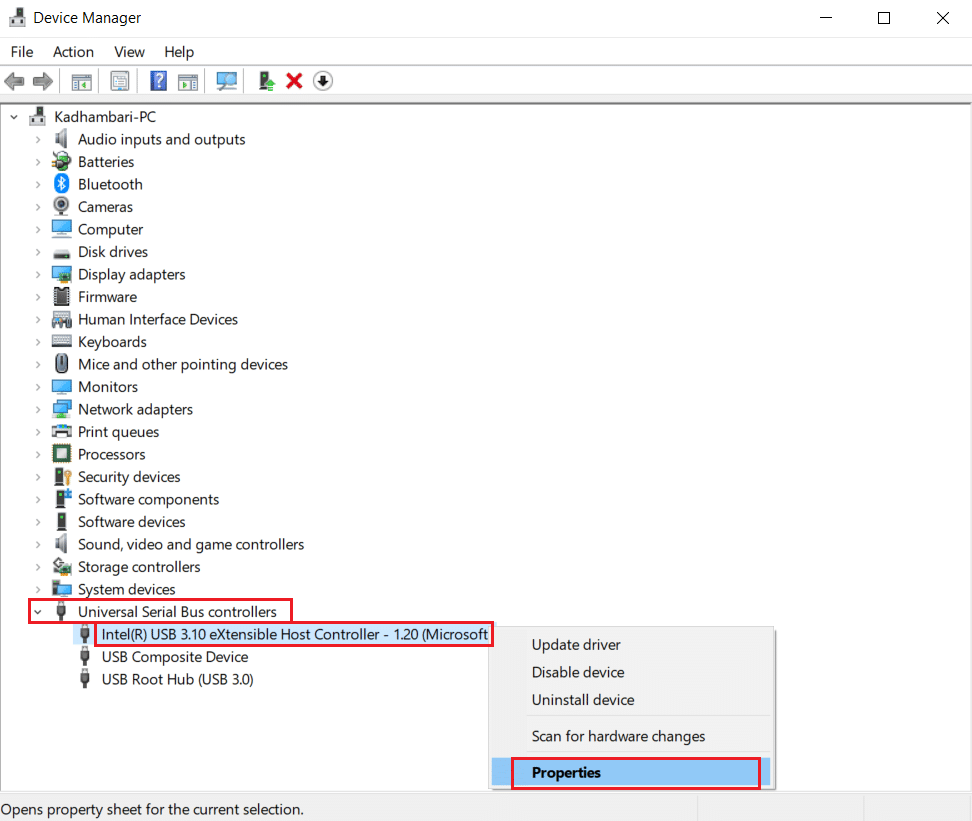
3. Téigh Bainistíocht Cumhacht tab, check the box marked Lig don ríomhaire an gléas seo a mhúchadh chun cumhacht a shábháil agus cliceáil OK chun athruithe a shábháil.
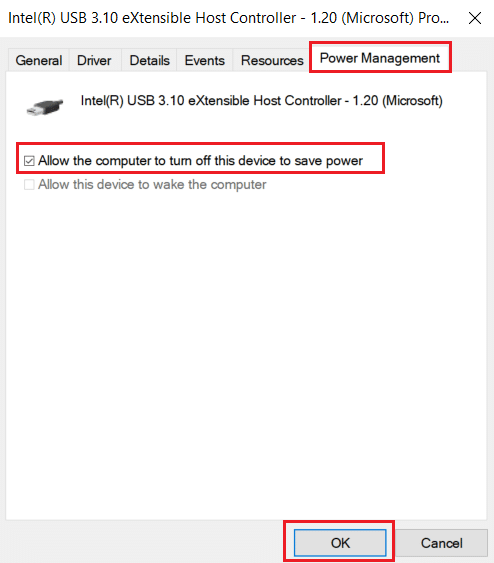
4. Repeat the process for all other devices to identify which ones are the problematic hardware devices and disable them.
5. If the issue persists, you can run the following command to check which devices are not powered off and hit the Iontráil eochair.
powercfg -devicequery wake_armed
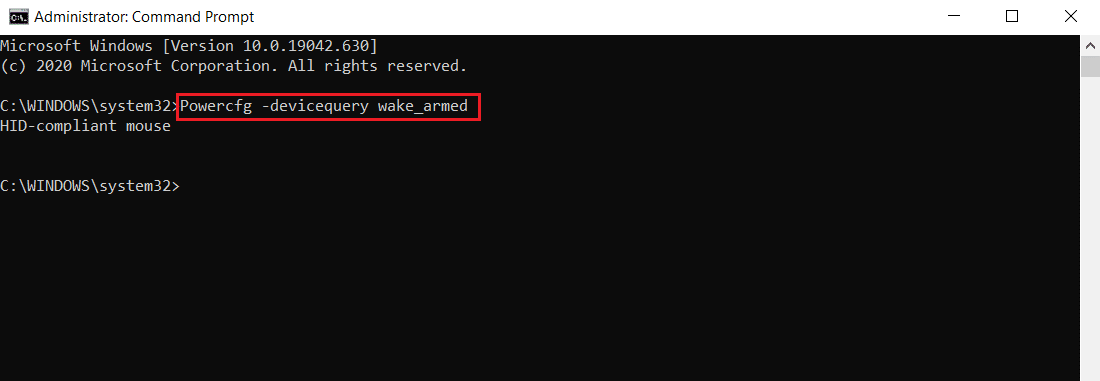
6. After this command is executed unplug the device mentioned in Command Prompt or modify its properties by going to the Bainistíocht Cumhacht cluaisín mar a thaispeántar i 3 Céim.
Modh 14: Athchóirigh an Chórais a Fheidhmiú
If none of the above solutions works, your final option is to perform System Restore. If you are unable to identify any program or driver causing MoUSO Core Worker Process to constantly wake up PC from sleep, restore your PC to a previous date by following our guide to Use System Restore on Windows 10. This method will surely fix the issue.
Molta:
We hope that this guide was helpful and you were able to stop MoUSO Core Worker Process from waking your PC from sleep. Let us know which method worked for you the best. If you have any queries or suggestions then feel free to drop them in the comments section.

