Do you share your work or home computer with others? Do apps and files from guest accounts consume an insane amount of disk space? Windows has a quota system that grants administrators more control over storage management. You can use the tool to set disk usage quota for both internal and external storage devices.
We’ll walk you through the steps to control data users can store on your PC by setting disk quota limits. Before jumping to the steps, note that the Windows Quota Management tool only works on drives formatted using the Córas comhaid NTFS.

Configure Disk Quota via File Explorer
There are several ways to enable the quota management system in Windows 11. You can do so via File Explorer, Registry Editor, or the Eagarthóir Polasaí Grúpa. However, the File Explorer route is the easiest.
- Open File Explorer and select an ríomhaire ar an mbarra taobh.

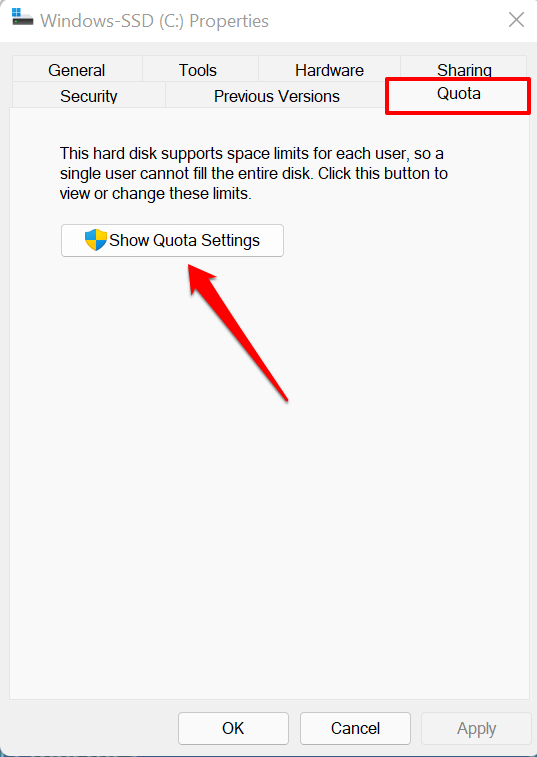
- Scroll to the “Devices and drives” section, right-click the disk you want to limit, and select Airíonna.

- Head to the Quota tab and select Show Quota Settings.
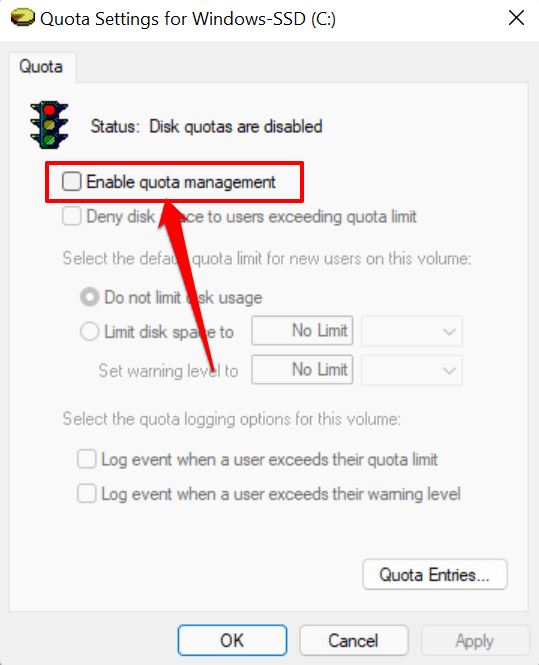
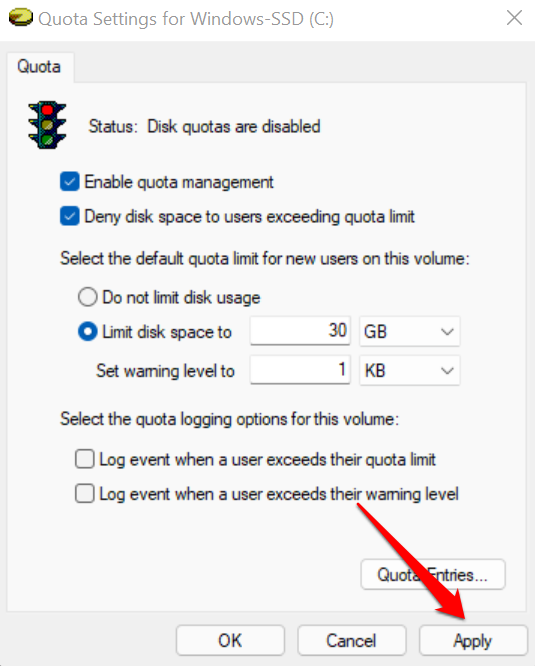
- seiceáil an Enable quota management bosca.
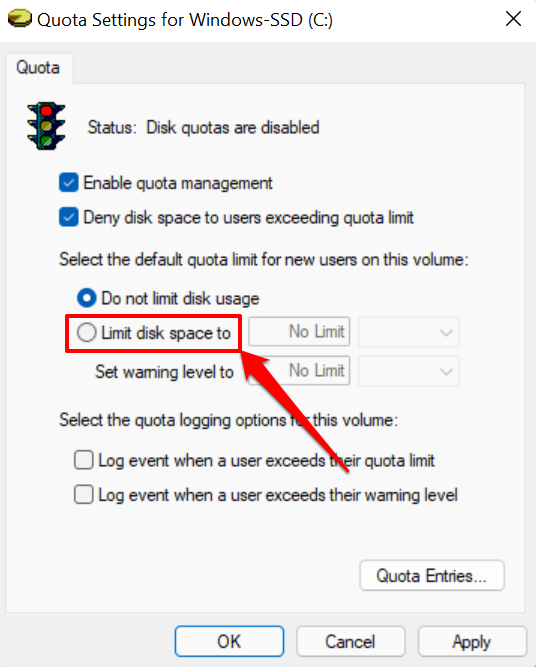
- Next, check the Deny disk space to users exceeding quota limit box. That will enforce the limitation and ensure any user who reaches the quota limit can no longer write data to the disk.

- Roghnaigh Limit disk space to.
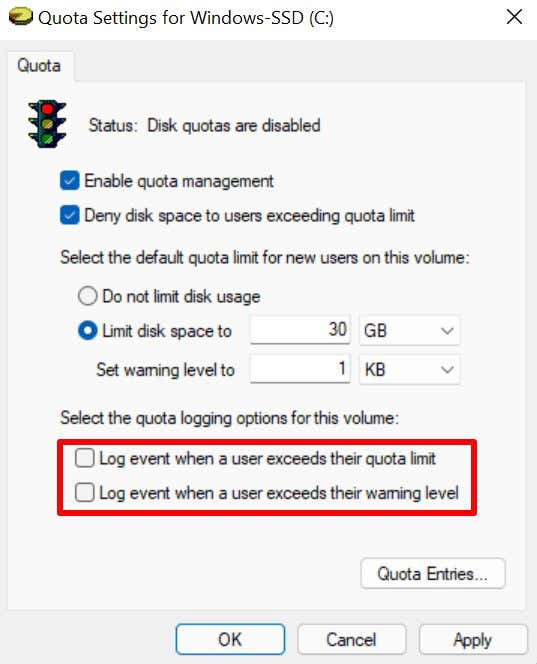
- The next step is to set the disk limit. Say you want to set a 30GB disk quota, enter the digit (30) in the first dialog box and select the storage unit (GB) in the adjacent drop-down box.

You should also set a warning level that’s slightly lower than the disk limit. For a 30GB disk limit, setting a 25GB warning level is ideal. When users hit or exceed the warning limit, Windows sends a reminder that they’re close to exhausting the disk space allocated to them.
- If you want Windows to record an event log (in the Amharcóir Imeachtaí Windows) when users excess their disk quotas or hit storage limit, check Log event when a user exceeds their quota limit agus Log event when a user exceeds their warning level.
- Roghnaigh Cuir iarratas isteach dul ar aghaidh.
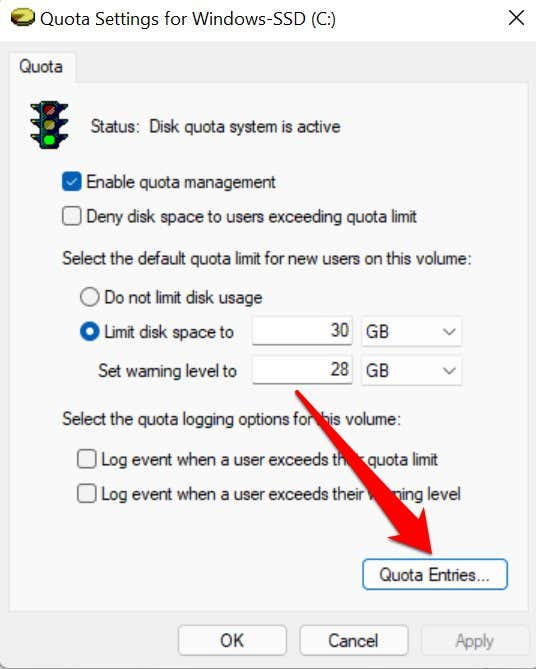
- Roghnaigh OK on the warning prompt to enable the quota system you configured.

- Roghnaigh OK in the Quota Settings window.

Note that you might have to restart your computer for these changes to take effect. We should also mention that disk quota configurations are drive-specific. If your PC has multiple disk partitions (separate from your C: drive), quota limits on the local disk don’t apply to other partitions.
View and Adjust Disk Quota Limit
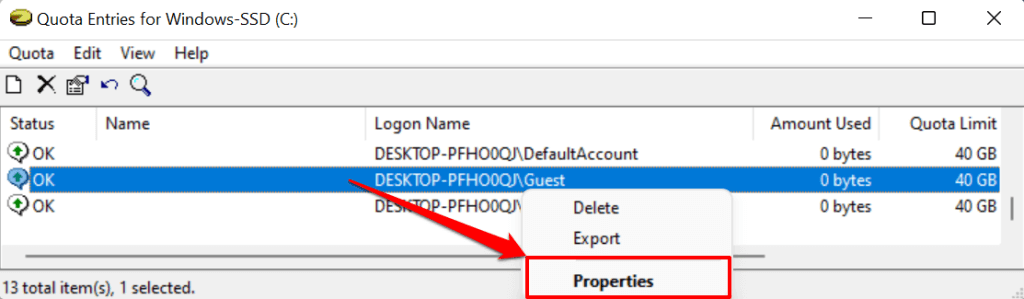
When you set a storage quota limit for disk, Windows applies the limit to all users on your computer. There’s a “Quota Entries” tool in the Quota Settings window that lets you adjust or disable the disk quota limit for specific users. You can also use the tool to check the current disk space usage for all user accounts against the set quota.
- Open the Quota Settings window for the drive and tap the Quota Entries cnaipe.
- The “Amount Used” and “Quota Limit” columns show how much disk space a user has consumed against their allotted quota limit.
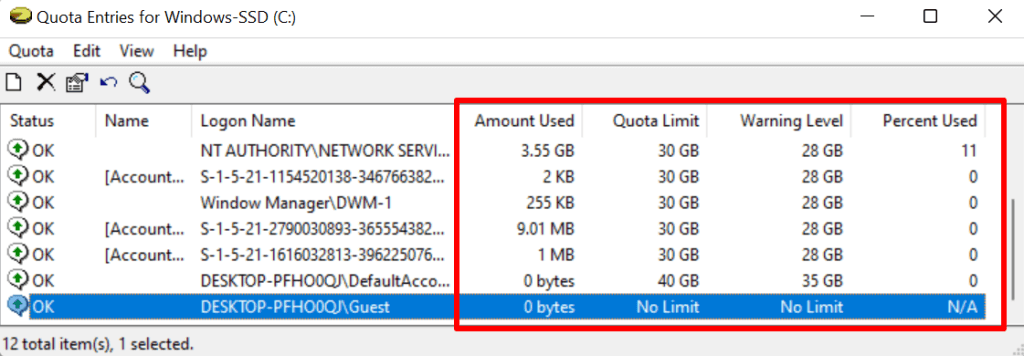
If you don’t find an account in the “Name” or “Logon Name” columns, proceed to add the user to the list manually. Tap Quote on the menu bar and select New Quota Entry.
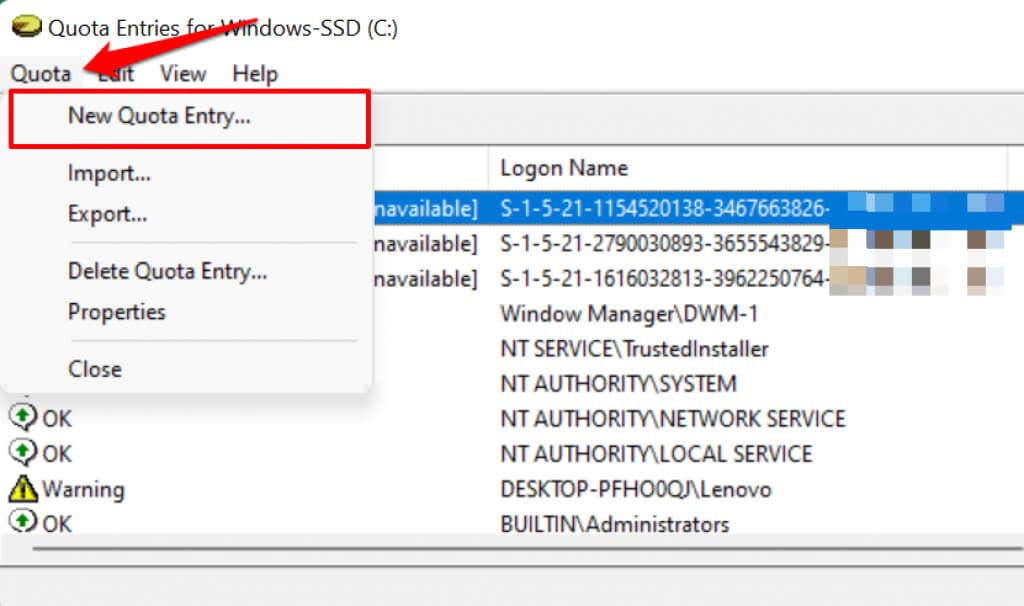
- Roghnaigh Advanced sa chúinne ag bun na láimhe clé.
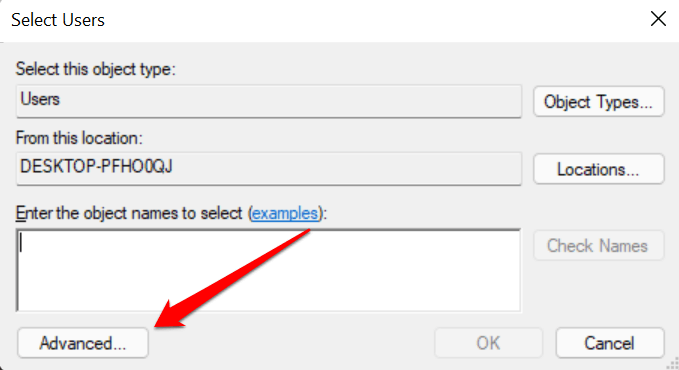
- Roghnaigh an Faigh Anois button and double-click the account you want to include in the storage quota limitation.

- Roghnaigh OK dul ar aghaidh.
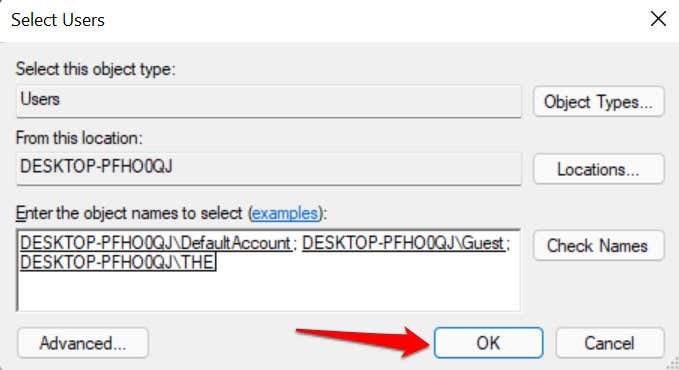
- Set the quota limit and warning level for the user and select OK.

- To adjust or disable disk quota for a user, right-click the account and select Airíonna.
- Adjust the user’s disk quota in the Limit disk space to agus Set warning level to dialog boxes. Select Cuir iarratas isteach agus ansin OK.
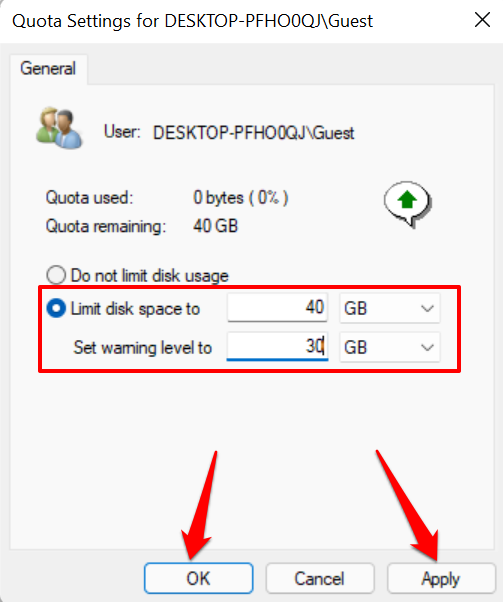
- Roghnaigh an Do not limit disk usage radio button if you want to delete or remove the quota limit. Select Cuir iarratas isteach agus OK dul ar aghaidh.
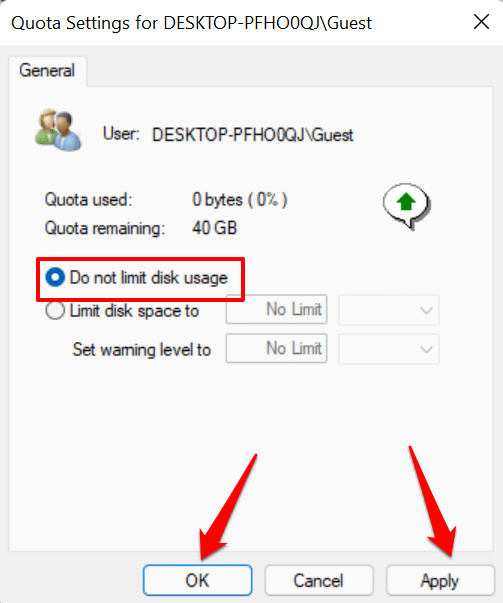
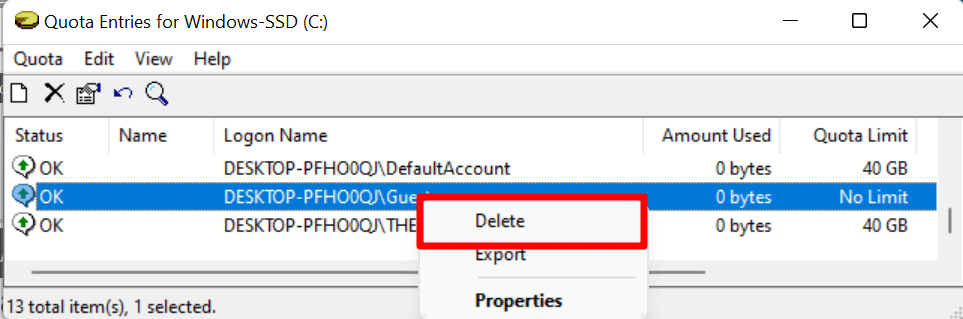
Another way to disable quota limits is to right-click the account name in the “Quota Entries” window and select Scrios.
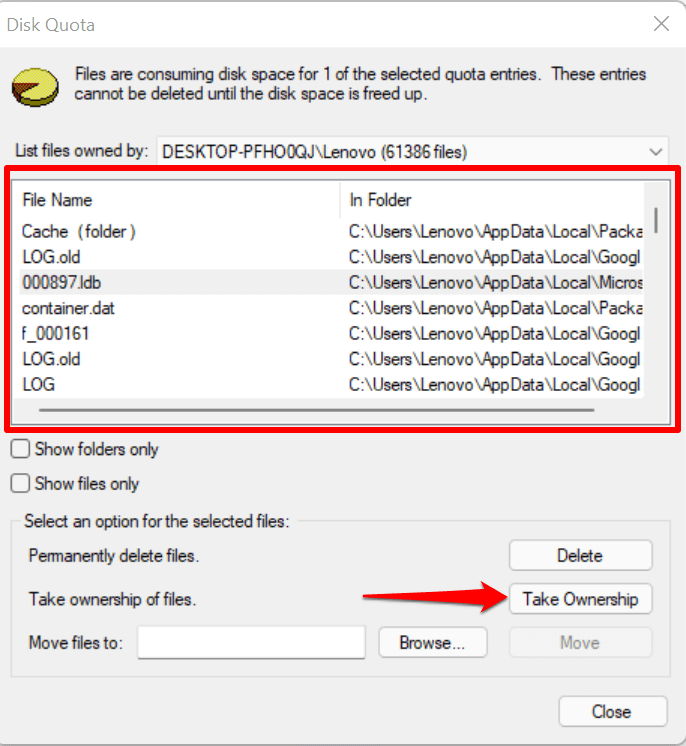
Roghnaigh Tóg Úinéireacht on the next page to save files in the disk space you allotted to the user account. Select Scrios if you don’t need the files.
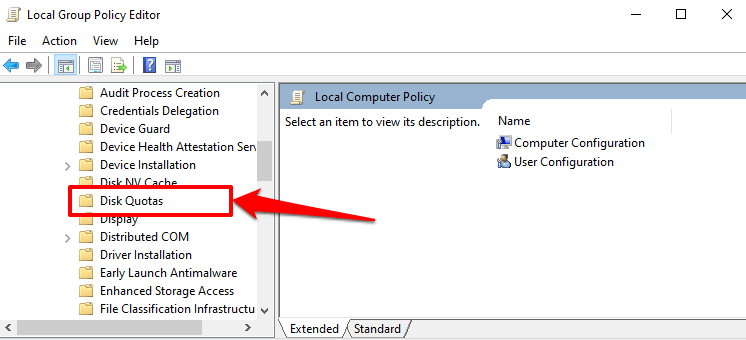
Set Disk Quotas Using Group Policy Editor
There are instances when Windows fails to enforce the storage quota limit configured via File Explorer. If that happens, modify or re-enable the disk quota in the Group Policy Editor.
Note that the Group Policy Editor is only available in Windows 11 Pro, Education, and Enterprise. If you use Windows 11 Home edition, try re-enabling the storage quota in the Registry Editor instead.
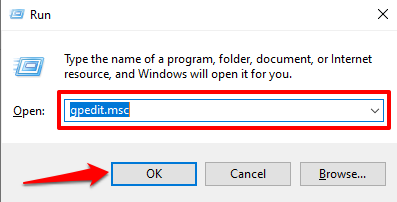
- Bain úsáid as an Eochair fuinneoige + R keyboard shortcut to open the Windows Run box. Type gpedit sa bhosca dialóige agus brúigh Iontráil.
- On the sidebar, go to Cumraíocht ríomhaire > Teimpléid riaracháin > córas agus roghnaigh an Disk Quotas fillteán.
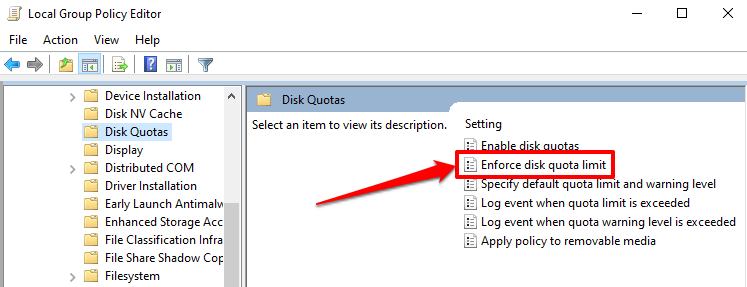
- Double-cliceáil Enable disk quotas.

- Roghnaigh an Cumasaithe cnaipe raidió, roghnaigh Cuir iarratas isteach, agus roghnaigh OK dul ar aghaidh.

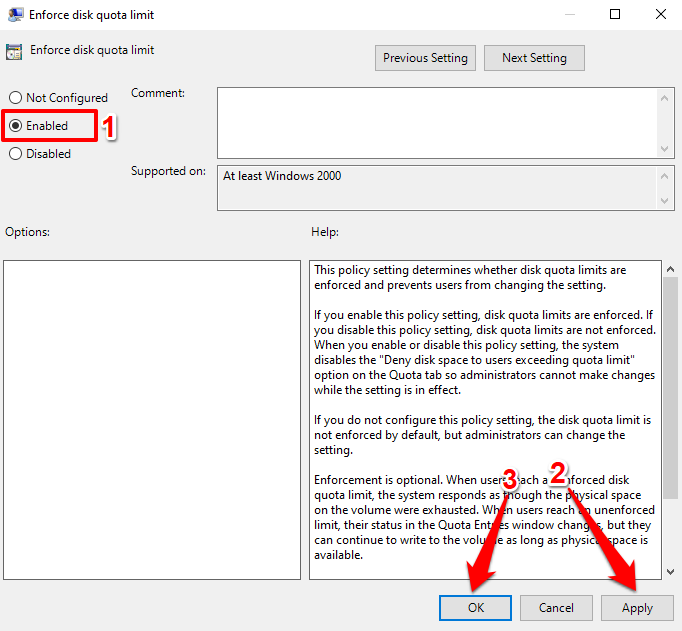
- One more thing: configure Windows to enforce the disk quota settings. Double-click Enforce disk quota limit.
- Roghnaigh Cumasaithe agus roghnaigh Cuir iarratas isteach to save the changes. Afterward, select OK chun an fhuinneog a dhúnadh.
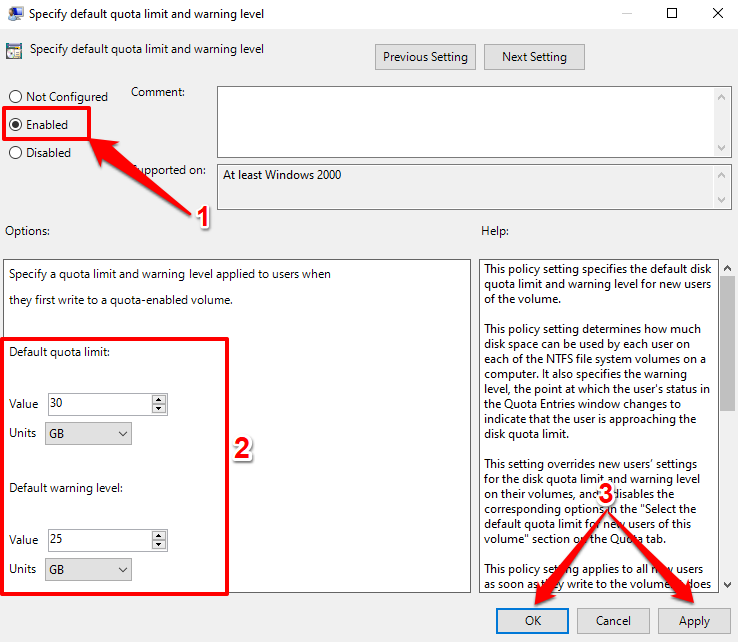
- The next and most crucial step is to specify your quota limit. Double-click Specify default quota limit and warning level.

- Roghnaigh Cumasaithe, enter the quota limit and warning level values and units, select Cuir i bhfeidhm, agus ansin OK.
- If you want the disk quota configuration applied to removable or external drives, double-click Apply policy to removable media agus leag go Cumasaithe.

Set Disk Quota via Registry Editor
You can also force-enable a disk quota limit on Windows 11 devices via the Registry Editor. Ensure you make a backup of your PC’s registry files before proceeding, so you don’t damage any critical file that could corrupt Windows or break your PC.
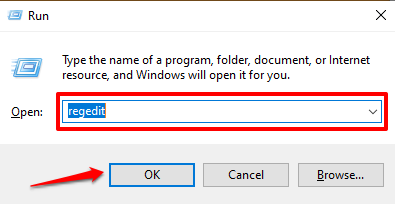
- Preas Windows eochair + R to open the Windows Run box. Enter regedit sa bhosca dialóige agus roghnaigh OK.
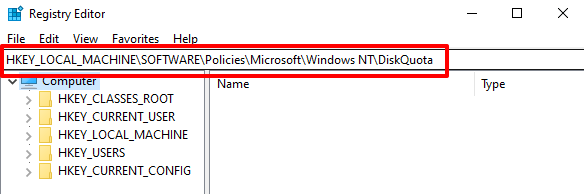
- Greamaigh HKEY_LOCAL_MACHINESOFTWAREPoliciesMicrosoftWindows NTDiskQuota sa bharra seoltaí agus sa phreas Iontráil.
A chinntiú go Cumasaigh agus A fhorfheidhmiú registry keys and their values are set to 1 (i.e., enabled). They both enable and enforce the disk quota limit in Windows.
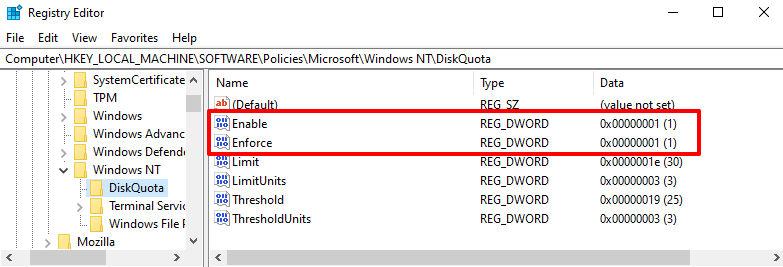
- Double-click the “Enable” or “Enforce” registry keys, enter 1 in the “Value data” dialog box and select OK.

Automate Storage Management
With the steps in this tutorial, you can set up a disk quota management system in Windows 11. These methods are backward compatible with older versions of the Windows operating system. That is, you can adopt these steps to set disk quotas in Windows 10, Windows 8, and Windows 7.

