If you don’t see Wireless Adapter under Network Connections neither there is a Network adapter tab under device manager then it seems like your Network Adapter is missing or not detected on your Windows 10 which is a serious issue because you won’t be able to access the Internet until the issue is resolved. In short, when you click on the Wireless icon on the system tray there won’t be any device listed in order to connect to the Internet and if you open Device Manager then you won’t see the Network Adapter tab.
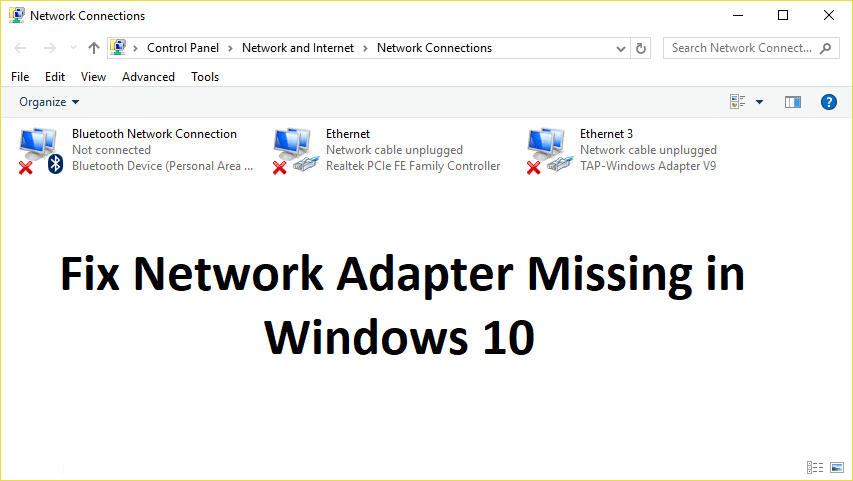
These are the reasons behind the Network Adapter missing issue:
- Network adapter missing in Device manager
- No Network Adapters showing in Device Manager
- Network Adapter Not Detected
- Network Adapter Not Found Windows 10
- No Network Adapter In Device Manager
The main cause of this issue seems to be outdated, incompatible or corrupted Network Adapter drivers. If you have recently upgraded from previous versions of Windows then it’s possible that the old drivers will not work with the new Windows and hence the issue. So without wasting any time let’s see how to actually Fix Network Adapter Missing in Windows 10 issue with the below-listed troubleshooting steps.
Note: Just make sure to uninstall any VPN software on your PC before continuing.
Deisigh adapter líonra ar iarraidh i Windows 10
Bí cinnte pointe athchóirithe a chruthú ar eagla go n-imíonn rud éigin mícheart.
Method 1: Reboot your Computer
Tá a fhios ag an gcuid is mó againn faoin cleas an-bhunúsach seo. Uaireanta is féidir aon choimhlint bogearraí a réiteach trí do ríomhaire a atosú ach tús úr a chur leis. Mar sin más duine thú arbh fhearr leis a ríomhaire a chur ar chodladh, is smaoineamh maith é do ríomhaire a atosú.
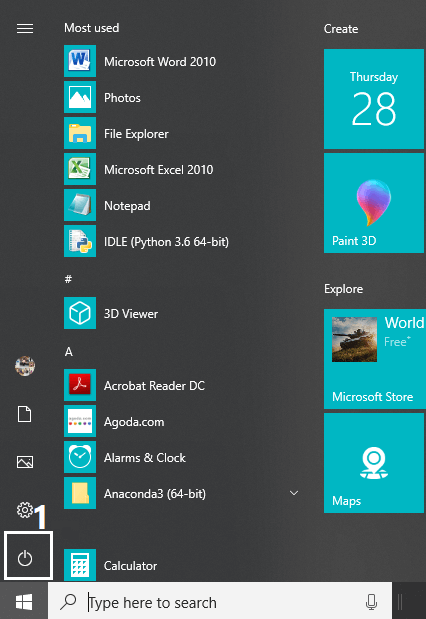
1. Cliceáil ar an roghchlár Tosaigh agus ansin cliceáil ar an cnaipe Power ar fáil ag an chúinne ag bun ar chlé.
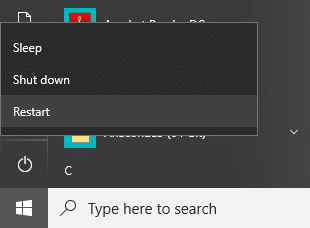
2. Ar Aghaidh, cliceáil ar an Atosaigh rogha agus atosóidh do ríomhaire é féin.
Tar éis an ríomhaire a atosú, seiceáil an bhfuil d'fhadhb réitithe nó nach bhfuil.
Method 2: Flush DNS and Reset Winsock Components
1. Open elevated Command Prompt.
2. Anois clóscríobh an t-ordú seo a leanas agus brúigh Iontráil tar éis gach ceann:
ipconfig / Preaseisiúint
ipconfig / flushdns
ipconfig / athnuachan

3. Arís oscail Pras Ordú agus clóscríobh an t-ordú seo a leanas ceann ar cheann agus buail isteach tar éis gach ceann:
ipconfig /flushdns
nbtstat –r
netsh int ip reset
netsh winsock reset
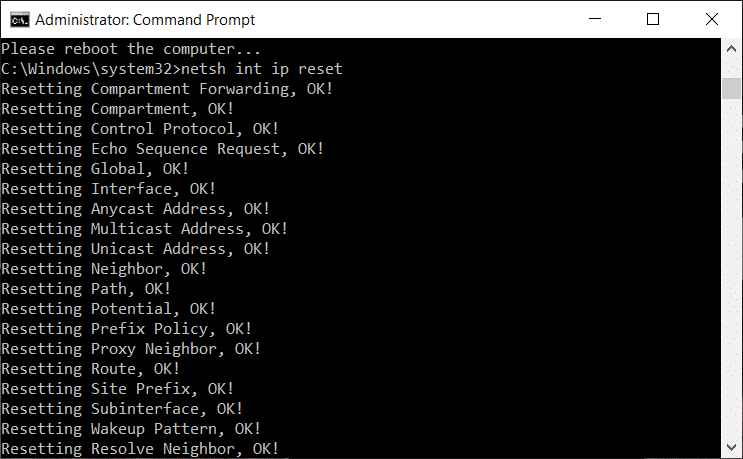
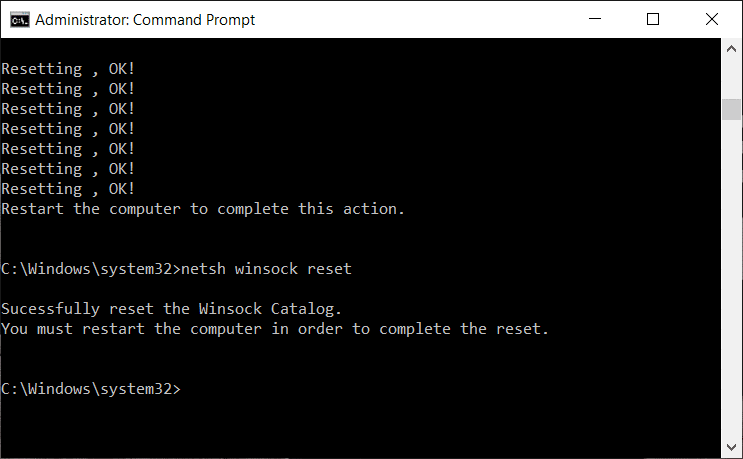
4. Reboot to apply changes. Flushing DNS seems to Fix Network Adapter Driver Issues on Windows 10.
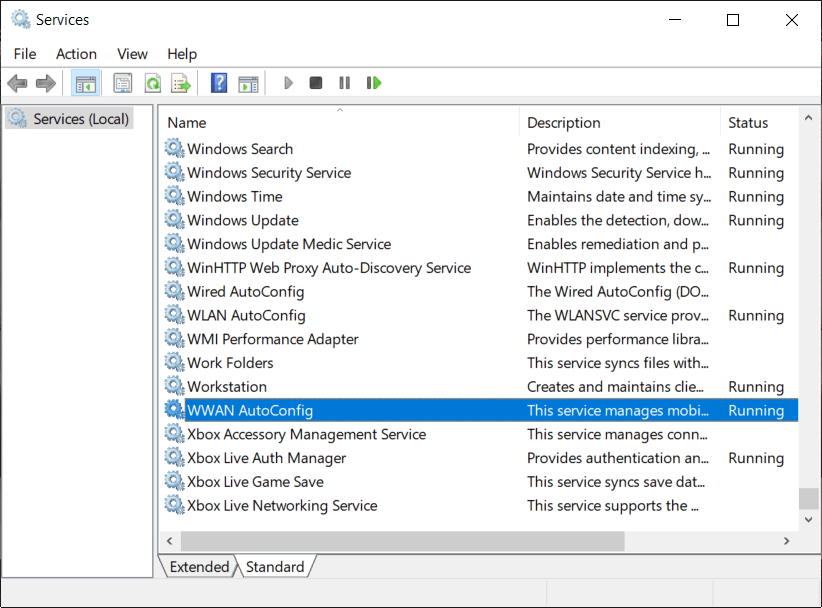
Method 3: Run WWAN AutoConfig Service
1. Brúigh Windows Key + R ansin clóscríobh services.msc agus bhuail Iontráil.

2. Faigh WWAN AutoConfig Service in the list (press W to reach to the end of the list quickly).
3. Cliceáil faoi dhó ar WWAN AutoConfig Service.
4. If the service is already running then click on Stop, then from the Startup type drop-down select Uathoibríoch.
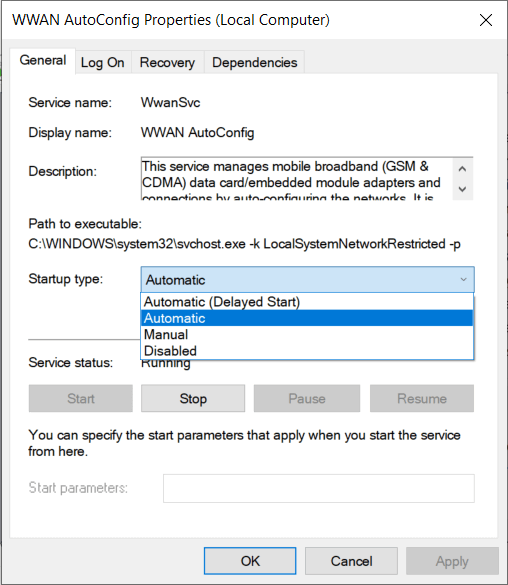
5. Click Apply followed by OK.
6. Deaschliceáil ar an WWAN AutoConfig Service agus roghnaigh Tosaigh.
Modh 4: Nuashonraigh Tiománaithe Adapter Líonra
1. Brúigh eochair Windows + R agus clóscríobh “devmgmt.msc” sa bhosca dialóige Rith le hoscailt bainisteoir Gléas.

2. Leathnaigh adapters líonra, ansin deaschliceáil ar do Tiománaí Wi Fi rialaitheoir (mar shampla Broadcom nó Intel) agus roghnaigh Nuashonraigh Bogearraí Tiománaithe.

3. Anois roghnaigh “Cuardaigh go huathoibríoch le haghaidh bogearraí tiománaí cothrom le dáta".
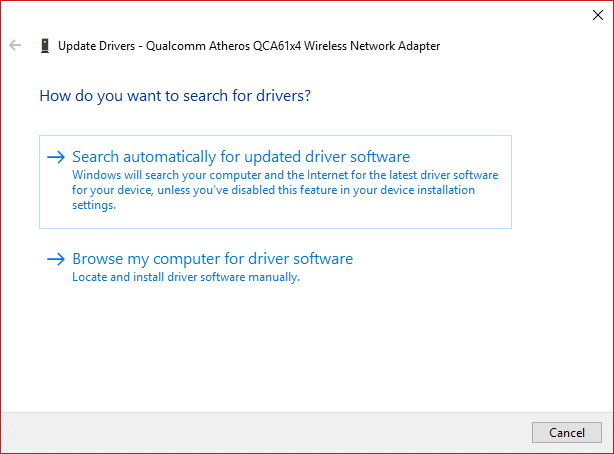
4. Anois Windows will automatically search for the Network driver update and if new update is found, it will automatically download and install it.
5. Nuair a bheidh tú críochnaithe, dún gach rud agus atosaigh do ríomhaire.
6. Má tá tú fós ag tabhairt aghaidh ar an Network Adapter Missing in Windows 10 issue, then again right-click on your WiFi controller and select Tiománaí nuashonraithe i Bainisteoir Gléas.
7. Anois, sa Nuashonrú Bogearraí Tiománaithe Windows, roghnaigh “Brabhsáil mo ríomhaire le haghaidh bogearraí tiománaí."

8. Anois roghnaigh “Lig dom roghnú ó liosta de na tiománaithe atá ar fáil ar mo ríomhaire."

9. Déan iarracht nuashonraigh tiománaithe ó na leaganacha liostaithe (déan cinnte crua-earraí comhoiriúnacha a sheiceáil).
10. Mura n-oibreodh a leithéid thuas ansin téigh go dtí láithreán gréasáin an mhonaróra chun tiománaithe a nuashonrú.

11. Íoslódáil agus suiteáil an tiománaí is déanaí ó shuíomh Gréasáin an mhonaróra agus ansin atosaigh do ríomhaire.
Method 5: Uninstall Network Adapter Drivers
1. Brúigh Windows Key + R ansin clóscríobh “devmgmt.msc” agus buail Enter chun an Bainisteoir Gléas a oscailt.
2. Leathnaigh Adapters Líonra agus faigh Ainm do adapter líonra.
3. Bí cinnte go bhfuil tú nóta síos an t-ainm adapter ach i gcás go dtéann rud éigin mícheart.
4. Right-click on your network adapter and uninstall it.

5. It will ask for confirmation roghnaigh Sea.
6. Restart your PC and Windows will automatically install the network adapter drivers again.
7. If the drivers are not installed automatically then again open the Device Manager.
8. From the Device Manager menu, click on gníomh ansin cliceáil ar “Scanadh le haghaidh athruithe crua-earraí".

Modh 6: Déan cinnte go bhfuil Windows cothrom le dáta
1. Brúigh Eochair Windows + I to open Settings then click on Nuashonrú & Slándáil.
![]()
2. From the left-hand side, menu click on Windows Update.
3. Now click on the “Seiceáil do nuashonruithe” cnaipe chun aon nuashonruithe atá ar fáil a sheiceáil.

4. If any updates are pending then click on Íoslódáil agus Suiteáil nuashonruithe.

5. Once the updates are downloaded, install them and your Windows will become up-to-date.
6. After the updates are installed reboot your PC to save changes.
Modh 7: Rith Fabhtcheartú Adaptóir Líonra
1. Brúigh Windows Key + I chun Socruithe a oscailt ansin cliceáil ar Nuashonrú & Slándáil.
![]()
2. Ón roghchlár ar chlé roghnaigh Fabhtcheartú.
3. Faoi Troubleshoot cliceáil ar Ceangal Idirlín agus ansin cliceáil Rith an fabhtcheartóir.

4. Lean treoracha breise ar an scáileán chun an fabhtcheartaithe a rith.
5. Murar réitigh an méid thuas an cheist ansin ón bhfuinneog Fabhtcheartú, cliceáil ar Líonra Adapter agus ansin cliceáil ar Rith an fabhtcheartóir.
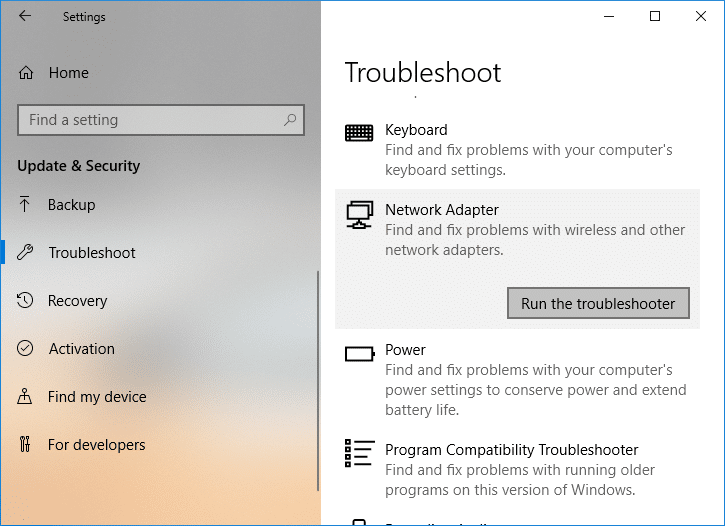
5. Atosaigh do ríomhaire chun athruithe a shábháil agus féach an bhfuil tú in ann fix the Network Adapter Missing issue.
Modh 8: Suiteáil Intel PROSet/Bogearraí Gan Sreang
Uaireanta déantar an fhadhb de bharr Bogearraí PROSet Intel atá as dáta, agus mar sin dealraíonn sé go ndéantar é a nuashonrú fix Network Adapter Missing in Windows 10 issue. Dá bhrí sin, go here agus an leagan is déanaí de PROSet/Bogearraí Gan Sreang a íoslódáil agus é a shuiteáil. Is bogearraí tríú páirtí é seo a bhainistíonn do nasc wifi seachas Windows agus má tá PROset/Bogearraí Gan Sreang as dáta is féidir go n-eiseofaí tiománaithe i Adapter Líonra Gan Sreang. Hence, read How to Update Network Adapter Drivers on Windows 10.
Modh 9: Athshocraigh Ceangal Líonra
1. Brúigh Windows Key + I chun Socruithe a oscailt ansin cliceáil ar Líonra & Idirlíon.

2. Ón roghchlár ar chlé roghnaigh Stádas.
3. Anois scrollaigh síos agus cliceáil ar Athshocraigh an líonra ag bun an leathanaigh.

4. Arís cliceáil ar “Athshocraigh anois” faoin alt um athshocrú Líonra.

5. This will successfully reset your network adapter and once it is complete the system will be restarted.
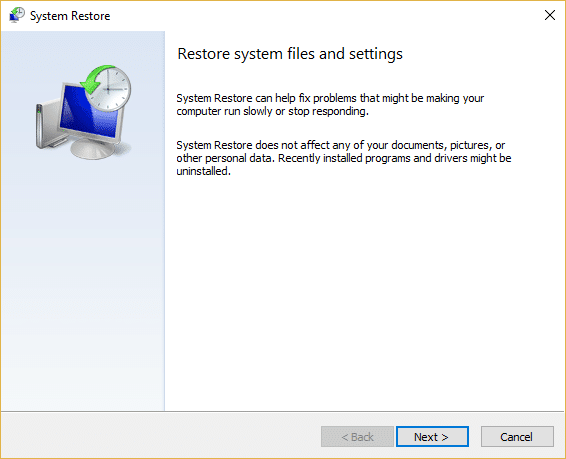
Modh 10: Déan Córas Athchóirigh
System Restore always works in resolving the error, therefore System Restore can definitely help you in fixing this error. So without wasting any time run system restore in order to resolve Network Adapter Missing issue.
Method 11: Using elevated Command Prompt
1. Brúigh Windows Key + X ansin roghnaigh Command Prompt (Riarachán).

2. Clóscríobh an t-ordú seo a leanas isteach i cmd agus brúigh Iontráil:
netcfg –s n
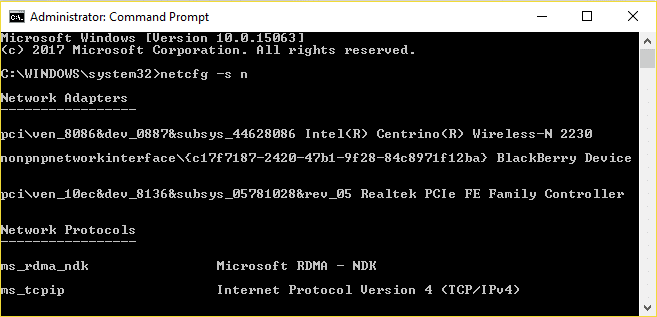
3. This will display a list of networking protocols and in that list find DNI_DNE.
4. If DNI_DNE is listed then type the following command into cmd:
reg scrios HKCRCLSID{988248f3-a1ad-49bf-9170-676cbbc36ba3} /va /f
netcfg -v -u lá_lá
5. If you don’t see DNI_DNE listed then only run the command netcfg -v -u dni_dne.
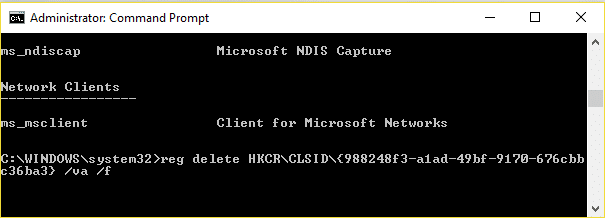
6. Now if you receive the error 0x80004002 after trying to run the above command then you need to delete the above key manually.
7. Brúigh Windows Key + R ansin clóscríobh regedit agus bhuail Iontráil.

8. Navigate to the following Registry Key:
HKEY_CLASSES_ROOTCLSID{988248f3-a1ad-49bf-9170-676cbbc36ba3}
9. Delete this key and then again type netcfg -v -u lá_lá command in cmd.
10. Atosaigh do ríomhaire chun athruithe a shábháil.
Molta duit:
Sin é atá agat go rathúil Deisigh adapter líonra ar iarraidh i Windows 10 ach má tá aon cheist agat fós maidir leis an bpost seo ansin bíodh leisce ort iad a chur sa chuid tuairimí.

