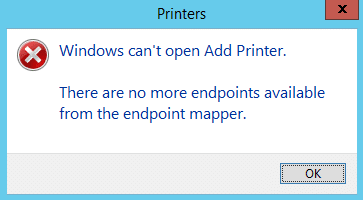
Fix There are no more endpoints available from the endpoint mapper: If you’re facing this error then this means either you are trying to install a printer or you’re sharing your drive within your network. Generally ‘No More Endpoints Available’ error occur when you try to join a domain but the Windows services are corrupted and therefore, conflicting with other services which won’t let you join that particular domain and ultimately causing the error. Anyway, this error is very annoying and that’s why troubleshooter is here to fix this error via the following troubleshooting steps.
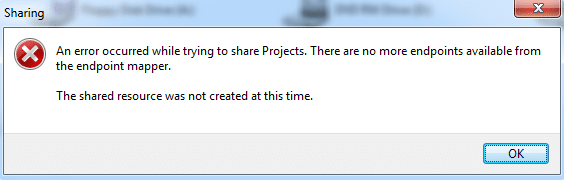
When attempting to join a client to an Active Directory domain, you may receive the following error:
The following error occurred attempting to join the domain <domain>:
There are no more endpoints available from the endpoint mapper.
Error 1753: There are no more endpoints available from the endpoint mapper.
Níl a thuilleadh críochphointí ar fáil ón mapa críochphointe [SOLVED]
Bí cinnte pointe athchóirithe a chruthú ar eagla go n-imíonn rud éigin mícheart.
Method 1: Delete the Internet key to remove RPC restriction
1.Press Windows Key + R cineál ansin regedit agus brúigh Iontráil chun Eagarthóir Clárlainne a oscailt.

2.Navigate chuig an eochair chláraithe seo a leanas:
ComputerHKEY_LOCAL_MACHINESoftwareMicrosoftRpcInternet
3.Right-cliceáil ar an Internet key agus roghnaigh Scrios.
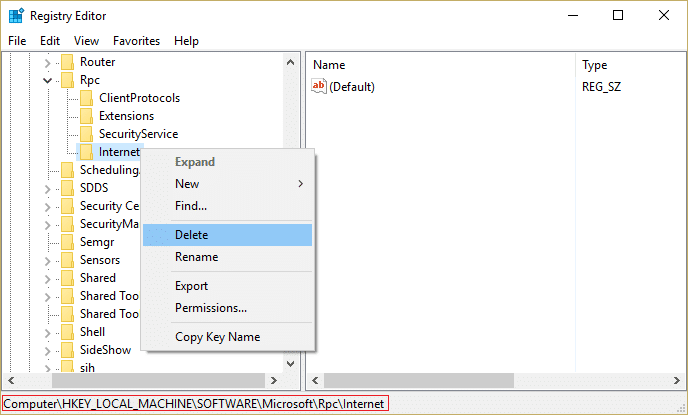
4.Reboot do ríomhaire chun athruithe a shábháil.
Method 2: Verify that Remote Procedure Call (RPC) Services are Started
1.Press Windows Key + R cineál ansin services.msc agus bhuail Iontráil.

2.Locate the following services:
Glao ar Nós Imeachta cianda
Remote Procedure Call Locator
ByProcessManager
If you are trouble adding a printer then make sure following services are also running:
Priontáil Spooler
Tosaitheoir Próisis Freastalaí DCOM
Léarscáil Críochphointe RPC
3.Right-click and select Airíonna for above services.
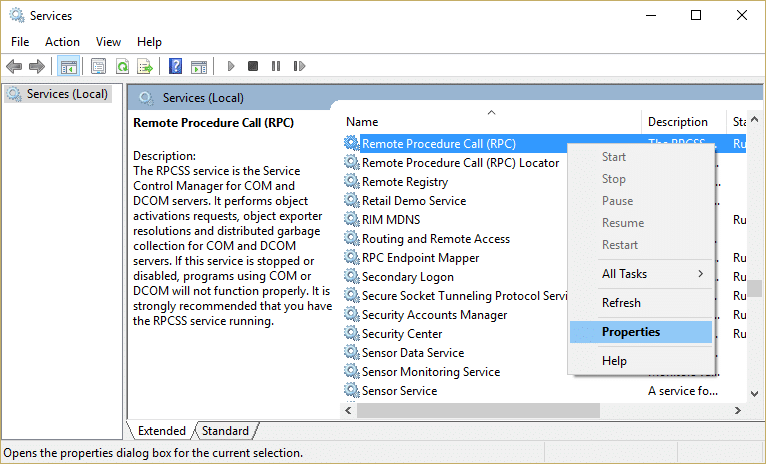
4.Next, make sure the Startup type is Automatic agus an services are running.
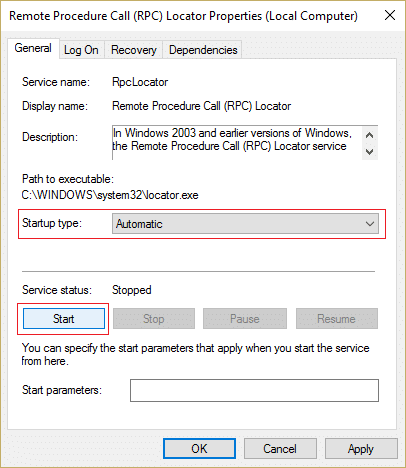
5.If the above services are stopped make sure to Rith them from properties window.
6.Reboot your PC to save changes and the error “There are no more endpoints available from the endpoint mapper” may be resolved.
Method 3: Temporary Disable antivirus agus balla dóiteáin
Uaireanta is féidir leis an gclár Antivirus a chur faoi deara “There are no more endpoints available from the endpoint mapper” and in order to verify this is not the case here, you need to disable your antivirus for a limited time so that you can check if the error still appears when the antivirus is off.
1.Right-cliceáil ar an Deilbhín clár antivirus ón gcóras tráidire agus roghnaigh Díchumasaigh.

2.Next, roghnaigh an fráma ama le haghaidh an Fanfaidh frithvíreas díchumasaithe.

Nóta: Roghnaigh an méid ama is lú is féidir mar shampla 15 nóiméad nó 30 nóiméad.
3. Nuair a dhéantar é, déan iarracht arís ceangal leis an líonra wifi agus seiceáil an réitíonn an earráid nó nach bhfuil.
4.Press Windows Key + roghnaigh mé ansin Painéal rialú.

5.Next, cliceáil ar Córas agus Slándáil.
6.Ansin cliceáil ar Windows Balla Dóiteáin.

7.Now ón bhfuinneog ar chlé cliceáil ar Cas Balla Dóiteáin Windows air nó as.

8.Roghnaigh Múch Balla Dóiteáin Windows agus atosaigh do ríomhaire. Again try to connect to the WiFi network and see if the issue is resolved or not.
Mura n-oibríonn an modh thuas déan cinnte na céimeanna céanna a leanúint chun do Bhalla Dóiteáin a chur ar siúl arís.
Method 4: Run Print Troubleshooter
1.Type “Fabhtcheartú” i mbarra Cuardaigh Windows agus cliceáil ar Fabhtcheartú.

2.Next, as an phána fhuinneog ar chlé roghnaigh Féach ar gach.
3.Then ón liosta fadhbanna ríomhaire Troubleshoot roghnaigh Printéir.

4.Lean teagasc ar an scáileán agus lig don Fabhtcheartú Printéir rith.
5.Restart your PC and the error “There are no more endpoints available from the endpoint mapper” may be resolved.
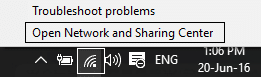
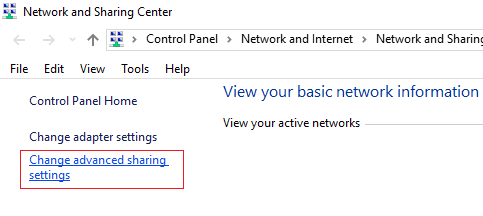
Method 5: Change advanced sharing settings
1.Right-click on Wireless icon on system tray and click on Líonra Oscailte agus Ionad Comhroinnte.
2.Cliceáil ar Athraigh socruithe comhroinnte chun cinn in the left-hand window.
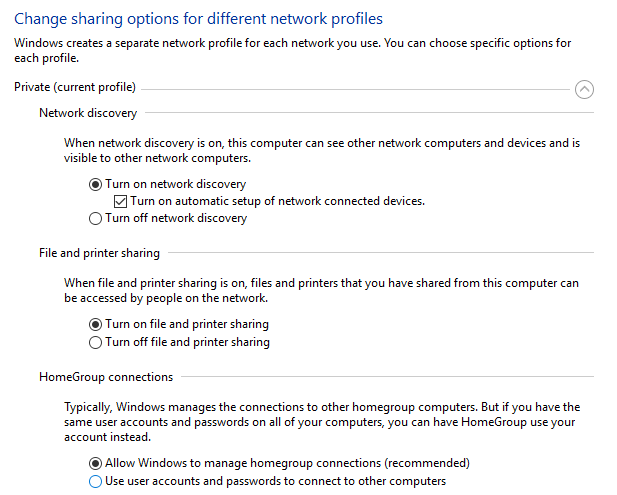
3.Enable the Network discovery, File and printer sharing and Public folder.
4.Click Save changes and close everything. Reboot your PC to save changes.
Method 6: Registry fix for Sharing error
1. Íoslódáil MpsSvc.reg agus BFE.reg files. Double-click on them to run and to add these files to the registry.
2.Reboot do ríomhaire chun athruithe a shábháil.
3.Press Windows Key + R cineál ansin regedit agus brúigh Iontráil chun Eagarthóir Clárlainne a oscailt.
4.Next, déan nascleanúint chuig an eochair chláraithe seo a leanas:
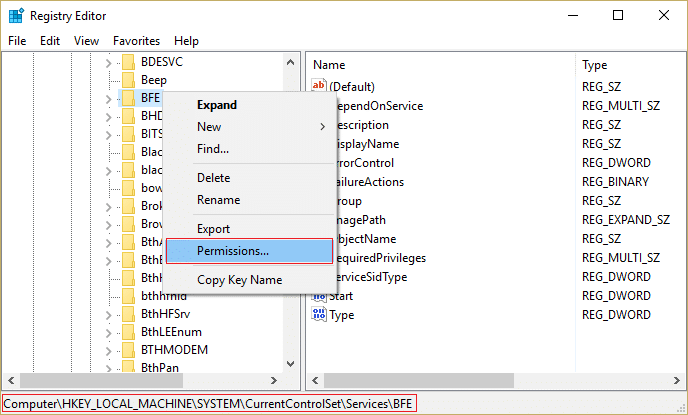
ComputerHKEY_LOCAL_MACHINESYSTEMCurrentControlSetServicesBFE
5.Right-click the BFE key and select Permissions.
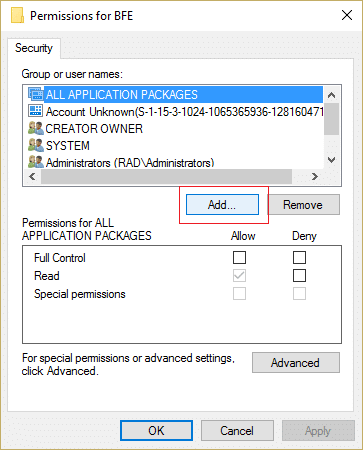
6.In the next window that opens, click the Add button.
7.Type “Tá ag gach duine” (without quotes) under the field Enter the object names to select and then click on Seiceáil Ainmneacha.
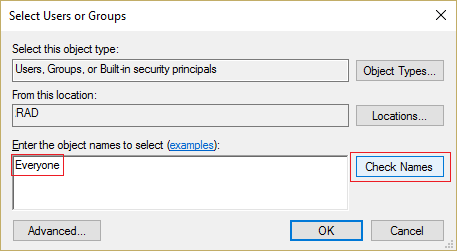
8.Now once the name is verified click OK.
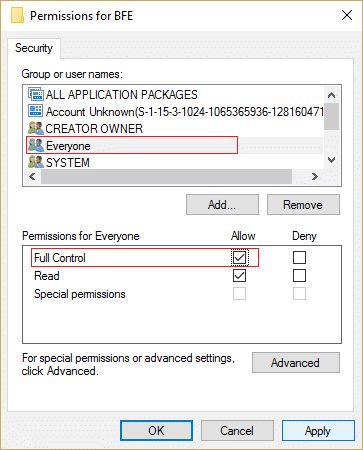
9.Everyone should be now added to the Group or user names section.
10.Make cinnte a roghnú Tá ag gach duine from the list and check mark Rialú iomlána option in Allow column.
11.Cliceáil Iarratas a leanúint ag OK.
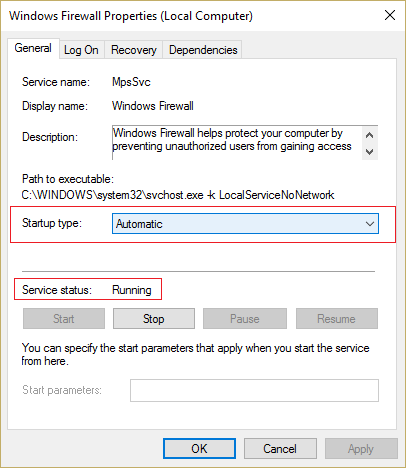
12.Press Windows Key + R cineál ansin services.msc agus bhuail Iontráil.
13.Find the below services and right-click on them then select airíonna:
Filtering Engine
Windows Firewall
14.Enable them both in the Properties window (click on Start) and make sure their Cineál Tosaithe leagtha amach Uathoibríoch.
15.That’s it you may have Fix There are no more endpoints available from the endpoint mapper but if not then run SFC and CHKDSK in the next step.
Modh 7: Seiceálaí Comhad Córais Rith (SFC) agus Diosca Seiceála (CHKDSK)
1.Press Windows Key + X ansin cliceáil ar Leid Ordú(Riarachán).

2. Anois clóscríobh an méid seo a leanas sa cmd agus brúigh Enter:
Sfc / scannow sfc / scannow / offbootdir=c: /offwindir=c: fuinneoga

3.Fan go gcríochnóidh an próiseas thuas agus do ríomhaire a atosú nuair a bheidh sé déanta.
4.Next, reáchtáil CHKDSK as seo Deisigh Earráidí Córas Comhad le Seiceáil Diosca Utility (CHKDSK).
5.Lig an próiseas thuas a chríochnú agus arís Atosaigh do ríomhaire chun athruithe a shábháil.
Modh 8: Rith DISM (Seirbhísiú agus Bainistíocht Íomhá Imscaradh)
1.Press Windows Key + X roghnaigh ansin Leid Ordú(Riarachán).

2.Cuir isteach an t-ordú seo a leanas i cmd agus brúigh Enter:
Tábhachtach: Nuair a bheidh tú DISM ní mór duit Windows Installation Media a bheith réidh.
DISM.exe /Ar Líne / Glanta-Íomhá /RestoreHealth /Foinse:C:RepairSourceWindows /LimitAccess
Nóta: Cuir suíomh d'fhoinse deisiúcháin in ionad an C:RepairSourceWindows

2.Press dul isteach chun an t-ordú thuas a reáchtáil agus fanacht leis an bpróiseas a chríochnú, de ghnáth, tógann sé 15-20 nóiméad.
NÓTA: Mura n-oibríonn an t-ordú thuas déan iarracht ar an méid seo a leanas: Dism / Íomhá:C: as líne / Glanta-Image / RestoreHealth / Foinse: c: testmountwindows Dism / Ar Líne / Glanta-Image / RestoreHealth / Foinse: c:testmountwindows / LimitAccess
3. Tar éis an phróisis DISM má tá sé críochnaithe, clóscríobh an méid seo a leanas sa cmd agus brúigh Iontráil: Craobh Sinsear / scannow
4.Let System File Checker run and once it’s complete, restart your PC. Check if the Windows 10 Slow Shutdown problem is resolved or not.
Molta duit:
Sin é atá agat go rathúil Fix There are no more endpoints available from the endpoint mapper ach má tá aon cheist agat fós maidir leis an bpost seo ná bíodh drogall ort iad a chur sa chuid tuairimí.

