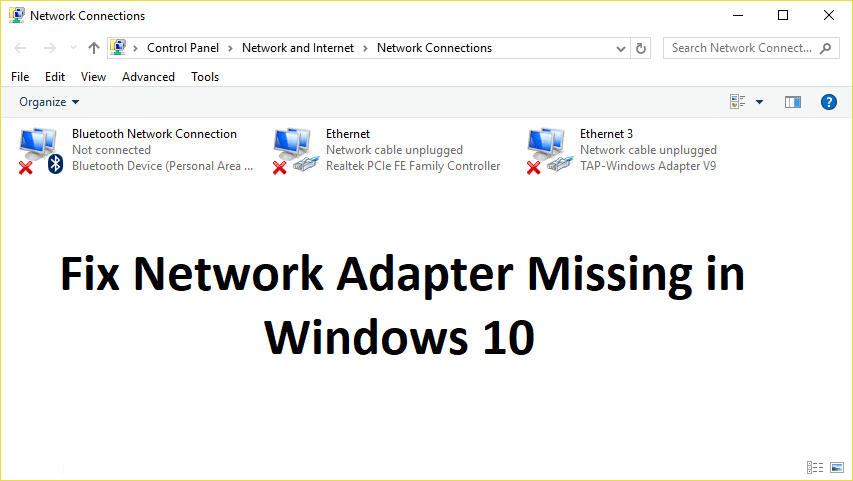
If you don’t see Wireless Adapter under Network Connections neither there is a Network adapter tab under device manager then it seems like your Network Adapter is missing or not detected on your Windows 10 which is a serious issue because you won’t be able to access the Internet until the issue is resolved. In short, when you click on the Wireless icon on the system tray there won’t be any device listed in order to connect to the Internet and if you open Device Manager then you won’t see the Network Adapter tab.
These are the reasons behind the Network Adapter missing issue:
- Network adapter missing in Device manager
- No Network Adapters showing in Device Manager
- Network Adapter Not Detected
- Network Adapter Not Found Windows 10
- No Network Adapter In Device Manager
The main cause of this issue seems to be outdated, incompatible or corrupted Network Adapter drivers. If you have recently upgraded from previous versions of Windows then it’s possible that the old drivers will not work with the new Windows and hence the issue. So without wasting any time let’s see how to actually Fix Network Adapter Missing in Windows 10 issue with the below-listed troubleshooting steps.
Note: Just make sure to uninstall any VPN software on your PC before continuing.
Fix Network Adapter Missing in Windows 10
Dèan cinnteach gun cruthaich thu puing ath-nuadhachaidh dìreach air eagal ‘s gun tèid rudeigin ceàrr.
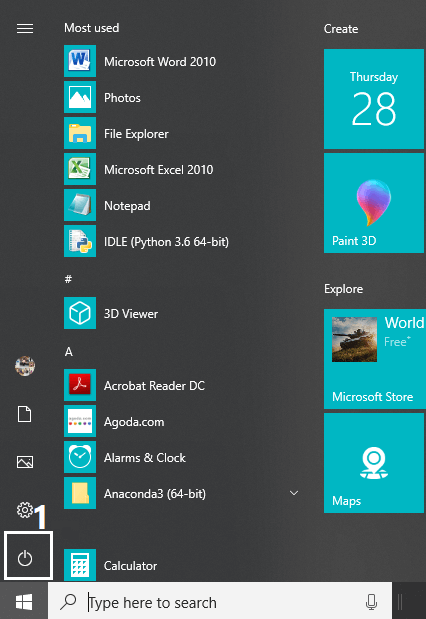
Method 1: Reboot your Computer
Tha fios aig a’ mhòr-chuid againn mun chleas fìor bhunasach seo. Faodaidh ath-thòiseachadh do choimpiutair uaireannan còmhstri bathar-bog sam bith a cheartachadh le bhith a’ toirt tòiseachadh às ùr dha. Mar sin mas e cuideigin a th’ annad a b’ fheàrr leis a’ choimpiutair aca a chuir na chadal, is e deagh bheachd a th’ ann do choimpiutair ath-thòiseachadh.
1. Cliog air a 'phutan start menu agus an uairsin cliog air an Putan Cumhachd ri fhaighinn san oisean gu h-ìosal air an taobh chlì.
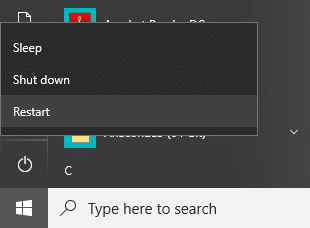
2. An ath-, cliog air an Ath-thòisich roghainn agus tòisichidh an coimpiutair agad fhèin.
Às deidh don choimpiutair ath-thòiseachadh, dèan cinnteach a bheil an duilgheadas agad air fhuasgladh no nach eil.
Method 2: Flush DNS and Reset Winsock Components
1. Open elevated Command Prompt.
2. A-nis dèan an àithne a leanas agus brùth Enter às deidh gach fear:
ipconfig / release
ipconfig / flushdns
ipconfig / renew

3. A-rithist fosgail Command Prompt agus dèan an àithne a leanas aon ri aon agus buail a-steach às deidh gach fear:
ipconfig / flushdns nbtstat –r netsh int ip ath-shuidheachadh netsh winsock ath-shuidheachadh
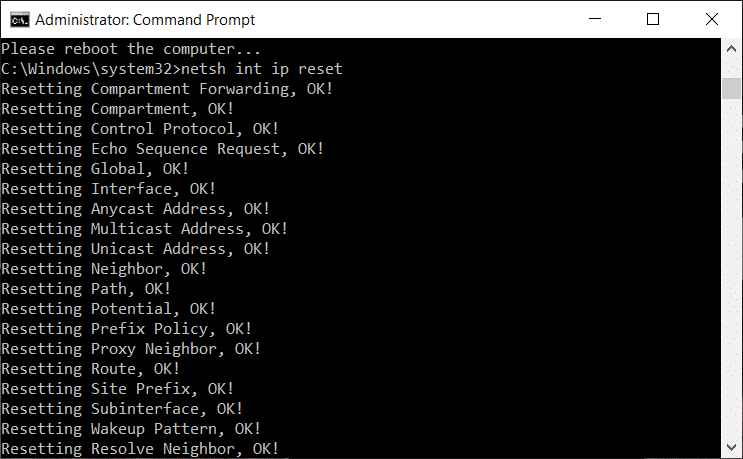
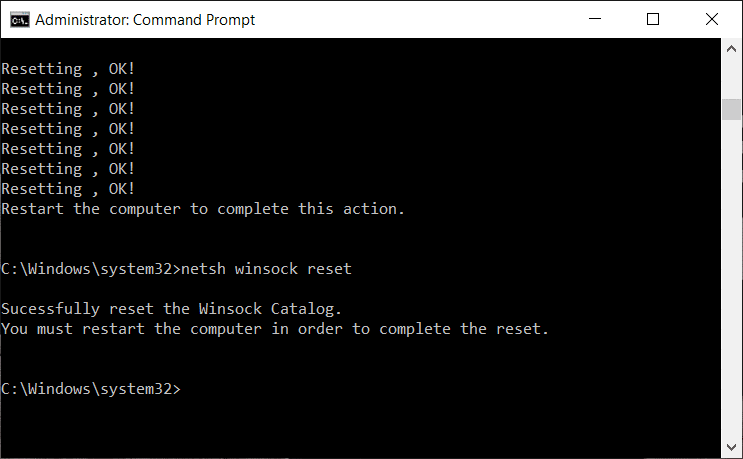
4. Reboot gus atharrachaidhean a chur an gnìomh. Tha e coltach gu bheil DNS a’ sruthadh Fix Network Adapter Driver Issues on Windows 10.
Method 3: Run WWAN AutoConfig Service
1. Brùth Windows Key + R an uairsin dèan seòrsa seirbheisean.msc agus bhuail Enter.

2. Lorg WWAN AutoConfig Service in the list (press W to reach to the end of the list quickly).
3. Dèan briogadh dùbailte air WWAN AutoConfig Service.
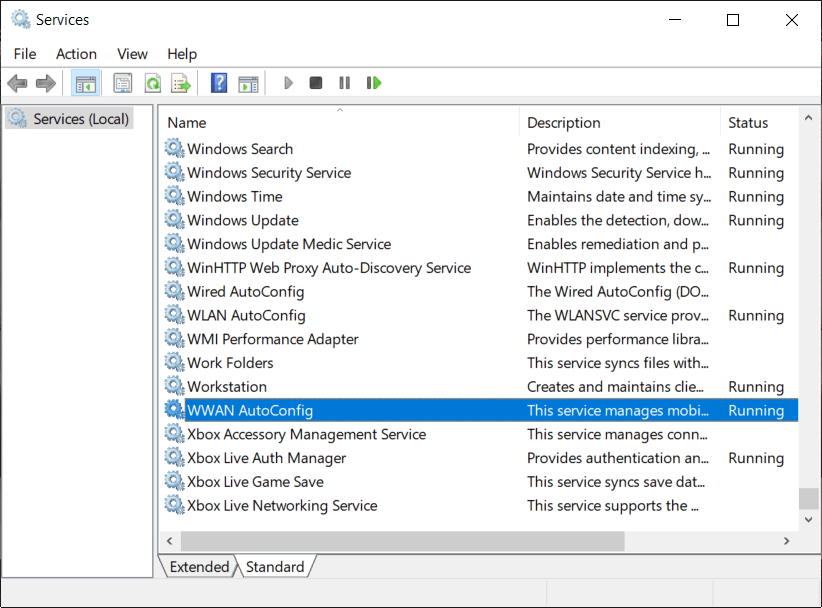
4. If the service is already running then click on Stop, then from the Startup type drop-down select Uath-ghluasadach.
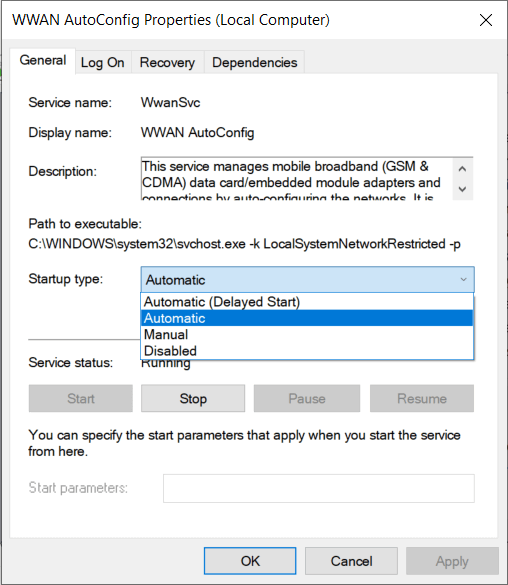
5. Click Apply followed by OK.
6. Dèan briogadh deas air an WWAN AutoConfig Service agus tagh Tòisich.
Dòigh 4: Ùraich draibhearan lìonra adapter
1. Brùth iuchair Windows + R agus sgrìobh “devmgmt.msc” ann am bogsa còmhraidh Run gus fhosgladh manaidsear inneal.

2. Leudaich Adaptters lìonra, an uairsin cliog deas air do Stiùiriche Wi-Fi (mar eisimpleir Broadcom no Intel) agus tagh Ùraich bathar-bog draibhear.

3. A-nis tagh "Lorg gu fèin-obrachail airson bathar-bog driver ùraich".
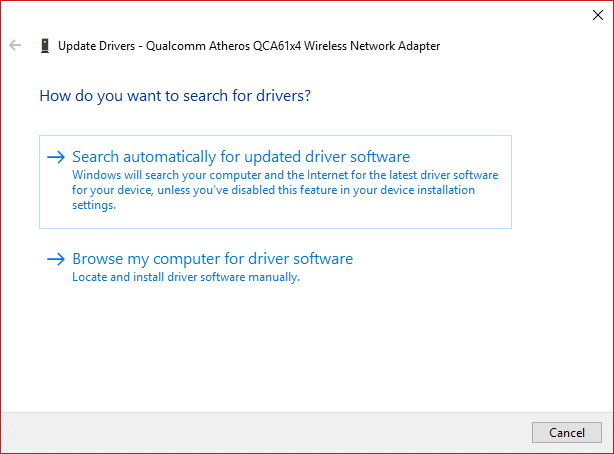
4. A-nis Windows will automatically search for the Network driver update and if new update is found, it will automatically download and install it.
5. Nuair a bhios tu deiseil, dùin a h-uile càil agus ath-thòisich am PC agad.
6. Ma tha thu fhathast air beulaibh an Network Adapter Missing in Windows 10 issue, then again right-click on your WiFi controller and select Ùraich an dràibhear ann am Manaidsear Inneal.
7. A-nis, ann an Update Driver bathar-bog Windows, tagh "Thoir sùil air a ’choimpiutair agam airson bathar-bog draibhear."

8. A-nis tagh "Leig leam taghadh bho liosta de dhraibhearan a tha rim faighinn air a’ choimpiutair agam."

9. Feuch ri ùraich draibhearan bho na dreachan clàraichte (dèan cinnteach gun comharraich thu bathar-cruaidh co-chosmhail).
10. Mura obraich na tha gu h-àrd an uairsin rachaibh gu làrach-lìn an neach-dèanamh gus draibhearan ùrachadh.

11. Luchdaich sìos agus stàlaich an dràibhear as ùire bho làrach-lìn an neach-dèanamh agus an uairsin ath-thòiseachadh do PC.
Method 5: Uninstall Network Adapter Drivers
1. Brùth Windows Key + R agus an uairsin sgrìobh “devmgmt.msc” agus buail Enter gus am Manaidsear Inneal fhosgladh.
2. Leudaich Adapters Lìonra agus lorg ainm an adapter lìonra agad.
3. Dèan cinnteach gu bheil thu Thoir fa-near ainm an adapter gun fhios nach tèid rudeigin ceàrr.
4. Right-click on your network adapter and uninstall it.

5. It will ask for confirmation tagh Tha.
6. Restart your PC and Windows will automatically install the network adapter drivers again.
7. If the drivers are not installed automatically then again open the Device Manager.
8. From the Device Manager menu, click on Gnìomh an uairsin cliog air “Dèan sgan airson atharrachaidhean cruaidh".

Dòigh 6: Dèan cinnteach gu bheil Windows ùraichte
1. Brùth Windows Key+ Tha mi airson Settings fhosgladh agus an uairsin cliog air Ùrachadh & Tèarainteachd.
![]()
2. From the left-hand side, menu click on Ùrachadh Windows.
3. A-nis cliog air “Dèan cinnteach airson ùrachaidhean” putan gus sùil a thoirt airson ùrachaidhean sam bith a tha rim faighinn.

4. If any updates are pending then click on Luchdaich sìos & stàlaich ùrachaidhean.

5. Once the updates are downloaded, install them and your Windows will become up-to-date.
6. After the updates are installed reboot your PC to save changes.
Dòigh 7: Ruith inneal fuasgladh lìonra adapter
1. Brùth Windows Key + I gus Settings fhosgladh agus an uairsin cliog air Ùrachadh & Tèarainteachd.
![]()
2. Bho chlàr-taice air an taobh chlì tagh Fuasgladh.
3. Fo Troubleshoot cliog air Ceanglaichean Eadar-lìn agus an uair sin cliog Ruith an trioblaid.

4. Lean tuilleadh stiùiridh air-sgrion gus an troubleshooter a ruith.
5. Ma tha gu h-àrd cha robh an socraicheadh a 'chùis an uair sin bhon uinneig Troubleshoot, briog air Adapter Lìonra agus an uair sin cliog air Ruith an trioblaid.
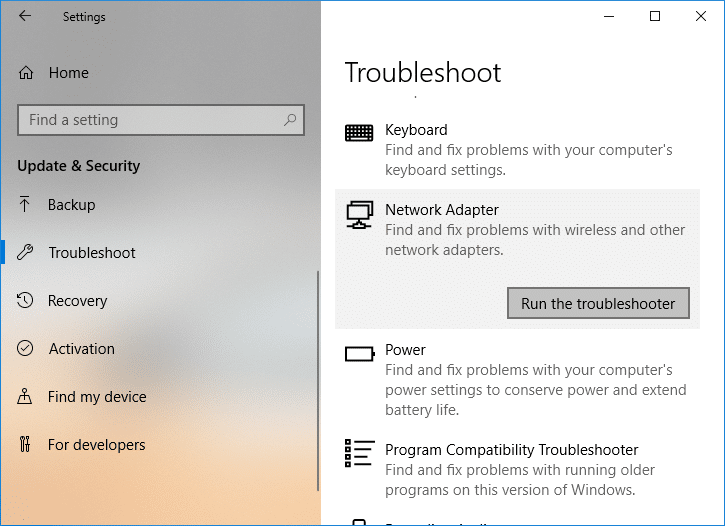
5. Ath-thòisich am PC agad gus atharrachaidhean a shàbhaladh agus faic an urrainn dhut fix the Network Adapter Missing issue.
Method 8: Install Intel PROSet/Wireless Software
Sometimes the problem is caused due to outdated Intel PROSet Software, hence updating it seems to fix Network Adapter Missing in Windows 10 issue. Mar sin, falbh an seo and download the latest version of PROSet/Wireless Software and install it. This is a third party software which manages your WiFi connection instead of Windows and if PROset/Wireless Software is outdated is can cause drivers issue in Wireless Network Adapter. Hence, read How to Update Network Adapter Drivers on Windows 10.
Dòigh 9: Ath-shuidheachadh Ceangal Lìonra
1. Brùth Windows Key + I gus Settings fhosgladh agus an uairsin cliog air Lìonra & Eadar-lìn.

2. Bho chlàr-taice air an taobh chlì tagh Inbhe.
3. A-nis sgrolaich sìos agus cliog air Ath-shuidheachadh lìonra aig a 'bhonn.

4. A-rithist cliog air “Aisig a-nis” fo earrann ath-shuidheachadh Lìonra.

5. This will successfully reset your network adapter and once it is complete the system will be restarted.
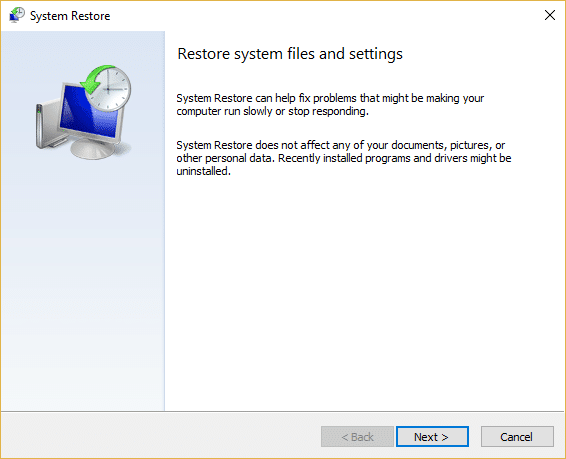
Dòigh 10: Dèan siostam ath-nuadhachadh
System Restore always works in resolving the error, therefore System Restore can definitely help you in fixing this error. So without wasting any time run system restore in order to resolve Network Adapter Missing issue.
Method 11: Using elevated Command Prompt
1. Brùth Windows Key + X an uair sin tagh Command Prompt (Rianachd).

2. Taidhp an àithne a leanas a-steach do cmd agus bhuail Enter:
netcfg –s n
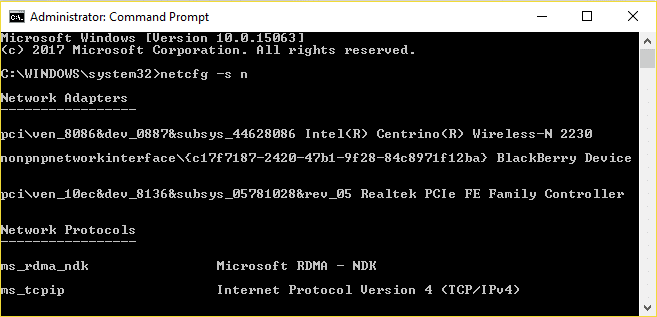
3. This will display a list of networking protocols and in that list find DNI_DNE.
4. If DNI_DNE is listed then type the following command into cmd:
cuir às do HKCRCLSID {988248f3-a1ad-49bf-9170-676cbbc36ba3} / va / f
netcfg -v -u dni_dne
5. If you don’t see DNI_DNE listed then only run the command netcfg -v -u dni_dne.
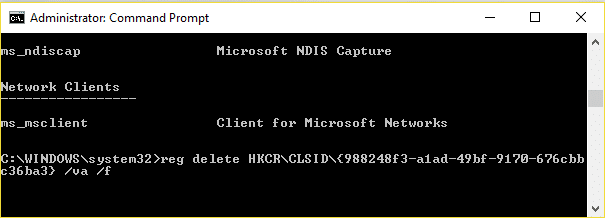
6. Now if you receive the error 0x80004002 after trying to run the above command then you need to delete the above key manually.
7. Brùth Windows Key + R an uairsin dèan seòrsa s an Iar- agus bhuail Enter.

8. Navigate to the following Registry Key:
HKEY_CLASSES_ROOTCLSID{988248f3-a1ad-49bf-9170-676cbbc36ba3}
9. Delete this key and then again type netcfg -v -u dni_dne command in cmd.
10. Ath-thòisich am PC agad gus atharrachaidhean a shàbhaladh.
Air a mholadh dhut:
Sin agad e gu soirbheachail Fix Network Adapter Missing in Windows 10 ach ma tha ceist sam bith agad fhathast a thaobh na dreuchd seo faodaidh tu faighneachd dhaibh anns an earrann bheachdan.

