Process and Compressed Memory is a Windows 10 feature responsible for memory compression (also referred to as RAM compression and memory compression). This feature basically utilizes data compression to reduce the size or number of paging request to and from the auxiliary storage. In short, this feature is designed to take less amount of disk space and memory but in this case the System and Compressed Memory process start using 100% Disk and Memory, causing the affected PC to become slow.

In Windows 10, a compressions store is added to the concept of Memory Manager, which is an in-memory collection of compressed pages. So whenever the memory starts to fill up, the System and Compressed Memory process will compress the unused pages instead of writing them to the disk. The benefit of this is the amount of memory used per process is reduced, which allows Windows 10 to maintain more programs or apps in physical memory.
The problem appears to be incorrect Virtual Memory settings. Someone changed the paging file size from automatic to a particular value, virus or malware, Google Chrome or Skype, corrupt system files etc. So without wasting any time let’s see how to actually Fix 100% Disk Usage by System and Compressed Memory with the help of below-listed troubleshooting guide.
[SOLVED] 100% Disk Usage by System and Compressed Memory
Dèan cinnteach gun cruthaich thu puing ath-nuadhachaidh, dìreach gun fhios nach tèid rudeigin ceàrr.
Dòigh 1: Dèan càradh air faidhlichean siostam coirbte
1. Fosgailte Command Prompt. Faodaidh an neach-cleachdaidh an ceum seo a choileanadh le bhith a’ lorg 'cmd' agus an uairsin brùth Enter.

2. A-nis cuir a-steach na leanas anns an cmd agus buail a-steach:
Sfc / scannow sfc / scannow / offbootdir = c: / offwindir = c: uinneagan (Ma dh'fhàilligeas gu h-àrd feuch am fear seo)
![SFC scan now command prompt | [SOLVED] 100% Disk Usage by System and Compressed Memory](https://lbsite.org/wp-content/uploads/2023/01/SFC-scan-now-command-prompt.png)
3. Fuirich airson a 'phròiseas gu h-àrd a chrìochnachadh agus aon uair' dèanamh, ath-thòiseachadh do PC.
4. A-rithist fosgail cmd agus dèan an àithne a leanas agus buail a-steach às deidh gach fear:
Dism / Air-loidhne / Glanadh-Ìomhaigh / CheckHealth Dism / Air-loidhne / Glanadh-Ìomhaigh / ScanHealth Dism / Air-loidhne / Glanadh-Ìomhaigh / RestoreHealth

5. Leig leis an àithne DISM ruith agus feitheamh gus an crìochnaich e.
6. Mura obraich an àithne gu h-àrd feuch air na leanas:
Dism / Ìomhaigh: C: far loidhne / Glanadh-Ìomhaigh / RestoreHealth / Stòr: c:testmountwindows Dism / Air-loidhne / Glanadh-Ìomhaigh / RestoreHealth / Stòr: c:testmountwindows / LimitAccess
Note: Cuir an stòr càraidh agad (Windows Installation or Recovery Disc) an àite an C:RepairSourceWindows).
7. Ath-thòisich am PC agad gus atharrachaidhean a shàbhaladh agus faic an urrainn dhut Fix 100% Disk Usage by System and Compressed Memory Issue.
Method 2: Set Correct Paging File Size
1. Brùth Windows Key + R an uairsin dèan seòrsa sysdm.cpl agus bhuail Enter gus fosgladh Feartan an t-siostaim.

2. Atharraich chun an Tab adhartach agus an uair sin cliog air Suidhichidhean fo Choileanadh.

3. Again switch to the Advanced tab and click Change under Virtual Memory.

4. Checkmark “Riaghladh gu faiceallach meud faidhle paging airson a h-uile dràibhidh."
![Checkmark Automatically manage paging file size for all drives | [SOLVED] 100% Disk Usage by System and Compressed Memory](https://lbsite.org/wp-content/uploads/2023/02/Checkmark-Automatically-manage-paging-file-size-for-all-drives.png)
5. Click OK, then click Apply followed by OK.
6. Select Yes to Restart your PC to save changes.
Dòigh 3: Cuir à comas tòiseachadh luath
1. Brùth Windows Key + R an uairsin dèan seòrsa smachd agus bhuail Enter gus fhosgladh Pannal Smachd.

2. Cliog air Cruth-cruaidh is Caolas an uairsin cliog air Roghainnean Cumhachd.

3. An uair sin, bhon taobh chlì pane uinneig a thaghadh "Tagh dè na putanan cumhachd a nì thu."

4. A-nis brùth air "Atharraich na roghainnean nach eil ri fhaighinn an-dràsta."

5. Thoir air falbh "Cuir air adhart gu luath”Agus cliog air Sàbhail atharrachaidhean.
![Uncheck Turn on fast startup | [SOLVED] 100% Disk Usage by System and Compressed Memory](https://lbsite.org/wp-content/uploads/2023/01/Uncheck-Turn-on-fast-startup.png)
6. Restart your PC and see if you’re able to Fix 100% Disk Usage by System and Compressed Memory Issue.
Method 4: Disable Superfetch Service
1. Brùth Windows Key + R an uairsin dèan seòrsa seirbheisean.msc agus bhuail Enter.

2. Lorg Super fetch service from the list then right-click on it and select Feartan.

3. Under Service status, if the service is running, click on Stad.
4. A nis, as an tòiseachaidh type drop-down select Ciorramach.

5. Cliog Cuir a-steach, air a leantainn le OK.
6. Ath-thòisich am PC agad gus atharrachaidhean a shàbhaladh.
If the above method doesn’t disable Superfetch services then you can follow disable Superfetch using Registry:
1. Brùth Windows Key + R an uairsin dèan seòrsa s an Iar- agus bhuail Enter gus Deasaiche Clàraidh fhosgladh.

2. Seòl chun iuchair chlàraidh a leanas:
HKEY_LOCAL_MACHINESYSTEMCurrentControlSetControlSession ManagerMemory ManagementPrefetchParameters
3. Make sure you have selected Prefetch Parameters an uairsin san uinneag cheart cliog dùbailte air Dèan comas airSuperfetch iuchair agus change it’s value to 0 in the Value data field.

4. Click OK and close the Registry Editor.
5. Ath-thòisich am PC agad gus atharrachaidhean a shàbhaladh agus faic an urrainn dhut Fix 100% Disk Usage by System and Compressed Memory Issue.
Method 5: Adjust your PC for Best Performance
1. Brùth Windows Key + R an uairsin dèan seòrsa sysdm.cpl agus bhuail Enter gus fosgladh Feartan an t-siostaim.
2. Atharraich chun an adhartach tab agus an uairsin cliog air roghainnean fo Dèanadas.
3. Under Visual Effects checkmark “Atharraich airson an coileanadh as fheàrr".

4. Cliog Cuir a-steach, air a leantainn le OK.
5. Ath-thòisich am PC agad agus faic a bheil e comasach dhut Fix 100% Disk Usage by System and Compressed Memory Issue.
Method 6: Kill the Speech Runtime Executable Process
1. Brùth Ctrl + Shift + Esc gus am Manaidsear Gnìomha a chuir air bhog.
2. Anns a Tab pròiseasan, lorg Speech Runtime Executable.
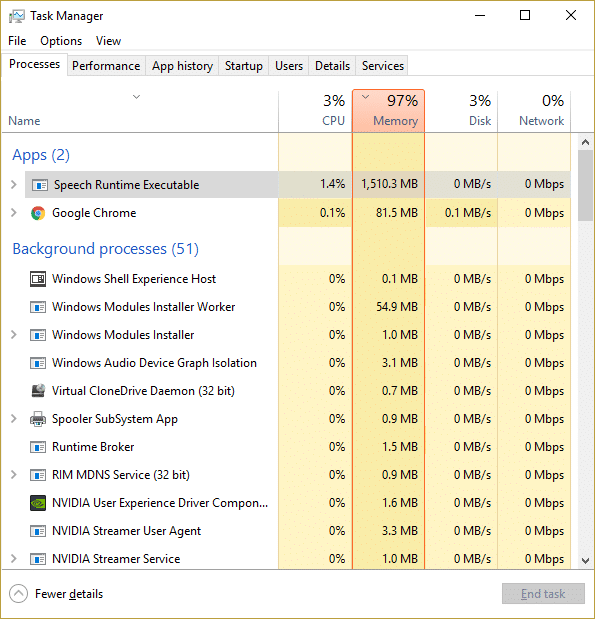
3. Dèan briogadh deas air agus tagh Tasc crìochnachaidh.
Dòigh 7: Ruith CCleaner agus Malwarebytes
1. Luchdaich a-nuas is stàlaich e CCleaner & Malwarebytes.
2. Ruith Malwarebytes agus leig leis an siostam agad a sganadh airson faidhlichean cronail. Ma lorgar malware, bheir e air falbh iad gu fèin-ghluasadach.

3. A-nis ruith CCleaner agus tagh Glan Glan.
4. Fo Custom Clean, tagh an Windows tab agus thoir sùil air roghainnean bunaiteach agus cliog Mion-sgrùd.
![Select Custom Clean then checkmark default in Windows tab | [SOLVED] 100% Disk Usage by System and Compressed Memory](https://lbsite.org/wp-content/uploads/2023/01/Select-Custom-Clean-then-checkmark-default-in-Windows-tab.png)
5. Aon uair ‘s gu bheil Analyze deiseil, dèan cinnteach gu bheil thu cinnteach gun cuir thu às na faidhlichean a thèid a dhubhadh às.

6. Mu dheireadh, cliog air an Ruith Glanadair putan agus leig le CCleaner a chùrsa a ruith.
7. Gus an siostam agad a ghlanadh tuilleadh, tagh am putan Clàraidh, agus dèan cinnteach gu bheil na leanas air an sgrùdadh:

8. Cliog air a 'phutan Dèan scan airson cùisean putan agus leig le CCleaner sganadh, agus an uairsin cliog air an Ceartaich cùisean taghte putan.
![Once scan for issues is completed click on Fix selected Issues | [SOLVED] 100% Disk Usage by System and Compressed Memory](https://lbsite.org/wp-content/uploads/2023/01/Once-scan-for-issues-is-completed-click-on-Fix-selected-Issues.png)
9. Nuair a dh’ iarras CCleaner “A bheil thu ag iarraidh atharraichean cùl-taic air a' chlàr?" tagh Tha.
10. Nuair a tha do lethbhreac glèidhidh air a chrìochnachadh, briog air a ' Ceartaich a h-uile cùis taghte putan.
11. Ath-thòisich am PC agad gus atharrachaidhean a shàbhaladh.
Method 8: Change configuration of Google Chrome and Skype
Airson Google Chrome: Navigate to the following under Chrome: Settings > Show Advanced Settings > Privacy > Use a prediction service to load pages more quickly. Disable the toggle next to “Use a prediction service to load pages.”

Change configuration For Skype
1. Make sure you have exited Skype, if not end task from Task Manager for Skype.
2. Press Windows Key + R then type the following and click OK:
C:Program Files (x86)SkypePhone
3. Dèan briogadh deas air skype.exe agus tagh Feartan.

4. Atharraich gu Tab tèarainteachd agus briog air Deasaich.

5. Tagh A H-UILE CÙM IARRTAS under Group or user names then checkmark Write fo Ceadaich.

6. Click Apply, followed by OK and see if you’re able to Fix 100% Disk Usage by System and Compressed Memory Issue.
Method 9: Set Correct Permission for System and Compressed Memory Process
1. Brùth Windows Key + R an uairsin dèan seòrsa gnìomhanchd.msc and hit Enter to open Task Scheduler.

2. Seòl chun t-slighe a leanas:
Task Scheduler Library > Microsoft > Windows > MemoryDiagnostic
![Double click on ProcessMemoryDiagnostic Events | [SOLVED] 100% Disk Usage by System and Compressed Memory](https://lbsite.org/wp-content/uploads/2023/02/Double-click-on-ProcessMemoryDiagnostic-Events.png)
3. Dèan briogadh dùbailte air ProcessMemoryDiagnostic Events agus an uair sin cliog Atharraich an cleachdaiche no am buidheann under Security Options.

4. cliog adhartach agus an uair sin cliog Find Now.

5. Tagh do Cunntas rianadair from the list then click OK.

6.a-rithist briog OK to add your administrator account.
7. Checkmark Le bhith a ’faighinn le na sochairean as àirde agus an uairsin cliog air OK.

8. Follow the same steps for RunFullMemoryDiagnostic and close everything.
9. Ath-thòisich am PC agad gus atharrachaidhean a shàbhaladh.
Method 10: Disable System and Compressed Memory Process
1. Brùth Windows Key + R an uairsin dèan seòrsa gnìomhanchd.msc agus bhuail Enter gus fosgladh Clàraiche gnìomh.
2. Seòl chun t-slighe a leanas:
Task Scheduler Library > Microsoft > Windows > MemoryDiagnostic
3. Dèan briogadh deas air RunFullMemoryDiagnostic agus tagh Cuir an comas.
![Right-click on RunFullMemoryDiagnostic and select Disable | [SOLVED] 100% Disk Usage by System and Compressed Memory](https://lbsite.org/wp-content/uploads/2023/02/Right-click-on-RunFullMemoryDiagnostic-and-select-Disable.png)
4. Close Task Scheduler and restart your PC.
Air a mholadh:
Sin agad e gu soirbheachail Fix 100% Disk Usage by System and Compressed Memory ach ma tha ceist sam bith agad fhathast a thaobh na dreuchd seo faodaidh tu faighneachd dhaibh anns an earrann bheachdan.

