Fix The Service Couldn’t Be Started Windows Defender Error 0x80070422: Windows Defender is a malware protection software which is inbuilt into Windows 10. Now it is used widely by Windows users because it’s reliable, but in some cases, users also installed 3rd party Antivirus software such as Norton, Quick Heal etc which is not recommend because they corrupt the files of Windows Defender. Once you completely uninstall 3rd party antivirus you won’t be able to use Windows Defender properly because files required by it have already been corrupted and can no longer be used.
“The service couldn’t be started.
The service cannot be started, either because it is disabled or because it has no enabled devices associated with it.”
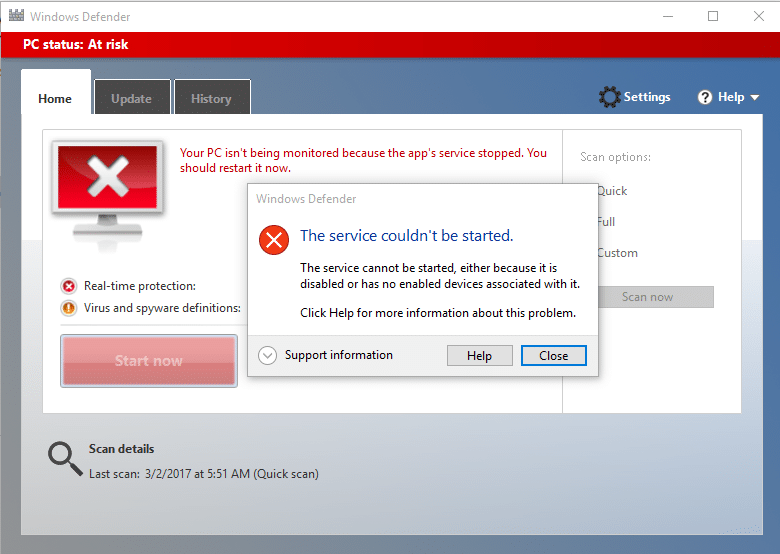
Windows Defender is turned off when you use a 3rd party Antivirus and once you uninstall the Antivirus software you won’t be able to turn ON Windows Defender. If you try to enable Windows Defender you will face the error “The Service Couldn’t Be Started” with error code 0x80070422. So without wasting any time let’s see how to actually Fix The Service Couldn’t Be Started Windows Defender Error 0x80070422 with the help of below-listed troubleshooting guide.
Fix The Service Couldn’t Be Started Windows Defender Error 0x80070422
Asegúrate de crear un punto de restauración por se algo falla.
Método 1: executa SFC e CHKDSK
1.Preme a tecla Windows + X e despois fai clic en Símbolo de comandos (administrador).

2.Agora escriba o seguinte no cmd e prema Intro:
Sfc /scannow sfc /scannow /offbootdir=c: /offwindir=c:windows (Se o anterior falla, proba con este)

3.Agarde a que remate o proceso anterior e, unha vez feito, reinicie o PC.
4.A continuación, executa CHKDSK desde aquí Corrixir erros do sistema de ficheiros con Check Disk Utility (CHKDSK).
5.Deixa que se complete o proceso anterior e reinicie o PC para gardar os cambios.
Method 2: Temporarily Disable 3rd party Antivirus
1. Fai clic co botón dereito sobre o Icona do programa antivirus desde a bandexa do sistema e seleccione Desactivar.

2.A continuación, seleccione o período de tempo para o que o O antivirus permanecerá desactivado.

Nota: Escolla a menor cantidade de tempo posible, por exemplo, 15 minutos ou 30 minutos.
3.Once done, again try to run Windows Defender and check if the error resolves or not.
4.Preme a tecla Windows + X e despois selecciona Panel de control.

5.A continuación, fai clic en Sistema e seguridade.
6.A continuación, fai clic en Firewall de Windows.

7.Agora no panel esquerdo da xanela fai clic en Activar ou desactivar o Firewall de Windows.

8.Seleccione Desactivar o Firewall de Windows e reinicie o PC. Again try to open Windows Defender and see if you’re able to Fix The Service Couldn’t Be Started Windows Defender Error 0x80070422.
Se o método anterior non funciona, asegúrate de seguir exactamente os mesmos pasos para volver activar o teu Firewall.
Método 3: asegúrese de que Windows estea actualizado
1.Preme a tecla Windows + I, a continuación, seleccione Actualización e seguridade.

2.A continuación, fai clic de novo Verifique se hai actualizacións e asegúrate de instalar as actualizacións pendentes.

3. Despois de instalar as actualizacións, reinicia o teu PC e mira se podes facelo Fix The Service Couldn’t Be Started Windows Defender Error 0x80070422.
Method 4: Make sure Windows Defender service is set to Automatic
Nota: If Windows Defender service is grayed out in Services Manager then follow this post.
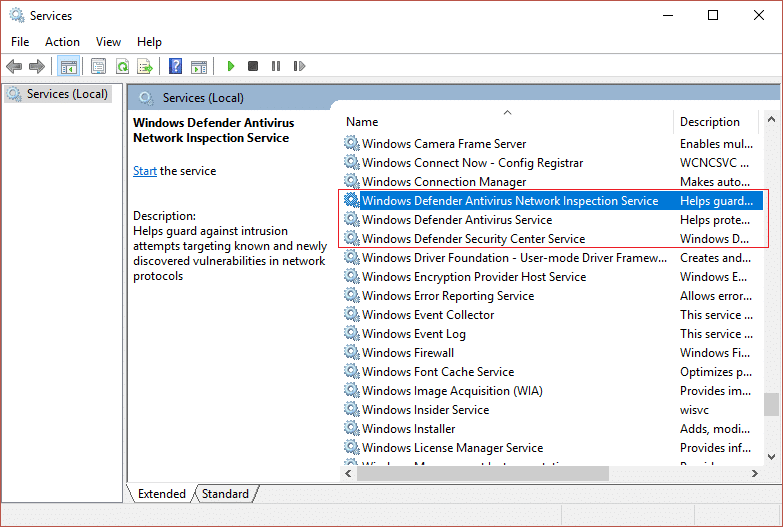
1.Preme a tecla Windows + R e despois escribe services.msc e presione Enter.

2.Find the following services in the Services window:
Windows Defender Antivirus Network Inspection Service
Windows Defender Antivirus Service
Windows Defender Security Center Service
3.Double-click on each of them and make sure their Startup type is set to Automático and click Start if the services are not already running.
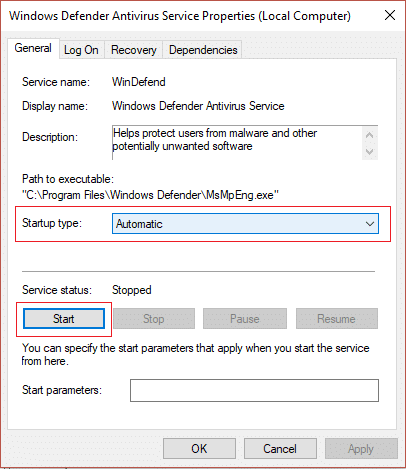
4. Fai clic en Aplicar seguido de Aceptar.
5.Reinicia o teu PC para gardar os cambios e ver se podes facelo Fix The Service Couldn’t Be Started Windows Defender Error 0x80070422.
Method 5: Enable Windows Defender through Registry Editor
1.Preme a tecla Windows + R e despois escribe regedit e presione Enter.

2. Navegue ata a seguinte clave de rexistro:
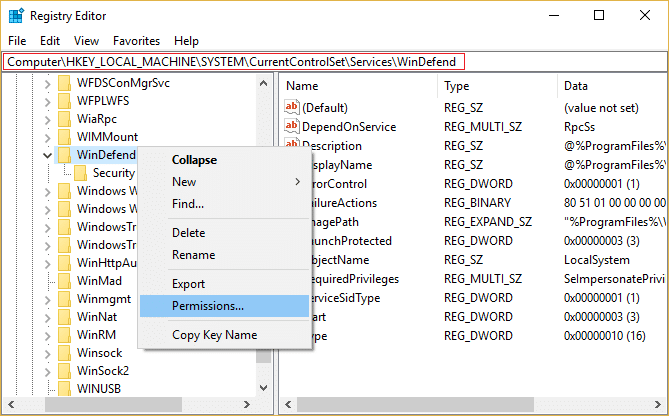
HKEY_LOCAL_MACHINESYSTEMCurrentControlSetServicesWinDefend
3.Now right-click on WinDefend e seleccione Permisos.
4.Follow this guide in order to take full control or ownership of the above registry key.
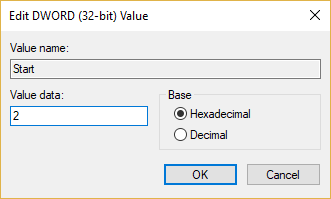
5.After that make sure you have selected WinDefend then in the right window double-click on Start DWORD.
6.Change the value to 2 in the value data field and click OK.
7. Pecha o Editor do Rexistro e reinicia o teu PC.
8.Again try to enable Windows Defender and this time it should work.
Método 6: executa CCleaner e Malwarebytes
1.Descarga e instala CCleaner & Malwarebytes.
2.Executar Malwarebytes e deixe que escanee o seu sistema en busca de ficheiros daniños.
3.Se se atopa malware, eliminaraos automaticamente.
4.Agora corre CCleaner e na sección "Limpador", na pestana de Windows, suxerímoslle que comprobe as seguintes seleccións a limpar:

5.Unha vez que teñas a certeza de que os puntos correctos están marcados, simplemente fai clic Run Cleaner, e deixe que CCleaner siga o seu curso.
6. Para limpar o sistema aínda máis, seleccione a pestana Rexistro e asegúrese de marcar o seguinte:

7.Seleccione Escanear para detectar problemas e permita que CCleaner busque e, a continuación, prema Corrixir problemas seleccionados.
8. Cando CCleaner pregunta "Queres cambios de copia de seguridade no rexistro?” seleccione Si.
9.Unha vez que se complete a copia de seguridade, seleccione Corrixir todos os problemas seleccionados.
10. Reinicia o teu PC para gardar os cambios e ver se podes facelo Fix The Service Couldn’t Be Started Windows Defender Error 0x80070422.
Method 7: Refresh or Reset your PC
1.Press Windows Key + I to open Settings then select Actualización e seguridade.
2.From left-hand menu select Recuperación e prema en "Comezar” under Reset this PC.

3.Seleccione a opción para Manter os meus ficheiros.

4.Follow the instructions on the screen to complete the process.
5.This will take some time and your computer will restart.
Método 8: Repara a instalación de Windows 10
This method is the last resort because if nothing works out then this method will surely repair all problems with your PC. Repair Install just using an in-place upgrade to repair issues with the system without deleting user data present on the system. So follow this article to see How to Repair Install Windows 10 Easily.
Recomendado para ti:
Iso é todo, con éxito Fix The Service Couldn’t Be Started Windows Defender Error 0x80070422 pero se aínda tes algunha dúbida sobre esta guía, non dubides en preguntalas na sección de comentarios.

