Fix unable to connect to the proxy server in Windows 10: A proxy server is a server that acts as an intermediary between your computer and other servers. Right now, your system is configured to use a proxy, but Google Chrome can’t connect to it.

Here are some suggestions: If you use a proxy server, check your proxy settings or contact your network administrator to make sure the proxy server is working. If you don’t believe you should be using a proxy server, adjust your proxy settings: Go to the Chrome menu – Settings – Show advanced settings… – Change proxy settings… – LAN Settings and deselect the “Use a proxy server for your LAN” checkbox. Error 130 (net::ERR_PROXY_CONNECTION_FAILED): Proxy server connection failed.
Problems caused by the Proxy virus:
Windows could not automatically detect this network’s proxy settings.
Can’t connect the internet, Error: cannot find the proxy server.
Error Message: Unable to Connect to Proxy Server.
Firefox: The proxy server is refusing connections
The proxy server isn’t responding.
The connection was interrupted
The connection was reset
Fix unable to connect to the proxy server in Windows 10
Method 1: Disable Proxy Settings
1. Danna Windows Key + R sannan ka rubuta msconfig kuma danna Ya yi.

2. Zaži boot tab da alamar bincike Safe boot. Then click Apply and OK.
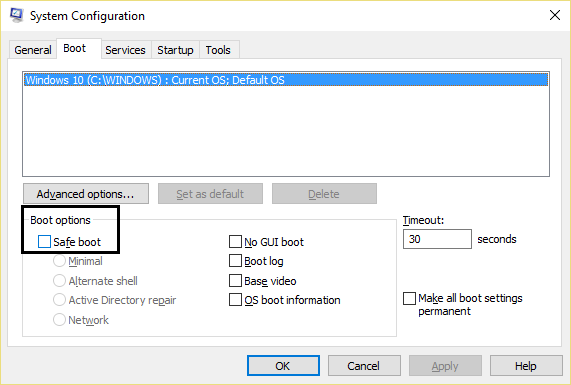
3. Now restart your PC and it will boot into Safe Mode.
4. Once the system starts in Safe Mode then press Windows Key + R and type ininasari.cpl
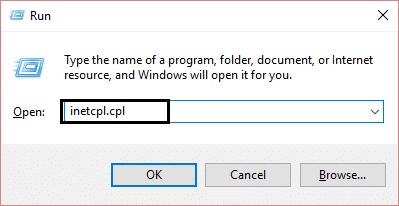
5. Hit Ok to open Internet Properties and from there switch to the Abubuwan haɗi tab.
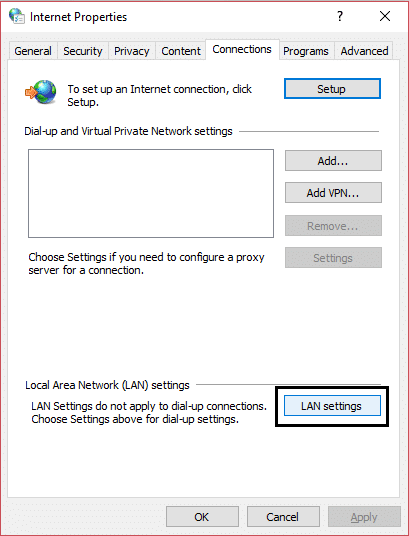
6. Danna kan Saitunan LAN button at the bottom under the Local Area Network (LAN) Settings.
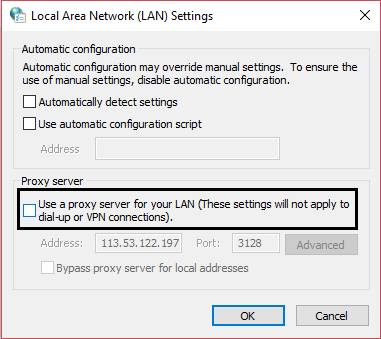
7. Cire"Yi amfani da uwar garken wakili na LAN“. Then click OK.
8. Again open msconfig and Cire alamar Safe boot option then click Apply followed by OK.
9. Sake kunna PC ɗinka don adana canje-canje.
Method 2: Reset Internet Settings
1. Danna Windows Key + R sannan ka rubuta inetcpl.cpl and hit enter to open Internet Properties.
2. In the Internet settings window, switch to the Na ci gaba tab.
3. Danna kan Sake saita button and Internet Explorer will start the reset process.
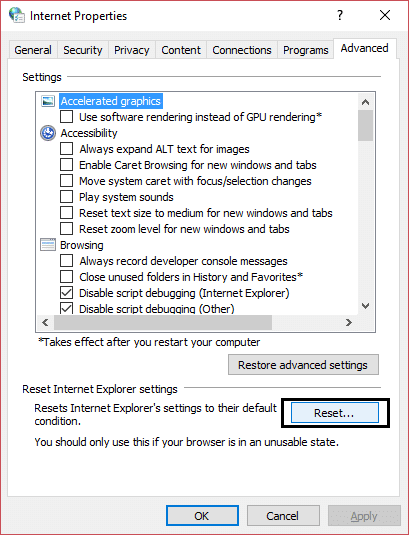
4. Reboot your computer and check if you’re able to fix Unable to connect to the proxy server in Windows 10.
Hanyar 3: Sabunta Google Chrome
1. Open Google Chrome then click on the uku a tsaye dige (Menu) from the top-right corner.

2. From the menu select Taimake sai ka danna"Game da Google Chrome".
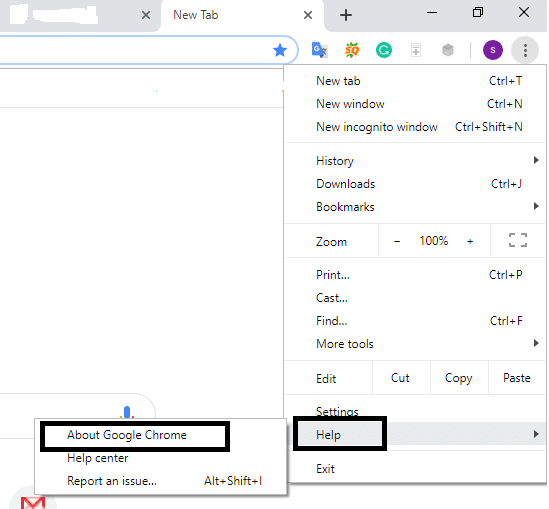
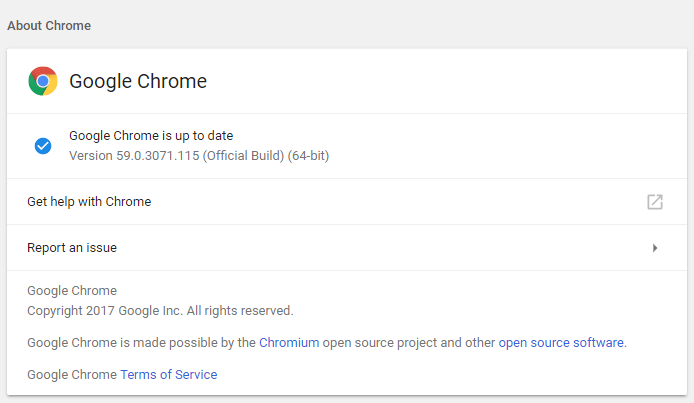
3. This will open a new page, where Chrome will check for any updates.
4. If updates are found, make sure to install the latest browser by clicking on the Update button.
5. Da zarar an gama, sake yi PC ɗinka don adana canje-canje.
Method 4: Run Netsh Winsock Reset Command
1. Danna-dama a kan Windows Button kuma zaɓi "Umurnin Umurni (Admin)."

2. Now type the following and hit enter after each one:
ipconfig / flushdns
nbtstat –r
netsh int ip sake saiti
Netsh Winsock sake saiti
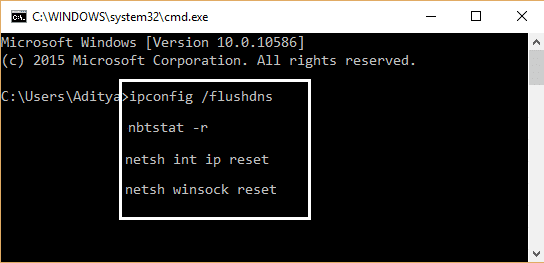
3. Sake yi don amfani da canje-canje.
Netsh Winsock Reset command seems to fix unable to connect to the proxy server error.
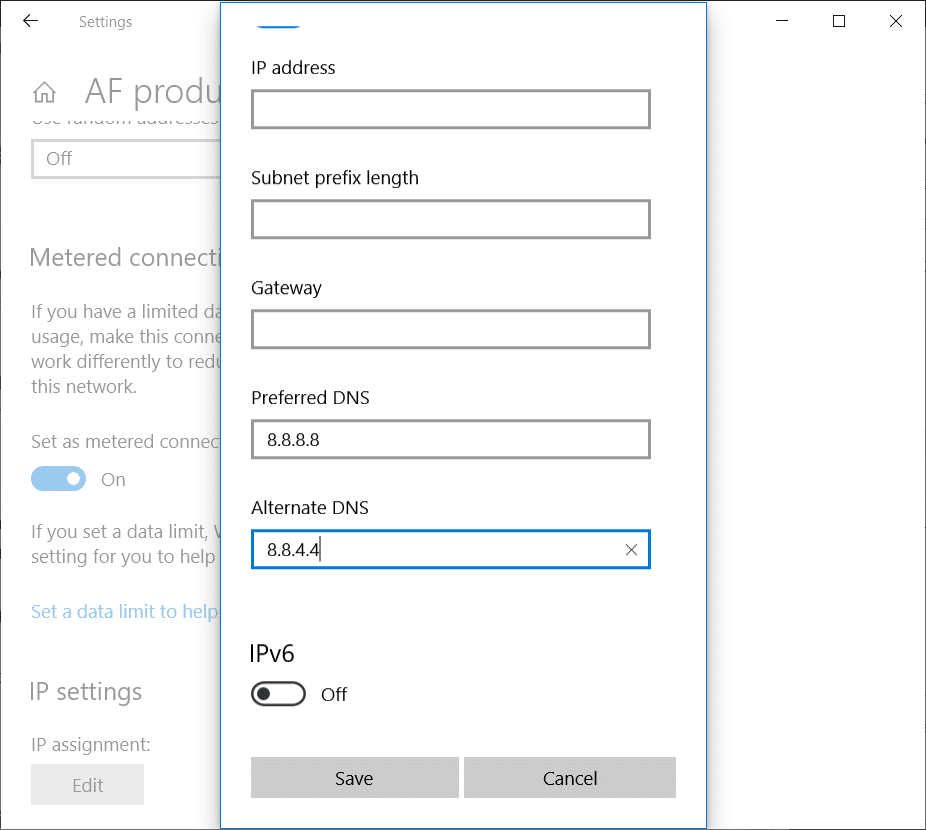
Method 5: Change DNS Address
Sometimes invalid or incorrect DNS can also cause the “Unable to connect to the proxy server” error in Windows 10. So the best way to fix this issue is to switch to OpenDNS or Google DNS on Windows PC. So without any further ado, let’s see how to switch to Google DNS in Windows 10 in order to fix Unable to connect to the proxy server error.
Method 6: Delete Proxy Server Registry Key
1. Danna Windows Key + R sannan ka rubuta regedit kuma danna Shigar don buɗe Editan rajista.

2. Kewaya zuwa maɓallin rajista mai zuwa:
HKEY_CURRENT_USERSoftwareMicrosoftWindowsCurrentVersionInternet Settings
3. Select Internet settings then right-click on ProxyEnable key (in the right-hand side window) and select Delete.
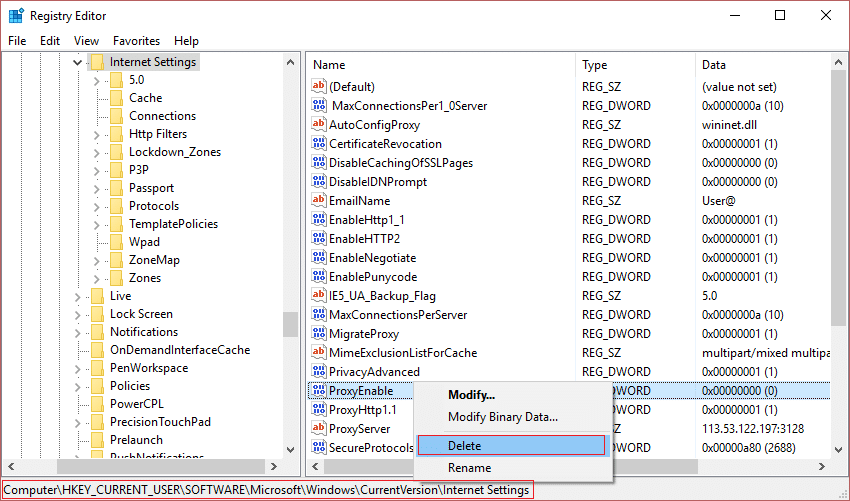
4. Follow the above step for the ProxyServer key ma.
5. Rufe komai kuma sake yi PC ɗinka don adana canje-canje.
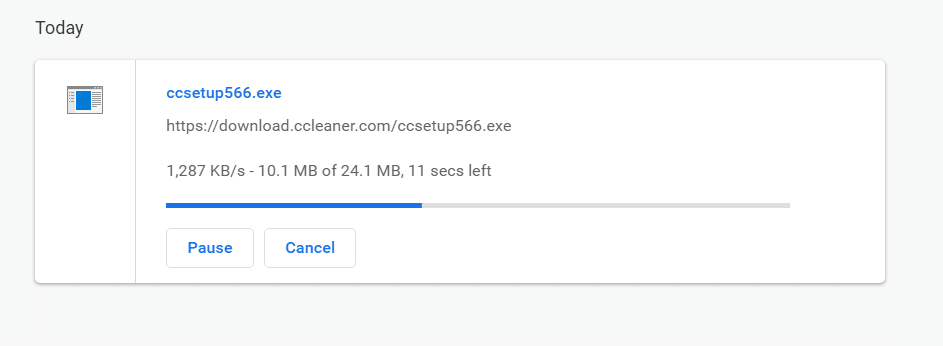
Method 7: Run CCleaner
If the above method didn’t work for you then running CCleaner might be helpful:
1. Download and install CCleaner.
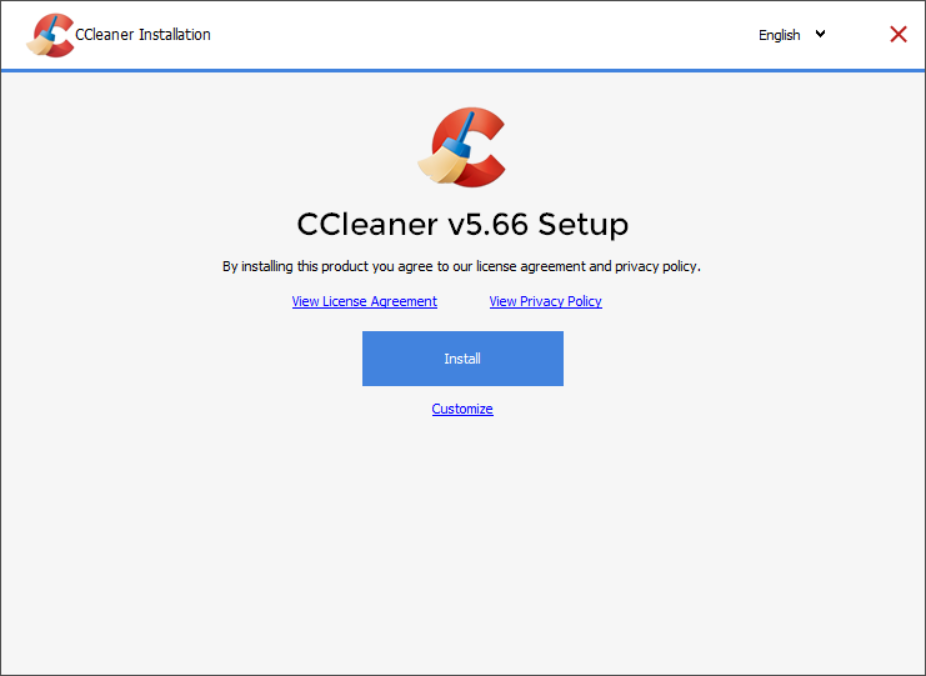
2. Double-click on the setup.exe to start the installation.
3. Danna kan Sanya maɓallin to start the installation of CCleaner. Follow on-screen instructions to complete the installation.
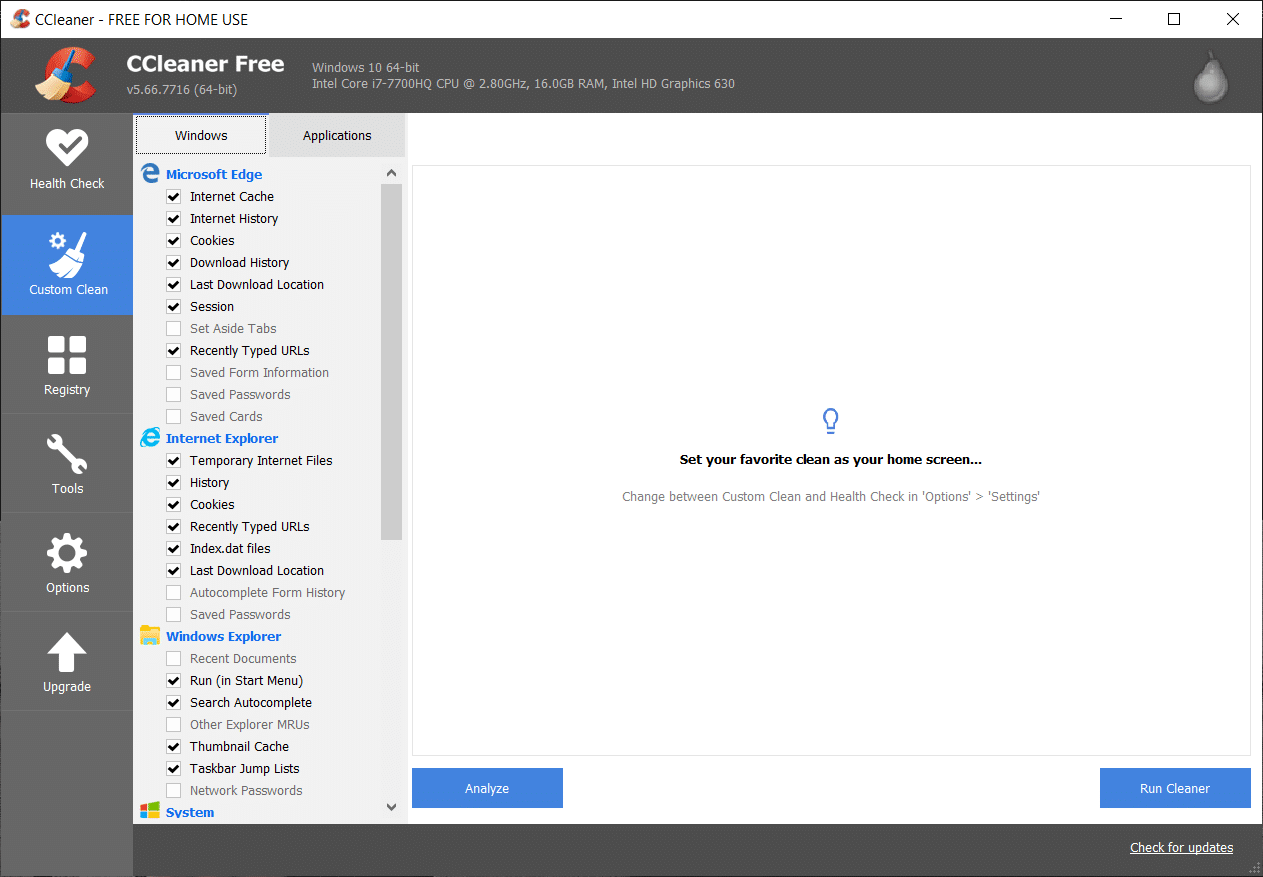
4. Launch the application and from the left-hand side menu, select Kasuwanci
5. Now see if you need to checkmark anything other than the default settings. Once done, click on Analyze.
6. Once the analysis is complete, click on the “Shigar da CCleaner"Button.

7. Let CCleaner run its course and this will clear all cache and cookies on your system.
8. Now, to clean your system further, select the Registry tab, and ensure the following are checked.

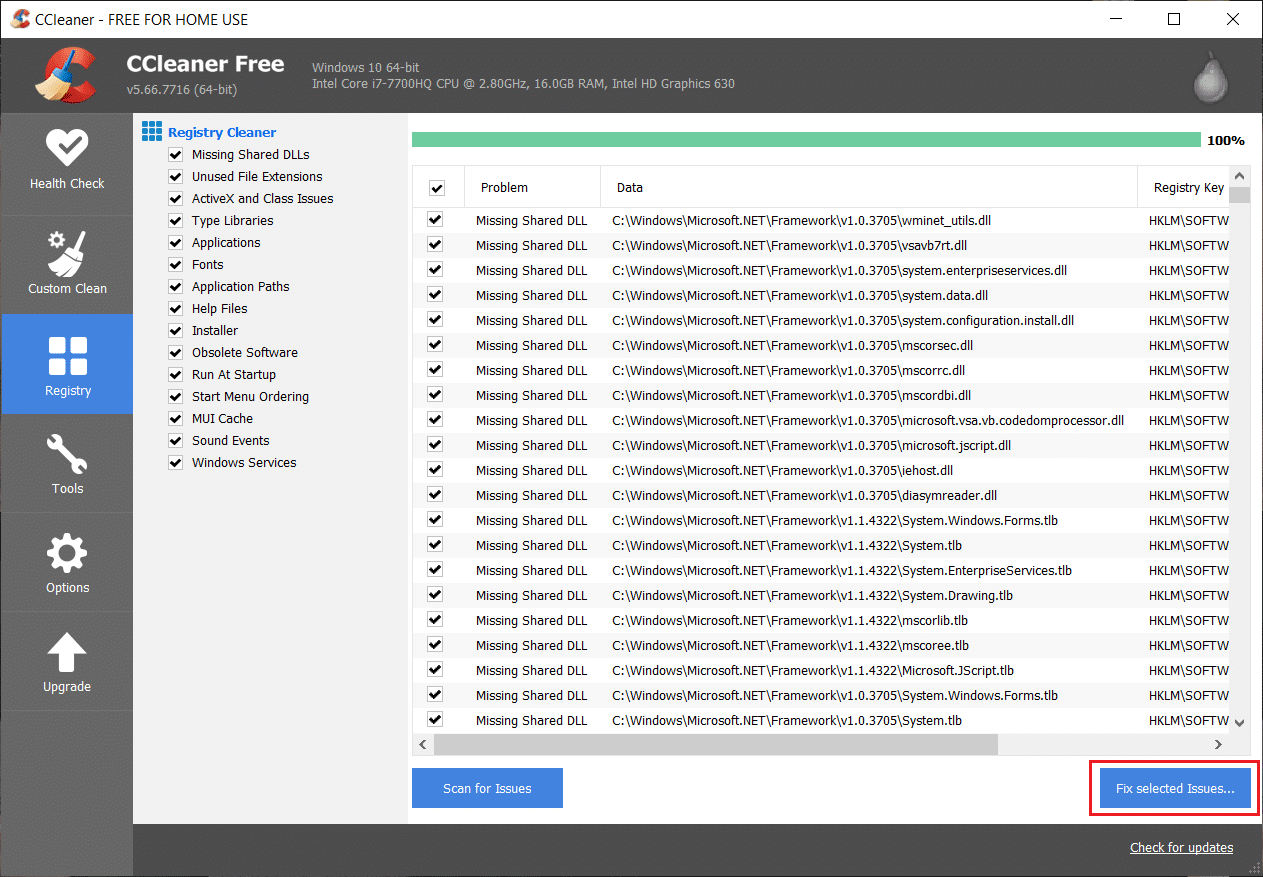
9. Once done, click on the “Duba ga Matsaloli” button and allow CCleaner to scan.
10. CCleaner will show the current issues with Windows Registry, simply click on the Fix selected Issues button.
11. Lokacin da CCleaner ya tambaya "Kuna son sauye-sauyen madadin zuwa wurin yin rajista?”Zaɓi Ee.
12. Once your backup has completed, select Fix All Selected Issues.
13. Sake yi PC ɗinka don adana canje-canje.
This method seems to Gyara Rashin Haɗa zuwa uwar garken wakili a cikin Windows 10 in some cases where the system is affected because of the malware or virus. Otherwise, if you have third-party Antivirus or Malware scanners, you can also use them to remove malware programs from your system. You should scan your system with anti-virus software and get rid of any unwanted malware or virus immediately.
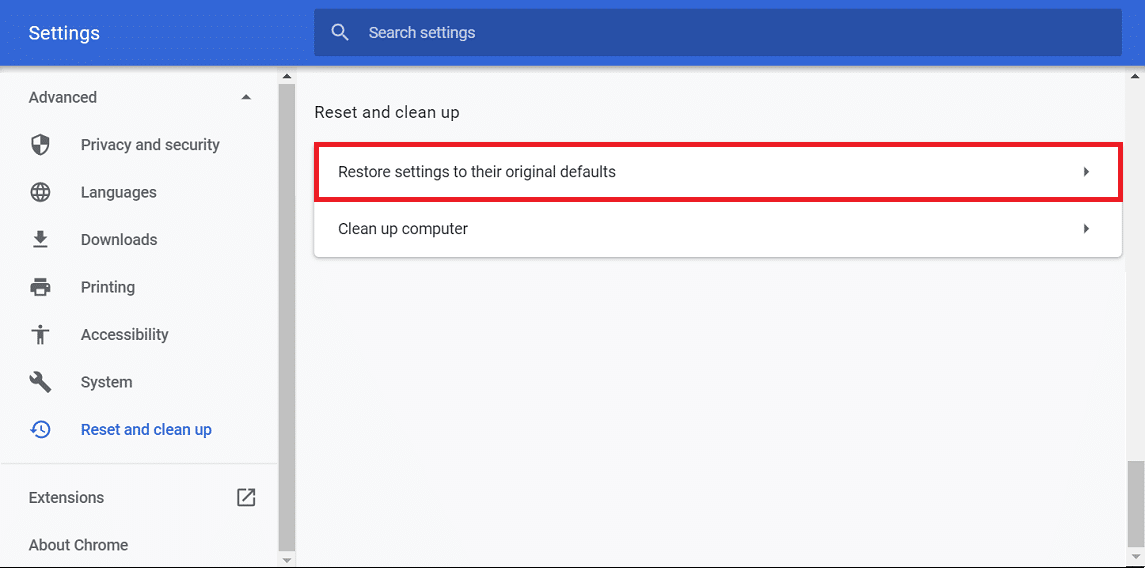
Hanyar 8: Sake saita Chrome Browser
To restore Google Chrome to its default settings follow the below steps:
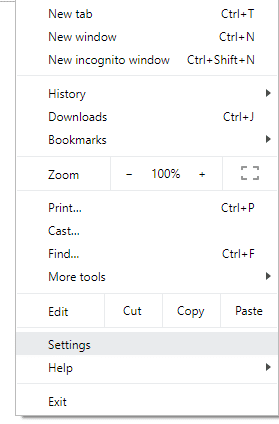
1. Danna kan icon dige uku samuwa a saman kusurwar dama.
2. Danna kan Saitin saiti from the menu opens up.
3. Scroll down at the bottom of the Settings page and click Na ci gaba.
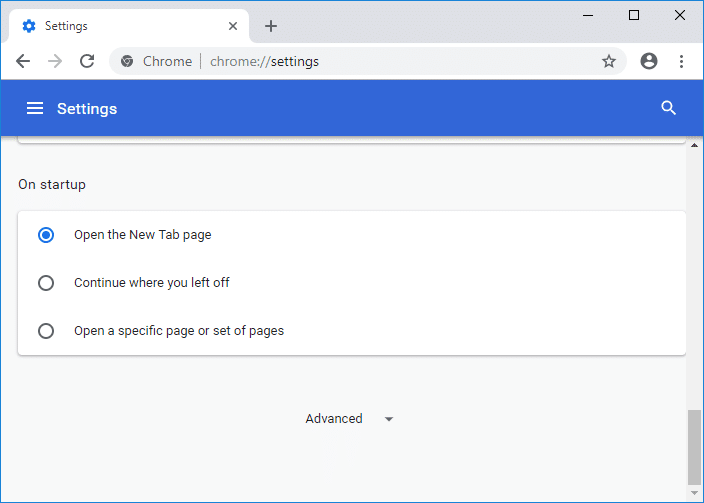
4. As soon as you click on Advanced, from the left-hand side click on “Sake saita kuma tsaftace".
5. Yanzu kunder Reset and clean up tab, click on Sake saitin saitunan zuwa ga asali na asali.
6. Below dialog box will open up which will give you all the details about what restoring Chrome settings will do.
lura: Before proceeding read the given information carefully as after that it may lead to loss of some important information or data.
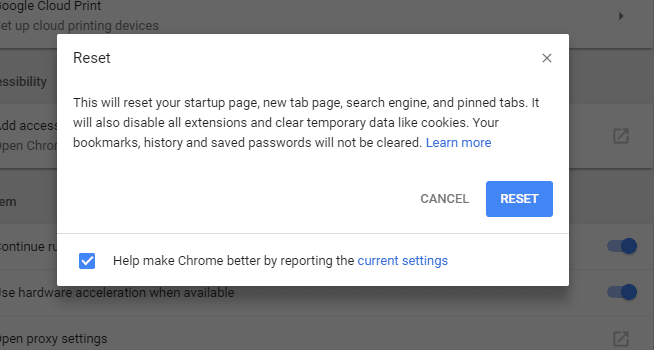
7. After making sure that you want to restore Chrome to its original settings, click on the Sake saitin saiti button.
When you tried to disable it through LAN settings, but it shows up in Light Gray and won’t let change anything? Or can’t change proxy settings? Uncheck the box in the LAN settings, the box check itself back? Run Malwarebytes Anti-Malware to remove any rootkit or malware from your PC.
I hope the above steps were helpful and you’re able to fix Unable to connect to the proxy server in Windows 10 error but if you still have any queries regarding this post feel free to ask them in comments.
![No Boot Disk Has Been Detected or the Disk Has Failed [SOLVED]](https://lbsite.org/wp-content/uploads/2023/01/Fix-No-Boot-Disk-Has-Been-Detected-or-the-Disk-Has-Failed.png "No Boot Disk Has Been Detected or the Disk Has Failed [SOLVED]")
