Process and Compressed Memory is a Windows 10 feature responsible for memory compression (also referred to as RAM compression and memory compression). This feature basically utilizes data compression to reduce the size or number of paging request to and from the auxiliary storage. In short, this feature is designed to take less amount of disk space and memory but in this case the System and Compressed Memory process start using 100% Disk and Memory, causing the affected PC to become slow.

In Windows 10, a compressions store is added to the concept of Memory Manager, which is an in-memory collection of compressed pages. So whenever the memory starts to fill up, the System and Compressed Memory process will compress the unused pages instead of writing them to the disk. The benefit of this is the amount of memory used per process is reduced, which allows Windows 10 to maintain more programs or apps in physical memory.
The problem appears to be incorrect Virtual Memory settings. Someone changed the paging file size from automatic to a particular value, virus or malware, Google Chrome or Skype, corrupt system files etc. So without wasting any time let’s see how to actually Fix 100% Disk Usage by System and Compressed Memory with the help of below-listed troubleshooting guide.
[SOLVED] 100% Disk Usage by System and Compressed Memory
Tabbatar ƙirƙirar wurin mayarwa, kawai idan wani abu ya ɓace.
Hanyar 1: Gyara Fayilolin Tsarin Lalata
1. Buɗe Umurnin Umurni. Mai amfani zai iya yin wannan matakin ta neman 'cmd' sa'an nan kuma danna Shigar.

2. Yanzu rubuta wadannan a cikin cmd kuma danna enter:
Sfc / scannow sfc / scannow /offbootdir=c: /offwindir=c:windows (Idan sama ya kasa to gwada wannan)
![SFC scan now command prompt | [SOLVED] 100% Disk Usage by System and Compressed Memory](https://lbsite.org/wp-content/uploads/2023/01/SFC-scan-now-command-prompt.png)
3. Jira na sama tsari don gama da zarar aikata, zata sake farawa da PC.
4. Sake bude cmd kuma buga wannan umarni kuma danna enter bayan kowannensu:
Dism / Kan layi / Hoto-Cleanup / CheckHealth Dism / Kan layi / Tsabtace-Hoto / ScanHealth Dism / Kan layi / Tsabtace-Hoto / Dawo daHealth

5. Bari umarnin DISM ya gudana kuma jira ya ƙare.
6. Idan umarnin da ke sama bai yi aiki ba to gwada abubuwan da ke ƙasa:
Dism / Image: C: offline / Cleanup-Image /RestoreHealth / Source: c: testmountwindows Dism / Online / Clean-Image / RestoreHealth / Source: c: testmountwindows /LimitAccess
lura: Maye gurbin C:RepairSourceWindows tare da tushen gyaran ku (Windows Installation ko Disc farfadowa da na'ura).
7. Sake yi PC ɗinka don adana canje-canje kuma duba idan zaka iya Fix 100% Disk Usage by System and Compressed Memory Issue.
Method 2: Set Correct Paging File Size
1. Danna Windows Key + R sannan ka rubuta sysdm.cpl kuma latsa Shigar don buɗewa Abubuwan Tsari.

2. Sauya zuwa Advanced shafin sa'an nan kuma danna kan Saituna ƙarƙashin Aiki.

3. Again switch to the Advanced tab and click Change under Virtual Memory.

4. Checkmark “Kai tsaye sarrafa girman fayil ɗin sarrafawa ta atomatik ga duk faifai."
![Checkmark Automatically manage paging file size for all drives | [SOLVED] 100% Disk Usage by System and Compressed Memory](https://lbsite.org/wp-content/uploads/2023/02/Checkmark-Automatically-manage-paging-file-size-for-all-drives.png)
5. Click OK, then click Apply followed by OK.
6. Select Yes to Restart your PC to save changes.
Hanyar 3: Kashe Saurin Farawa
1. Danna Windows Key + R sai a buga control sannan ka danna Enter don budewa Control Panel.

2. Danna kan Hardware da Sauti saika danna Zaɓuɓɓuka Power.

3. Sa'an nan, daga hagu na taga taga zaži "Zaɓi abin da maballin ikon ke yi."

4. Yanzu danna kan "Canja saitunan da ba a samuwa a halin yanzu."

5. Cire"Kunna fara farawa”Saika latsa Adana canje-canje.
![Uncheck Turn on fast startup | [SOLVED] 100% Disk Usage by System and Compressed Memory](https://lbsite.org/wp-content/uploads/2023/01/Uncheck-Turn-on-fast-startup.png)
6. Restart your PC and see if you’re able to Fix 100% Disk Usage by System and Compressed Memory Issue.
Method 4: Disable Superfetch Service
1. Danna Windows Key + R sannan ka rubuta ayyuka.msc kuma buga Shigar.

2. Nemo Super debo service from the list then right-click on it and select Properties.

3. Under Service status, if the service is running, click on Tsaya.
4. Yanzu, daga Farawa type drop-down select Masiha.

5. Danna Aiwatar, sannan kuma KO.
6. Sake yi PC ɗinka don adana canje-canje.
If the above method doesn’t disable Superfetch services then you can follow disable Superfetch using Registry:
1. Danna Windows Key + R sannan ka rubuta regedit kuma danna Shigar don buɗe Editan rajista.

2. Kewaya zuwa maɓallin rajista mai zuwa:
HKEY_LOCAL_MACHINESYSTEMCurrentControlSetControlSession ManagerMemory ManagementPrefetchParameters
3. Make sure you have selected PrefetchParameters sannan a cikin taga dama danna sau biyu Kunna Superfetch mabudi da change it’s value to 0 in the Value data field.

4. Click OK and close the Registry Editor.
5. Sake kunna PC ɗinku don adana canje-canje kuma duba idan kuna iya Fix 100% Disk Usage by System and Compressed Memory Issue.
Method 5: Adjust your PC for Best Performance
1. Danna Windows Key + R sannan ka rubuta sysdm.cpl kuma latsa Shigar don buɗewa Abubuwan Tsari.
2. Sauya zuwa Na ci gaba tab sannan ka danna Saituna karkashin Ayyukan.
3. Under Visual Effects checkmark “Daidaita don mafi kyau".

4. Danna Aiwatar, sannan kuma KO.
5. Reboot your PC and see if you’re able to Fix 100% Disk Usage by System and Compressed Memory Issue.
Method 6: Kill the Speech Runtime Executable Process
1. Latsa Ctrl + Shift + Esc don kaddamar da Task Manager.
2. A cikin Tafiyar matakai tab, sami Speech Runtime Executable.
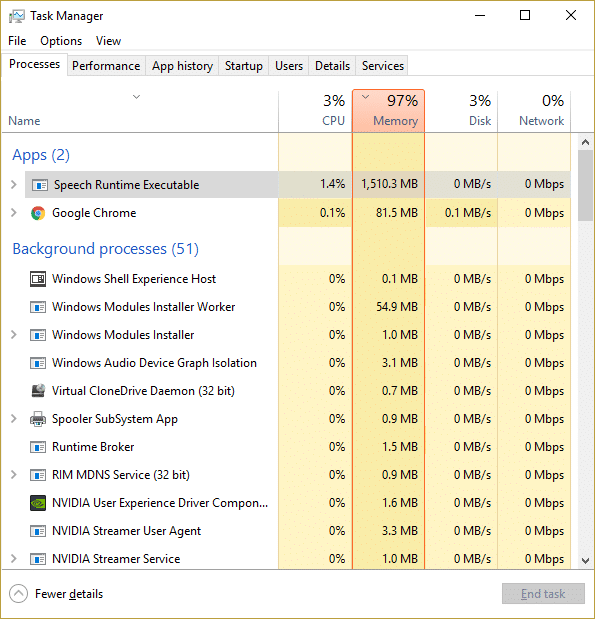
3. Danna-dama akan shi kuma zaɓi Ƙare Task.
Hanyar 7: Gudanar da CCleaner da Malwarebytes
1. Sauke kuma shigar CCleaner & Malwarebytes.
2. Shigar da Malwarebytes kuma bari ya duba tsarin ku don fayiloli masu cutarwa. Idan an sami malware, za ta cire su ta atomatik.

3. Yanzu gudanar da CCleaner kuma zaɓi Tsabta ta Musamman.
4. A ƙarƙashin Custom Clean, zaɓi da Windows tab kuma duba abubuwan da ba daidai ba kuma danna bincika.
![Select Custom Clean then checkmark default in Windows tab | [SOLVED] 100% Disk Usage by System and Compressed Memory](https://lbsite.org/wp-content/uploads/2023/01/Select-Custom-Clean-then-checkmark-default-in-Windows-tab.png)
5. Da zarar Bincike ya cika, tabbatar cewa kun tabbata za ku cire fayilolin da za a goge.

6. A ƙarshe, danna kan Gudu Tsabtace button kuma bari CCleaner ta gudanar da aikinta.
7. Don ƙara tsaftace tsarin ku, zaɓi shafin Registry, kuma tabbatar an duba waɗannan abubuwan:

8. Danna kan Duba ga Matsaloli button kuma ba da damar CCleaner ya duba, sannan danna kan Gyara Abubuwan da aka zaɓa button.
![Once scan for issues is completed click on Fix selected Issues | [SOLVED] 100% Disk Usage by System and Compressed Memory](https://lbsite.org/wp-content/uploads/2023/01/Once-scan-for-issues-is-completed-click-on-Fix-selected-Issues.png)
9. Lokacin da CCleaner ya tambaya "Kuna son sauye-sauyen madadin zuwa wurin yin rajista?" zaɓi Ee.
10. Da zarar your backup ya kammala, danna kan Gyara Duk Abubuwan da aka zaɓa button.
11. Sake kunna PC ɗinka don adana canje-canje.
Method 8: Change configuration of Google Chrome and Skype
Domin Google Chrome: Navigate to the following under Chrome: Settings > Show Advanced Settings > Privacy > Use a prediction service to load pages more quickly. Disable the toggle next to “Use a prediction service to load pages.”

Change configuration For Skype
1. Make sure you have exited Skype, if not end task from Task Manager for Skype.
2. Press Windows Key + R then type the following and click OK:
C:Program Files (x86)SkypePhone
3. Danna dama-dama skype.exe kuma zaži Properties.

4. Canja zuwa Tsaro shafin kuma danna Shirya.

5. Zaɓi DUK FASHIN APPLICATIONS under Group or user names then checkmark Write karkashin Kyale.

6. Click Apply, followed by OK and see if you’re able to Fix 100% Disk Usage by System and Compressed Memory Issue.
Method 9: Set Correct Permission for System and Compressed Memory Process
1. Danna Windows Key + R sannan ka rubuta Taskschd.msc and hit Enter to open Task Scheduler.

2. Kewaya zuwa hanya mai zuwa:
Task Scheduler Library > Microsoft > Windows > MemoryDiagnostic
![Double click on ProcessMemoryDiagnostic Events | [SOLVED] 100% Disk Usage by System and Compressed Memory](https://lbsite.org/wp-content/uploads/2023/02/Double-click-on-ProcessMemoryDiagnostic-Events.png)
3. Danna sau biyu ProcessMemoryDiagnostic Events sa'an nan kuma danna Canja Mai amfani ko Rukuni under Security Options.

4. Danna Na ci gaba sa'an nan kuma danna Find Now.

5. Zaɓi naka Mai kula da asusu from the list then click OK.

6. Sake danna Ya yi to add your administrator account.
7. Checkmark Gudun tare da mafi girman gata sannan ka danna OK.

8. Follow the same steps for RunFullMemoryDiagnostic and close everything.
9. Sake yi PC ɗinka don adana canje-canje.
Method 10: Disable System and Compressed Memory Process
1. Danna Windows Key + R sannan ka rubuta Taskschd.msc kuma latsa Shigar don buɗewa Mai tsara Aiki.
2. Kewaya zuwa hanya mai zuwa:
Task Scheduler Library > Microsoft > Windows > MemoryDiagnostic
3. Danna dama-dama RunFullMemory Diagnostic kuma zaži Kashe.
![Right-click on RunFullMemoryDiagnostic and select Disable | [SOLVED] 100% Disk Usage by System and Compressed Memory](https://lbsite.org/wp-content/uploads/2023/02/Right-click-on-RunFullMemoryDiagnostic-and-select-Disable.png)
4. Close Task Scheduler and restart your PC.
shawarar:
Shi ke nan kun samu nasara Fix 100% Disk Usage by System and Compressed Memory amma idan har yanzu kuna da tambayoyi game da wannan post ɗin to ku ji daɗin yin su a sashin sharhi.

