Steam is a well-known name in the gaming community, being the largest PC game distribution platform. But even the king sees some bad days. It is not uncommon to face issues with Steam PC clients and a lot of users have complained about Steam running slow at times to the point it literally stops to respond. You may eventually observe that Steam is slow and you can’t find your way around your library anymore. But worry not. We have compiled a list of remedies that you can try when you experience Steam is slow problem in Windows 10. So lets see what those methods are.

How to Fix Steam is Slow in Windows 10
There may be numerous reasons behind Steam running slow issue. Some of them are listed below.
- Lack of enough CPU and memory resources causes a computer to overheat.
- Too much cache and cookies
- आउटडेटेड डिवाइस ड्राइवर्स
- Outdated Steam app
We have shown all the possible methods to fix Steam is slow issue in the below section. But, before trying the given methods you should boot your system in safe mode. Read our article to boot to safe mode in Windows 10
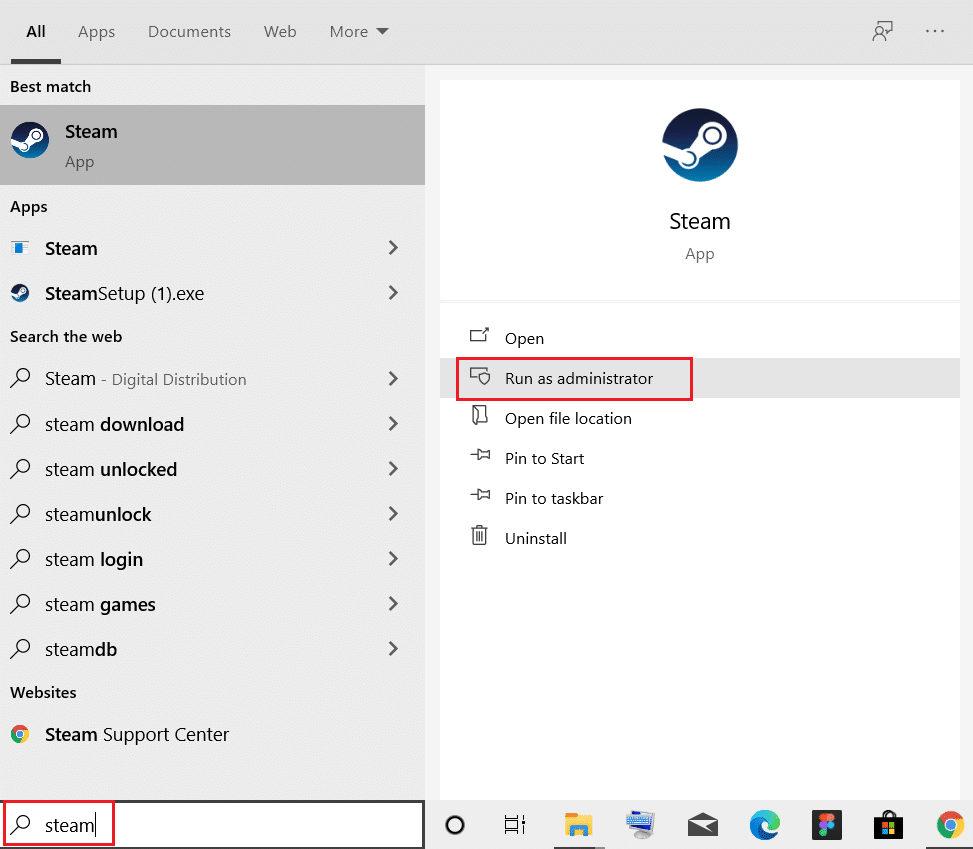
विधि 1: स्टीम को प्रशासक के रूप में चलाएँ
You must always run Steam as administrator as it will give administrative privileges to Steam to run all games. So, follow the given steps to run Steam as administrator.
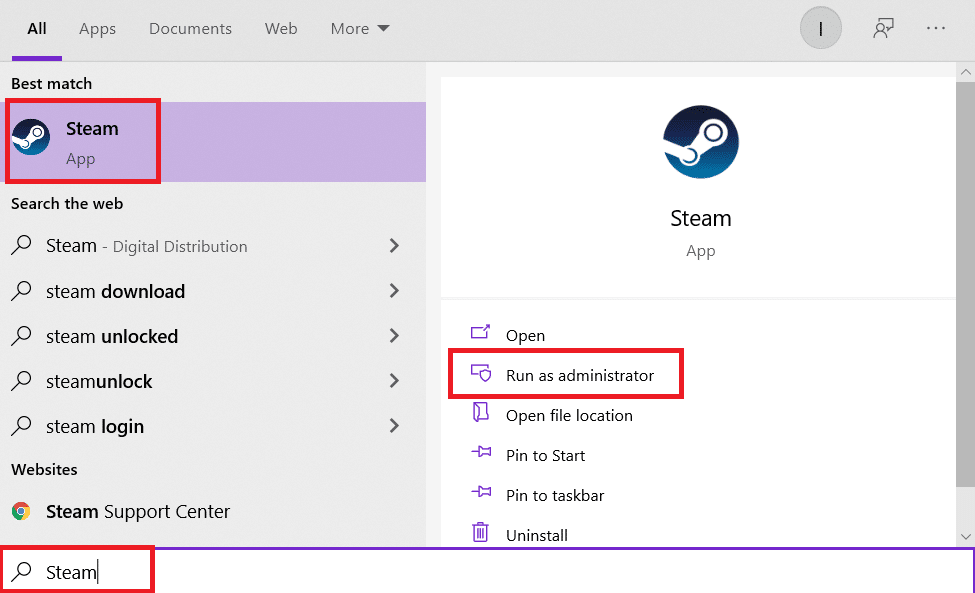
1. मारो विंडोज कुंजी और प्रकार भाप में खोज पट्टी.
2. अब, पर क्लिक करें व्यवस्थापक के रूप में चलाएँ, के रूप में दिखाया।
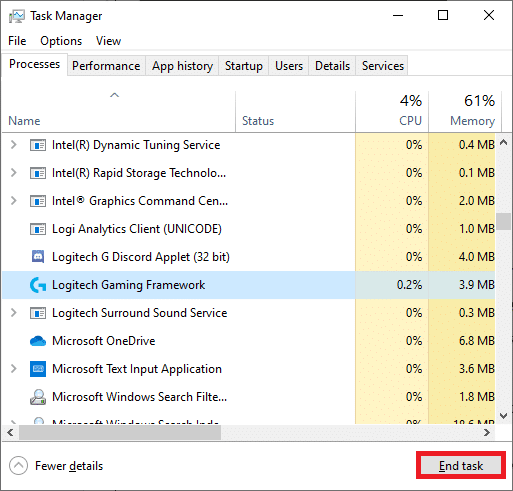
Method 2: Remove Background Processes
Unnecessary apps running in the background may result in high Memory usage. This can case Steam is slow issue in your system. So, follow these steps to remove background processes.
1। प्रक्षेपण Task Manager, दबाएं Ctrl + Shift + ईएससी Instagram पर देख सकते हैं।
2. पता लगाएँ और चुनें अवांछित पृष्ठभूमि प्रक्रियाओं उच्च का उपयोग करना याद.
3. फिर, क्लिक करें अंतिम कार्य, जैसा कि हाइलाइट किया गया दिखाया गया है।
यह भी पढ़ें: How to Fix Steam Not Opening on Windows 10
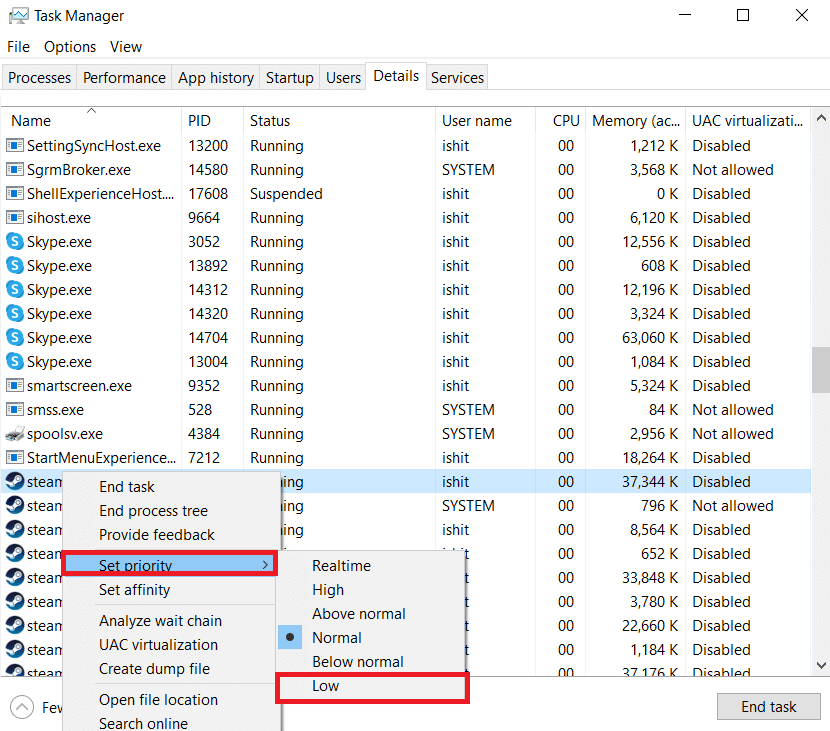
Method 3: Change Steam Process Priority
You can also set Steam priority to high from the Task Manager by following the given steps below.
1। प्रक्षेपण Task Manager और जाओ विवरण टैब.
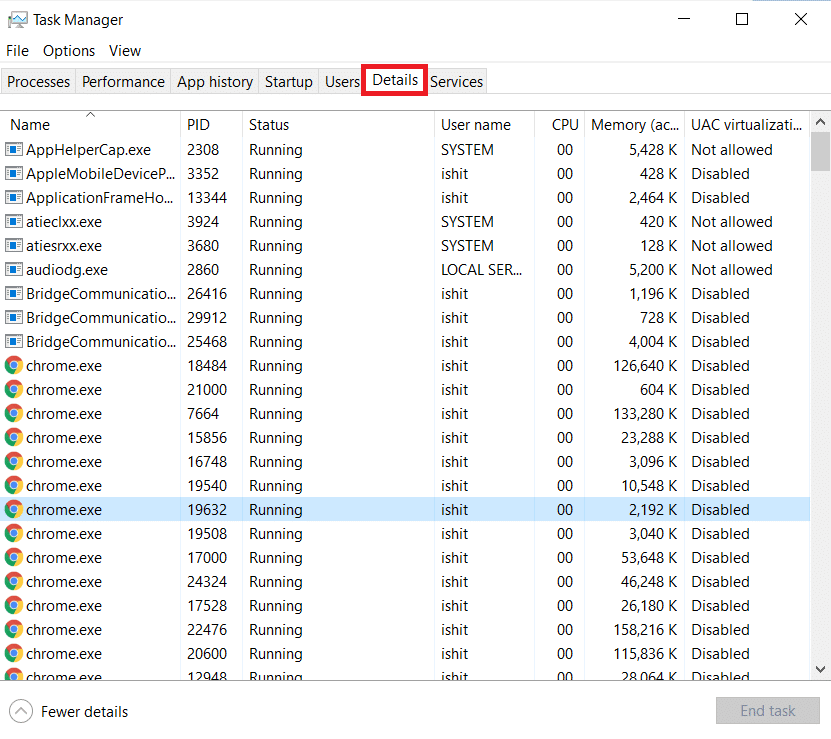
2. Scroll down and select the स्टीम ..exe प्रक्रिया.
3. पर राइट-क्लिक करें भाप process and hover to प्राथमिकता सेट, then select any one of the below विकल्पों.
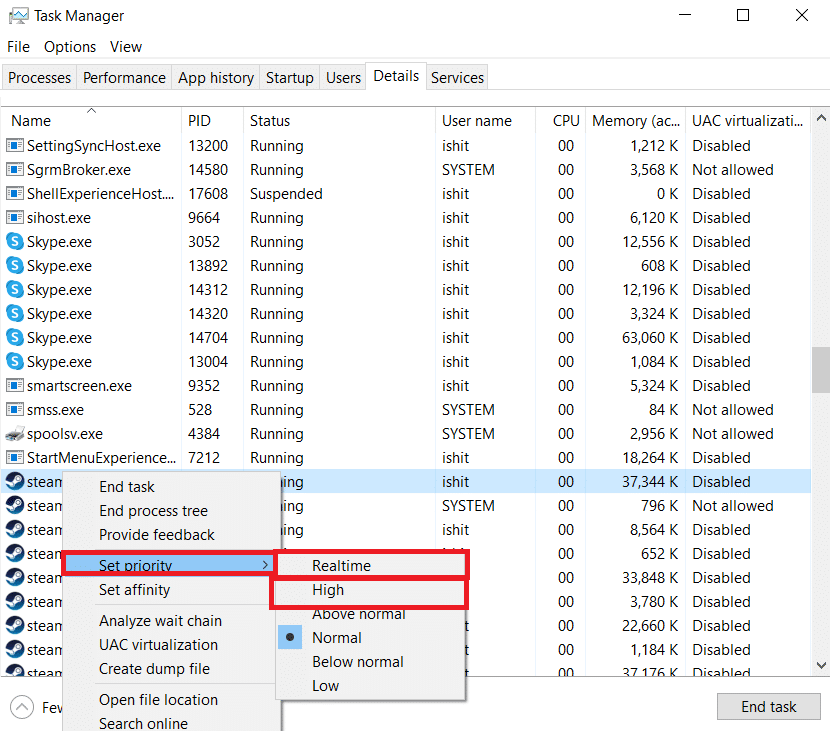
नोट: You can also set the priority to Low if Steam uses high memory by following the above steps and selecting the निम्न में विकल्प 3 कदम.
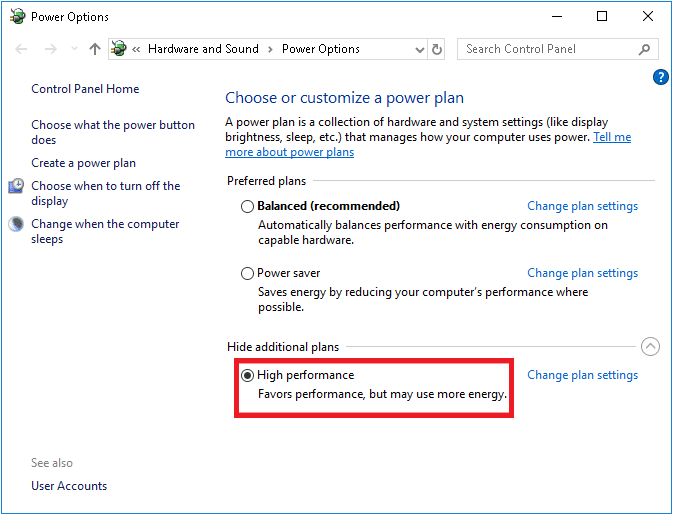
Method 4: Switch to High Performance Power Plan
If you are using a power-saving plan then, it may cause Steam is slow issue. Follow the given steps to switch to high performance power plan to fix Steam running slow issue.
1. पर राइट-क्लिक करें बैटरी आइकन पर टास्कबार का चयन करें और पावर विकल्प.
![]()
2. अब, चुनें उच्च निष्पादन option as highlighted in the pic below.
यह भी पढ़ें: विंडोज़ 502 में स्टीम एरर कोड e3 l10 को ठीक करें
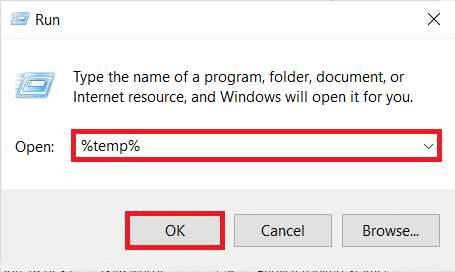
Method 5: Delete HTTP, HTML Cache & Temporary Files
Follow the given steps below to delete the temporary files and HTML cache file to fix Steam is slow issue.
1। दबाएं विंडोज + आर कीज को एक साथ लॉन्च करने के लिए रन संवाद बॉक्स।
2। टाइप % अस्थायी% और पर क्लिक करें OK.
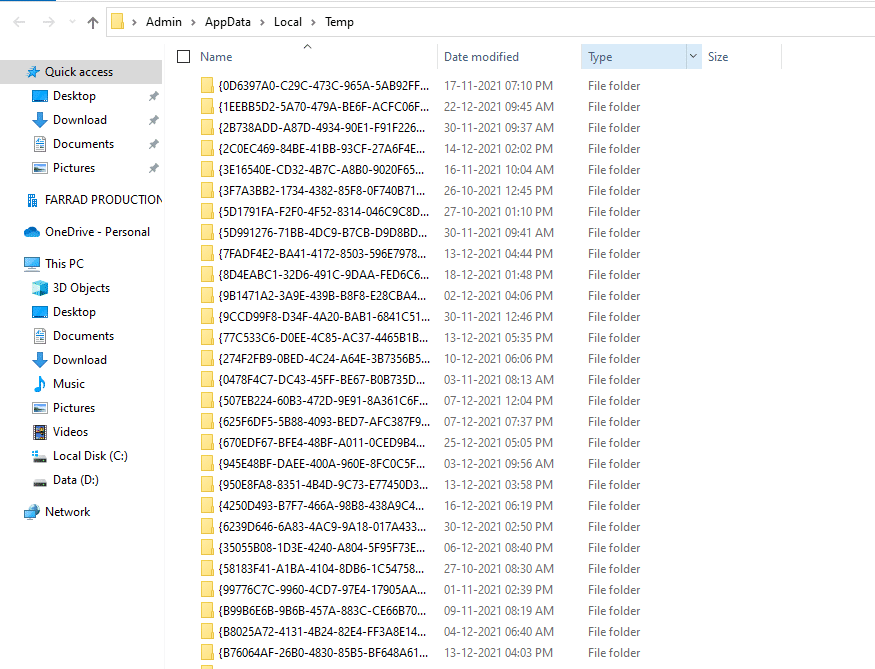
3। दबाएँ Ctrl + A कुंजियाँ together to select all the unrequired files and press the Shift + Del keys together to delete them permanently.
नोट: Some files cannot be deleted coz they are being used, so you can skip these.
4। दबाएँ विंडोज + ई Instagram पर एक साथ खोलने के लिए फाइल एक्सप्लोरर
5. Navigate to the location where you installed Steam: सी:प्रोग्राम फ़ाइलें (x86)स्टीम
नोट: If you are not sure, read our guide: Where are Steam Games installed? here.
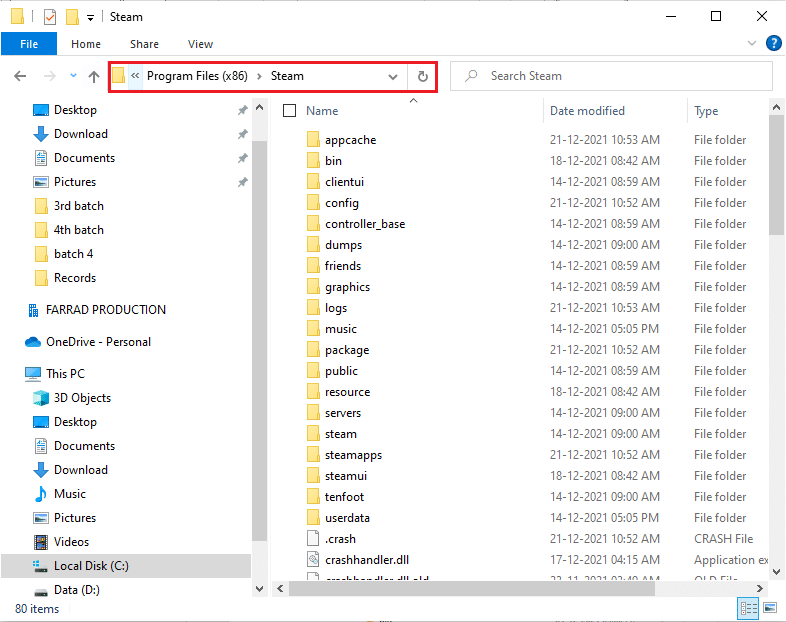
6. पर डबल-क्लिक करें तुष्टिकरण फ़ोल्डर.
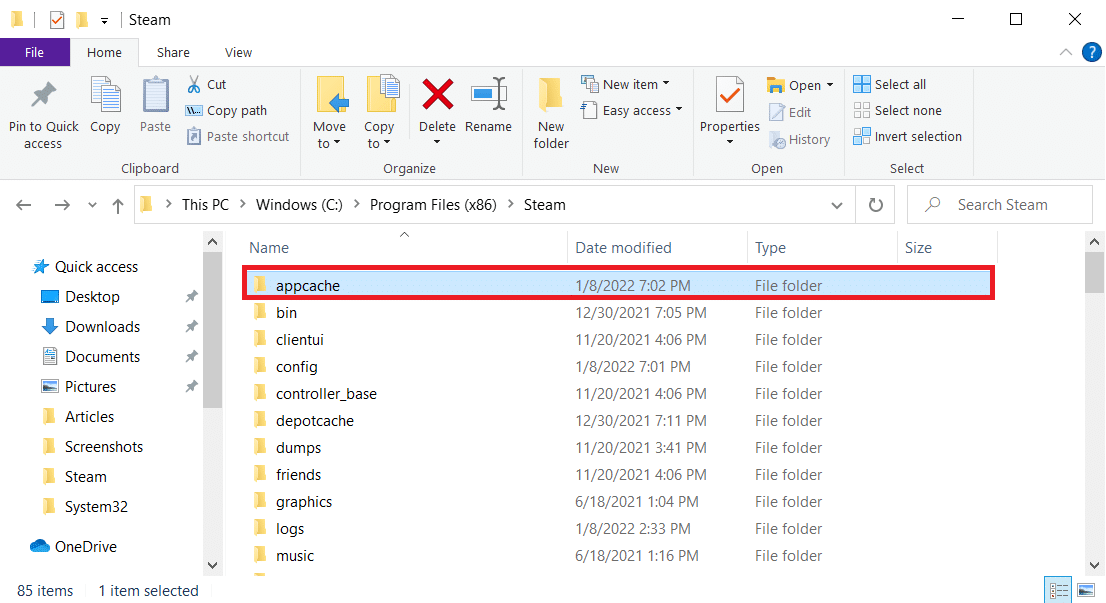
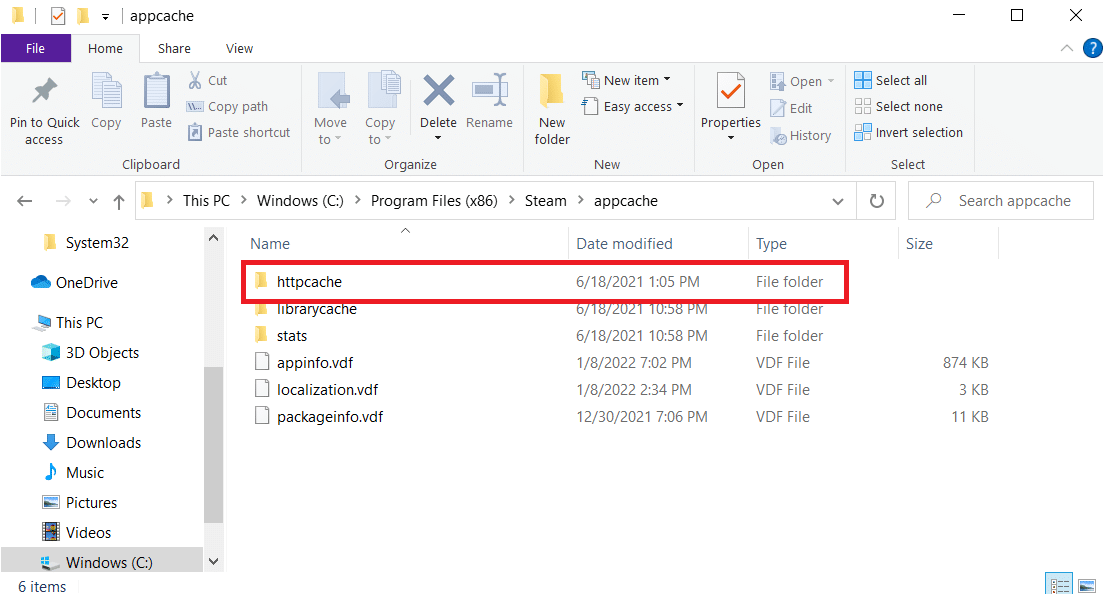
7. Here, delete the httpcache फ़ोल्डर.
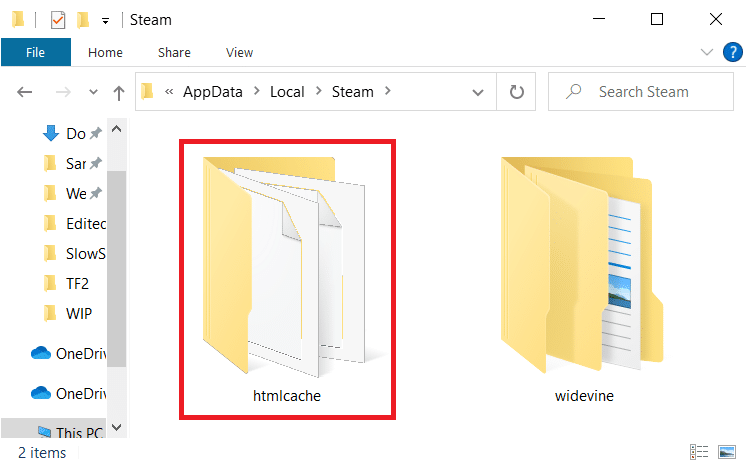
8. Then, go to the following पथ और हटाएं एचटीएमएलकैश फ़ोल्डर.
C:Users<UserName>AppDataLocalSteam
9. अंत में, अपने पीसी को पुनरारंभ करें and check if the issue persists or not.
यह भी पढ़ें: Fix Steam Stopping Downloads on Windows 10
Method 6: Clear Steam Browser Cache & Cookies
Here is how to fix Steam is slow issue by clearing Steam web browser cache and cookies.
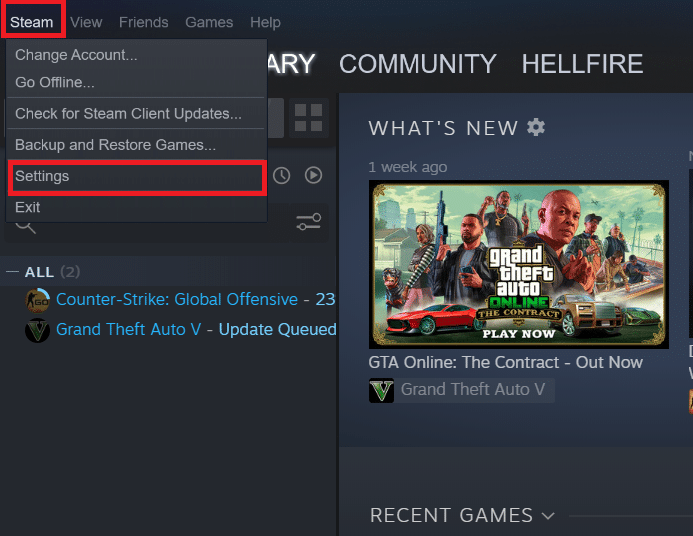
1. मारो विंडोज कुंजीटाइप भाप, और पर क्लिक करें व्यवस्थापक के रूप में चलाएँ.
2. In the upper left corner of the window, click on the भाप टैब और चयन करें सेटिंग ड्रॉप-डाउन बॉक्स से.
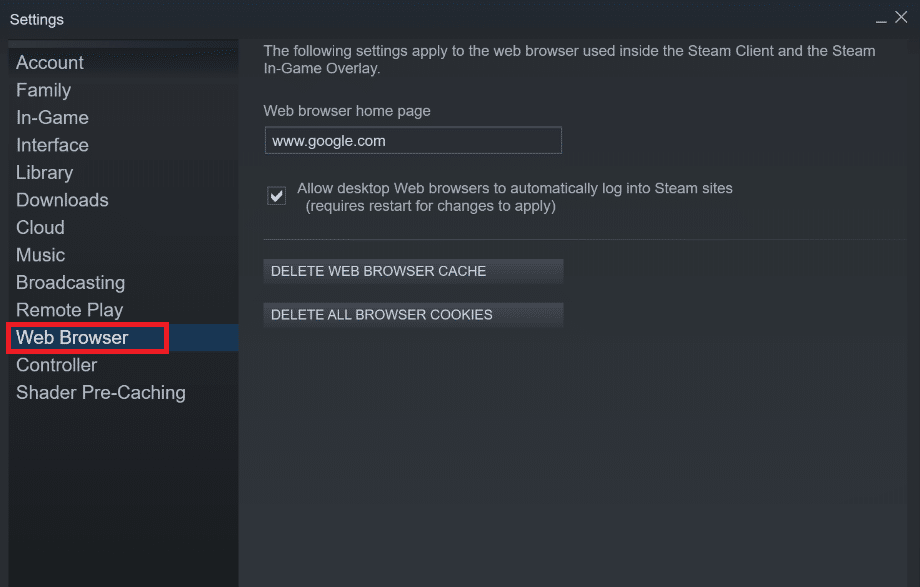
3. फिर, पर जाएँ वेब ब्राउजर settings from the left pane.
4. Click on both the given बटन to delete web browser cache and cookies respectively.
- वेब ब्राउज़र कैश हटाएं
- Delete Web Browser Cookies
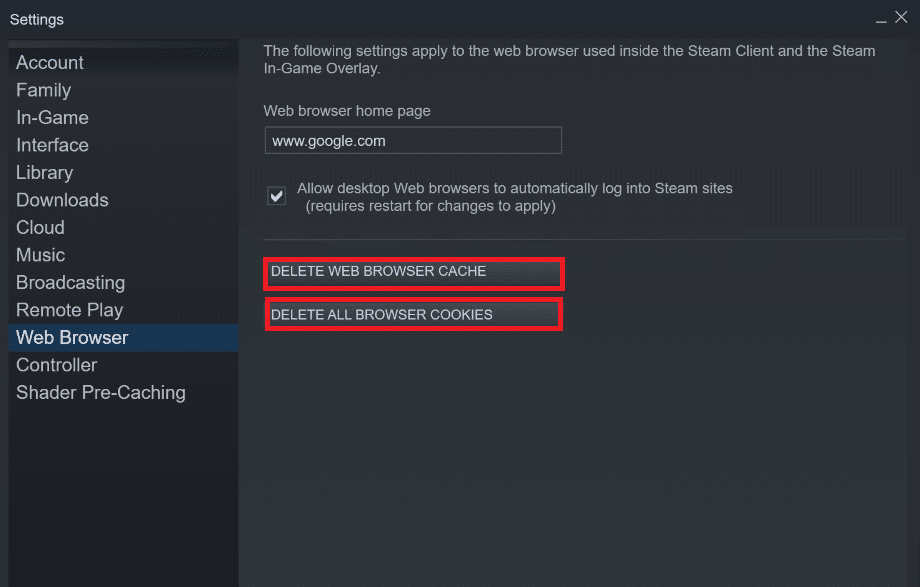
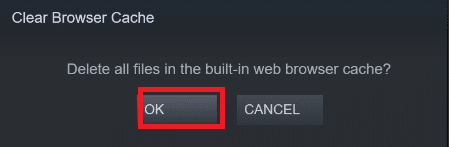
5. पर क्लिक करें OK in the confirmation prompt of both options.
6. अंत में, स्टीम पुनः आरंभ करें to check if Steam running slow issue is fixed or not.
यह भी पढ़ें: विंडोज़ 10 में स्टीम ओवरले को कैसे अक्षम करें
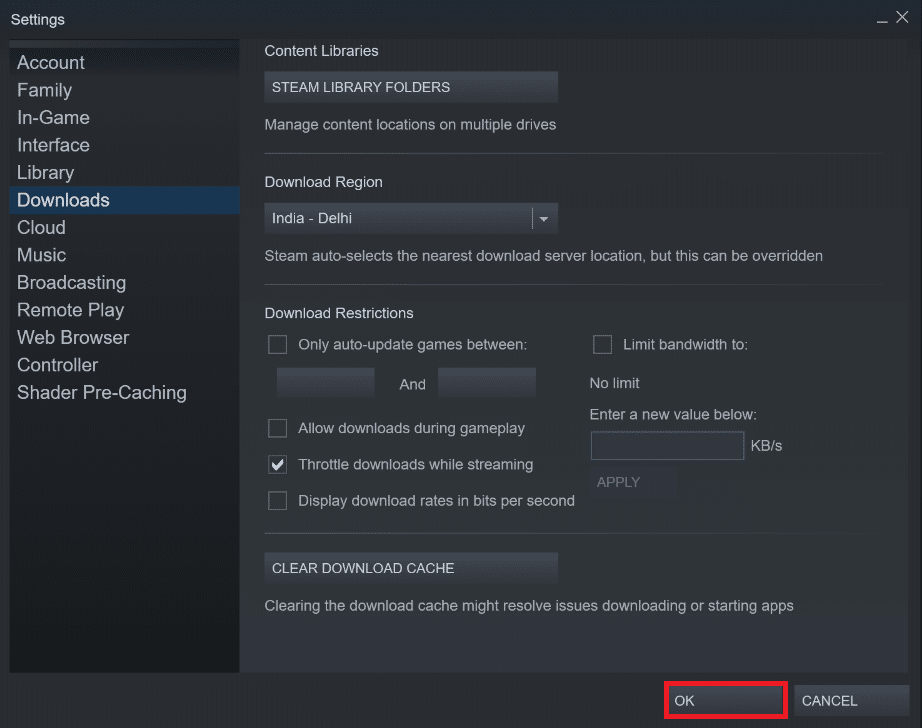
विधि 7: डाउनलोड कैशे साफ़ करें
There may be download cache of the games in Steam which can result in Steam is slow issue. So, here are the steps to clear download cache.
1। लॉन्च करें भाप app as administrator.
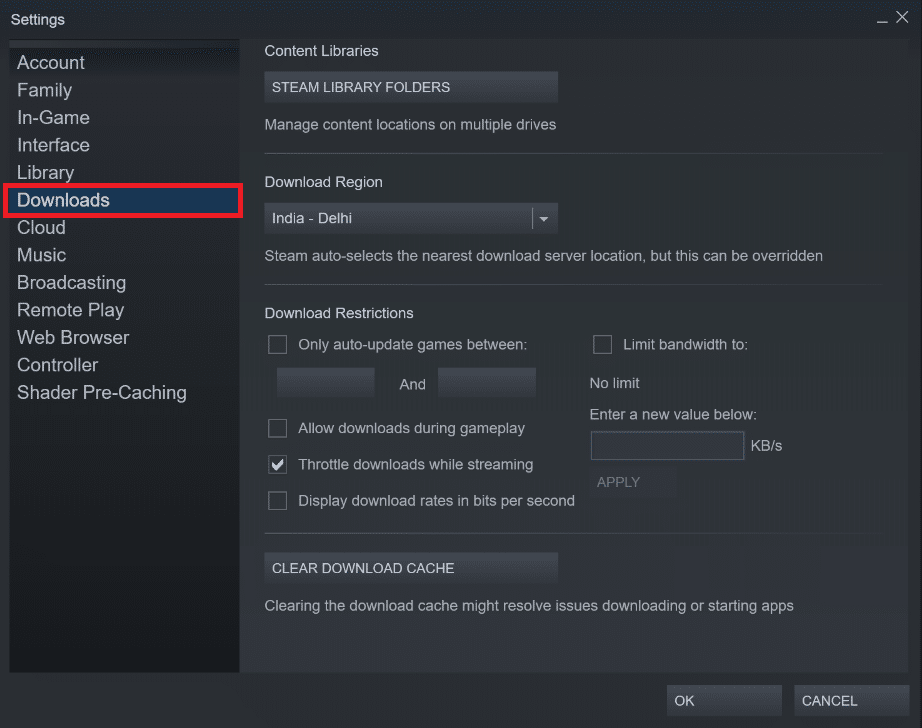
2. अब, पर जाएँ भाप टैब और चयन करें सेटिंग ड्रॉप-डाउन मेनू से. नीचे दी गई तस्वीर देखें.

3. चयन डाउनलोड बाएँ फलक पर सेटिंग्स.
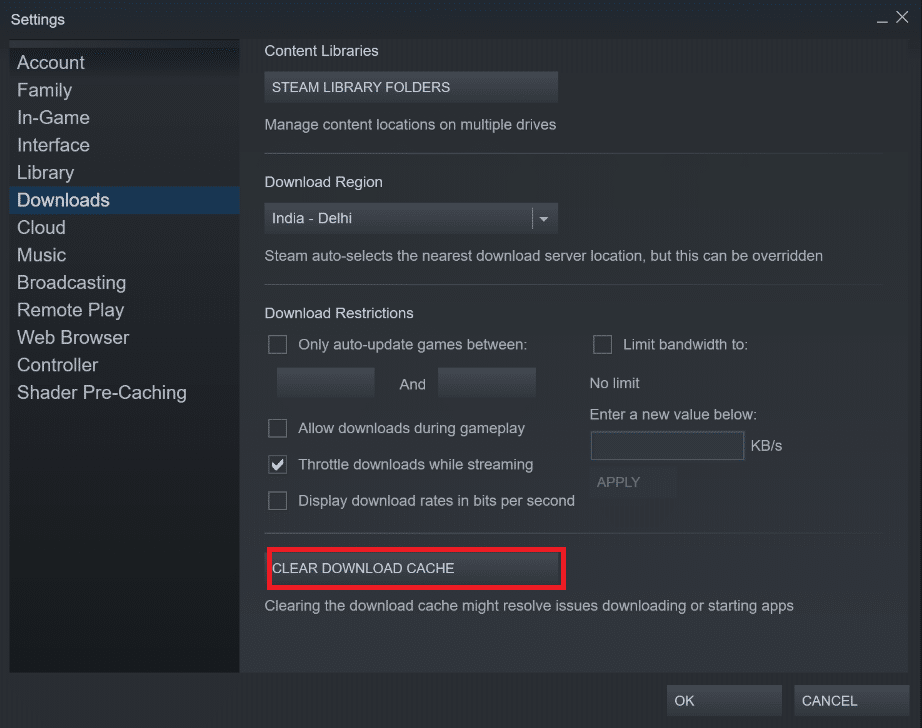
4. नीचे की ओर स्क्रॉल करें और पर क्लिक करें डाउनलोड कैश साफ़ करें बटन.
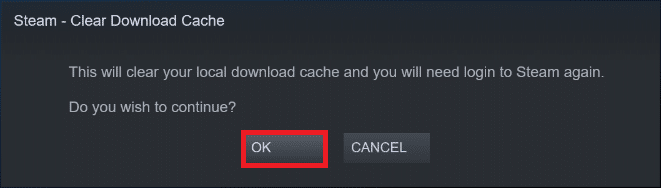
5. पर क्लिक करें OK में डाउनलोड कैशे साफ़ करें पुष्टिकरण शीघ्र।
6. अंत में, पर क्लिक करें OK बदलावों को सहेजने के लिए
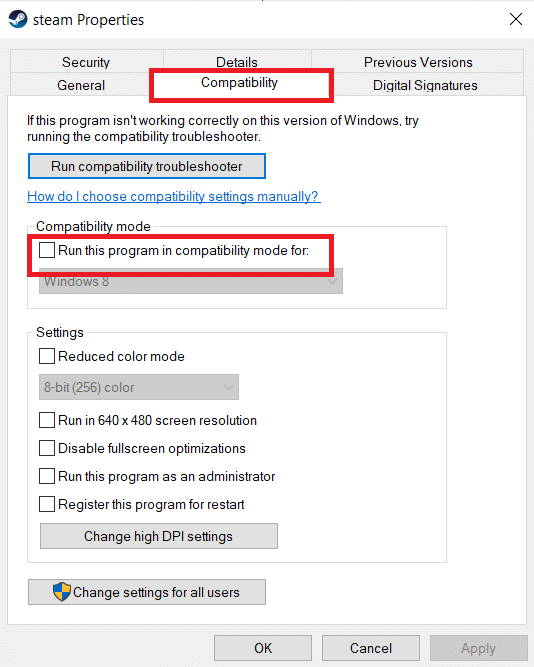
विधि 8: स्टीम को संगतता मोड में चलाएँ
You can also try running Steam in compatibility mode on different Windows versions to solve Steam is slow problem.
1. राइट-क्लिक करें Steam executable file और चयन करें गुण विकल्प.
2. करने के लिए जाओ अनुकूलता टैब में भाप गुण window and check the Run this Program in Compatibility Mode for विकल्प.
3. चयन विंडोज संस्करण ड्रॉपडाउन मेनू से
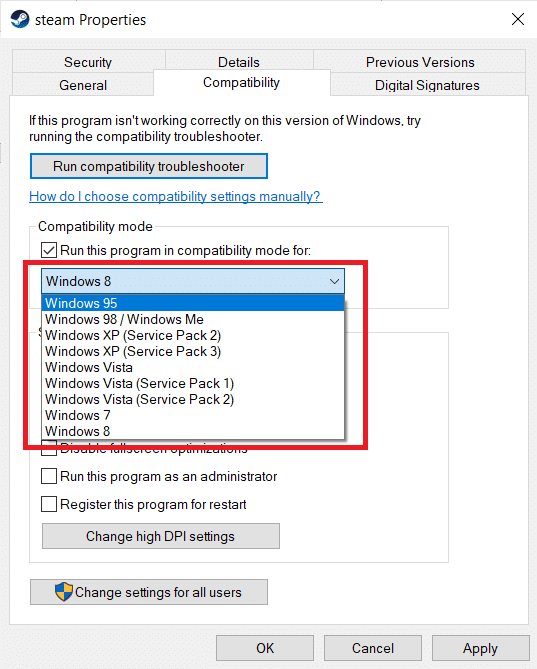
4. पर क्लिक करें लागू करें> ठीक है to save changes and run Steam as administrator.
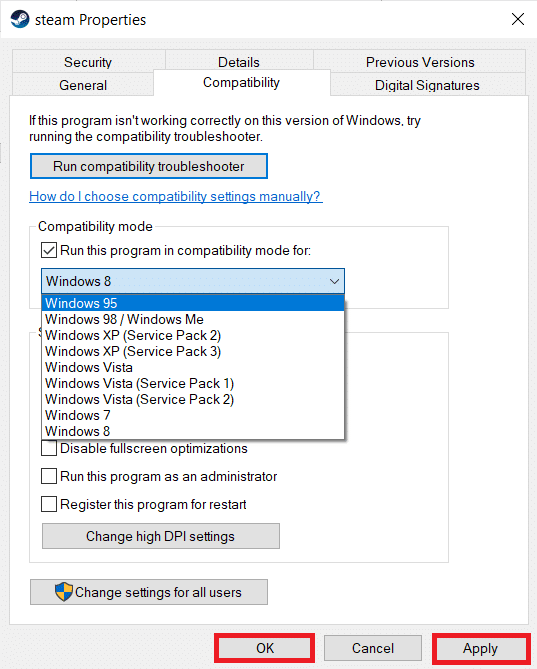
5. Check if the issue is fixed, else try running Steam in different Windows versions by repeating the above steps.
यह भी पढ़ें: स्टीम छवि को ठीक करें जो अपलोड होने में विफल रही
विधि 9: गेम फ़ाइलों की सत्यनिष्ठा सत्यापित करें
If you experience Steam running slow problem while playing a particular game then, you should check the integrity of that game file on Steam. Read our easy-to-follow tutorial on How to Verify Integrity of Game Files on Steam.
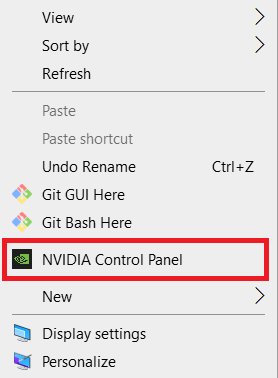
Method 10: Modify Graphics Driver Settings
Follow these steps to modify graphics driver settings to fix Steam is slow issue.
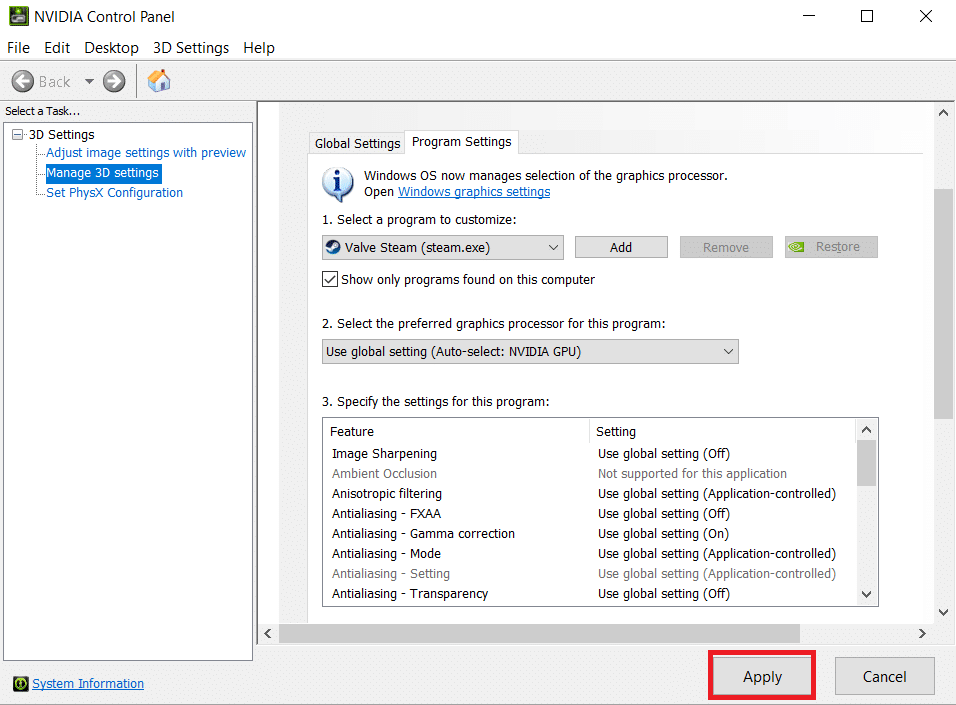
1। राइट-क्लिक करें अधर in the Desktop and select NVIDIA नियंत्रण कक्ष.
2। पर क्लिक करें 3D सेटिंग प्रबंधित करें option in the left pane and go to the कार्यक्रम सेटिंग्स टैब.
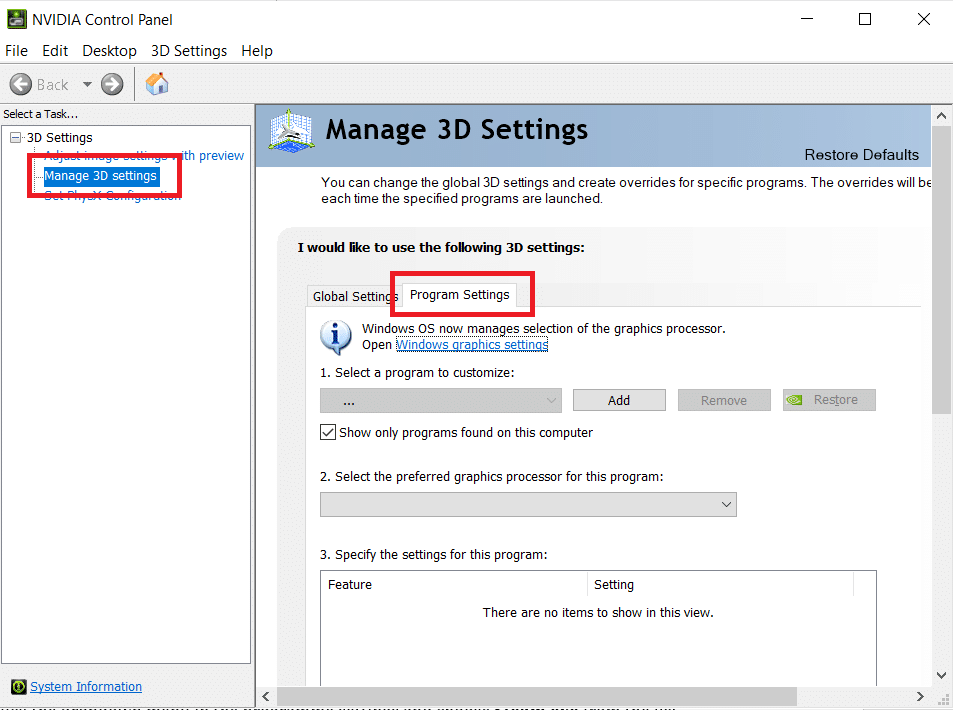
3। चुनें भाप से अनुकूलित करने के लिए एक प्रोग्राम चुनें ड्राॅप डाउन लिस्ट।
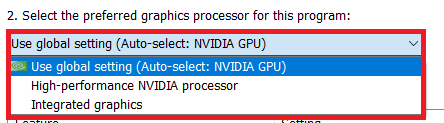
4. फिर, select the preferred graphics processor for this program. We recommend you select the उच्च प्रदर्शन NVIDIA प्रोसेसर.
5. अंत में, पर क्लिक करें लागू करें परिवर्तनों को सहेजने के लिए बटन
Method 11: Modify LAN Settings
There may be network configuration issues which is resulting in Steam running slow problem. So, here are the steps to Modify LAN configuration settings.
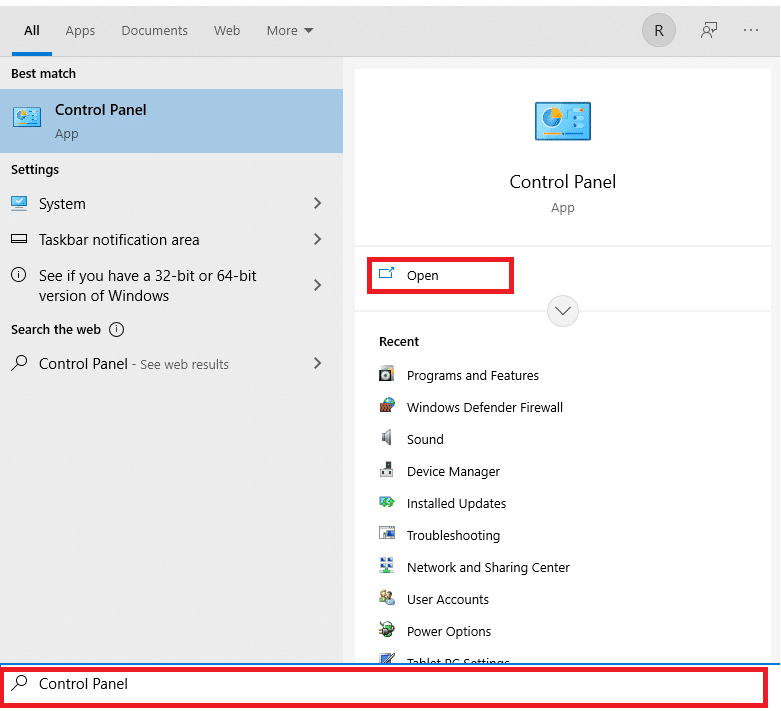
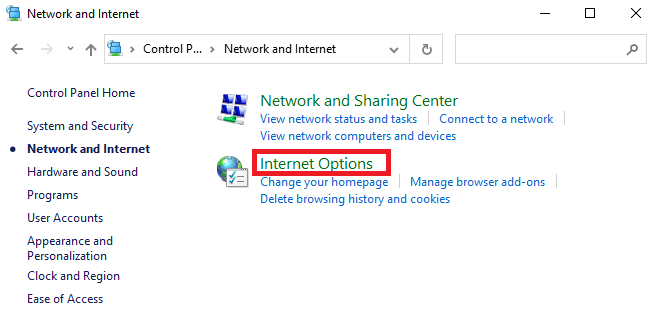
1। दबाएं विंडोज कुंजीटाइप नियंत्रण कक्ष, और पर क्लिक करें प्रारंभिक.
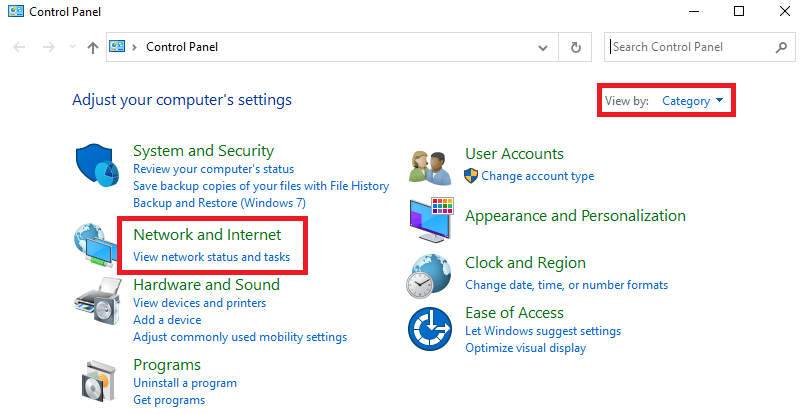
2. अब, सेट करें द्वारा देखें विकल्प वर्ग और चयन करें नेटवर्क और इंटरनेट लिंक नीचे दिखाया गया है।
3. यहां पर क्लिक करें इंटरनेट विकल्प के रूप में नीचे दिखाया गया है.
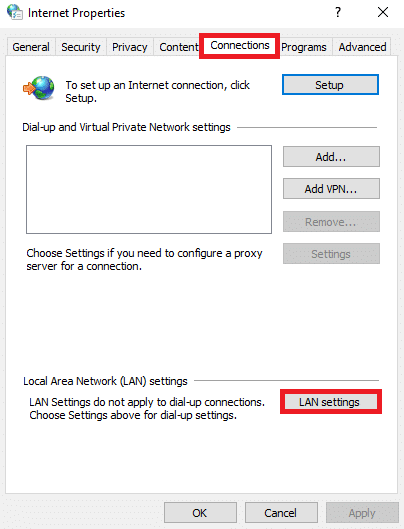
4। में इंटरनेट गुण विंडो, पर स्विच करें कनेक्शन टैब और चयन करें लैन सेटिंग्स के रूप में नीचे दिखाया गया है.
5. Now, in Local Area Network (LAN) Settings, check the box to स्वचालित रूप से सेटिंग पता लगाए में स्वचालित कॉन्फ़िगरेशन अनुभाग।

6. Also, uncheck the checkbox for अपने लैन के लिए प्रॉक्सी सर्वर का प्रयोग करें.
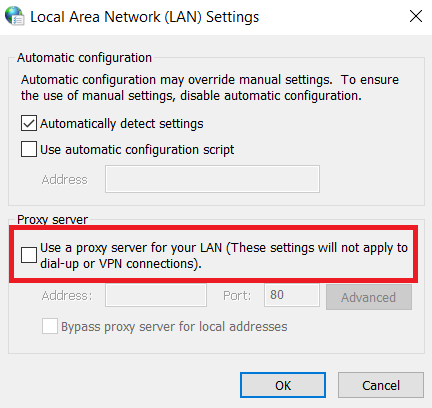
7. अंत में, पर क्लिक करें OK परिवर्तनों को सहेजने के लिए और स्टीम को पुनः लॉन्च करें to observe any performance improvement.
यह भी पढ़ें: फिक्स स्टीम क्रैश होता रहता है
विधि 12: डिवाइस ड्राइवर अपडेट करें
Outdated drivers may also result in Steam running slow problem. So, following are the steps to update the device drivers.
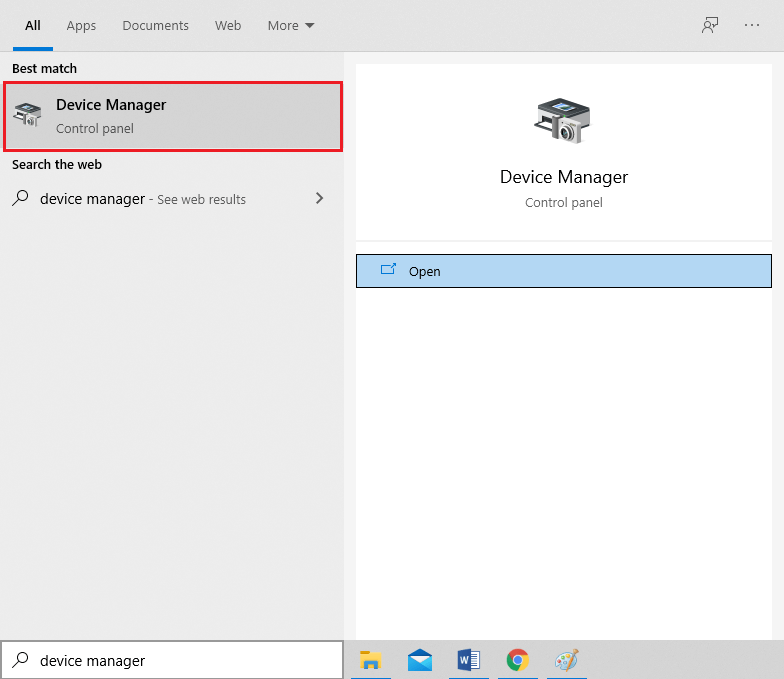
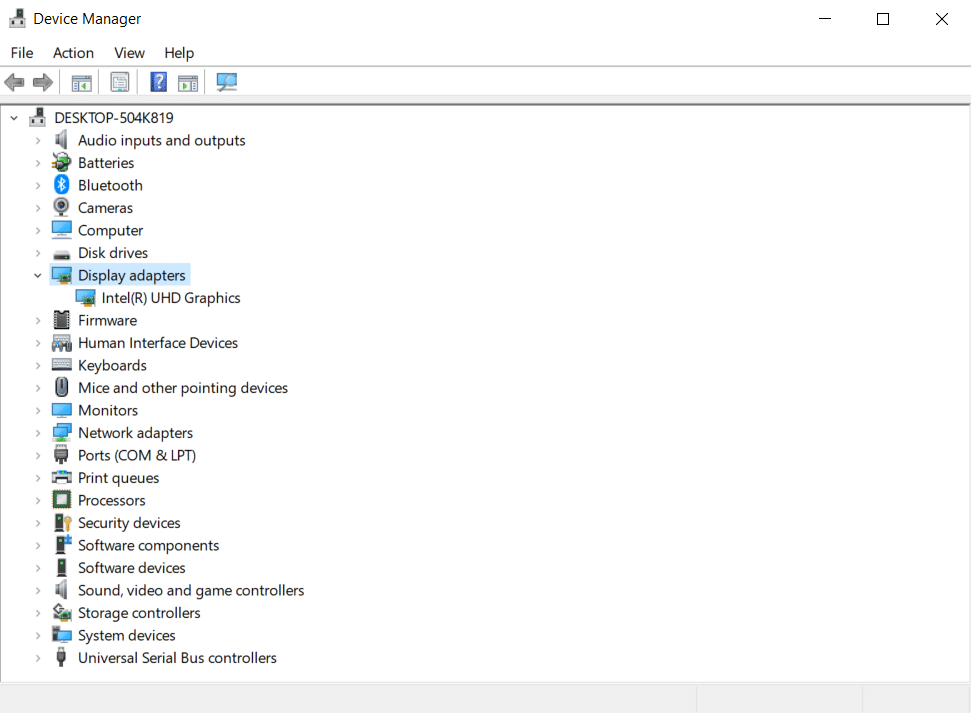
1. पर क्लिक करें प्रारंभटाइप डिवाइस मैनेजर, और मारा कुंजी दर्ज.
2. डबल-क्लिक करें अनुकूलक प्रदर्शन इसका विस्तार करने के लिए।
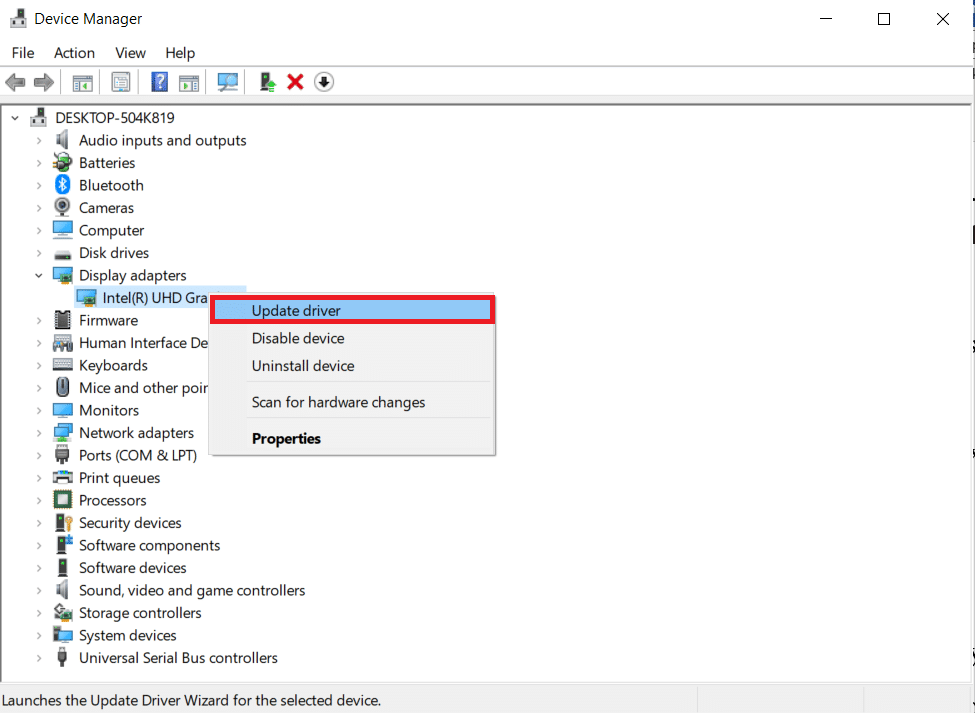
3। राइट-क्लिक करें video driver (उदाहरण के लिए Intel (R) UHD Graphics) और चुनें ड्राइवर अपडेट करें जैसा कि नीचे दर्शाया गया है।
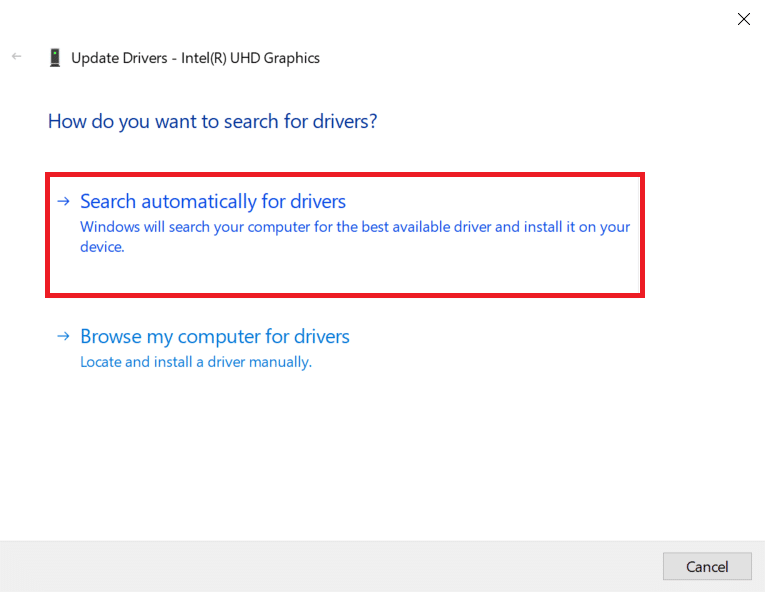
4। अगला, पर क्लिक करें ड्राइवरों के लिए स्वचालित रूप से खोजें के रूप में दिखाया।
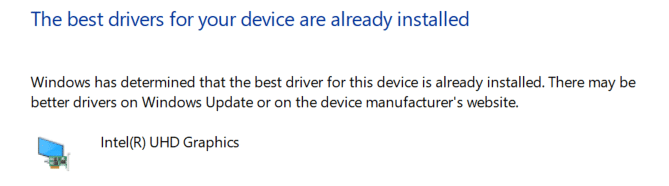
5A. If the drivers have been updated already, it shows आपके डिवाइस के लिए सर्वोत्तम ड्राइवर पहले से ही इंस्टॉल हैं.
5B. If the drivers are outdated, then they will get स्वचालित रूप से अपडेट किया गया.
6. Finally, update all the outdated drivers by following the above steps and अपने पीसी को पुनरारंभ करें.
विधि 13: स्टीम को अपडेट करें
Here are the steps to update Steam to fix the bugs and errors causing Steam is slow issue.
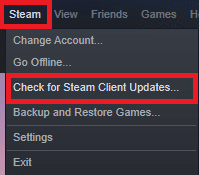
1। प्रक्षेपण भाप और नेविगेट करने के लिए मेन्यू बार।
2. अब, पर क्लिक करें भाप द्वारा पीछा स्टीम क्लाइंट अपडेट की जाँच करें…
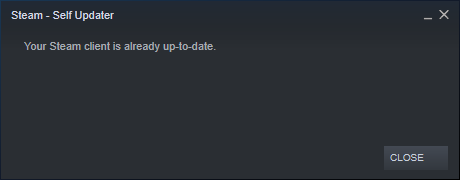
3A. स्टीम - सेल्फ अपडेटर will download updates automatically, if available. Click भाप पुनः प्रारंभ करें to apply the update.

3B. If you have no updates, Your Steam client is already up-to-date message will be displayed, as follows.
यह भी पढ़ें: बाहरी हार्ड ड्राइव पर स्टीम गेम्स कैसे डाउनलोड करें
विधि 14: भाप की मरम्मत करें
Follow these steps to repair Steam app to fix Steam is slow problem.
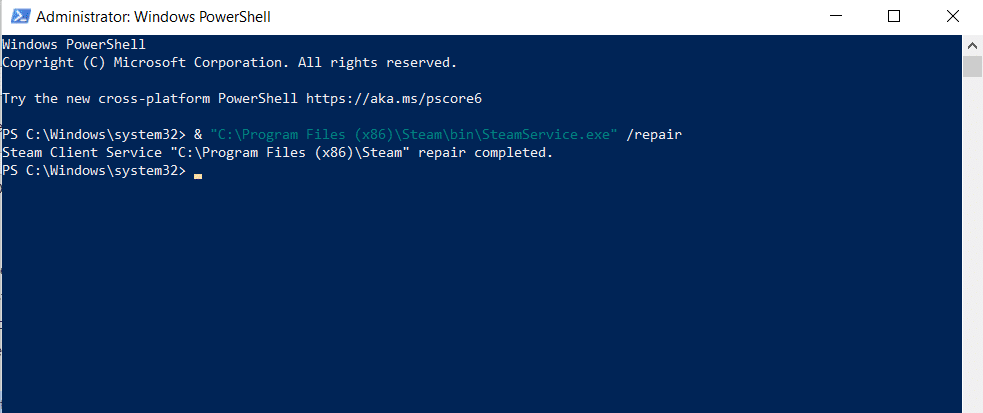
1। दबाएं विंडोज कुंजीटाइप विंडोज़ पॉवरशेल और पर क्लिक करें व्यवस्थापक के रूप में चलाएँ.

2। क्लिक करें हाँ में उपयोगकर्ता खाता नियंत्रण शीघ्र।
3. निम्नलिखित टाइप करें आदेश और हिट कुंजी दर्ज.
"सी:प्रोग्राम फ़ाइलें (x86)SteambinSteamService.exe" /मरम्मत
नोट: If your Steam file is placed in another location, you need to enter that directory instead. Read our guide: Where are Steam Games installed? here.
4। एक बार repair completed message is displayed, पुनः प्रारंभ आपका पीसी.
यह भी पढ़ें: स्टीम गेम्स को अनइंस्टॉल कैसे करें
विधि 15: स्टीम को पुनः स्थापित करें
If none of the above methods works for you, then reinstalling Steam is the last option to fix Steam is slow problem. Follow the given steps to reinstall Steam.
1. सबसे पहले, पर जाएँ भाप फ़ोल्डर और राइट-क्लिक करें भाप फ़ोल्डर, फिर का चयन करें प्रतिलिपि विकल्प.
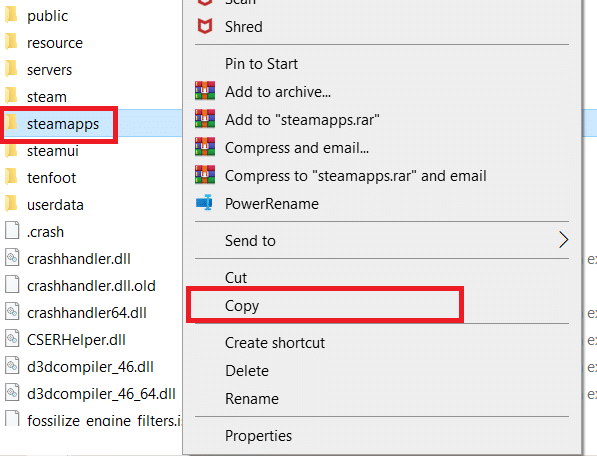
2. फिर, फ़ोल्डर पेस्ट करें दूसरे स्थान पर एक बैकअप बनाएं स्थापित खेलों में से.
3. अब हिट करें विंडोज कुंजीटाइप एप्लिकेशन और सुविधाएँ, और पर क्लिक करें प्रारंभिक.
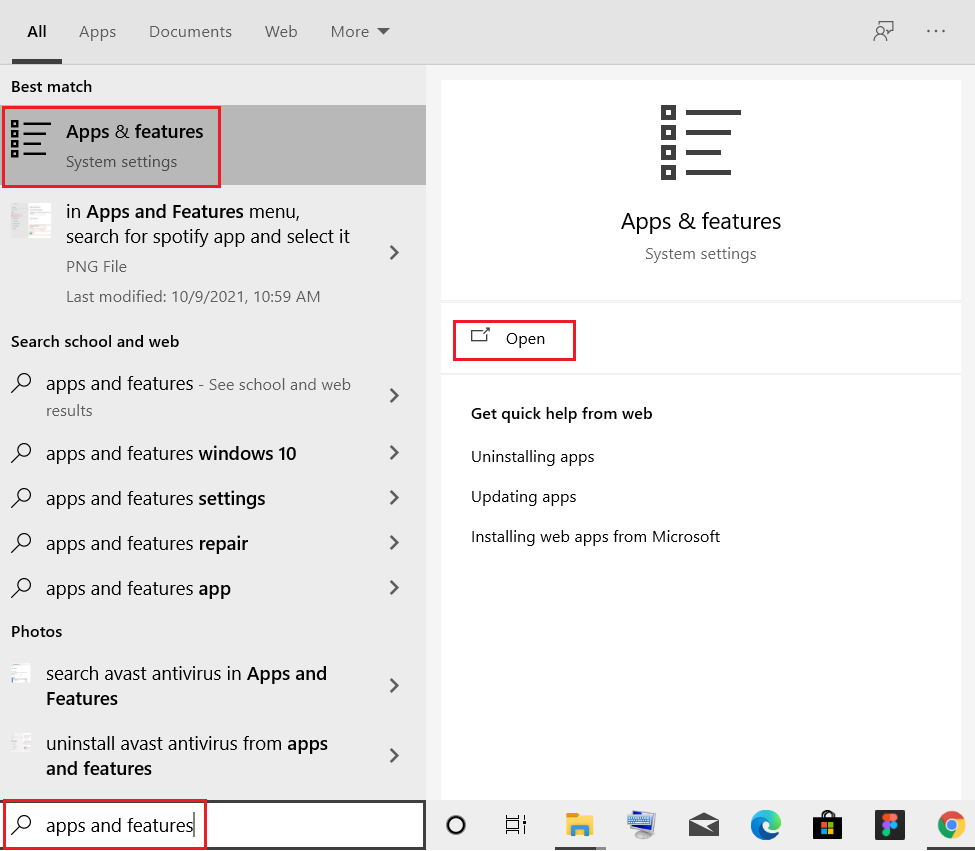
4। चुनते हैं भाप पर क्लिक करें और स्थापना रद्द करें बटन को हाइलाइट किया हुआ दिखाया गया है।
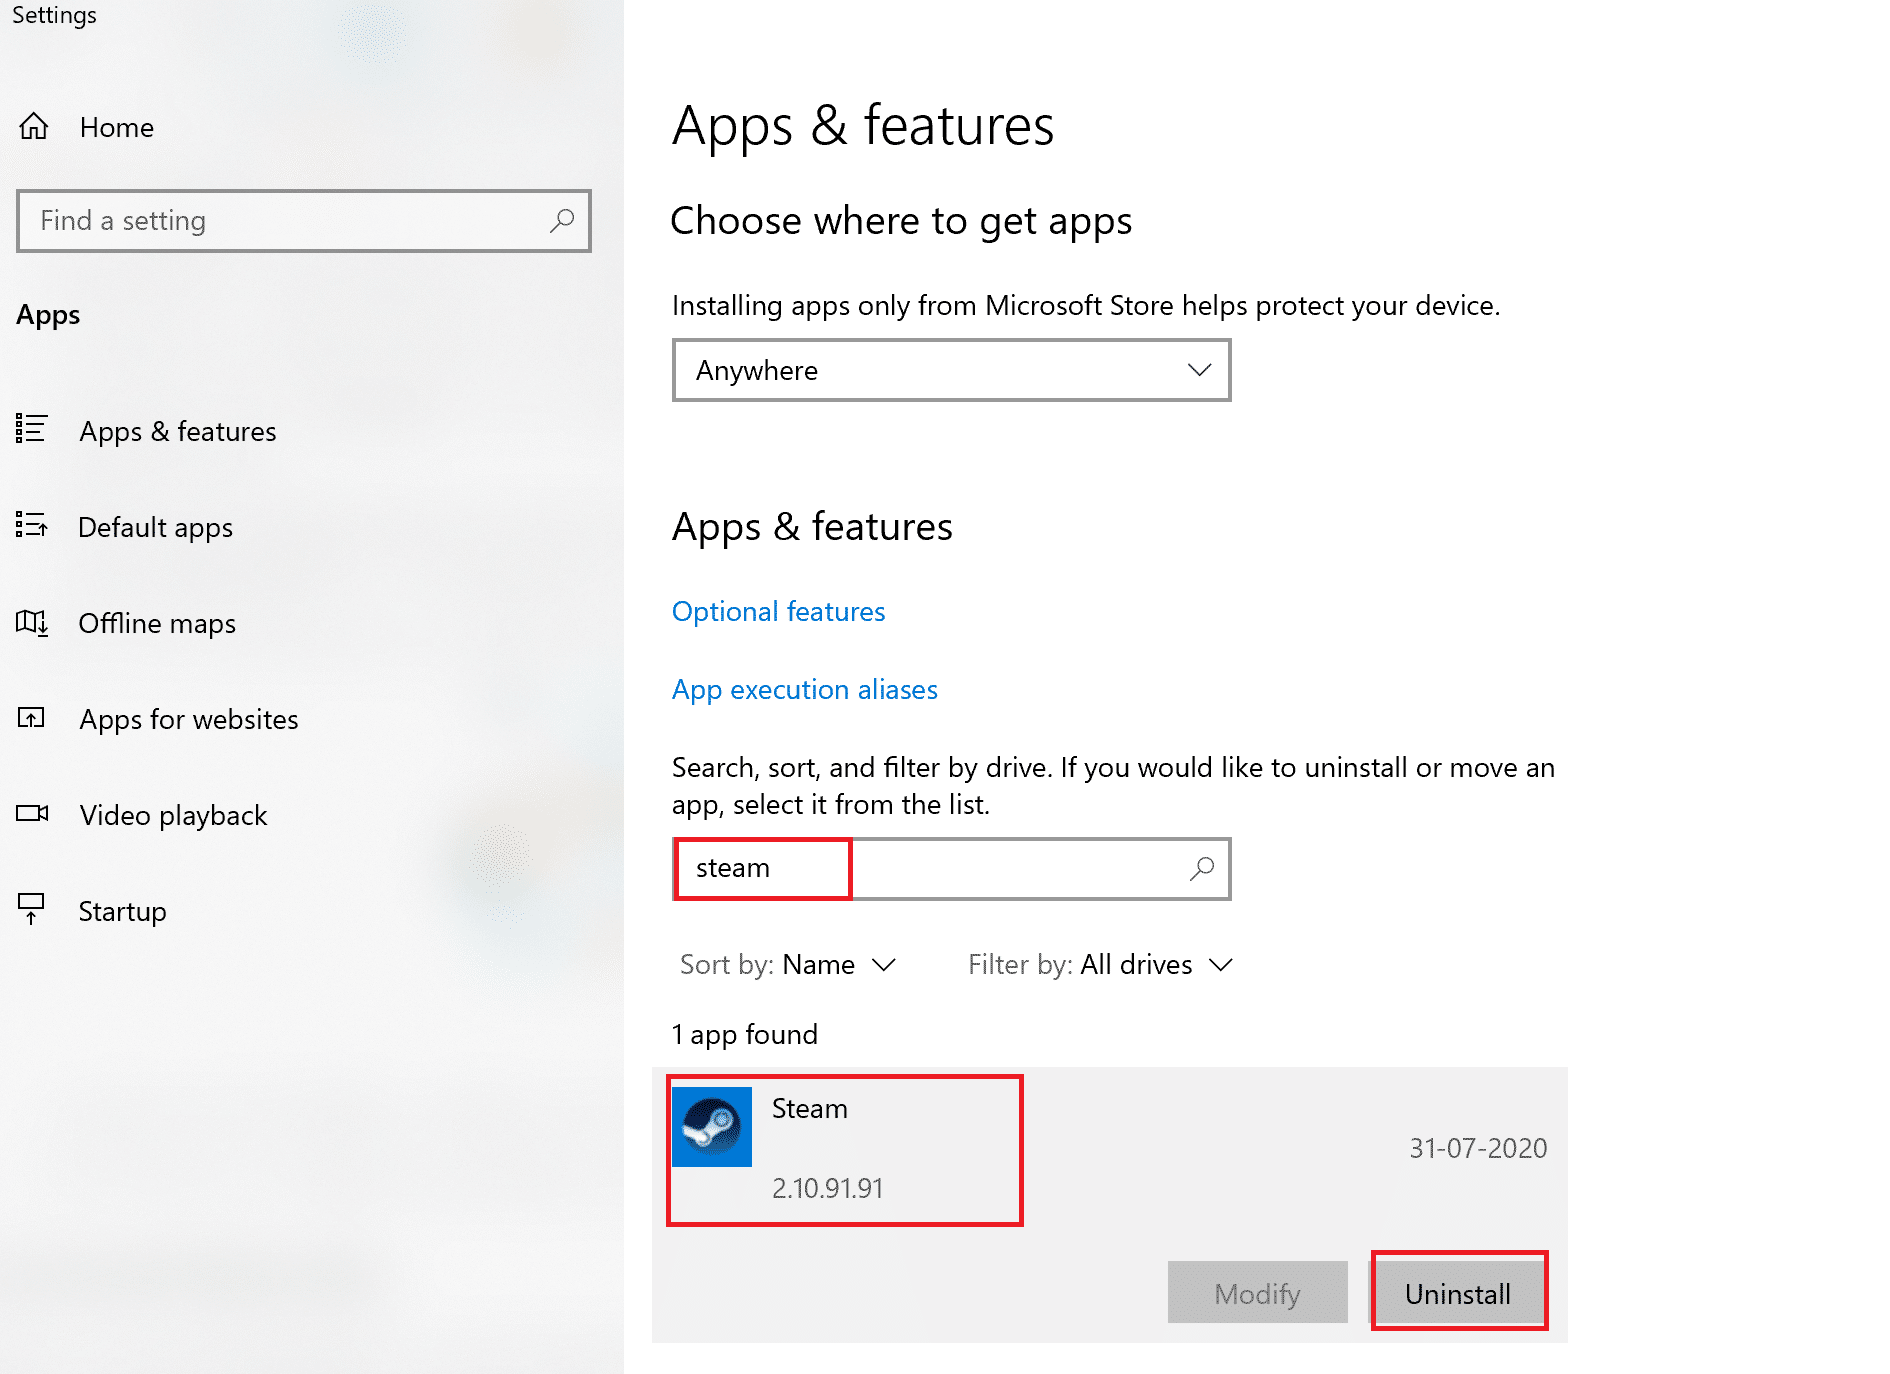
5. फिर से, पर क्लिक करें स्थापना रद्द करें पुष्टि करने के लिए।
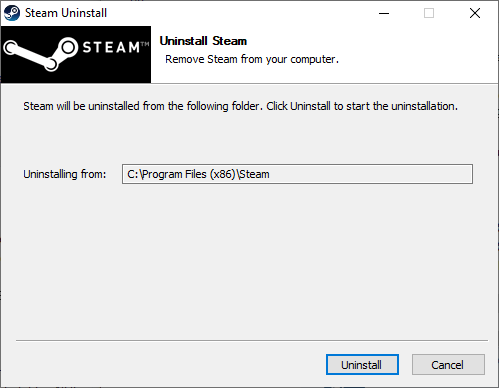
6। में स्टीम अनइंस्टॉल खिड़की पर क्लिक करें स्थापना रद्द करें भाप को हटाने के लिए.
7. फिर, पुनः प्रारंभ आपका विंडोज़ पीसी.
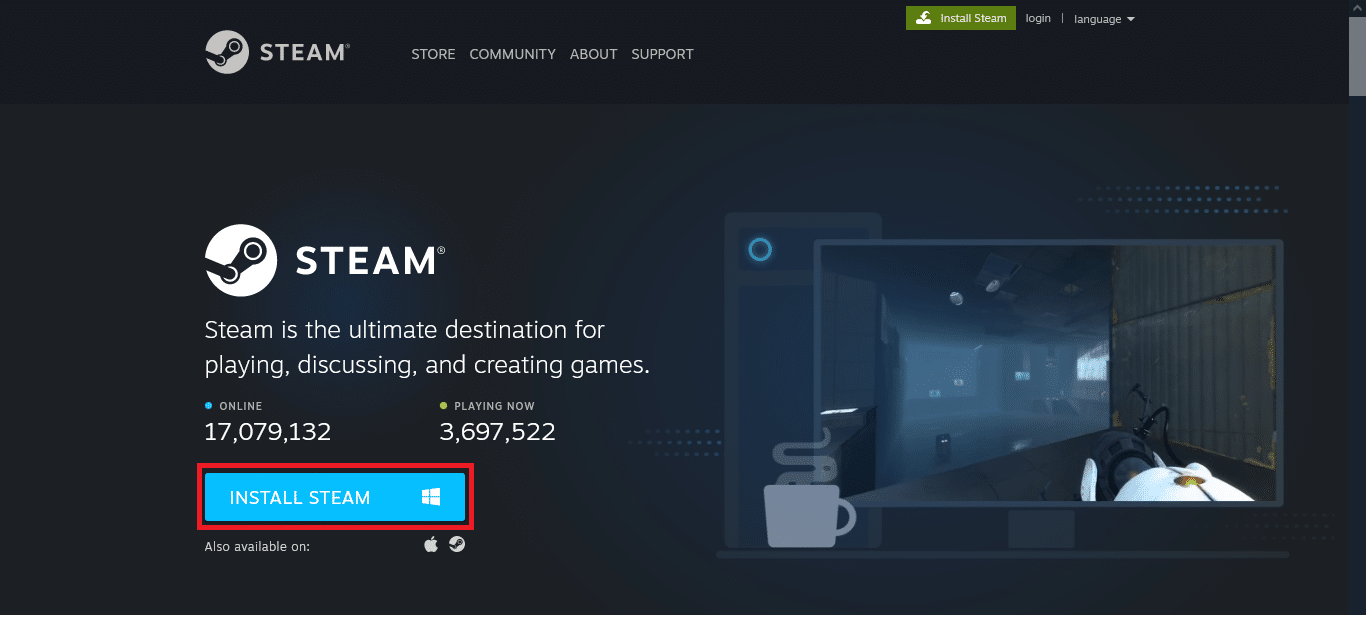
8। डाउनलोड करें नवीनतम संस्करण of भाप आपके वेब ब्राउज़र से, जैसा दिखाया गया है।
9. डाउनलोड करने के बाद डाउनलोड को रन करें स्टीमसेटअप.exe उस पर डबल क्लिक करके फ़ाइल।
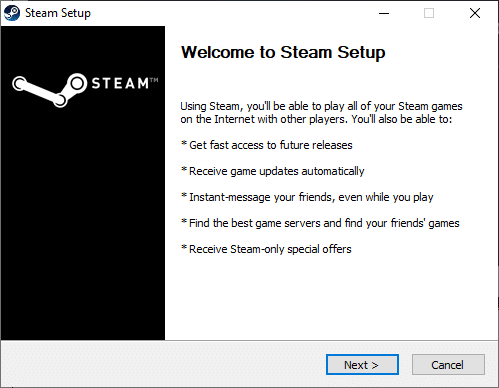
10। में भाप सेटअप विज़ार्ड, पर क्लिक करें अगला बटन.
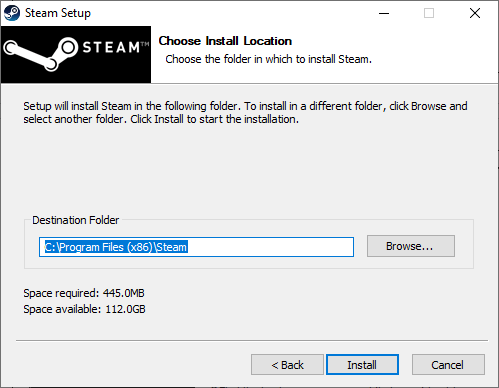
11। चुनना गंतव्य फ़ोल्डर का उपयोग करके ब्राउज़ करें ... विकल्प या रखें डिफ़ॉल्ट विकल्प। फिर, पर क्लिक करें स्थापित करें, जैसा कि नीचे दर्शाया गया है।
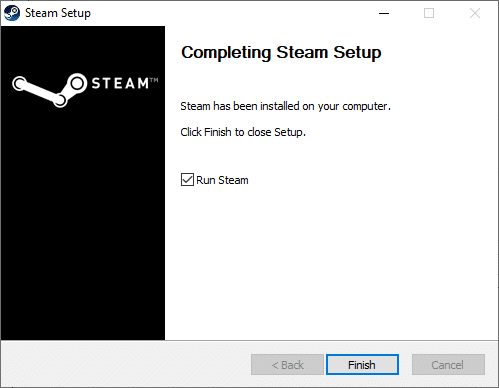
12. इंस्टॉलेशन पूरा होने तक प्रतीक्षा करें और क्लिक करें अंत, के रूप में दिखाया।
13. स्टीम इंस्टॉल करने के बाद इसे मूव करें भाप बैकअप फ़ोल्डर जिसे आपने पहले स्थापित स्टीम फ़ोल्डर में बनाया था।
14. अंत में, अपने पीसी को पुनरारंभ करें.
अनुशंसित:
हमें उम्मीद है कि यह जानकारी उपयोगी थी और आप इसे ठीक करने में सक्षम थे Steam is slow issue. Please let us know which best method worked best for you. If you have any questions or comments, please leave them in the comments area.

