When you try to install apps on Windows Store, you may face Error Code 0x80073cf9, which can be very frustrating as Windows Store is a reliable source to install apps. If you try to install 3rd party apps from any other source, you risk your machine to malware or infections but what other option you have if you cannot install apps from Windows Store. Well, that’s where you’re wrong this error can be fixed, and that’s what exactly we are going to teach you in this article.
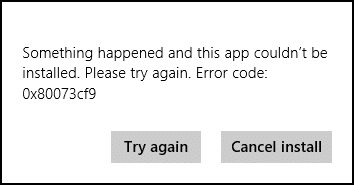
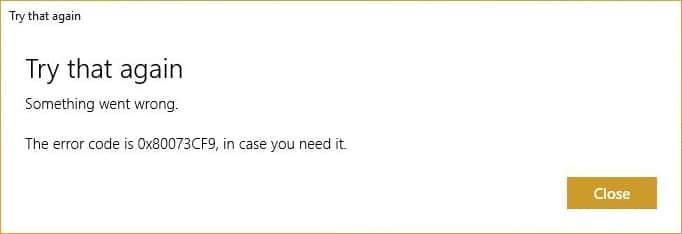
Something happened, and this app couldn’t be installed. Please try again. Error code: 0x80073cf9
There is no single cause as to why this error occurs so that various methods can fix this error. Most of the times it completely depends on the user machine configuration as to which method might work for them, so without wasting any time, let’s see how to fix this error.
Fix Windows 10 Store Error 0x80073cf9
Nco ntsoov tsim qhov taw tes rov qab tsuas yog thaum muaj qee yam yuam kev.
Method 1: Create A Folder AppReadiness
1. Nias Windows Key + R ces ntaus C: Windows thiab ntaus nkag.
2. Find the folder AppReadniess in the Windows folder, if you can’t follow the next step.
3. Right-click in an empty area and select New > Folder.
4. Name the newly created folder as AppReadiness thiab ntaus nkag.
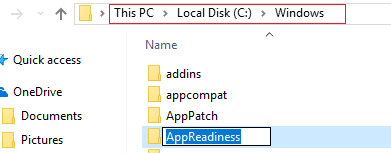
5. Reboot your PC to save changes. Again try to access the Store, and this time it might work perfectly.
Method 2: Reinstall Windows Store
1. Open Command Prompt as an Cov Thawj Tswj.

2. Run below PowerShell command
Tau-AppxPackage -AllUsers | Yav tom ntej {Ntxiv-AppxPackage -DisableDevelopmentMode -Register "$ ($ _. InstallLocation) AppXManifest.xml"}

3. Once done, close command prompt and Restart your PC.
This step re-register Windows Store apps which should automatically Fix Windows 10 Store Error 0x80073cf9.
Method 3: Create a folder AUInstallAgent
1. Nias Windows Key + R ces ntaus C: Windows thiab ntaus nkag.
2. Find the folder AUInstallAgent in the Windows folder, if you can’t then follow the next step.
3. Right-click in an empty area and select New > Folder.
4. Name the newly created folder as AAUInstallAgent thiab ntaus nkag.
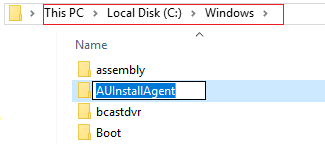
5. Reboot your PC to save changes. This step may fix Windows 10 Store Error 0x80D05001 or 0 x80073cf9 but if it didn’t then continue.
Method 4: Allow Full System Access to Packages in AppRepository
1. Nias Windows key + R ces ntaus C:ProgramDataMicrosoftWindows thiab ntaus nkag.
2. Now double click on AppRepository folder to open it, but you will receive an error:
You have been denied permission to access this folder.
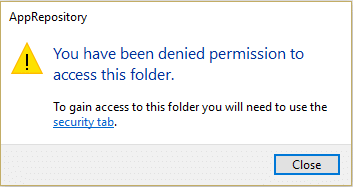
3. This means you need to take ownership of this folder before you can access it.
4. You can take ownership of the folder via the following method: How To Fix Destination Folder Access Denied Error.
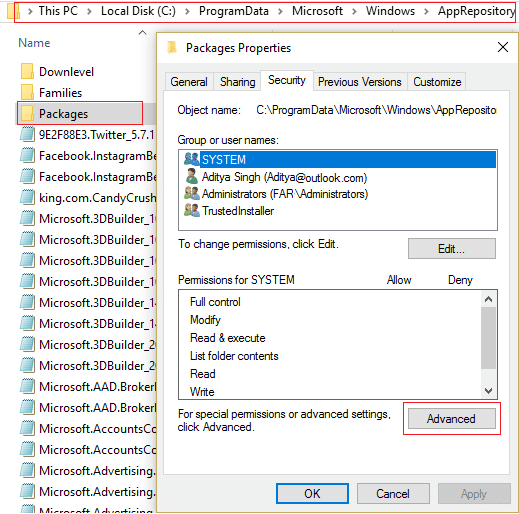
5. Now you need to give the SYSTEM account, and the APPLICATION PACKAGES account full control on the folder C:ProgramDataMicrosoftWindowsAppRepositoryPackages. To this follow the next step.
6. Txoj cai-nias rau ntawm Packages folder thiab xaiv Zog.
7. Xaiv qhov Kev ruaj ntseg tab thiab ces nias Advanced.
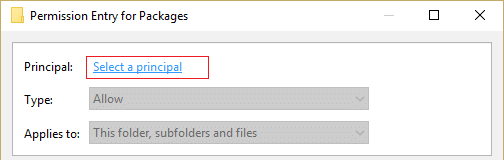
8. In Advanced Security Settings, click Ntxiv and click on Select a thawj xib fwb.
9. Tom ntej no, ntaus “TAG NRHO APPLICATION PACKAGES” (without quote) in the field Enter the object name to select and click OK.
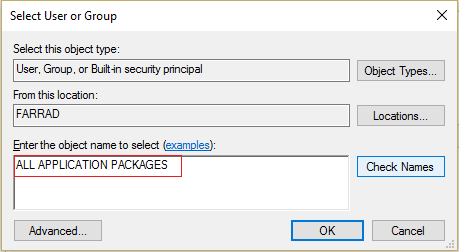
10. Now, on the next window check mark Full control and then click OK.
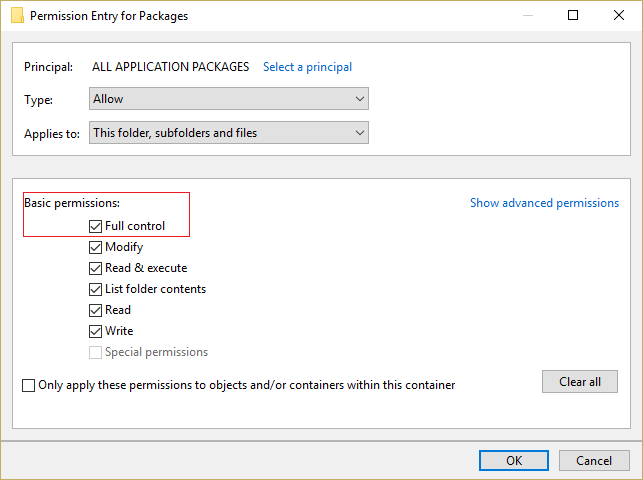
11. Do the same with the SYSTEM account. Reboot your PC to save changes.
Method 5: Rename Software Distribution Folder
1. Press Windows Key + Q to open Charms Bar and type ua cmd.
2. Right-click on cmd and select Khiav li tus Administrator.
3. Type these commands and hit enter:
net stop wuauserv
ren c:windowsSoftwareDistribution softwaredistribution.old
net start wuauserv
exit
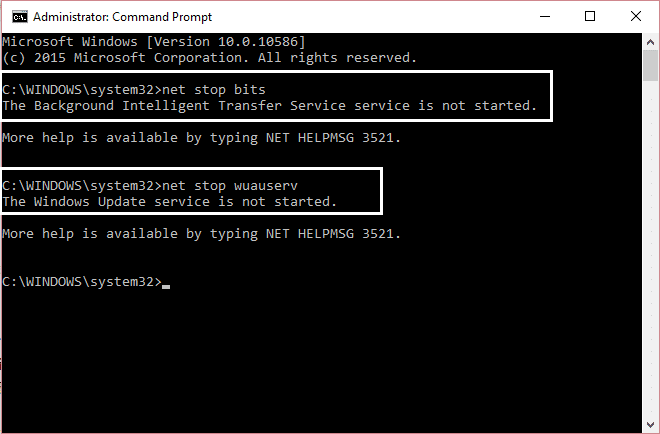
4. Reboot your PC to saves changes and again try to download updates.
Txoj Kev 6: Khiav DISM (Deployment Image Servicing and Management)
1. Nias Windows Key + X ces xaiv Command Prompt (Admin).

2. Enter the following command in cmd and hit enter:
Tseem ceeb: Thaum koj DISM koj yuav tsum muaj Windows Installation Media npaj txhij.
DISM.exe /Online /Cleanup-Image /RestoreHealth /Source:C:RepairSourceWindows /LimitAccess
Nco ntsoov: Hloov lub C: RepairSourceWindows nrog qhov chaw ntawm koj qhov chaw kho

3. Press enter to run the above command and wait for the process to complete; usually, it takes 15-20 minutes.
CEEB TOOM: Yog tias cov lus txib saum toj no tsis ua haujlwm, sim ua hauv qab no: Dism / Image: C: offline / Cleanup-Image / RestoreHealth / Source: c: testmountwindows Dism / Online / Cleanup-Image / RestoreHealth / Source: c: testmountwindows / LimitAccess
4. After the DISM process is complete, type the following in the cmd and hit Enter: sfc / scannow
5. Let System File Checker run and once it’s complete, restart your PC.
Txoj Kev 7: Khiav CCleaner thiab Malwarebytes
1. Download thiab nruab CCleaner & Malwarebytes.
2. Khiav Malwarebytes thiab cia nws luam theej duab koj lub cev rau cov ntaub ntawv tsis zoo. Yog tias pom malware, nws yuav tshem tawm lawv.

3. Tam sim no khiav CCleaner thiab xaiv Nchuav Huv Si.
4. Nyob rau hauv Custom Clean, xaiv lub Windows tab and checkmark defaults and click Tshawb nrhiav.

5. Thaum Analyze ua tiav, xyuas kom tseeb tias koj paub tseeb tias yuav tshem tawm cov ntaub ntawv yuav raug tshem tawm.

6. Thaum kawg, nyem rau ntawm qhov Khiav Cleaner khawm thiab cia CCleaner khiav nws txoj kev kawm.
7. Txhawm rau ntxuav koj lub cev ntxiv, xaiv qhov Registry tab, thiab xyuas kom meej tias cov hauv qab no raug kuaj:

8. Nyem ntawm qhov Tshawb nrhiav qhov teeb meem khawm thiab cia CCleaner luam theej duab, tom qab ntawd nyem rau ntawm qhov Txhim kho cov teeb meem xaiv khawm.

9. Thaum CCleaner nug "Koj puas xav tau kev hloov pauv hloov pauv rau lub npe?" xaiv Tau.
10. Thaum koj thaub qab tau ua tiav, nyem rau ntawm Txhim kho txhua qhov teeb meem xaiv khawm.
11. Rov pib koj lub PC kom txuag tau cov kev hloov pauv.
Method 8: Clear Windows Store cache
1. Nias Windows Key + R ces ntaus Wsreset.exe thiab ntaus nkag.
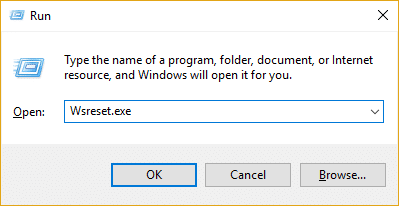
2. Ib qho txheej txheem tiav rov pib dua koj lub PC.
Method 9: Run Windows Update and Windows Store Apps troubleshooter
1. Hom teeb meem hauv Windows Search bar thiab nyem rau ntawm Troubleshooter.
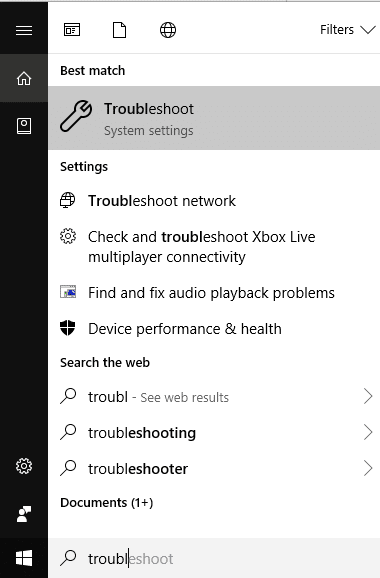
2. Tom ntej no, los ntawm sab laug lub qhov rais, pane xaiv Saib tag nrho.
3. Tom qab ntawd los ntawm Troubleshoot computer teeb meem daim ntawv xaiv Qhov Hloov Piav Qhia qhov rais

4. Follow on-screen instruction and let the Windows Update Troubleshoot run.

5. Now again go back to the View all window but this time select Windows Store Apps. Run the troubleshooter and follow on-screen instructions.
6. Pib dua koj lub PC thiab rov sim rau nruab apps los ntawm Windows Store.
pom zoo:
Qhov ntawd yog nws koj tau ua tiav Fix Windows 10 Store Error 0x80073cf9 but if you still have any queries regarding this post feel free to ask them in comment’s section.

