According to recent reports, few Call of Duty Modern Warfare gamers have experienced Call of Duty Error 6068. This problem is being reported since the time when Warzone was released into the market. There are various factors like corrupt DirectX installation, non-optimal settings, or graphic driver issues on your system, etc. that are causing Warzone Dev Error 6068. Hence, in this article, we will discuss various methods to fix Call of Duty Warzone Dev Error 6068 on Windows 10.
How to Fix Call of Duty Dev Error 6068
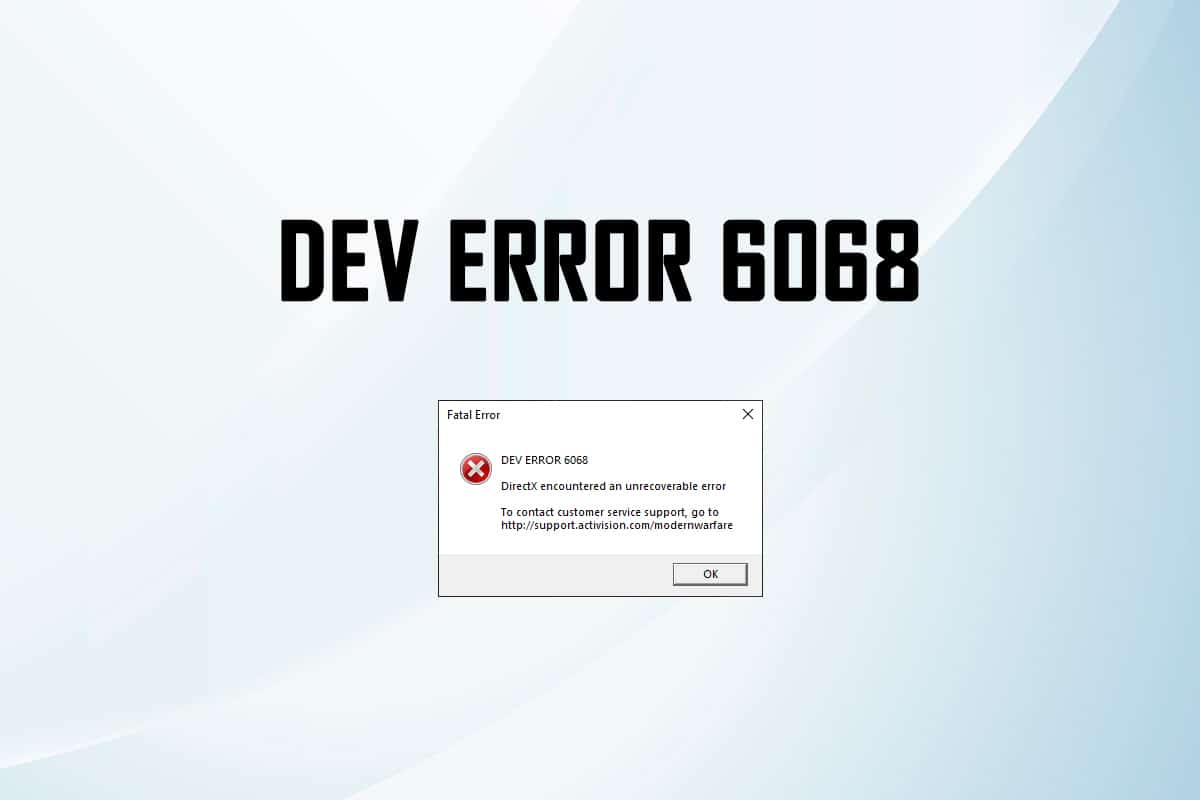
While playing Call of Duty, you may encounter several errors like Dev error 6071, 6165, 6328, 6068, and 6065. Dev error 6068 occurs when you press Ua si displaying the message: DEV ERROR 6068: DirectX encountered an unrecoverable error. To contact customer service support, go to http://support.activision.com/modernwarfare. The game then shuts down and does not respond, at all.
What Causes COD Warzone Dev Error 6068?
The COD Warzone Dev Error 6068 is not likely to be caused by any network or connectivity issues. The reasons could be:
- Erroneous Windows update: When you have an update pending in your system or if your system has a bug.
- Outdated/ Incompatible Drivers: If the current drivers in your system are incompatible or outdated with the game files.
- Bugs in Game Files: If you face this error frequently, then it might be due to the glitches and bugs in your game files.
- Corrupt or Damaged System Files: Many gamers face Warzone Dev Error 6068 when they have corrupt or damaged files in your system.
- Conflict with Third-party applications: Sometimes, an unknown application or program in your system might lead to this issue.
- Minimum requirements not met – If your PC does not meet the minimum requirements needed to run Call of Duty, you may face various errors.
Read here to learn the official list of System Requirements rau qhov kev ua si.
A list of methods to fix Call of Duty Error 6068 is compiled and arranged according to user convenience. So, one by one, implement these until you find a solution for your Windows PC.
Txoj Kev 1: Khiav Game li Administrator
If you do not have the required administrative rights to access files and services in Call of Duty, then you might face Warzone Dev Error 6068. However, running the game as an administrator can resolve the issue.
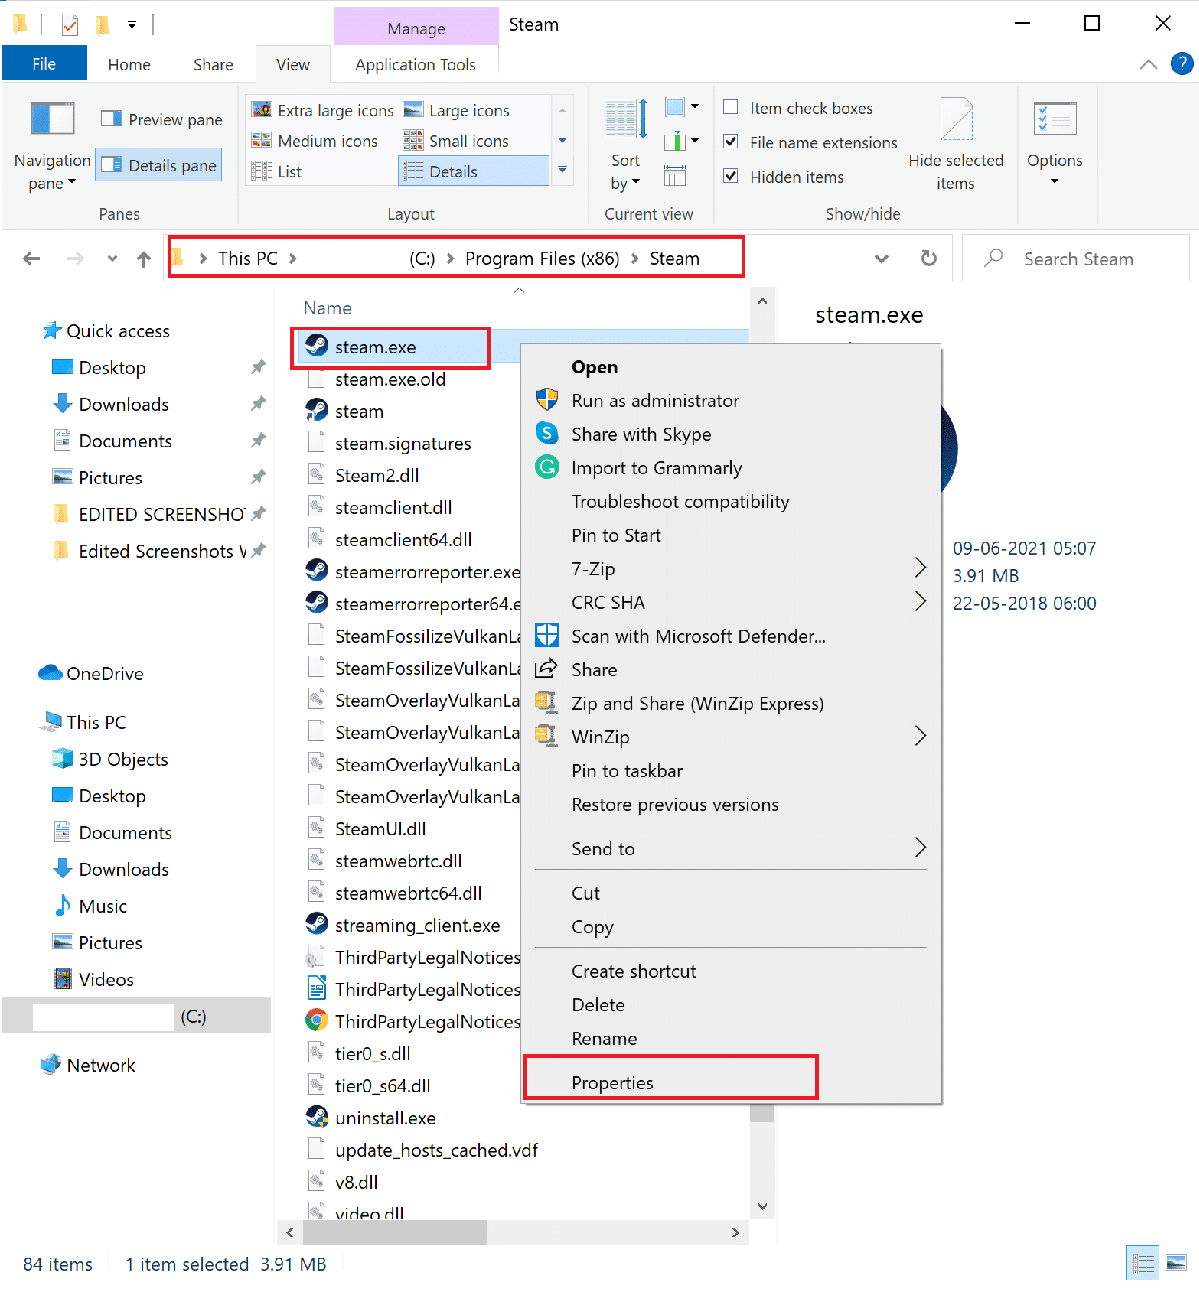
1. Mus rau Hu rau Duty nplaub tshev los ntawm Ua Ntaub Ntawv Faib.
2. Txoj cai-nias rau ntawm .exe ntawv of Call of Duty and select Zog.
Nco ntsoov: The image below is an example given for the Chav app instead.
3. Nyob rau hauv lub qhov rais Properties, hloov mus rau lub compatibility tab.
4. Tam sim no, kos lub thawv Khiav txoj haujlwm no ua tus tswj hwm.
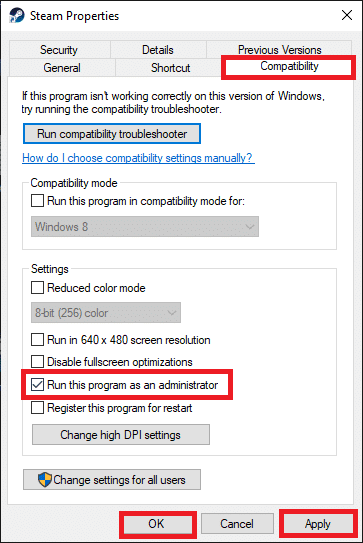
5. Thaum kawg, nyem rau ntawm Thov> OK kom txuag tau qhov kev hloov.
Method 2: Disable Background Apps & Set COD as High Priority
There may be plenty of applications that run in the background. This will increase the CPU and memory space, thereby affecting the performance of the game and the system. Call of Duty is the kind of game that requires a lot out of CPU and GPU. Thus, you need to set Call of Duty processes to Siab qhov tseem ceeb so that your computer favors the game over other programs and allocates more CPU and GPU to run it. Here’s how to do so:
1. Tua tawm Task Manager los ntawm nias Ctrl + Ua haujlwm + Esc daws ua ke.
2. Hauv dab tab, nrhiav thiab xaiv lub unnecessary tasks khiav hauv keeb kwm yav dhau.
Ceeb toom: Prefer to select a third-party program or application and avoid selecting Windows and Microsoft services. For Example, Discord or Skype.
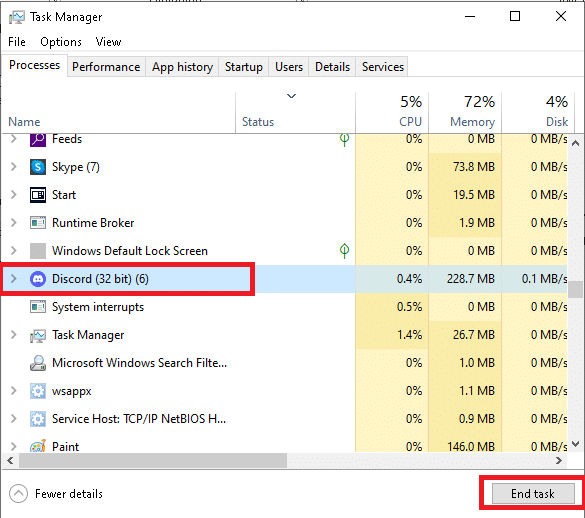
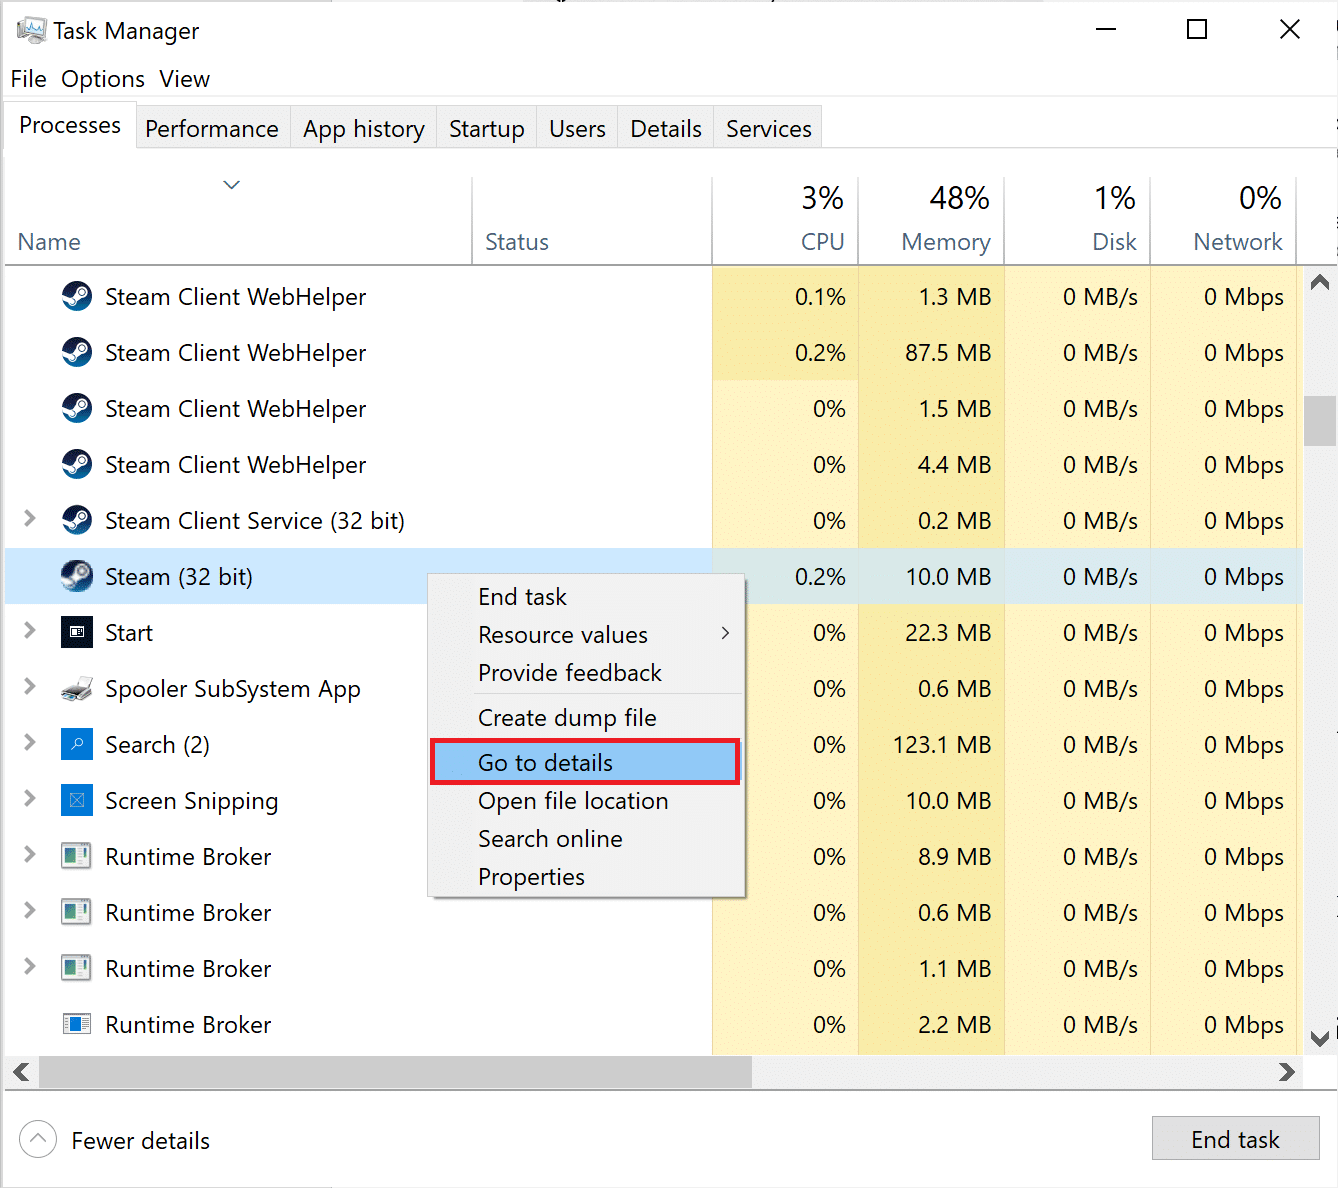
3. Nias rau Kawg ua tiav for all such tasks. Also, close Hu rau cov plaub ntug or Chav neeg ua haujlwm.
4. Txoj cai-nyem rau Hu rau cov plaub ntug thiab xaiv Go to details.
Nco ntsoov: Images shown are examples using the Steam application and for illustration purposes only.
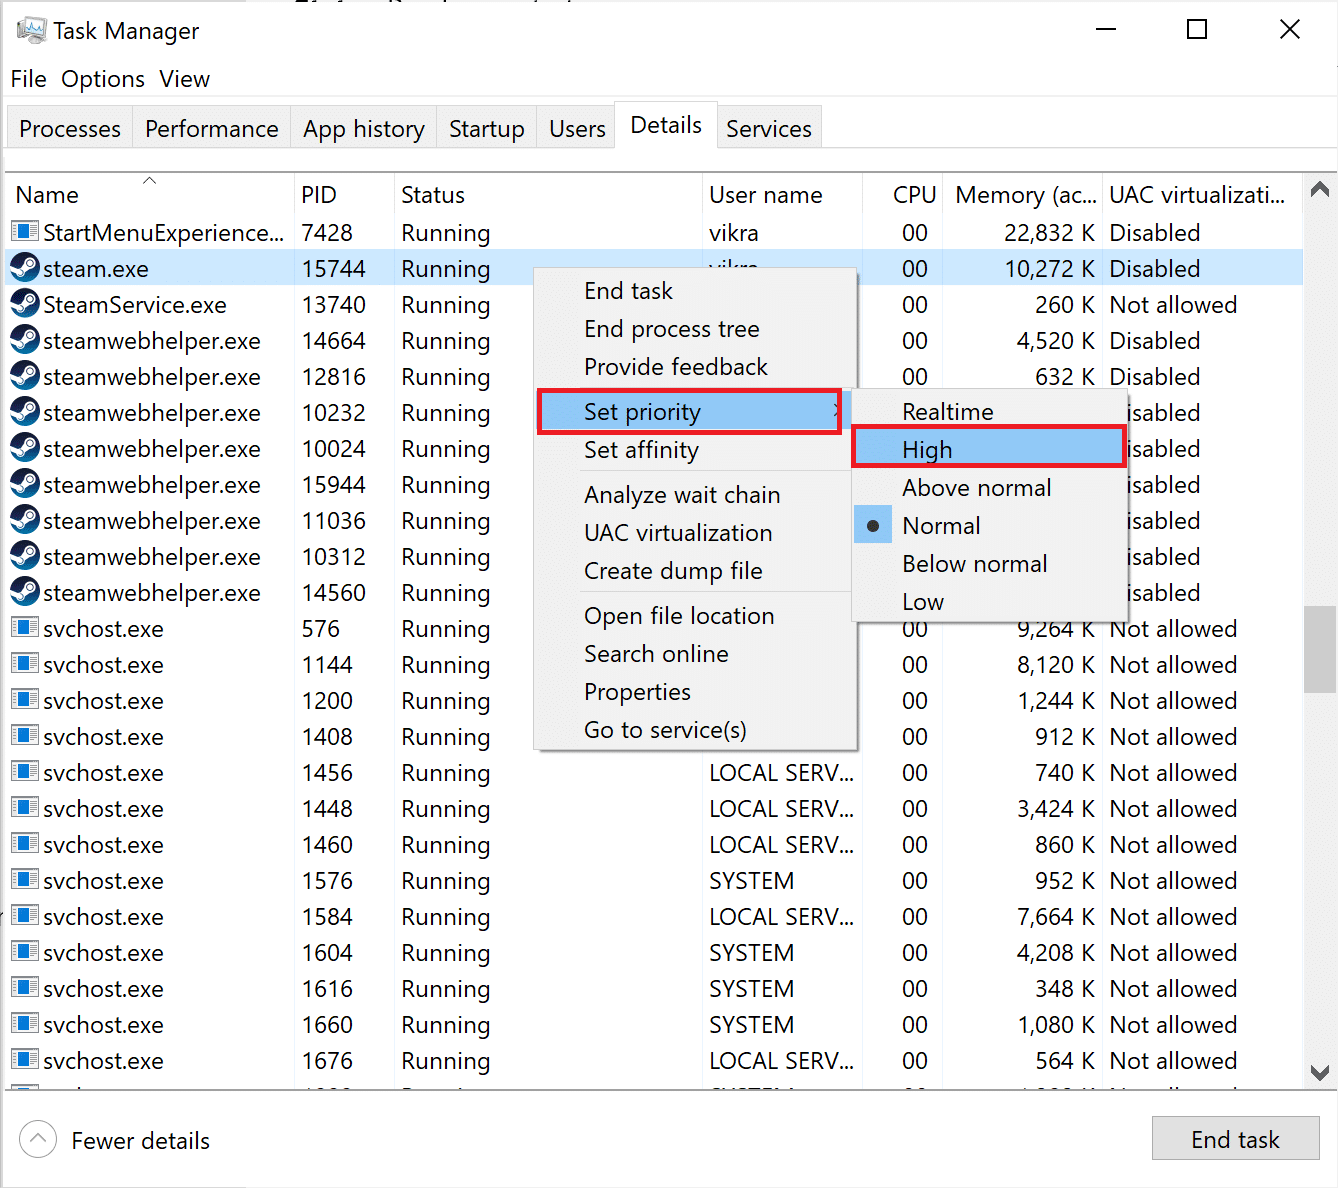
5. Here, right-click on Hu rau cov plaub ntug thiab nias Set Priority > High, raws li qhov tseem ceeb.
Kuj nyeem: Yuav ua li cas kho High CPU siv ntawm Windows 10
Txoj Kev 3: Disable In-game Overlay
Some programs, such as Nvidia GeForce Experience, Game Bar, Discord Overlay, and AMD Overlay allow you to enable in-game overlay features. However, they might also cause the said error. Hence, avoid running the following services when you are in-game:
- MSI gaming app afterburner metrics
- Video/audio recording
- Share menu
- Broadcasting Service
- Instant replay
- Kev soj ntsuam kev ua haujlwm
- Cov ntawv qhia
- Kev thaij duab hauv qab
Nco ntsoov: Depending on the gaming program you use, the steps to disable in-game overlay may vary.
Follow the below-mentioned steps to disable in-game overlay in Steam:
1. Disable all Hu rau cov plaub ntug dab in Task Manager, as explained earlier.
2. Tua tawm Chav Client on your Windows 10 desktop/laptop.
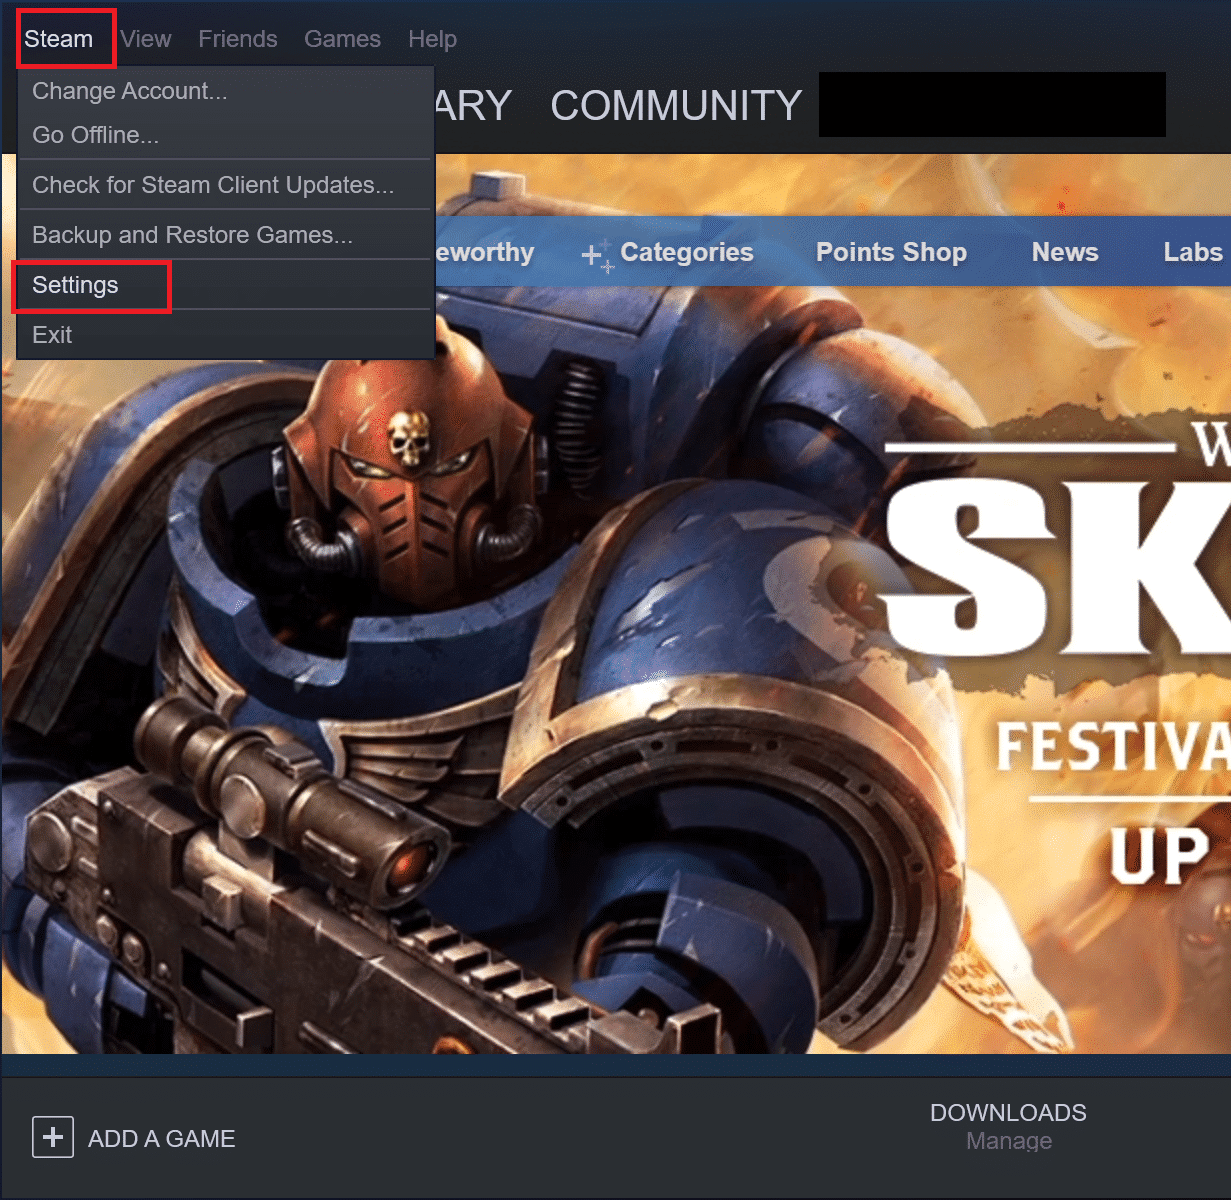
3. From the top left corner of the window, go to Chav> Chaw, raws li qhia.
4. Tom ntej no, nyem rau ntawm qhov Hauv-Kev Ua Si tab los ntawm sab laug pane.
5. Now, uncheck the box next to the option titled Pab kom Steam Overlay thaum nyob hauv-kev ua si, raws li qhia hauv qab no.
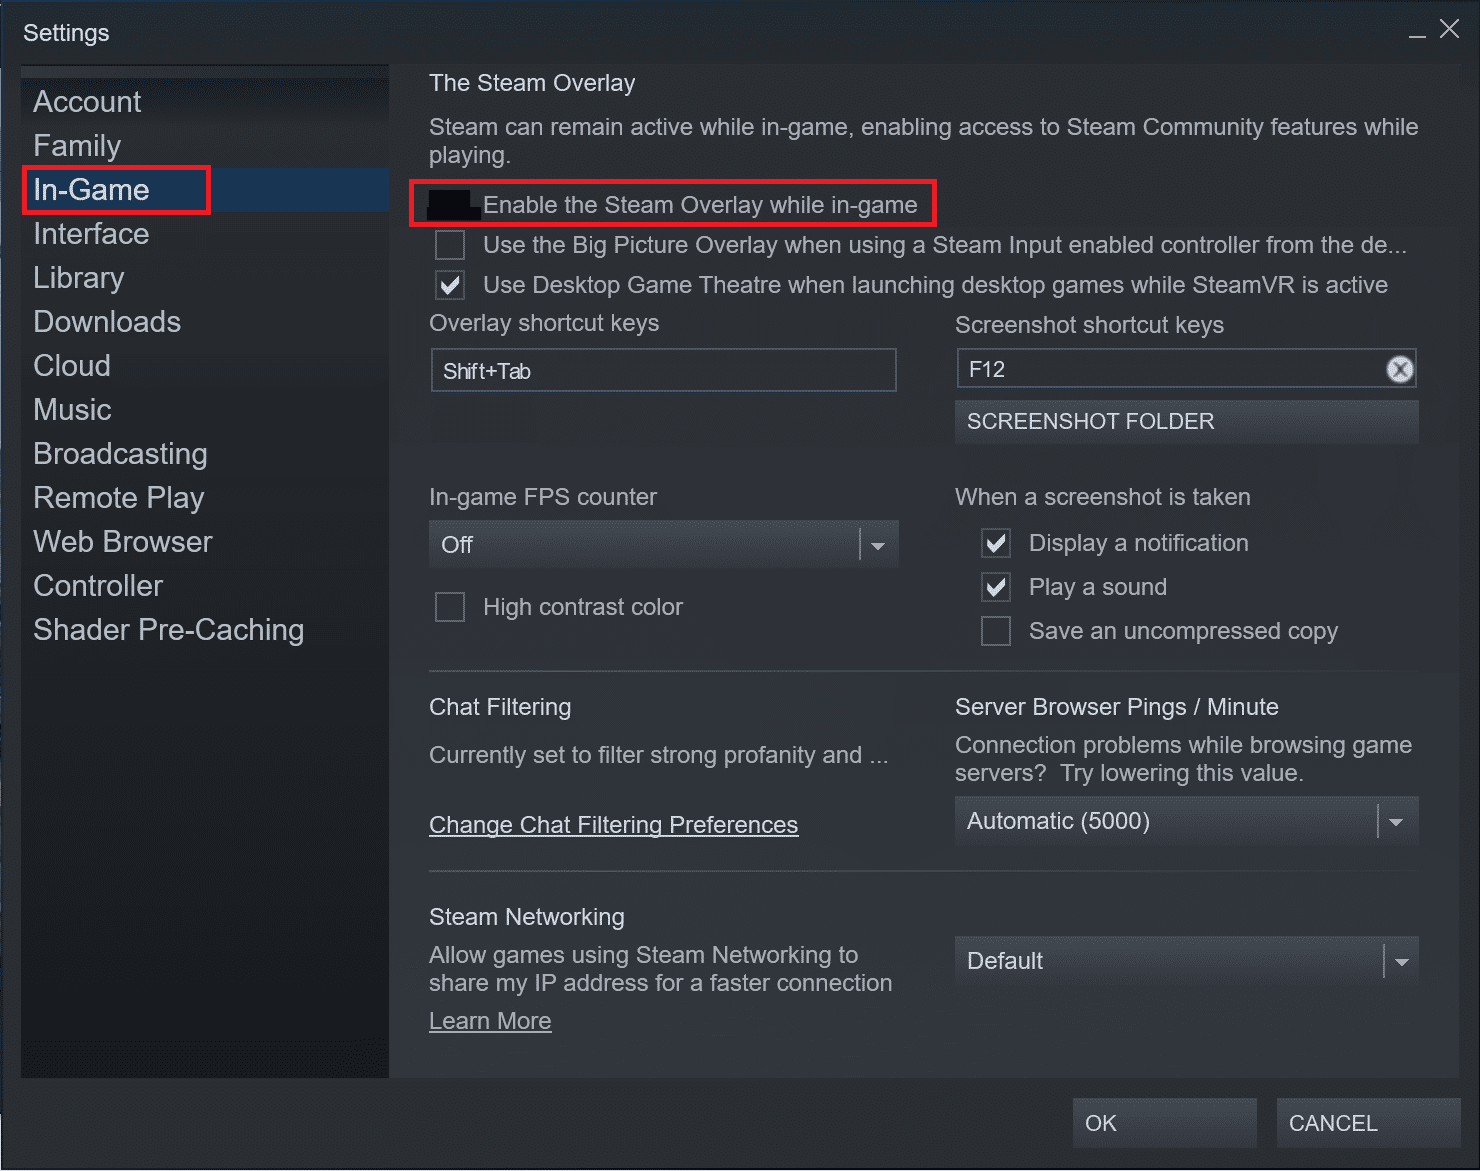
6. Kawg no, nyem rau OK.
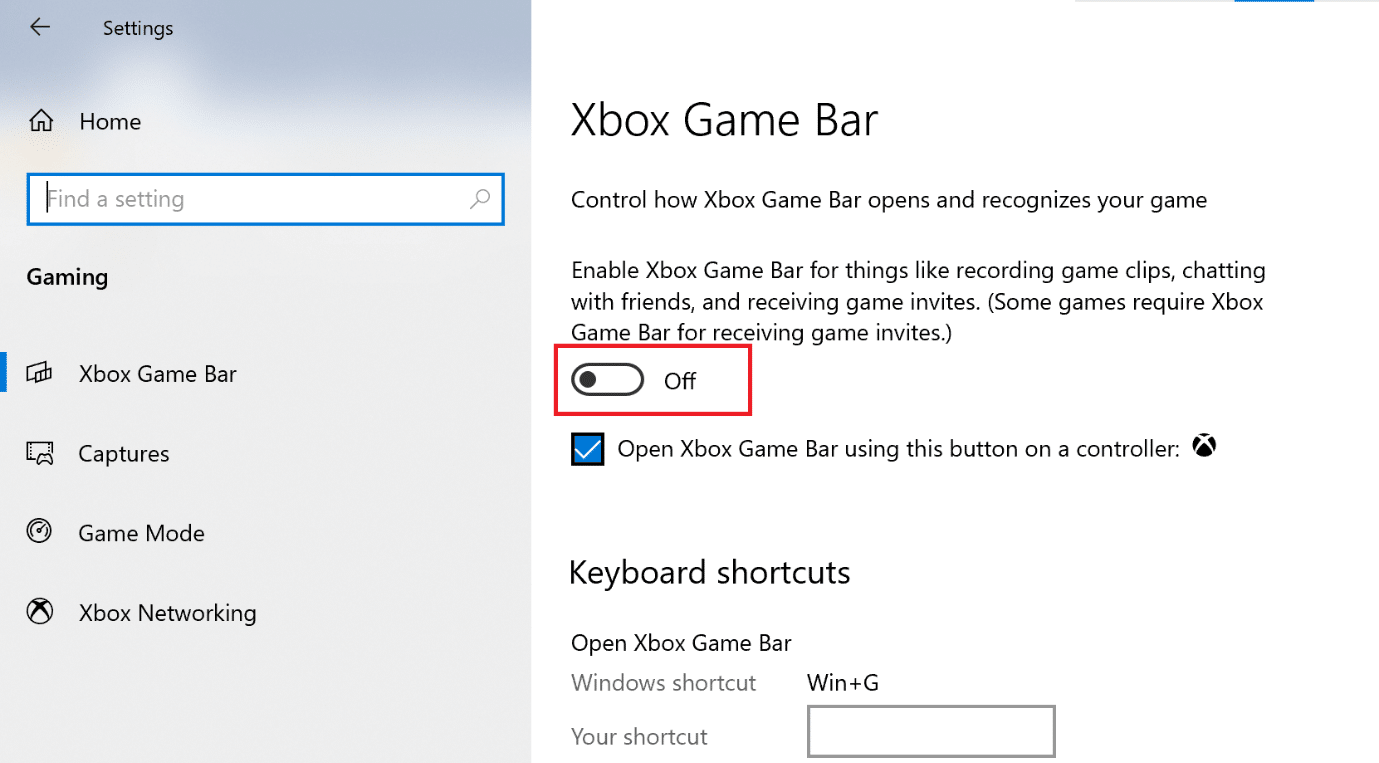
Method 4: Turn off Windows Game Bar
Few users have reported that you can fix Call of Duty Modern Warfare Dev Error 6068 when you turn off the Windows game bar.
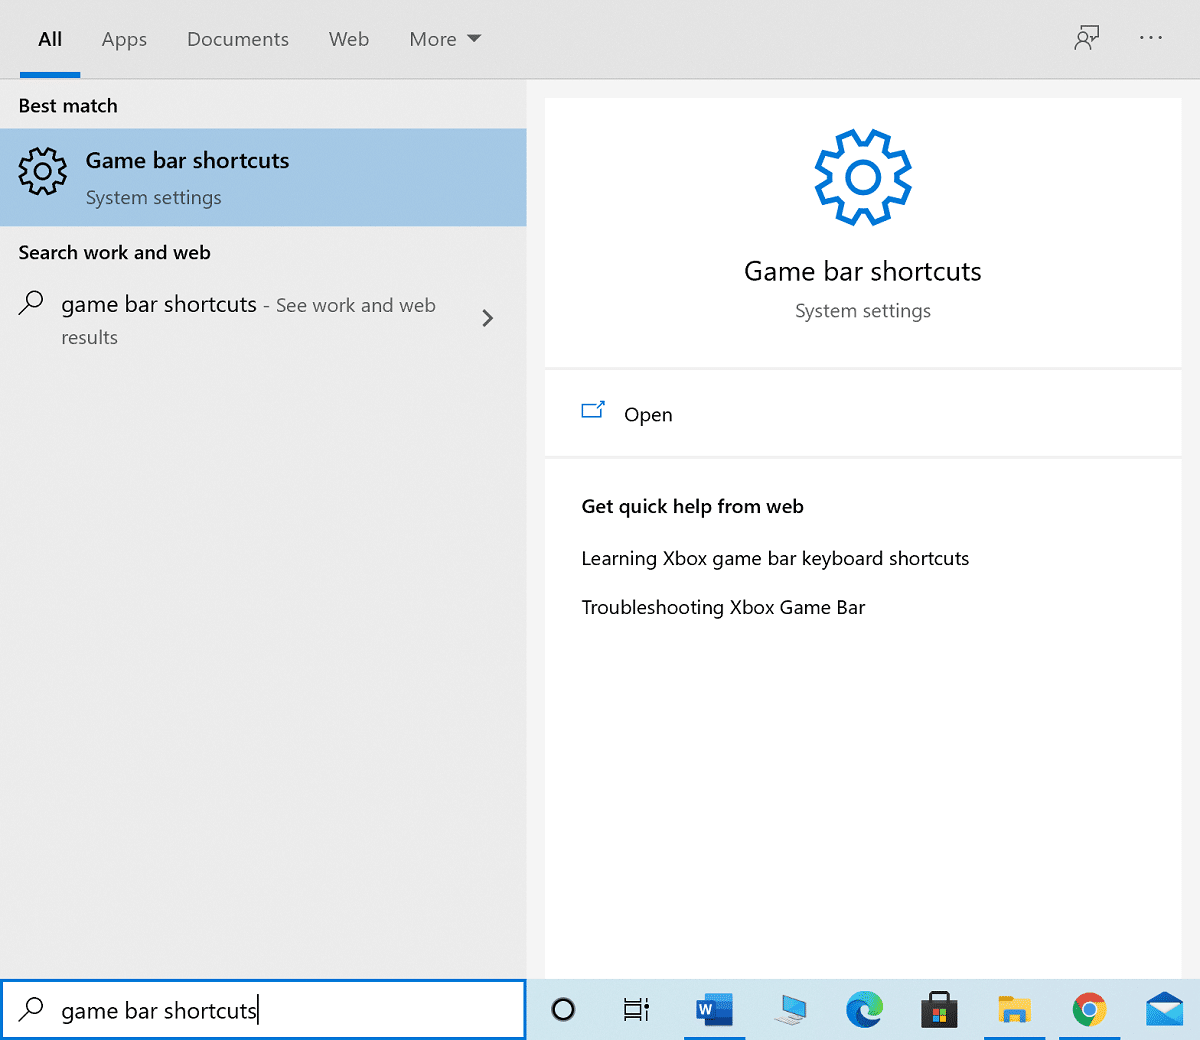
1. Hom Kev ua si bar shortcuts nyob rau hauv lub Windows search box and launch it from the search result, as shown.
2. Toggle tawm ntawm Xbox kev ua si Bar, raws li tau piav qhia.
Ceeb toom: Make sure to disable any other application that you use for performance Monitoring and In-game overlay as explained in the next method.
Kuj nyeem: Kho Fallout 76 Disconnected los ntawm Server
Method 5: Reinstall GeForce Experience
Some issues in the NVIDIA GeForce Experience might also cause the said issue. Hence, reinstalling the same should fix Warzone Dev Error 6068.
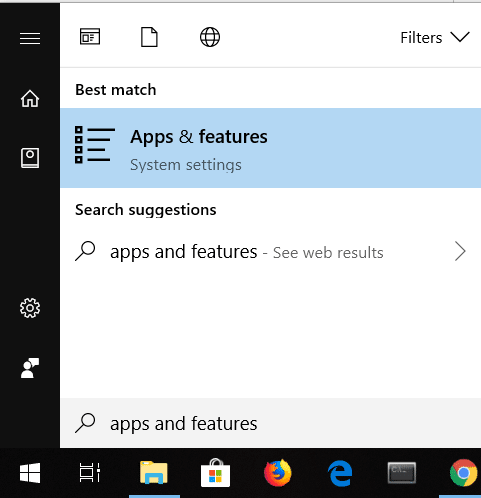
1. Siv tus Windows nrhiav bar to search and launch Apps & Nta, raws li tau piav qhia.
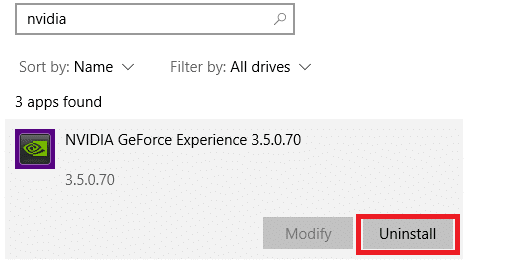
2. Hom NVIDIA nyob rau hauv lub Nrhiav daim ntawv no teb.
3. Xaiv NVIDIA Kev Ua Si Geforce thiab nias rau uninstall raws li qhia.
Now to delete the cache from the system, follow the given steps.
4. Nyem qhov Windows Search box thiab hom % appdata.
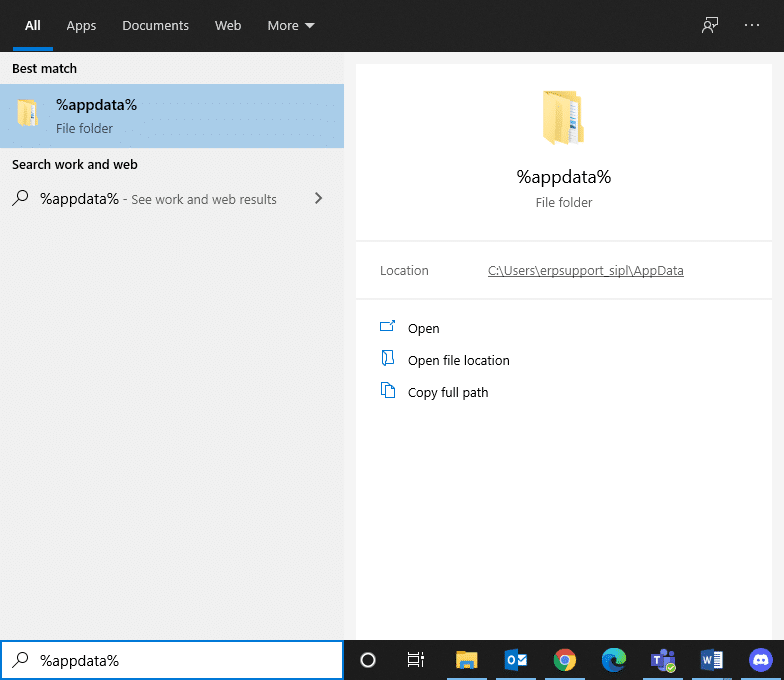
5. Xaiv qhov AppData Roaming nplaub tshev thiab mus rau NVIDIA nplaub tshev.
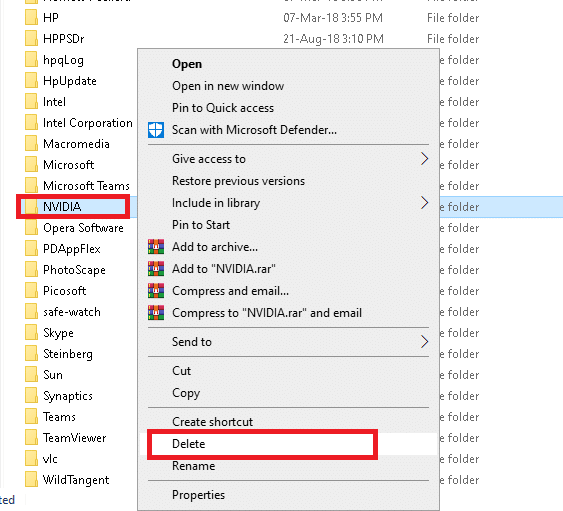
6. Now, right-click on it and click Rho tawm.
7. Nyem qhov Windows Search box dua thiab ntaus %LocalAppData%.
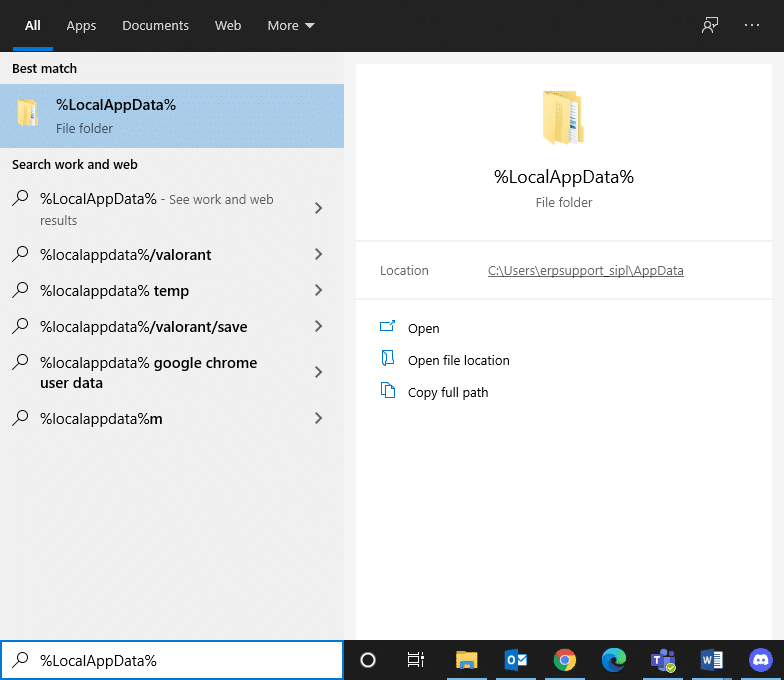
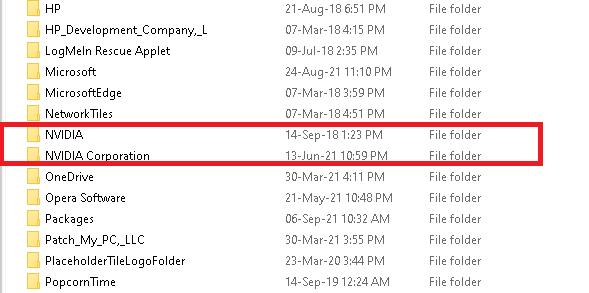
8. Nrhiav tus NVIDIA folders in your Local AppData folder thiab Rho tawm these as earlier.
9. Pib dua koj lub PC.
10. Download tau NVIDIA Kev Ua Si Geforce in relevance to your operating system through its official lub website.
11. Nyem ntawm qhov downloaded ntaub ntawv thiab ua raws li cov cov lus qhia on-screen kom ua tiav cov txheej txheem installation.
12. Thaum kawg, reboot koj qhov system dua.
Kuj nyeem: Yuav Ua Li Cas Disable lossis Uninstall NVIDIA GeForce Experience
Txoj Kev 6: Khiav SFC thiab DISM
Windows 10 users can automatically scan and repair their system files by running System File Checker and DISM. They are built-in tools that let the user delete files and fix Call of Duty Modern Warfare Dev Error 6068.
Method 6A: Run SFC
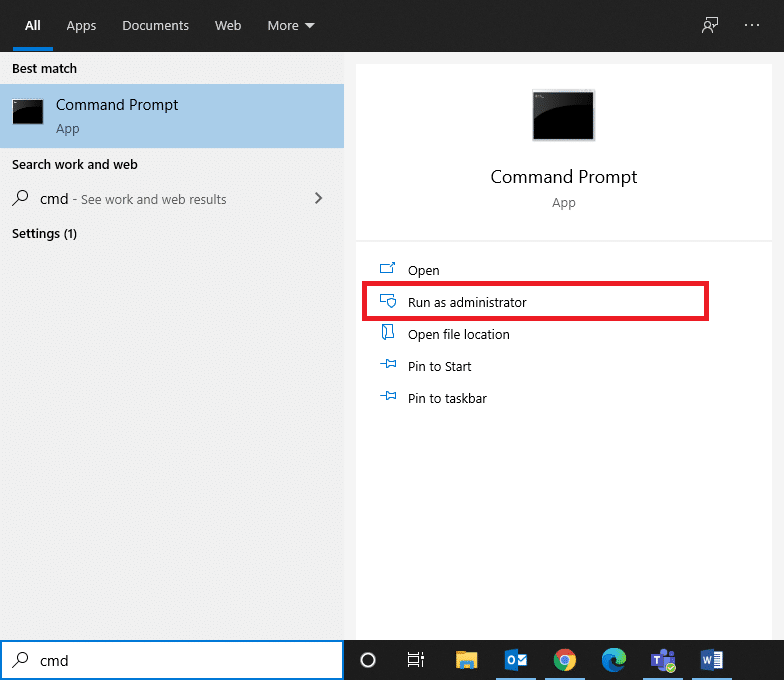
1. Kev Tshawb Nrhiav cmd nyob rau hauv lub Windows nrhiav bar. Nyem rau Khiav raws li cov thawj coj mus tua Hais kom sai with administrative privileges, as depicted.
2. Hom sfc / scannow thiab ntaus Sau. Now, the System File Checker will begin its scanning process.
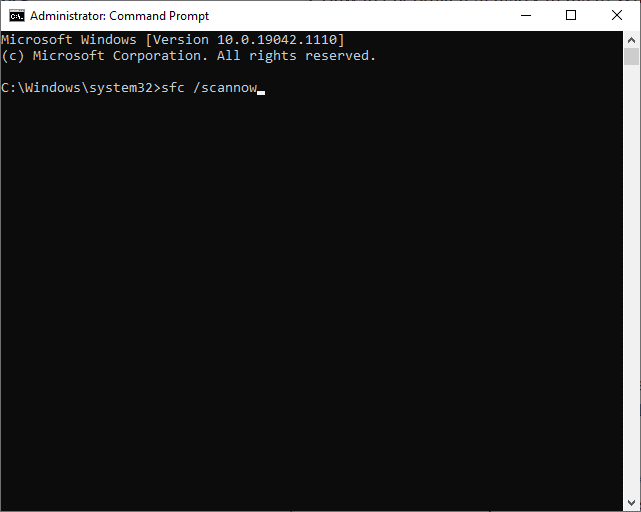
3. Tos rau lub Verification 100 % completed statement, and once done, pib dua koj lub cev.
Kuj nyeem: Kho CoD Dub Ops 2 Unhandled Exception Caught yuam kev
Method 6B: Run DISM
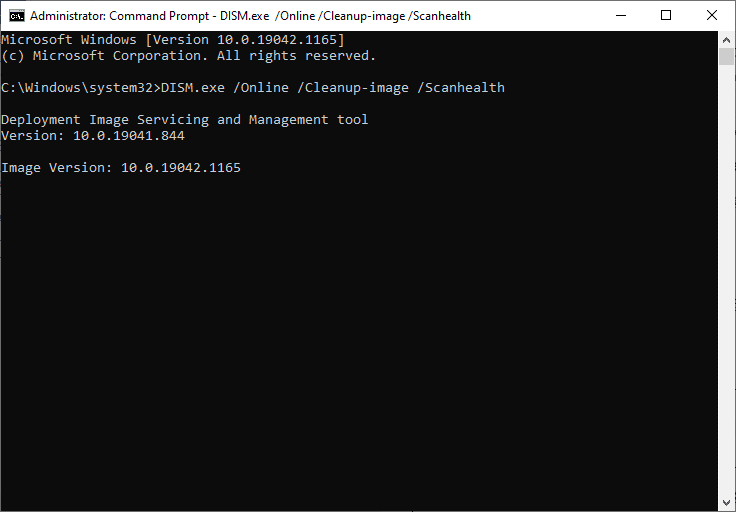
1. Tua tawm Command Prompt with administrative privileges raws li yav dhau los.
2. Hom Dism / Hauv internet / Tawm-Image / CheckHealth thiab ntaus Sau. The Check Health command will check your machine for corrupt files.
3. Hom Dism / Hauv internet / Teeb-Image / ScanHealthCov. Xov Xwm Sau key to execute. The Scan Health command will do an in-depth scan and take a little longer to complete.
If the scan finds corrupt files in your system, go to the next step to repair them.
4. Hom Dism / Hauv internet / Teeb-Image / RestoreHealth thiab ntaus Sau. This command will scan and repair all corrupt files on your system.
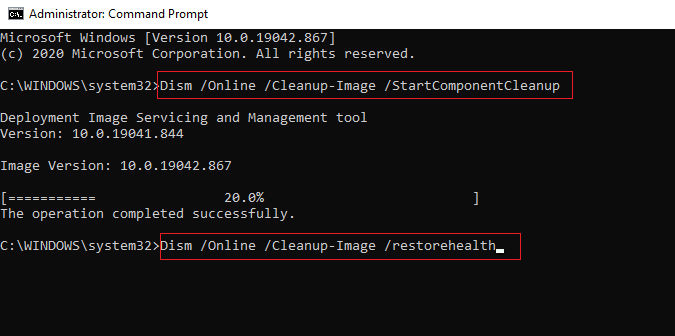
5. Finally, wait for the process to run successfully and ze lub qhov rais. Rov qab qhib koj lub PC and check if Call of Duty Error 6068 is fixed or not.
Method 7: Update or Reinstall Graphics Card Drivers
To fix Warzone Dev Error 6068 in your system, try updating or reinstalling the drivers to the latest version.
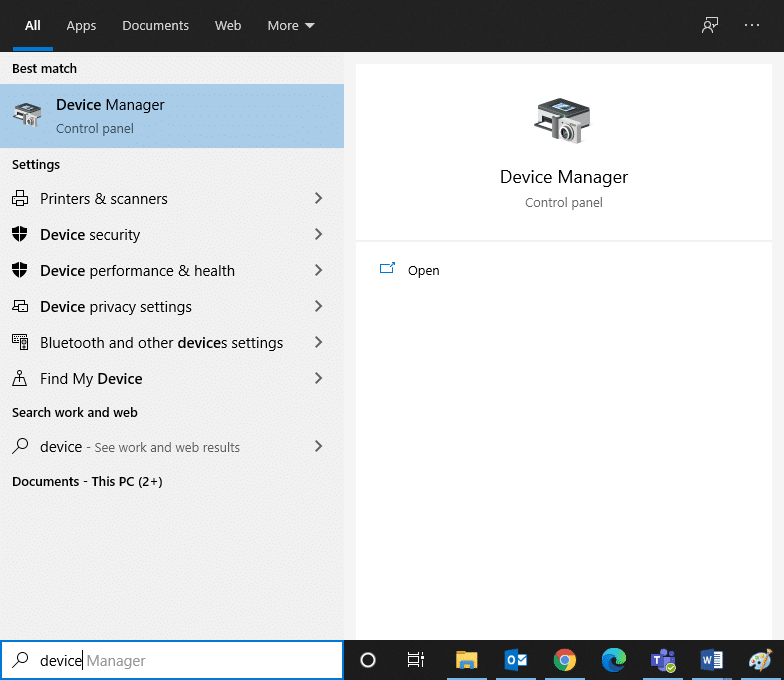
Method 7A: Update Display Adapter Drivers
1. Tua tawm Ntaus Tus Thawj Coj los ntawm lub Windows nrhiav bar, as shown
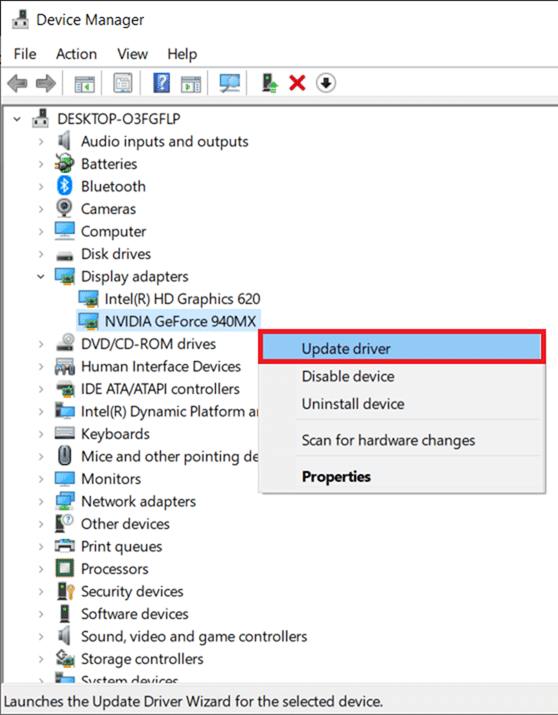
2. Ob npaug nias rau Zaub adapters.
3. Tam sim no, right-click rau koj daim video tsav tsheb thiab xaiv Hloov tshiab tsav tsheb, raws li qhov tseem ceeb.
4. Tam sim no, nyem rau Nrhiav rau tus tsav tsheb nkaus xwb to allow Windows to locate and install a driver.
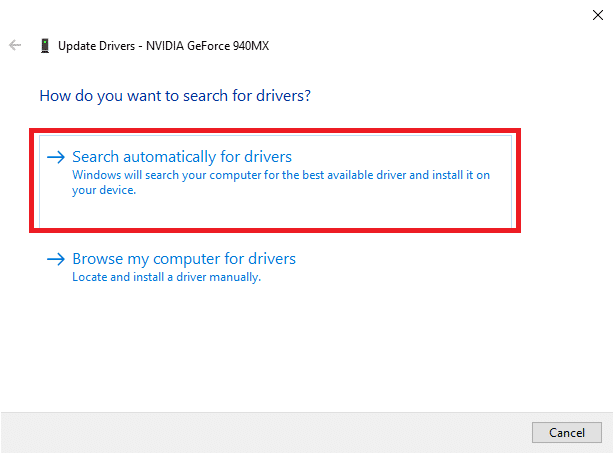
5A. Now, the drivers will update to the latest version, if they are not updated.
5B. If they are already in an updated stage, the screen displays, “Windows has determined that the best driver for this device is already installed. There may be better drivers on Windows Update or on the device manufacturer’s website".
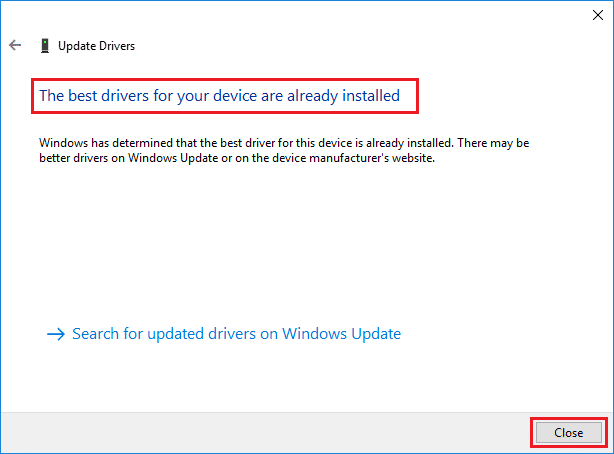
6. Rov qab kho lub computer, and check if you have fixed Warzone Dev Error 6068.
Method 7B: Reinstall Display Adapter Drivers
If the said issue still persists, reinstalling the drivers might help. Refer to Txoj kev 4 ua zoo li qub.
Kuj nyeem: Kho Pab Koomtes ntawm Legends Ncej Drops
Method 8: Update Windows OS
If you did not obtain any fix by the above methods, then there are chances that you might have bugs in your system. Installing the new update will help you fix these and potentially, fix Dev Error 6068.
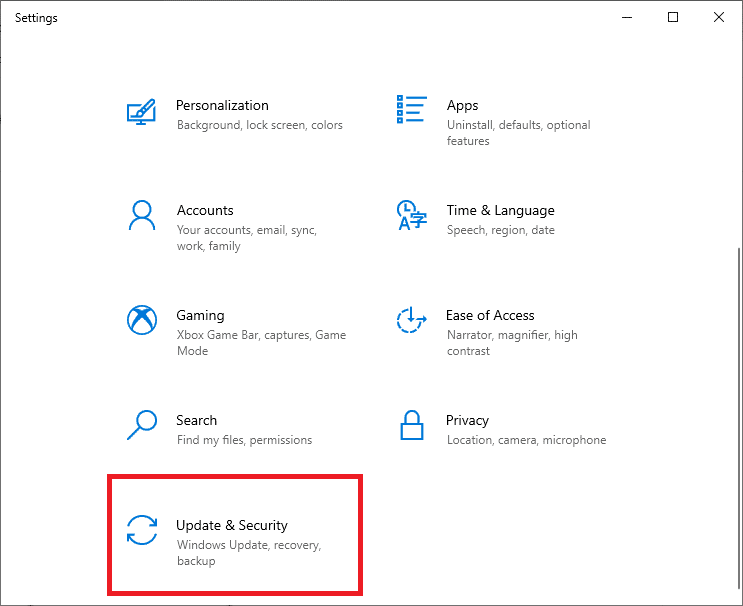
1. Nias lub Qhov rai + Kuv yuam sij ua ke qhib chaw hauv koj li kab ke.
2. Tam sim no, xaiv Hloov Kho & Ruaj Ntseg.
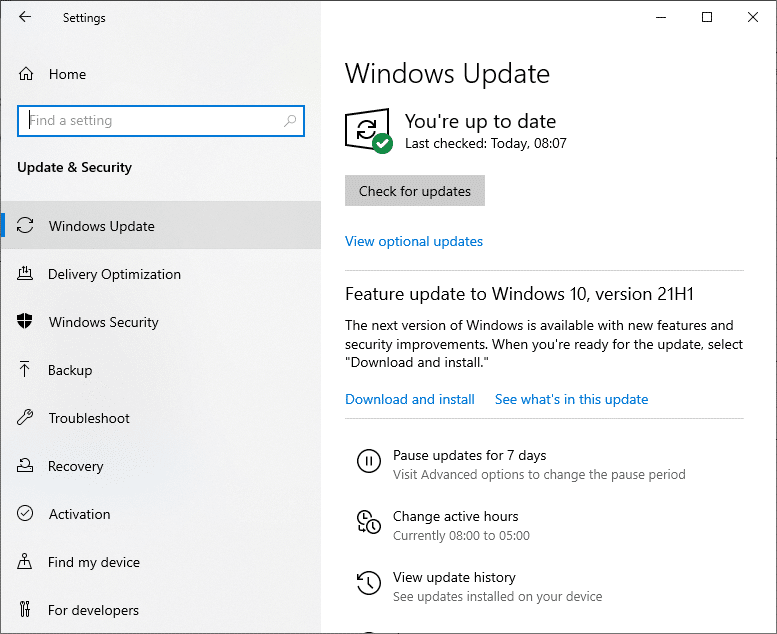
3. Tam sim no, xaiv Tshawb xyuas txog Cov Tshiab los ntawm txoj cai vaj huam sib luag.
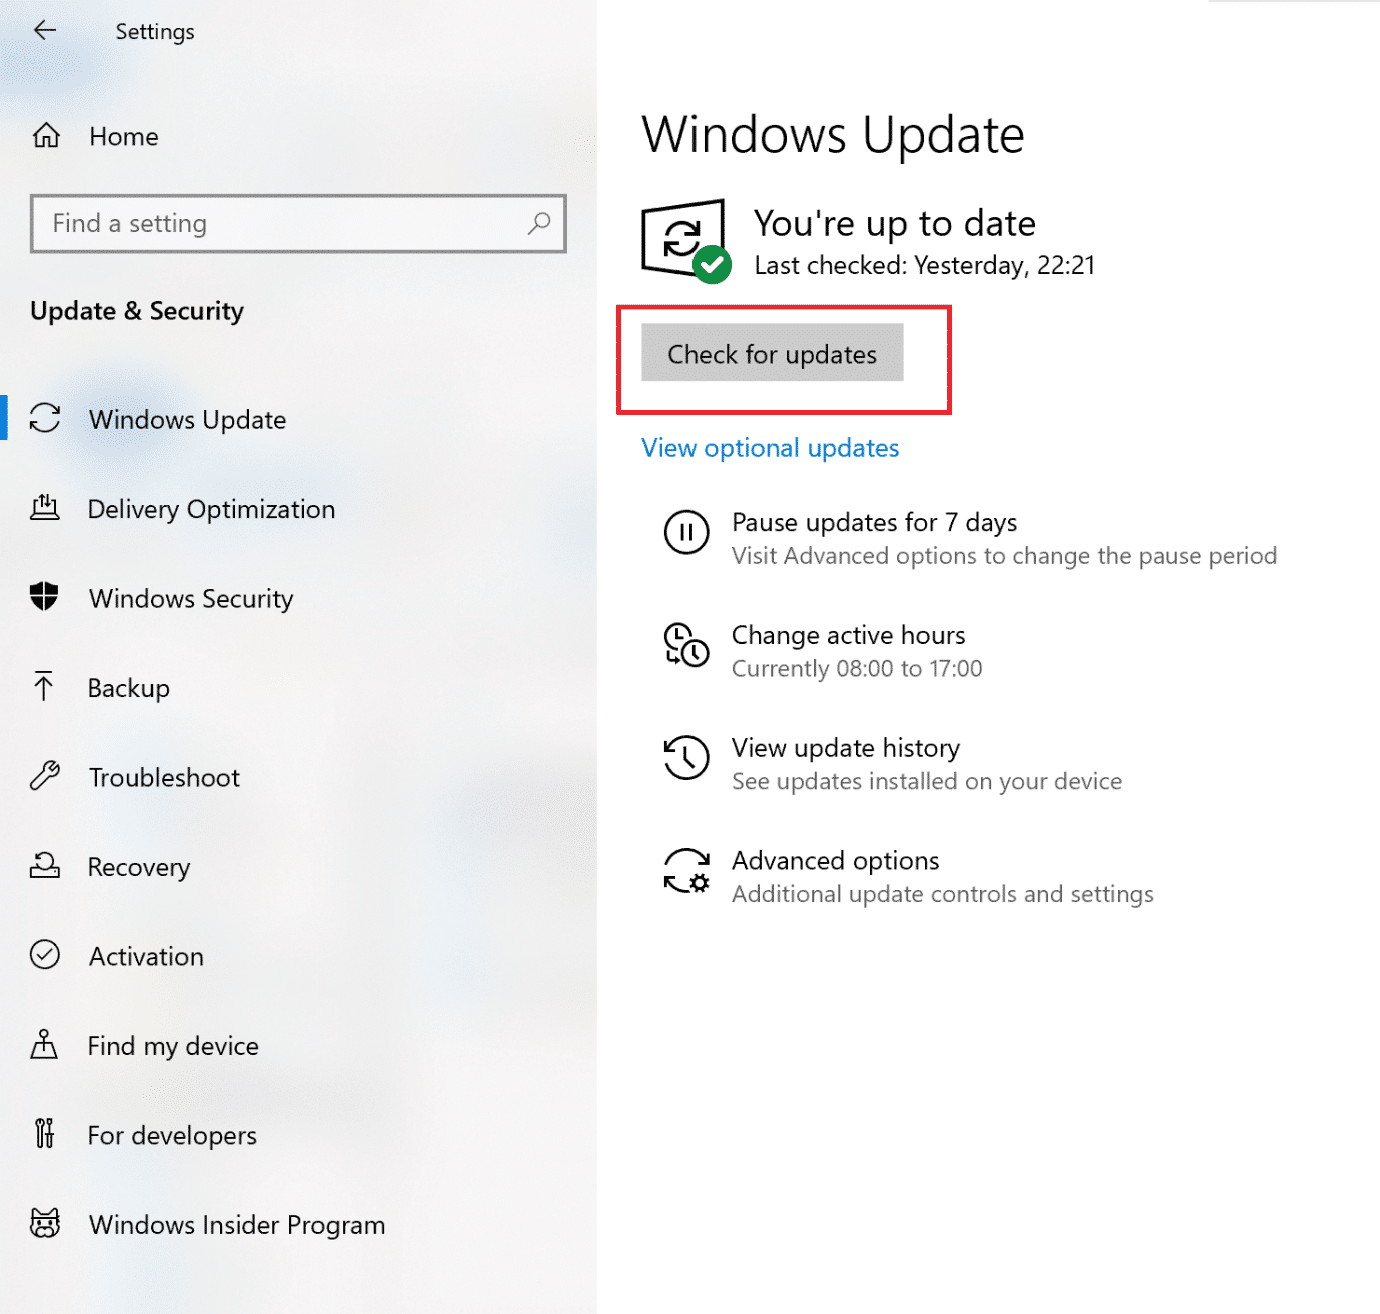
4A. Click on Tam sim no nruab mus download tau thiab nruab qhov hloov tshiab tshiab muaj.

4B. If your system is in an updated state, then it will show Koj mus txog hnub kawg message, as shown below.
5. Pib dua koj lub PC thiab xyuas seb qhov teeb meem puas daws tau tam sim no.
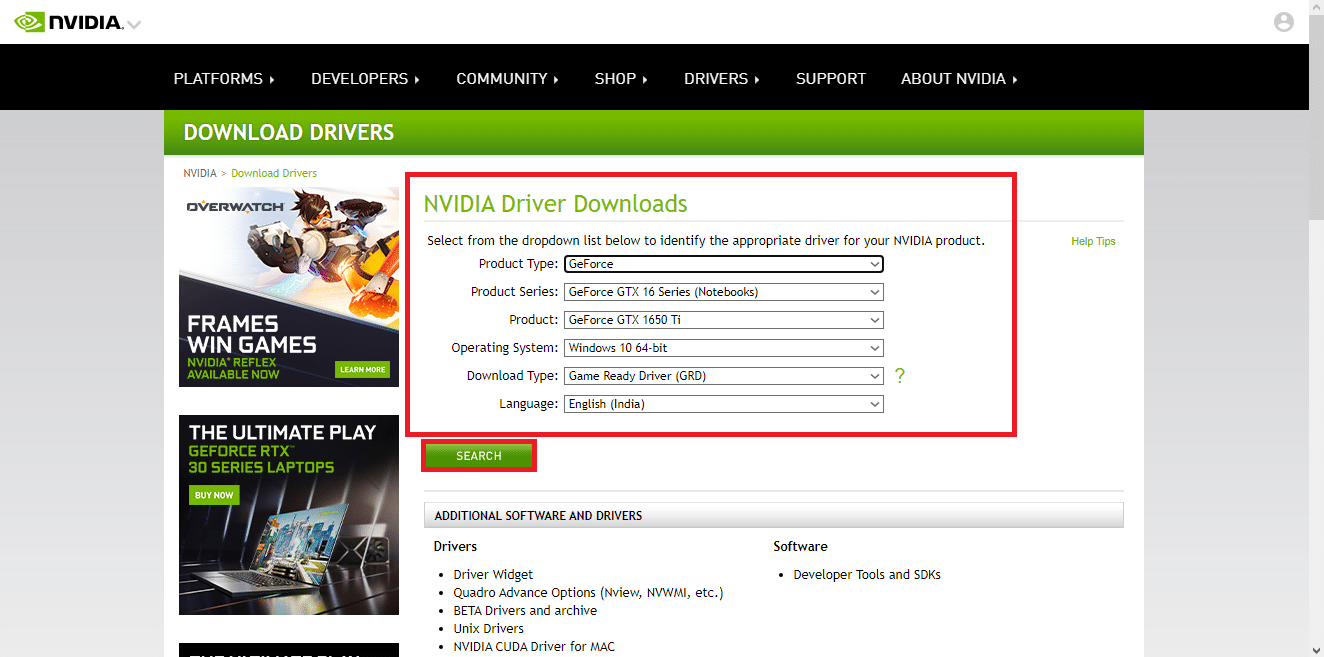
Method 9: Change Graphics Card Settings (For NVIDIA)
The COD Warzone Dev Error 6068 may be occurring because your system cannot handle heavy graphics settings that are enabled for the graphics card. Listed below are modifications that you can make to the graphics card settings to fix this issue.
Nco ntsoov: The steps written in this method are for NVIDIA Tswj Vaj Huam Sib Luag. If you use any other graphics processor such as AMD, make sure to go to the respective program settings and implement similar steps.
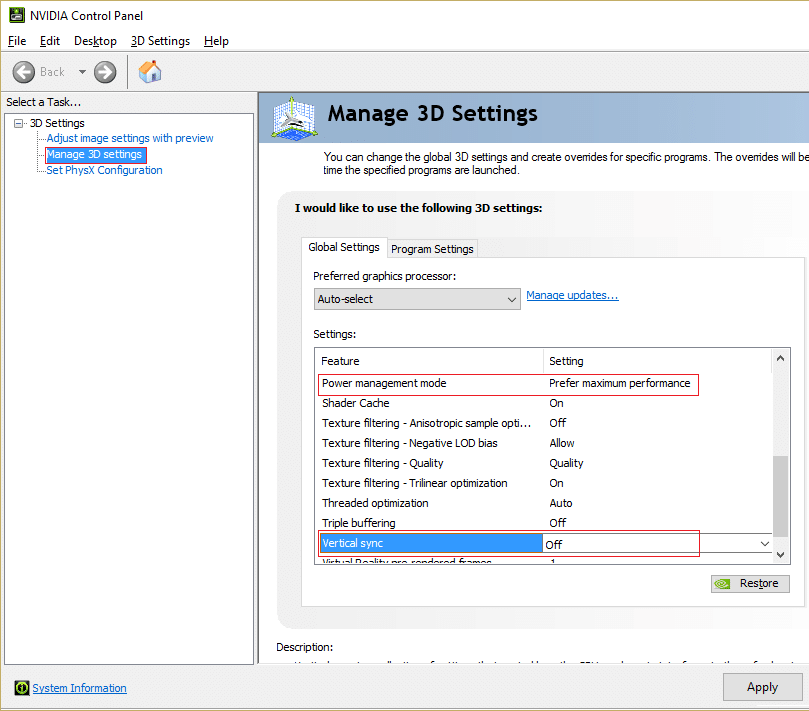
Setting 1: Vertical Sync Settings
1. Txoj cai-nias rau ntawm duab thiab xaiv NVIDIA Tswj Vaj Huam Sib Luag los ntawm cov ntawv qhia zaub mov.
2. Nias rau Tswj kev teeb tsa 3D ntawm sab laug pane.
3. In the right pane, turn Vertical sync Off thiab teeb tsa Fais fab tswj hom rau Xaiv Ua Ntau Yam, raws li qhov tseem ceeb.
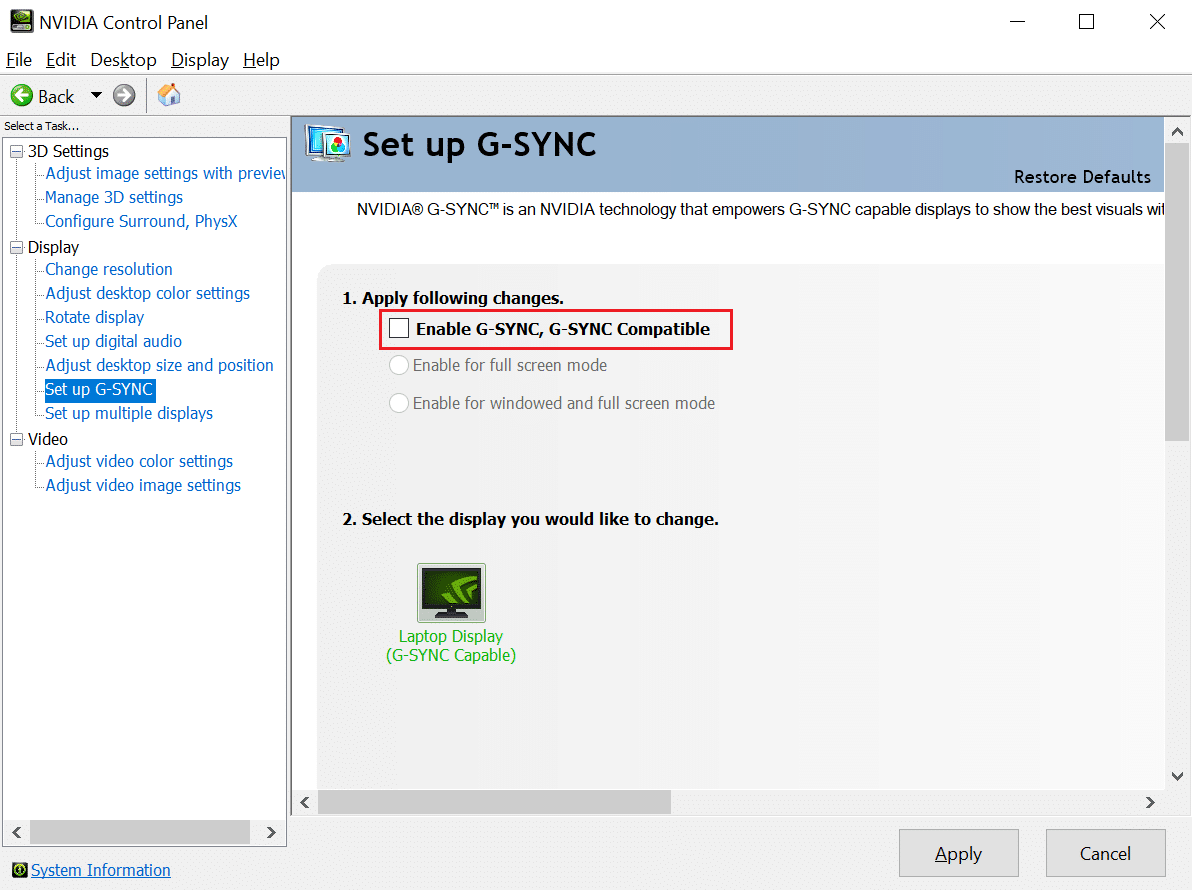
Setting 2: Disable NVIDIA G-Sync
1. qhib lub NVIDIA Tswj Vaj Huam Sib Luag zoo li ua ntej.
2. Nkag mus rau Display > Set up G-SYNC.
3. From the right pane, uncheck the box next to the option titled Enable G-SYNC.
Method 10: Reinstall Call of Duty
Reinstalling the game will fix all the issues related to it. :
1. Tshaj tawm rau Battle.net webpage thiab nyem rau ntawm Call of Duty icon.
2. Xaiv uninstall thiab ua raws li cov cov lus qhia on-screen kom ua tiav txoj haujlwm.
3. Reboot koj lub PC
4. Download the game from no.
5. Follow all the cov lus qhia kom ua tiav qhov kev teeb tsa.
Kuj nyeem: Txhim kho ARK Tsis Muaj Peev Xwm Tshawb Nrhiav Cov Ntaub Ntawv Server rau Caw
Method 11: Reinstall DirectX
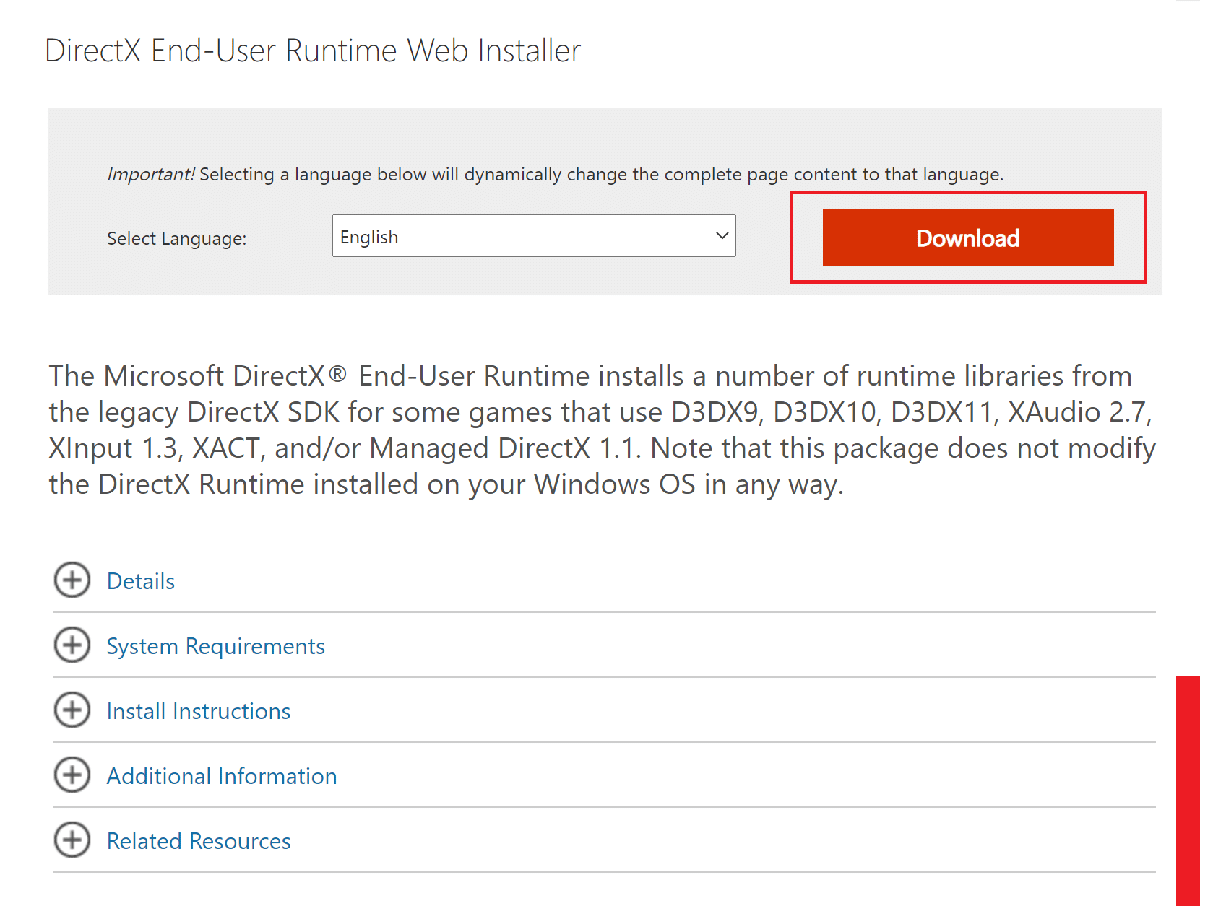
DirectX is an Application Programming Interface (API) that allows computer programs to communicate with the hardware. You may be receiving Dev Error 6068 because the DirectX installation on your system is corrupt. DirectX End-User Runtime Web Installer will help you to repair any/all corrupt files in the currently installed version of DirectX on your Windows 10 PC.
1. Nyem no to visit the official Microsoft website and click on download, as shown below. This will download DirectX End-User Runtime Web Installer.
2. Nyem ntawm qhov downloaded ntaub ntawv thiab run the installer. Follow the on-screen instruction to install the files in a directory of your choosing.
3. Nkag mus rau directory where you installed the files. Locate the file titled DXSETP.exe thiab nyem ob npaug rau nws.
4. Follow the on-screen instruction to finish the kho of corrupt DirectX files on your PC, if any.
5. You may choose to rho tawm the DirectX End-User Runtime installation files once the above process is complete.
Method 12: Reinstall Shader cache
Shader Cache contains temporary shader files that are responsible for the light and shadow effects of your game. The shader cache is maintained so that shader files do not have to be generated every time you launch the game. However, it is possible that files in your shader cache have gotten corrupt, thereby resulting in COD Warzone Dev Error 6635 or 6068.
Nco ntsoov: The shader cache will be regenerated with new files the next time you launch the game.
Here’s how you can delete the shader cache:
1. Kill all Call of Duty processes nyob rau hauv lub Task Manager as instructed in Method 2.
2. Nyob rau hauv Cov ntaub ntawv Explorer, mus rau Documents > Call of Duty Modern Warfare.
3. Locate a folder called Cov neeg ua si. Rov qab txog the folder by copy-pasting the folder on your Duab.
4. Finally, delete the Players folder.
Note: If there is a players2 folder, take a backup and delete that folder too.
Launch Call of Duty. The shader cache will be regenerated. Check if any error pops up now.
Method 13: Hardware Changes
If the error is still not rectified, you need to make changes to the hardware on your system like:
- Increase or Change RAM
- Install a better Graphics card
- Install a higher Storage drive
- Upgrade from an HDD to SSD
Method 14: Contact COD Support
If you are still facing Warzone Dev Error 6068, then contact Activision support by filling the questionnaire here.
pom zoo:
Peb cia siab tias phau ntawv qhia no yuav pab tau thiab koj tuaj yeem ua tau fix Call of Duty Warzone Dev Error 6068 hauv koj lub cuab yeej. Qhia rau peb paub seb txoj kev twg ua haujlwm rau koj zoo tshaj plaws. Tsis tas li ntawd, yog tias koj muaj lus nug / cov lus pom zoo txog tsab xov xwm no, koj tuaj yeem xa lawv mus rau hauv nqe lus.


)