If you are quarantined in your home or cannot leave your place, definitely Netflix will be the right choice for passing time. Netflix is known for its unlimited streaming service of movies, TV series and programs with high quality to its subscribers. It can be accessed in multiple devices with amazing catalogue and subtitles. However, you cannot access your Netflix account when you receive Netflix error code UI3012 or UI3010. This error code UI3010 arises due to network restrictions and browser conflicts. Nevertheless, there are so many troubleshooting methods that will help you fix the error. This is a very common problem encountered by users in different browsers on Windows 10. So, what are you waiting for? Continue reading the article as we are here to help you out of the struggle.
Yuav ua li cas kho Netflix yuam kev UI3010
Here are some reasons that cause Netflix error code UI3010. Analyze them deeply so that you can follow appropriate troubleshooting methods.
- Issues in the Wi-Fi network.
- Router conflicts.
- Network restrictions.
- Incompatible/outdated drivers.
- Corrupt cache in your browser.
- VPN or proxy network interference.
- Corrupt cookies and cache in Netflix.
In this section, we have compiled a list of methods that will help you fix Netflix error code UI3010. The methods are arranged in such a way that you can attain easier and faster results. Follow them in the same order to troubleshoot the problem quickly.
Txoj Kev 1: Kev daws teeb meem yooj yim
Before you follow the advanced methods here are some basic troubleshooting steps that will help you fix the error code with simple hacks.
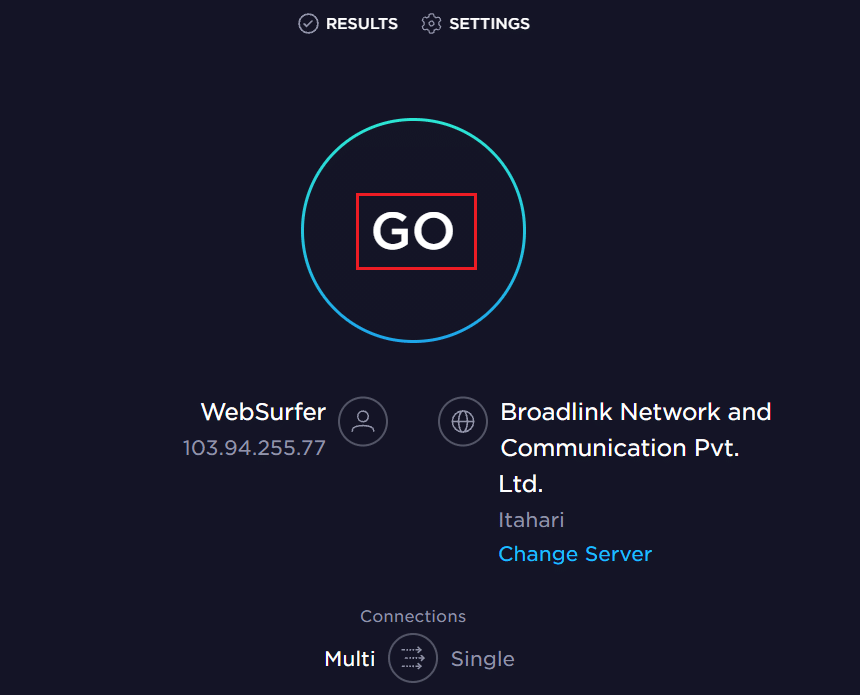
1. Make sure you have the super-fast internet speed to enjoy 4K video services. Run a Speedtest. If you detect your network is very slow, then contact your Internet Service Provider.
2. Improve the Wi-nkaus lub zog by placing your device as close to the router as possible.
3. Make sure your device does not have electrical or magnetic interference.
4. Connect to a different network using a Wi-nkaus hotspot.
If you did not get any fix for error code UI3010 by following these basic troubleshooting steps, then move ahead to the next method.
Method 2: Re-login Netflix
Any temporary glitches in Netflix login can be resolved by logging in again. This fixes the majority of general issues associated with the browser version of Netflix. To re-login to the application, follow the below-mentioned instructions.
1. Tua tawm Netflix and in the top right corner of the screen, click on Sau npe tawm.

2. Once you have signed out of your Netflix account, wait for 30 seconds or reboot your computer. Click on kos npe rau Nyob rau hauv.
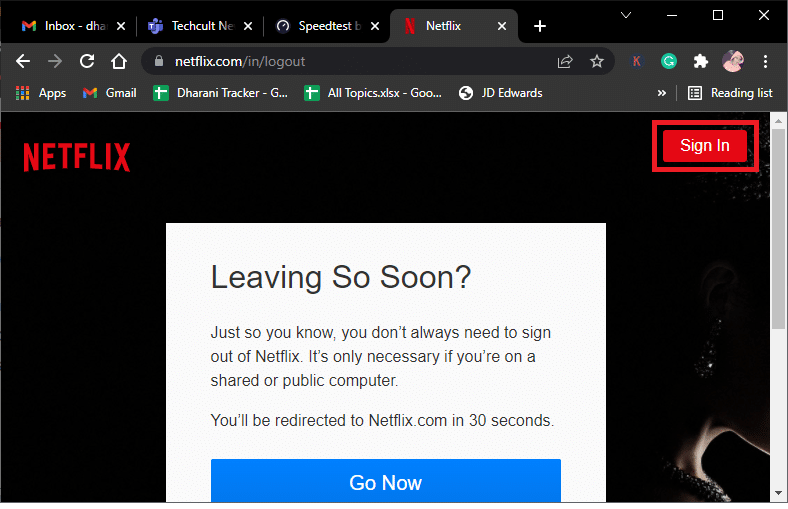
3. Ntaus koj cov ntawv pov thawj and check if you face error code UI3010 again.
Kuj nyeem: Yuav Ua Li Cas Hloov Netflix Video Zoo ntawm koj lub computer
Txoj Kev 3: Restart Router
Restarting your router will help you fix all internet issues associated with Netflix. This process is also called as Power Cycle of the router. Follow the below-listed instructions to reset connection settings, exclude malicious network attacks, and remove other unwanted connected devices from the network.
Nco ntsoov: Yog tias koj siv cable modem / Wi-Fi router combo ntaus ntawv, ua raws cov kauj ruam tsuas yog rau ib qho khoom siv xwb.
1. Nrhiav tus Lub hwj chim khawm hauv qab ntawm koj lub router.
2. Nias lub khawm ib zaug rau tig tawm nws.
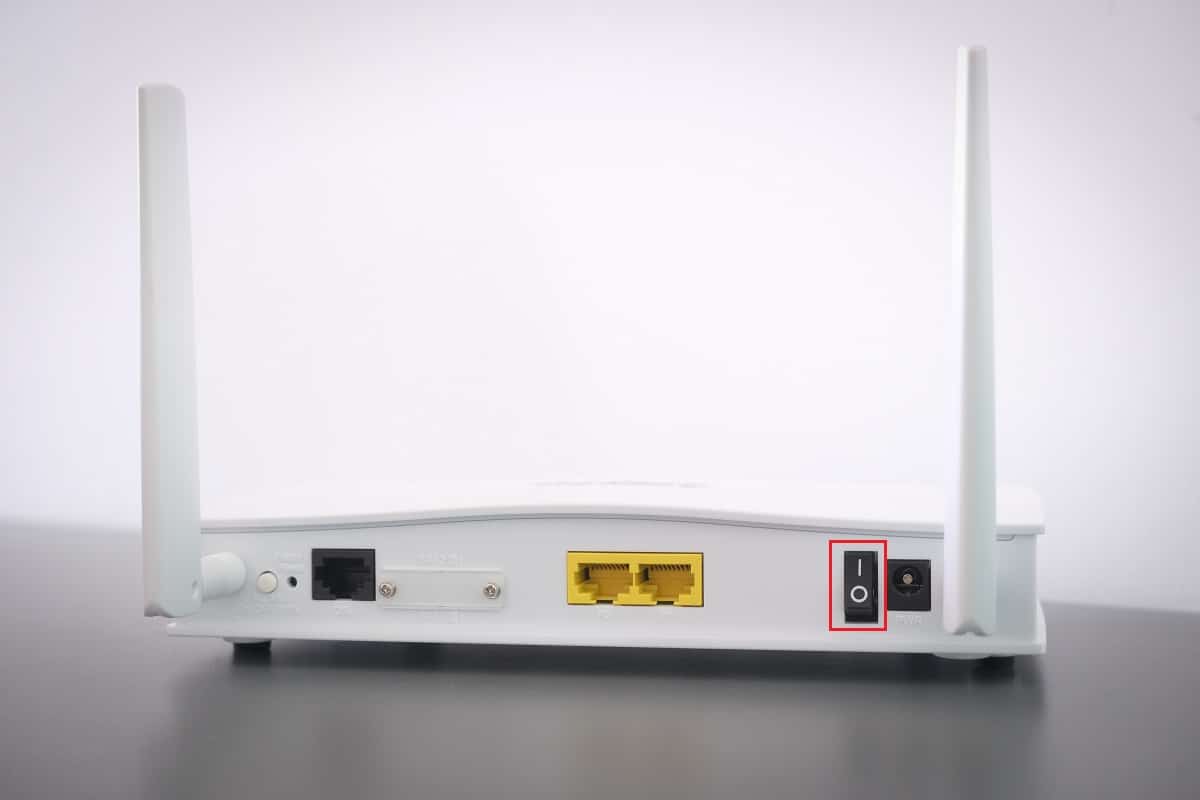
3. Tam sim no, disconnect koj Router fais fab cable thiab tos kom txog thaum lub zog tag nrho ntws los ntawm cov capacitors.
4. Tom qab ntawd, reconnect lub fais fab cable thiab hloov nws tom qab ib feeb.
5. Tos kom txog thaum lub network txuas rov tsim dua thiab sim kos npe rau hauv dua.
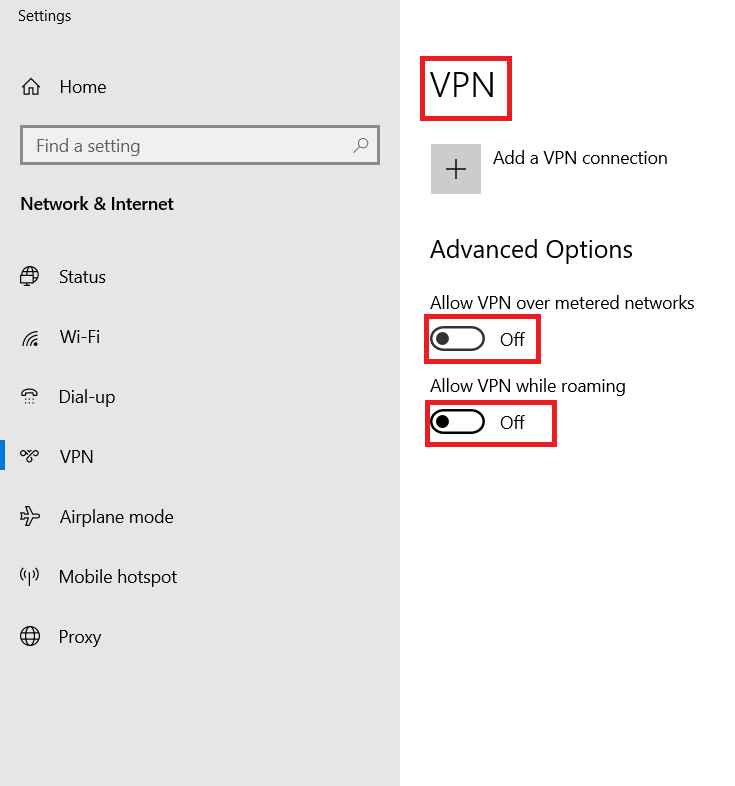
Txoj Kev 4: Disable VPN
The Virtual Private Network (VPN) can interfere with the Netflix servers and the network connection. Try disabling the VPN network in your Windows 10 computer by following the below-mentioned instructions.
1. Ntaus lub Windows qhov tseem ceeb thiab hom Cov chaw VPN hauv qhov chaw tshawb nrhiav. Nyem rau Qhib.

2. Disconnect the active VPN service and toggle off the Kev xaiv VPN.
Kuj nyeem: How to Use Netflix Party to Watch Movies with Friends
Txoj Kev 5: Disable Proxy
A proxy server acts as an intermediate connection between your computer and the internet. The proxy server requests the websites, servers, and other services on the network based on your inputs. However, this may interfere with internet accessing applications or programs like Netflix. Hence try disabling this proxy server by following the below-mentioned instructions.
1. Exit from Netflix and make sure you close all the background processes related to Netflix from Task Manager.
2. Ntaus lub Windows qhov tseem ceeb, hom tso cai, thiab nias rau Qhib.

3. Here, toggle OFF the following settings.
- Txais ntes chaw
- Use setup script
- Siv ib lub npe server
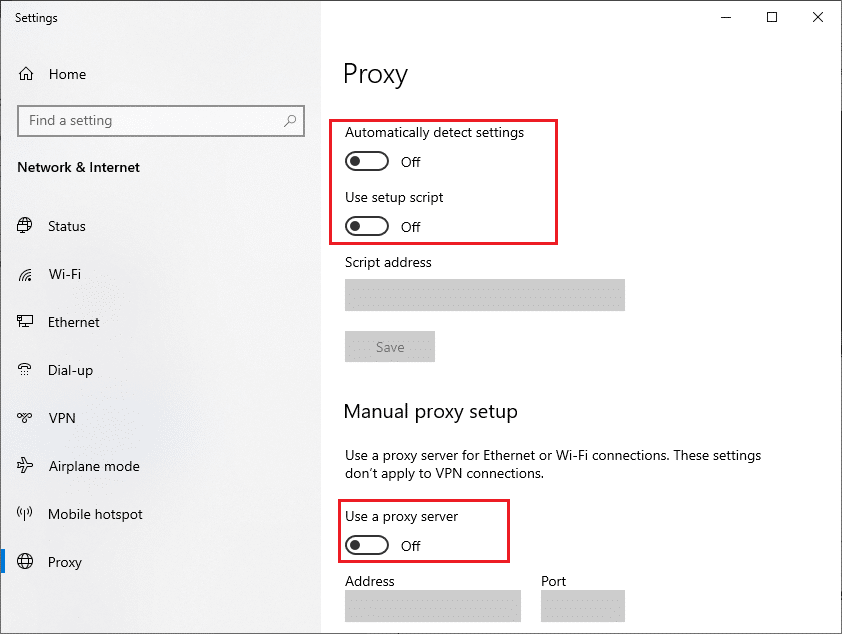
4 . Now, launch Netflix again and try if you can access it without any errors.
Method 6: Remove Netflix Cookies
If the browser version of Netflix has any corrupt cache or cookies, you will face Netflix error UI3010. Follow the below-mentioned instructions to remove Netflix cookies from any browsers you use.
1. Nkag mus rau Netflix tshem cov ncuav qab zib page in your web browser.
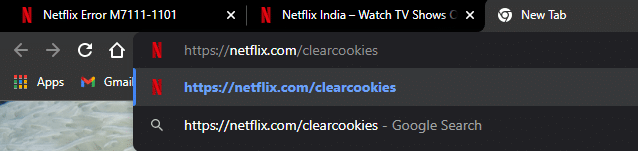
2. All the cookies will be cleared from the site and now you have to kos npe rau Nyob rau hauv again with your login credentials.

3. Finally, check if you have fixed Netflix error UI3010 on your PC.
Kuj nyeem: Yuav ua li cas rau Export Saved Passwords los ntawm Google Chrome
Txoj Kev 7: Clear Browser Cache
To improve your browsing data, browsers store cache memory. So, next time you visit the same website again, you need to wait for a long time for responses. But, when these browser caches are corrupt, you may face so many errors and problems. In that case, clear the browser cache by following the steps as instructed. Since Google Chrome, Microsoft Edge, and Firefox are mostly preferred by users, we have compiled steps for all of them. Follow the steps according to your browser.
Option I: On Google Chrome
1. Ntaus lub Windows qhov tseem ceeb, hom Chrome, thiab nias rau Qhib.
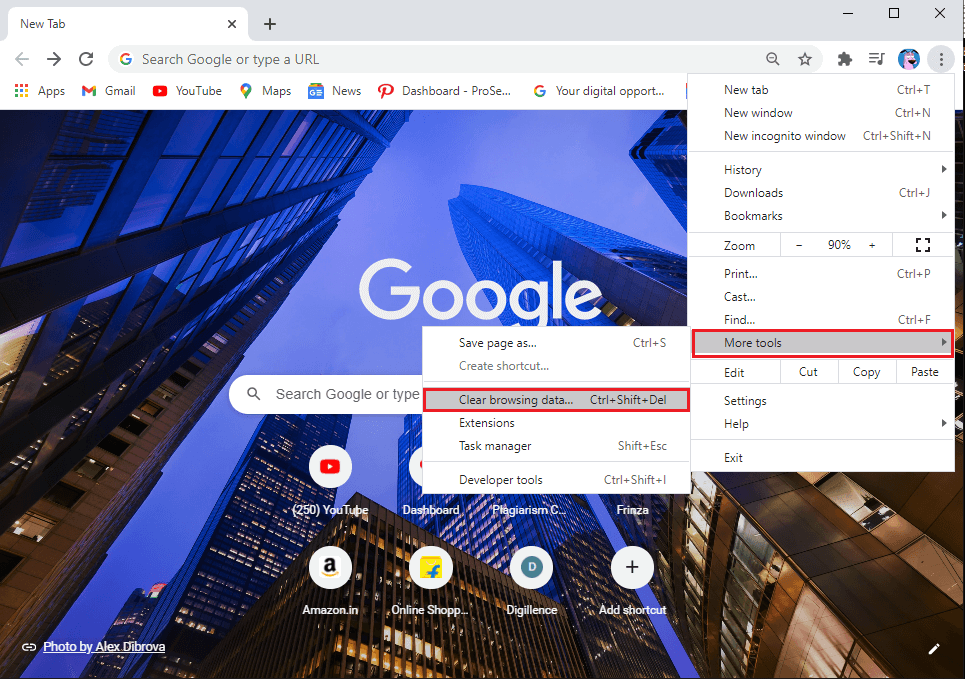
2. Ces, nyem rau ntawm qhov peb-dotted icon > Lwm yam cuab yeej > Tshawb cov ntaub ntawv ntshiab… raws li tau piav qhia hauv qab no.
3. Txheeb xyuas cov kev xaiv hauv qab no.
- Ncuav qab zib thiab lwm cov ntaub ntawv xaib
- Cached cov duab thiab cov ntaub ntawv
4. Tam sim no, xaiv cov Txhua lub sijhawm kev xaiv rau Sij hawm ntau.
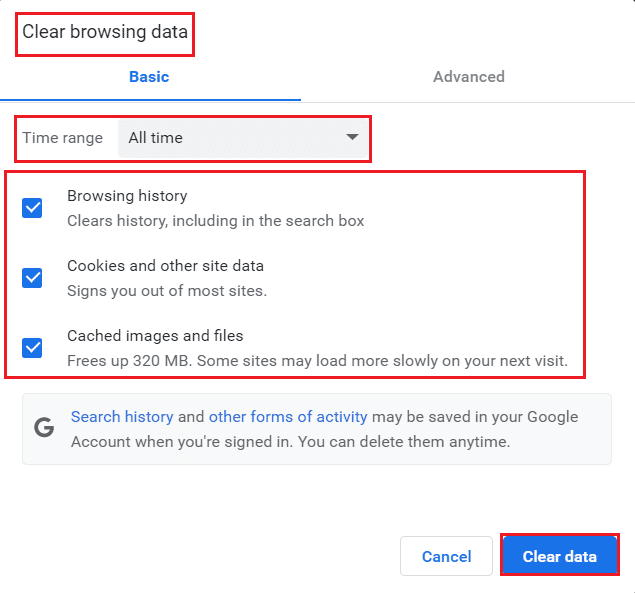
5. Thaum kawg, nyem rau ntawm Cov ntaub ntawv ntshiab.
Option II: On Microsoft Edge
1. Tshaj tawm rau Microsoft ntug browser thiab nyem rau ntawm qhov three-dotted icon.
![]()
Nco ntsoov: You can directly navigate the page to delete browsing history in Edge by typing ntug: // settings / clearBrowserData nyob rau hauv qhov kev tshawb nrhiav bar.

2. Nkag mus rau Kev ceev ntiag tug, tshawb nrhiav, thiab kev pabcuam kev xaiv.
3. Scroll down the right screen and click on Xaiv dab tsi kom meej.
4. In the next window, select the boxes according to your preferences like Browsing history, Cookies and other site data, Cached images and files, etc, and click on Tam sim no du.
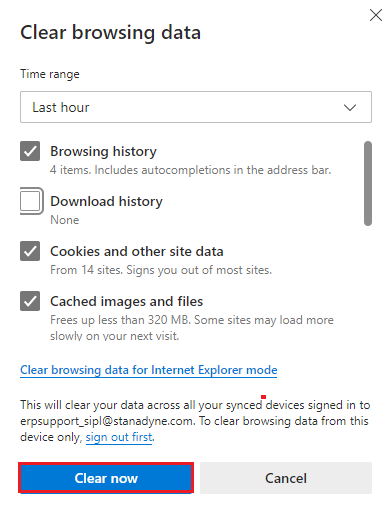
5. Finally, all your browsing data will be cleared now.
Option III: On Mozilla Firefox
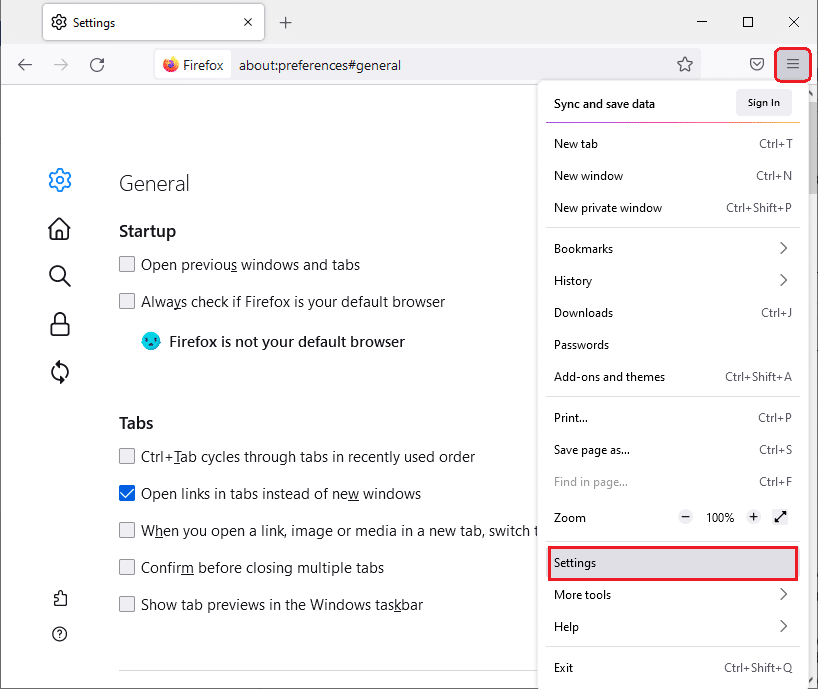
1. qhib lub Mozilla Firefox browser.
2. Nyem ntawm qhov Ntawv qhia zaub mov icon nyob rau sab xis saum toj kawg nkaus ntawm qhov screen.
![]()
3. Xaiv chaw kev xaiv los ntawm drop-down.
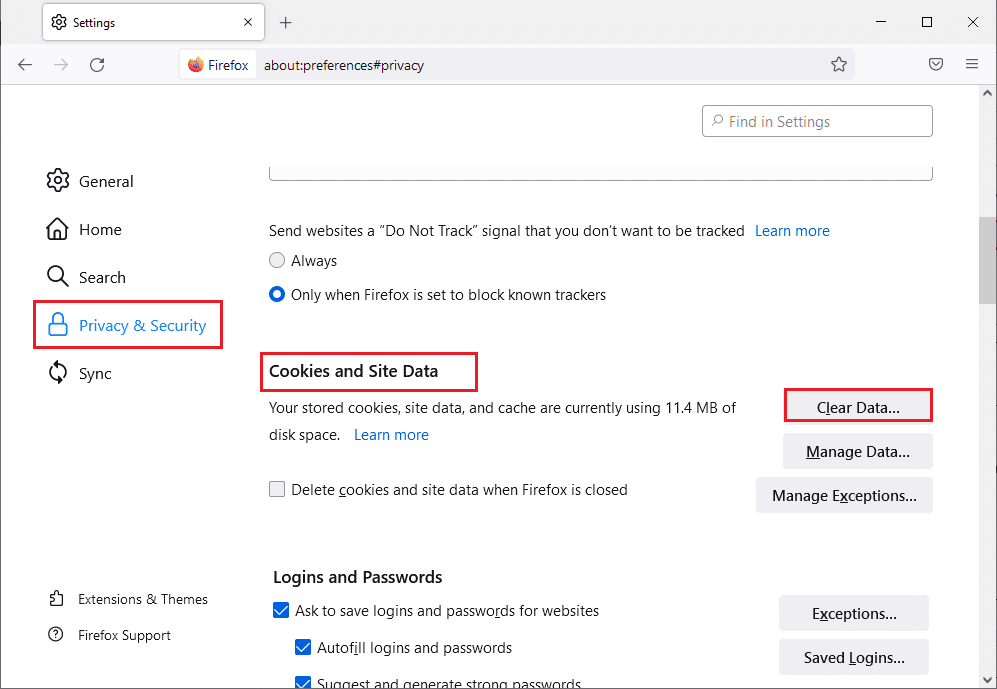
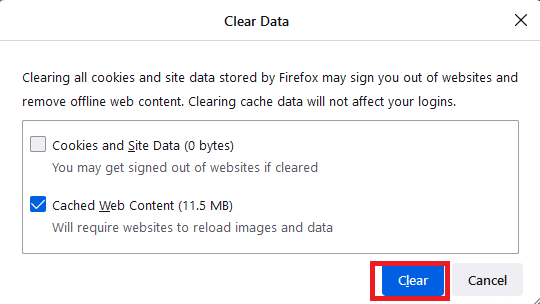
4. Nkag mus rau Tsis pub twg paub & Kev ruaj ntseg ntu thiab nyem rau ntawm Clear ntaub ntawv nyob rau hauv lub Ncuav Qab Zib thiab Cov Ntaub Ntawv Hauv Tsev Kawm Ntawv ntawv qhia zaub mov.
5 . Uncheck the Ncuav Qab Zib thiab Cov Ntaub Ntawv Hauv Tsev Kawm Ntawv box and check Cached Web Cov Ntsiab Lus lub thawv.
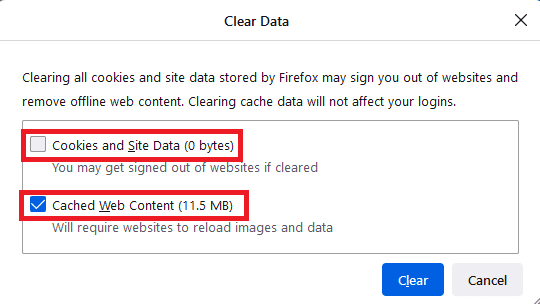
6. Thaum kawg, nyem rau ntawm qhov Clear button to clear the Firefox cached cookies.
Method 8: Disable Browser Extensions (If Applicable)
Browser extensions help you enjoy a lot of additional features on your computer with the help of associated add-ons. Yet, when these extensions are outdated or incompatible with the browser application you use, you may face a lot of errors like Netflix error F7121 1331 P7 or UI3010. To resolve this, follow the below-mentioned steps to disable extensions in your respective browsers.
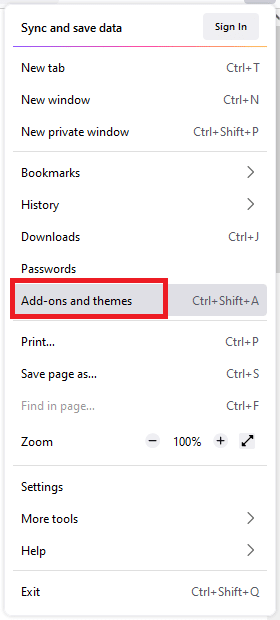
Option I: Disable Chrome Extensions
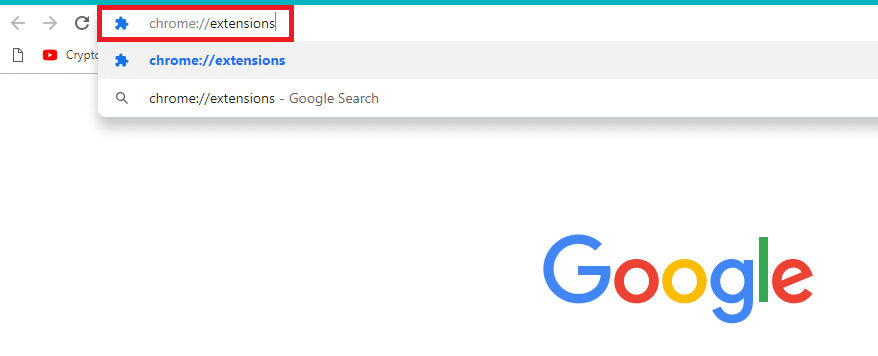
1. Tua tawm Chrome thiab hom chrome: // extensions in URL BarCov. Ntaus Sau tus yuam sij kom tau txais cov npe ntawm txhua qhov txuas txuas ntxiv.
2. Hloov pauv Off lub toggle rau lub extension (xws li Qauv sau ntawv rau Chrome) los lov tes taw nws.
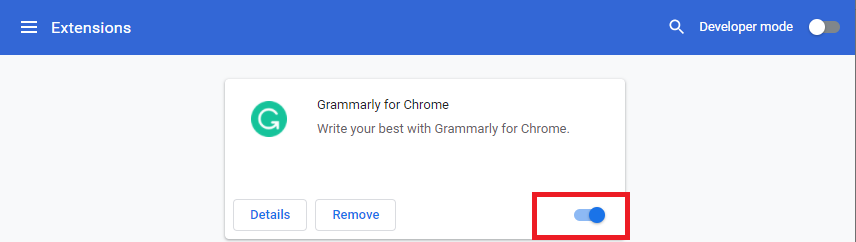
3. Refresh koj tus browser thiab saib seb qhov yuam kev tau tshwm sim dua lossis tsis.
4. Rov ua qhov saum toj no cov kauj ruam los lov tes taw extensions ib tug los ntawm ib tug los xyuas seb qhov yuam kev yog kho los tsis.
Option II: Disable Edge Extensions
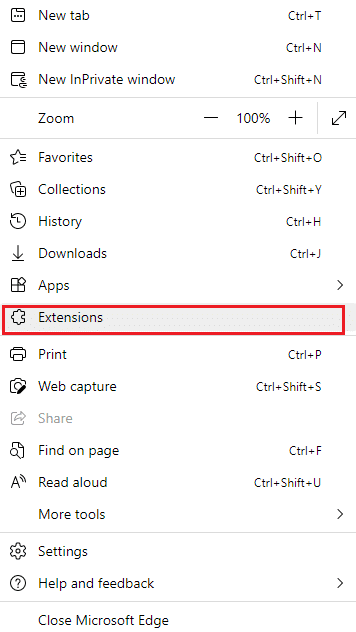
1. Tua tawm Ntug browser thiab nyem rau ntawm peb-dotted icon.
![]()
Nco ntsoov: To skip the long steps to reach the extensions page, type ntug: // txuas ntxiv/ nyob rau hauv lub search bar thiab ntaus Sau.
2. Nias rau extensions.
3. Select any extension and click on Tswj cov extensions.
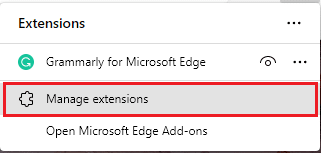
4. Toggle tawm the extension and check if you face the error again.
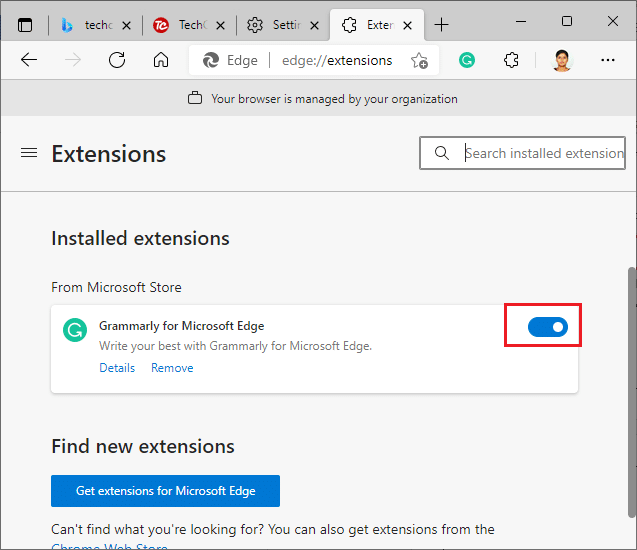
5. Likewise, lov tes taw all the extensions one by one and simultaneously check if the error recurs. If you find the error does not pop up after removing any particular extension, then uninstall it completely from your browser.
6. Select the respective extension and click on the peb-dotted icon. Xaiv qhov Remove from Microsoft Edge kev xaiv.
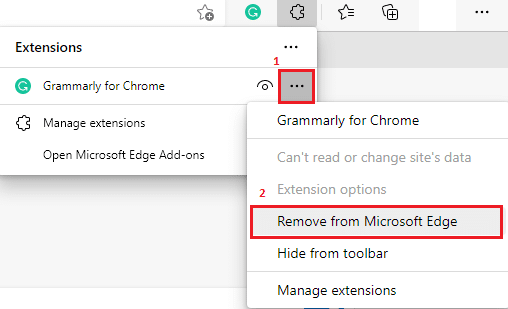
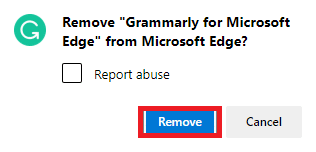
7. Paub meej tias qhov kev ceeb toom los ntawm nias rau tshem tawm.
Kuj nyeem: Fix Error STATUS BREAKPOINT in Microsoft Edge
Option III: Disable Firefox Extensions
1. Tua tawm Firefox thiab nyem rau ntawm Ntawv qhia zaub mov icon

2. Xaiv qhov Ntxiv-ons thiab cov ntsiab lus kev xaiv.
3. Nias rau extensions thiab toggle tawm the extensions.
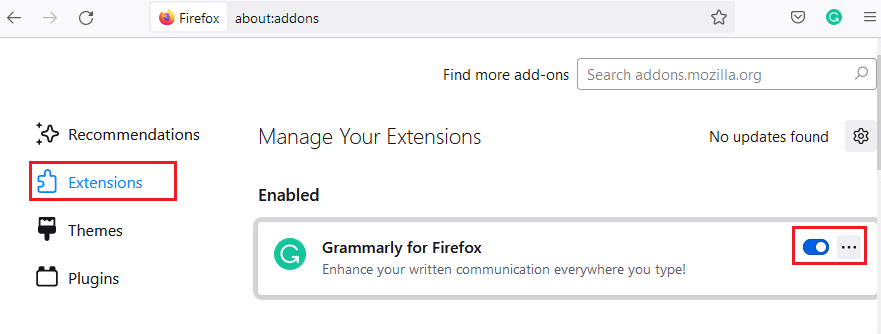
4. Disable all the extensions one by one and check which is causing the issue by checking it repeatedly.
5. Finally, if you have identified which extension is causing you the trouble, click on the peb-dotted icon corresponding to it and select the tshem tawm kev xaiv.
![]()
Method 9: Turn Off Do Not Track in Browsers
Browsers and sites track your activity and browsing data to advertise similar contents on the web page you visit on the internet. This happens when you have enabled Txhob Taug Qab settings in your browser. Few users have reported that disabling this setting has helped them to resolve Netflix error code NSES-404 or UI3010.
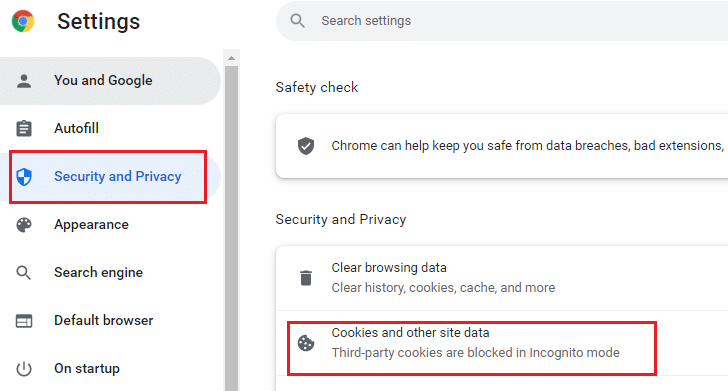
Option I: On Google Chrome
1. Qhib Chrome thiab nyem rau ntawm peb-dotted icon.
![]()
2. Nias rau chaw.
3. Nias rau Kev ruaj ntseg thiab Privacy.
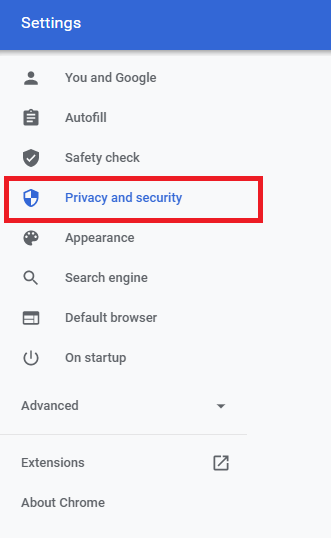
4. Xaiv qhov Ncuav qab zib thiab lwm cov ntaub ntawv xaib.
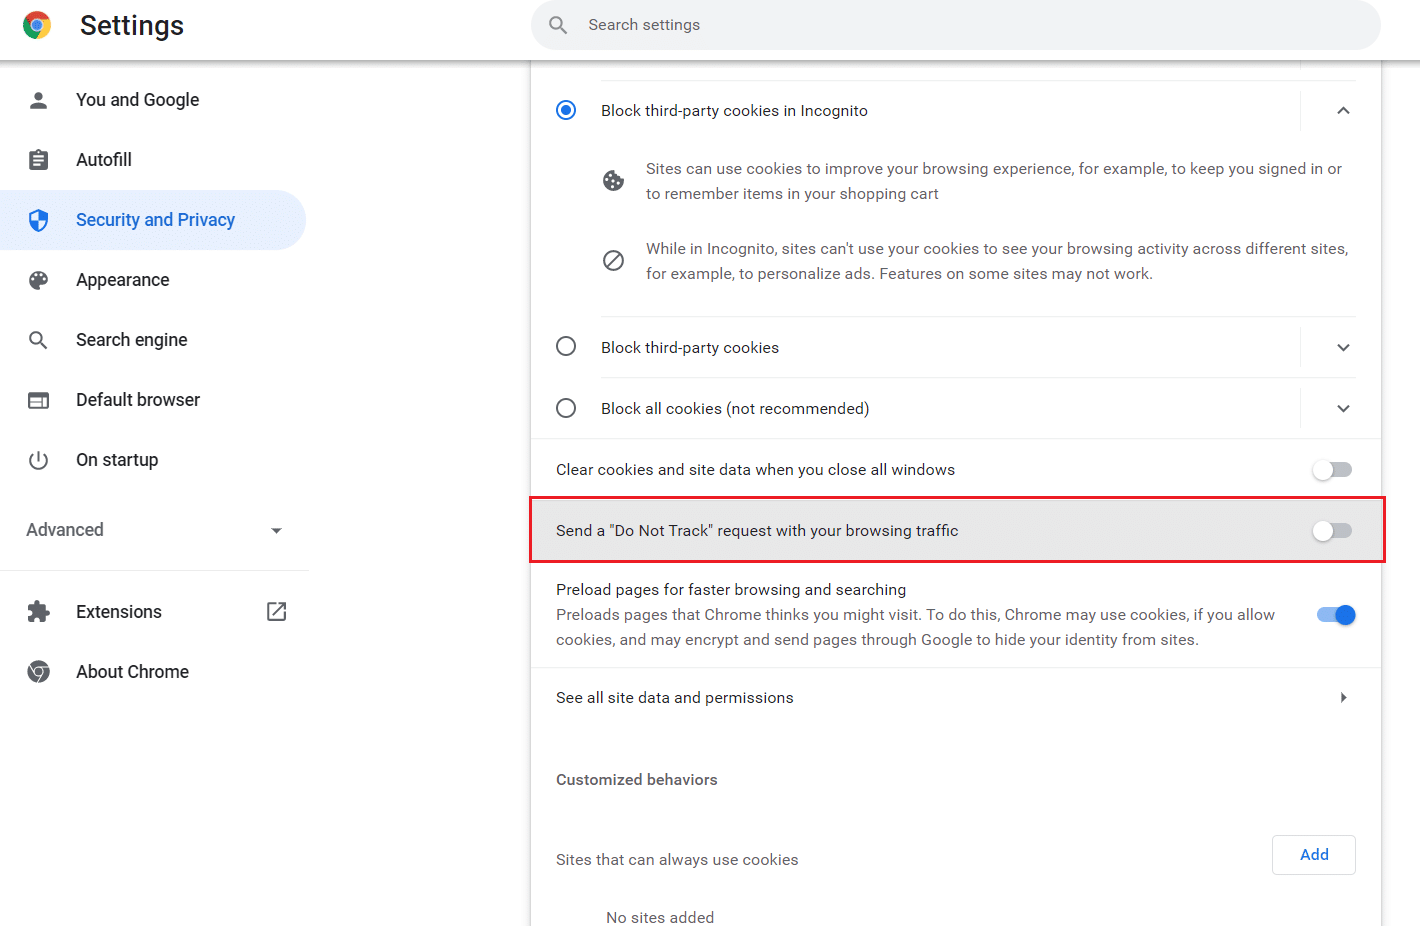
5. Hauv Kev teeb tsa dav dav window, toggle off the setting Clear cookies and site data when you close all windows.
Option II: On Microsoft Edge
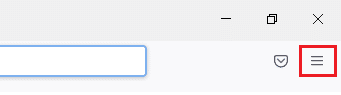
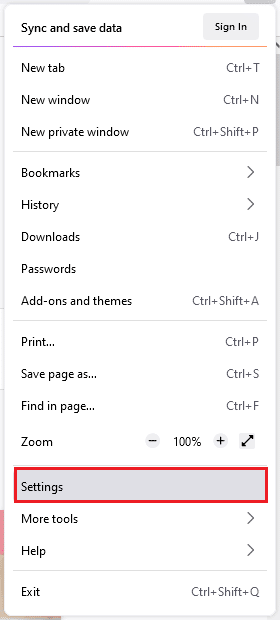
1. Nkag mus rau chaw in Edge by clicking on the peb-dotted icon.
![]()
2. Nkag mus rau Kev ceev ntiag tug, tshawb nrhiav, thiab kev pabcuam.

3. Scroll down the right screen and in the Tsis pub twg paub menu, toggle off Send “Do Not Track” requests.

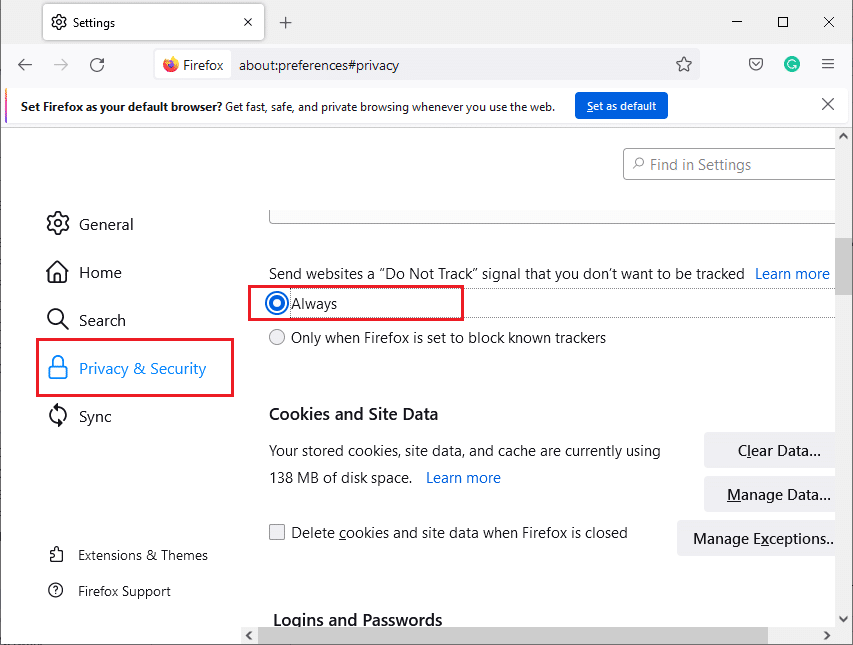
Option III: On Mozilla Firefox
1. Tua tawm Firefox thiab nyem rau ntawm Ntawv qhia zaub mov raws li qhia.
2. In the drop-down menu, select the chaw kev xaiv.
3. Nyem ntawm qhov Tsis pub twg paub & Kev ruaj ntseg tab, and scroll down to click on the Yuav xov tooj cua khawm.
Kuj nyeem: Fix Firefox is Not Responding
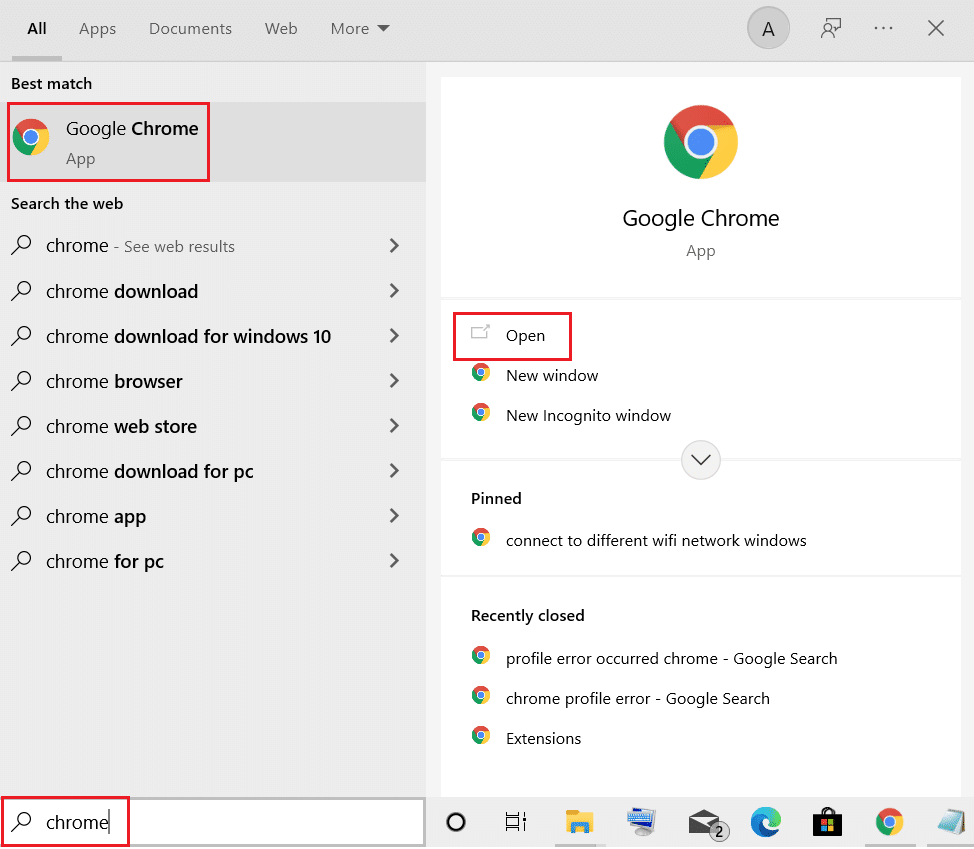
Method 10: Reinstall Browser
If you have not attained any fix for Netflix error code UI3010 after removing the browser cache and incompatible extensions, then try reinstalling the browser as the final try. The steps to reinstall any browser is common and thus for illustration, we have used Google Chrome as an example. Follow the steps according to your browser.
Nco ntsoov: Ntawm no Google Chrome raug coj los ua piv txwv.
1. Ntaus lub Windows qhov tseem ceeb, hom apps thiab nta, thiab nias rau Qhib.
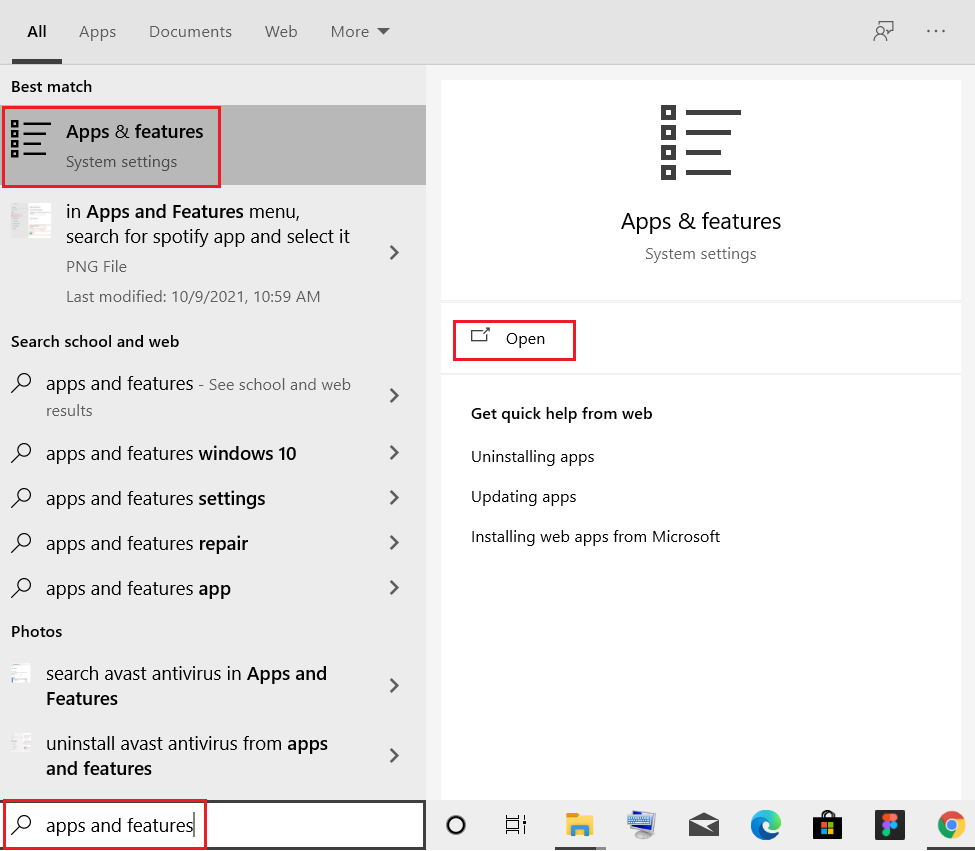
2. Nrhiav rau Chrome in Nrhiav daim ntawv no teb.
3. Tom qab ntawd, xaiv Chrome thiab nyem rau ntawm uninstall khawm qhia highlighted.
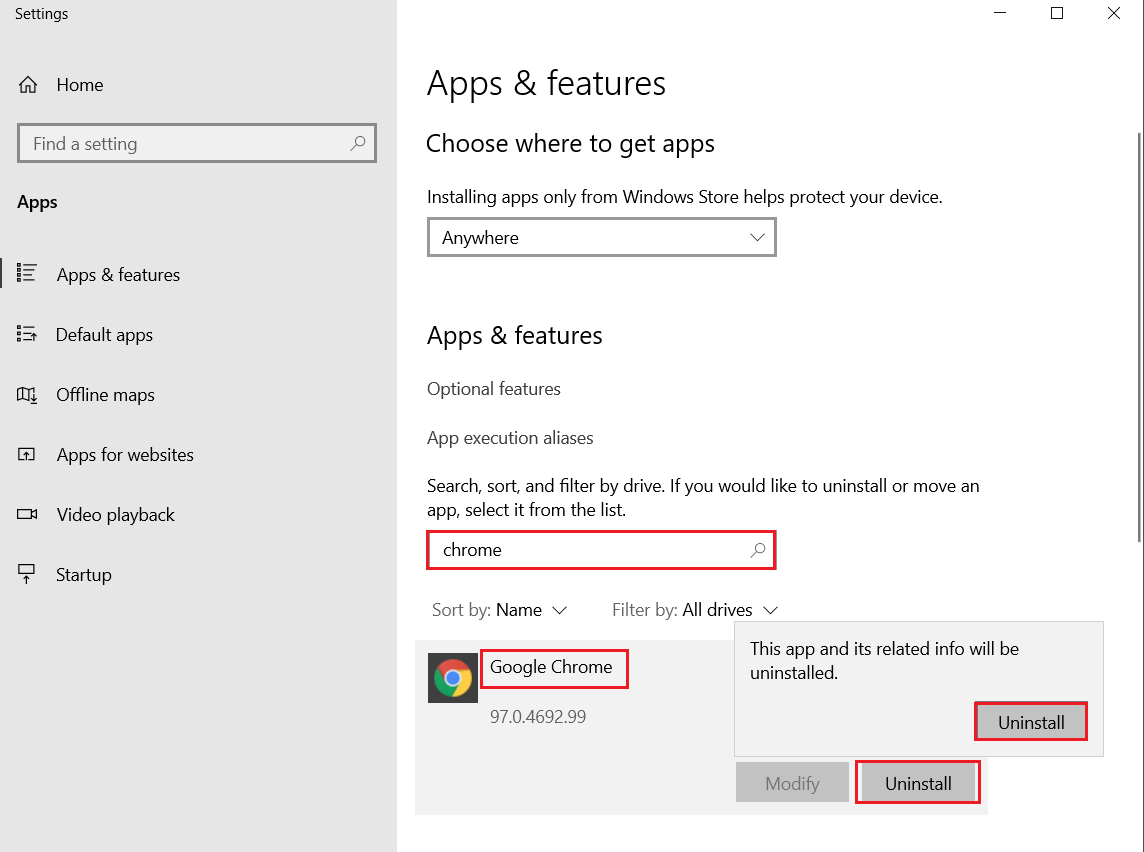
4. Ib zaug ntxiv, nyem rau ntawm uninstall kom paub meej.
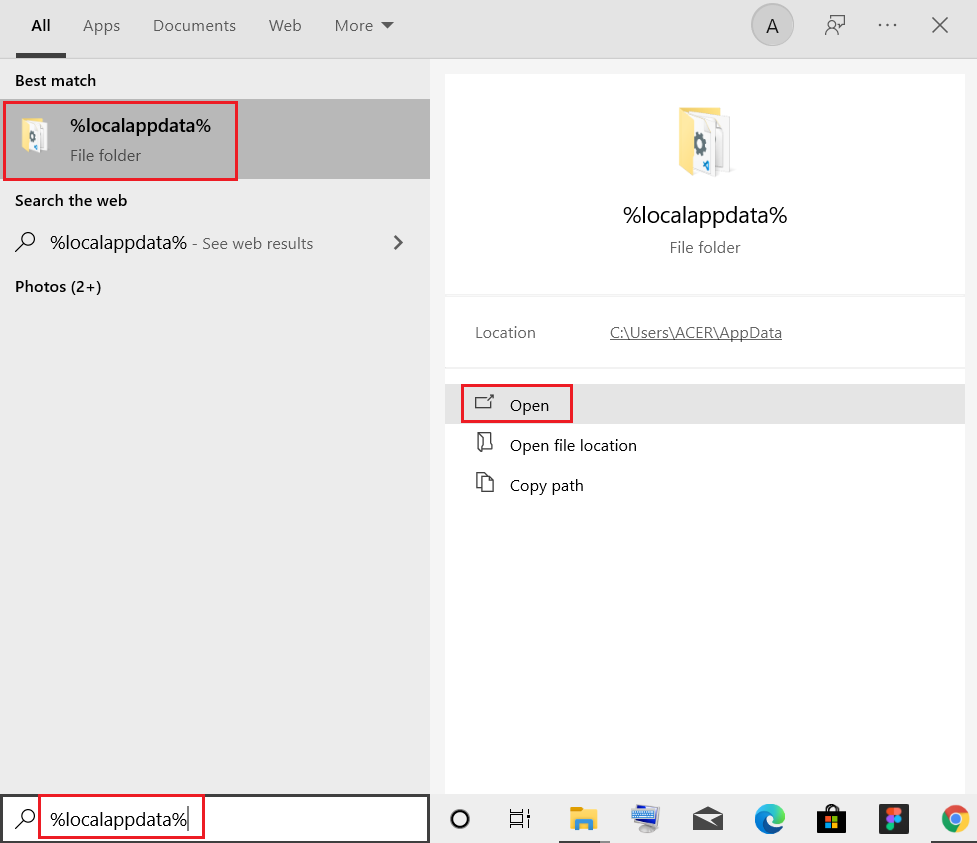
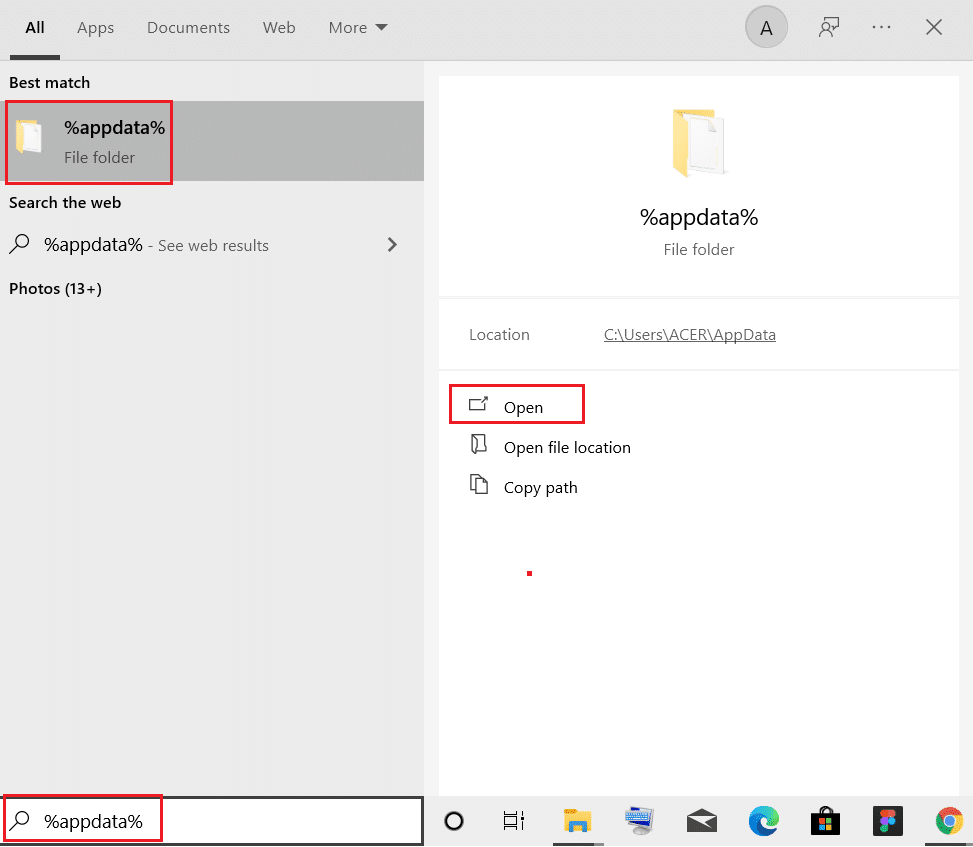
5. Tam sim no, nias lub Windows qhov tseem ceeb, hom % localappdata%, thiab nias rau Qhib mus rau AppData Local nplaub tshev.
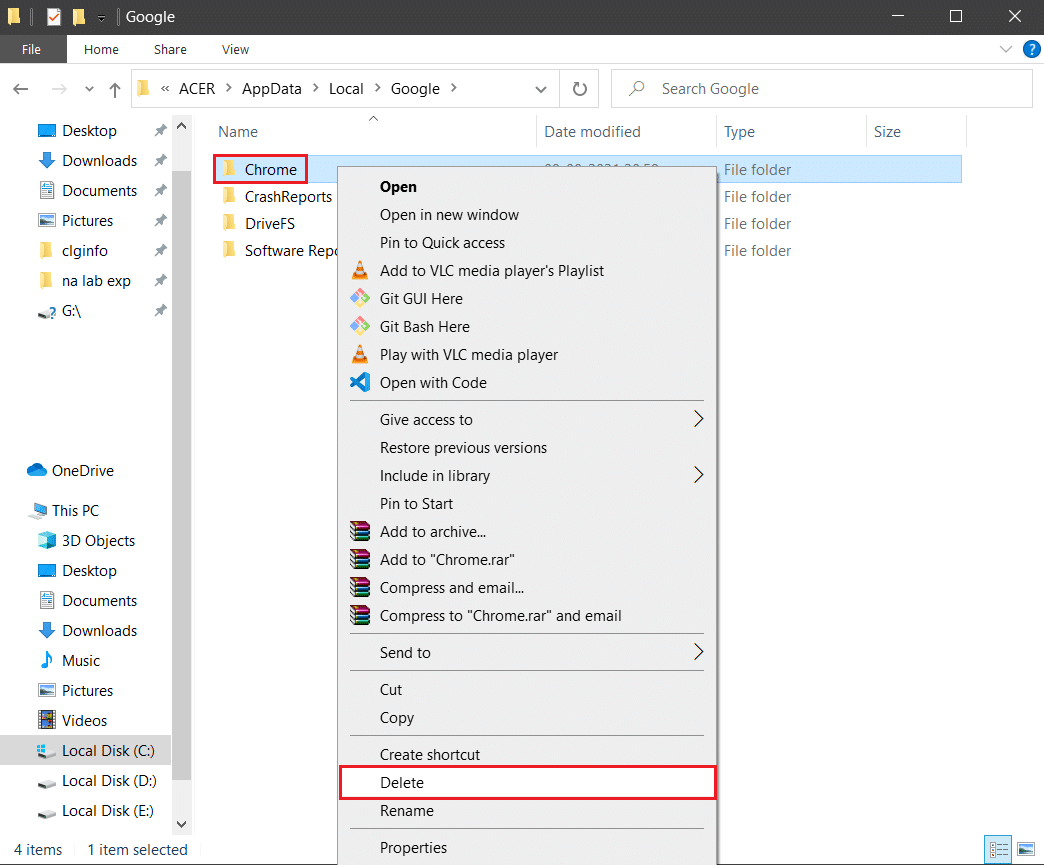
6. qhib lub Google folder los ntawm ob-nias ntawm nws.
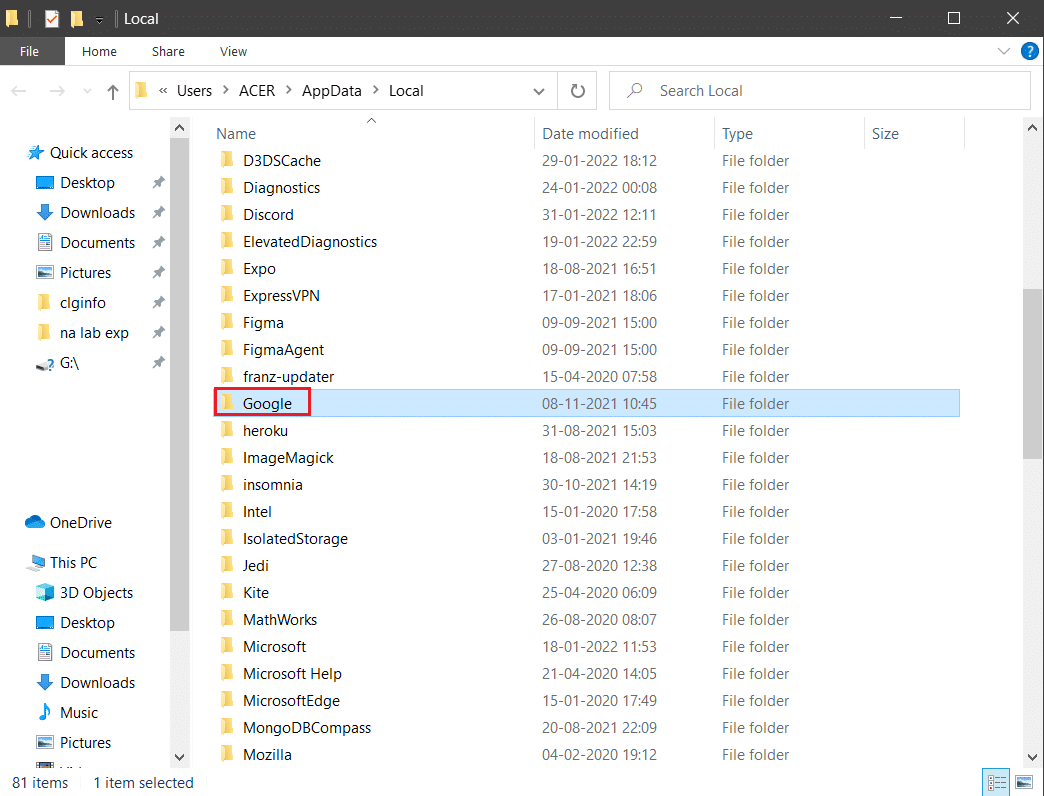
7. Txoj cai-nias rau ntawm Chrome folder thiab xaiv cov Rho tawm kev xaiv raws li tau piav qhia hauv qab no.
8. Ib zaug ntxiv, ntaus lub Windows qhov tseem ceeb, hom % appdata, thiab nias rau Qhib mus rau AppData Roaming nplaub tshev.
9. Ib zaug ntxiv, mus rau qhov Google nplaub tshev thiab rho tawm lub Chrome folder raws li qhia hauv qib 6-7.
10. Thaum kawg, pib dua koj lub PC.
11. Tom ntej no, rub lub tseeb version of Google Chrome raws li qhia.
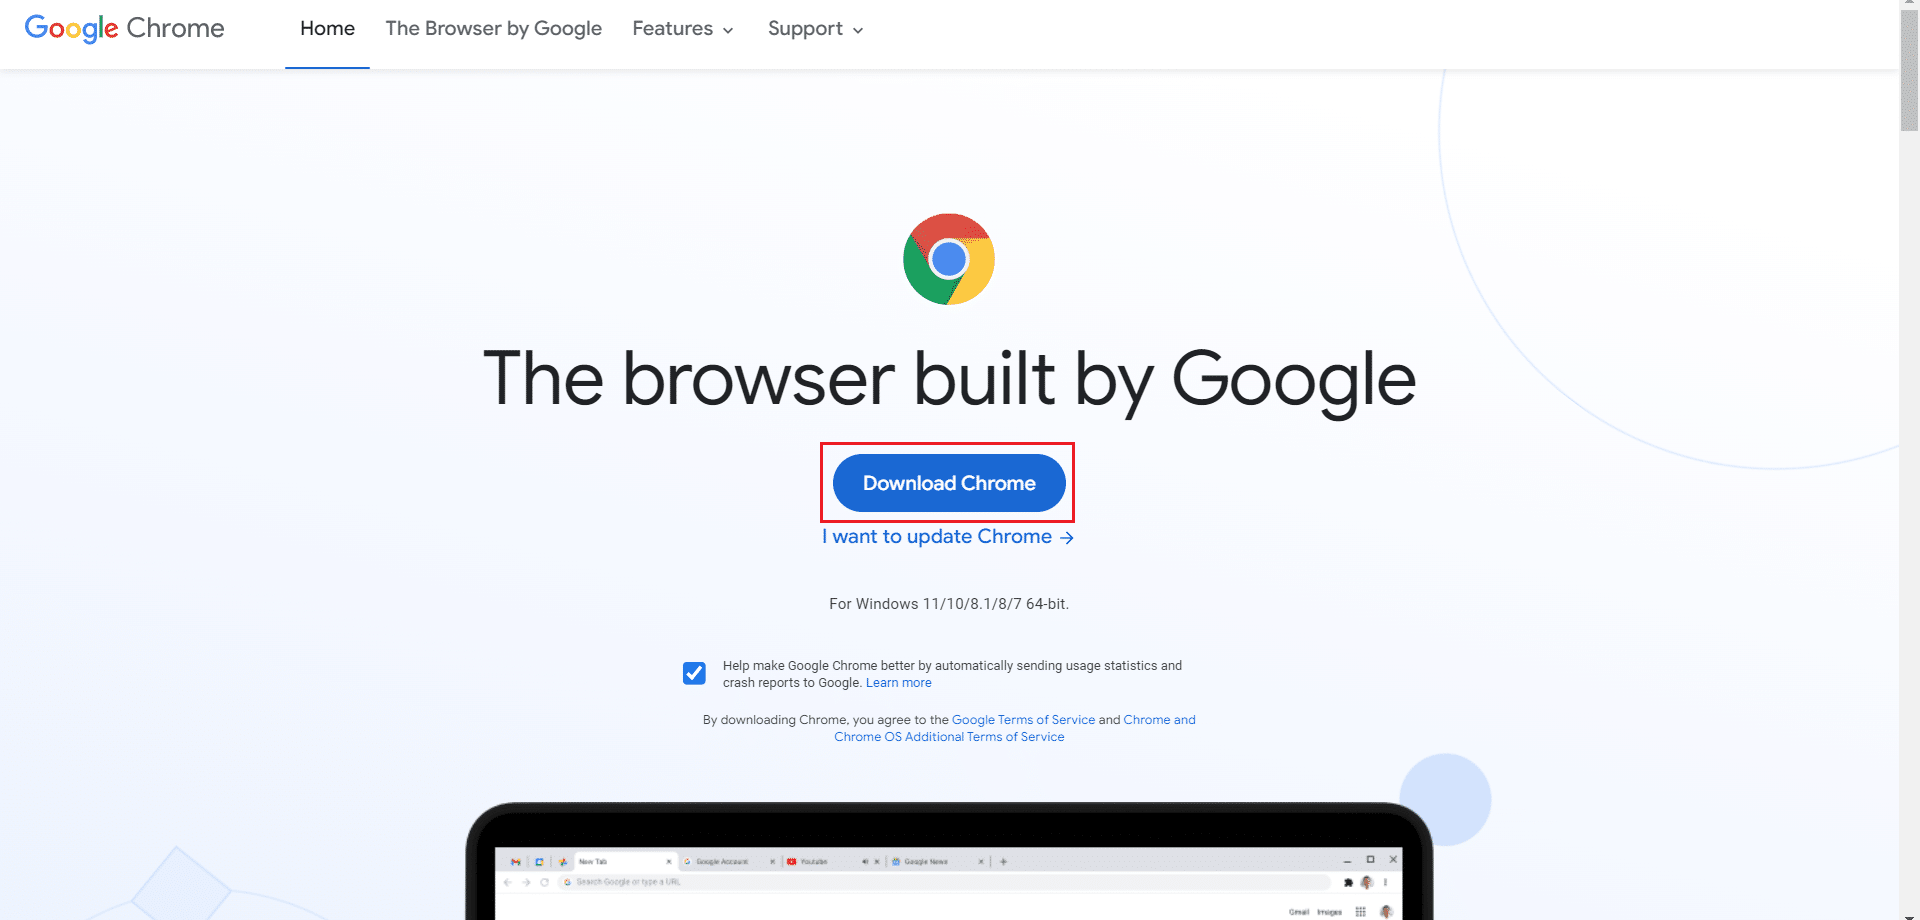
12. Khiav lub teeb ntaub ntawv thiab ua raws li cov lus qhia on-screen rau nruab Chrome.
Kuj nyeem: Yuav Ua Li Cas kwj Netflix hauv HD lossis Ultra HD
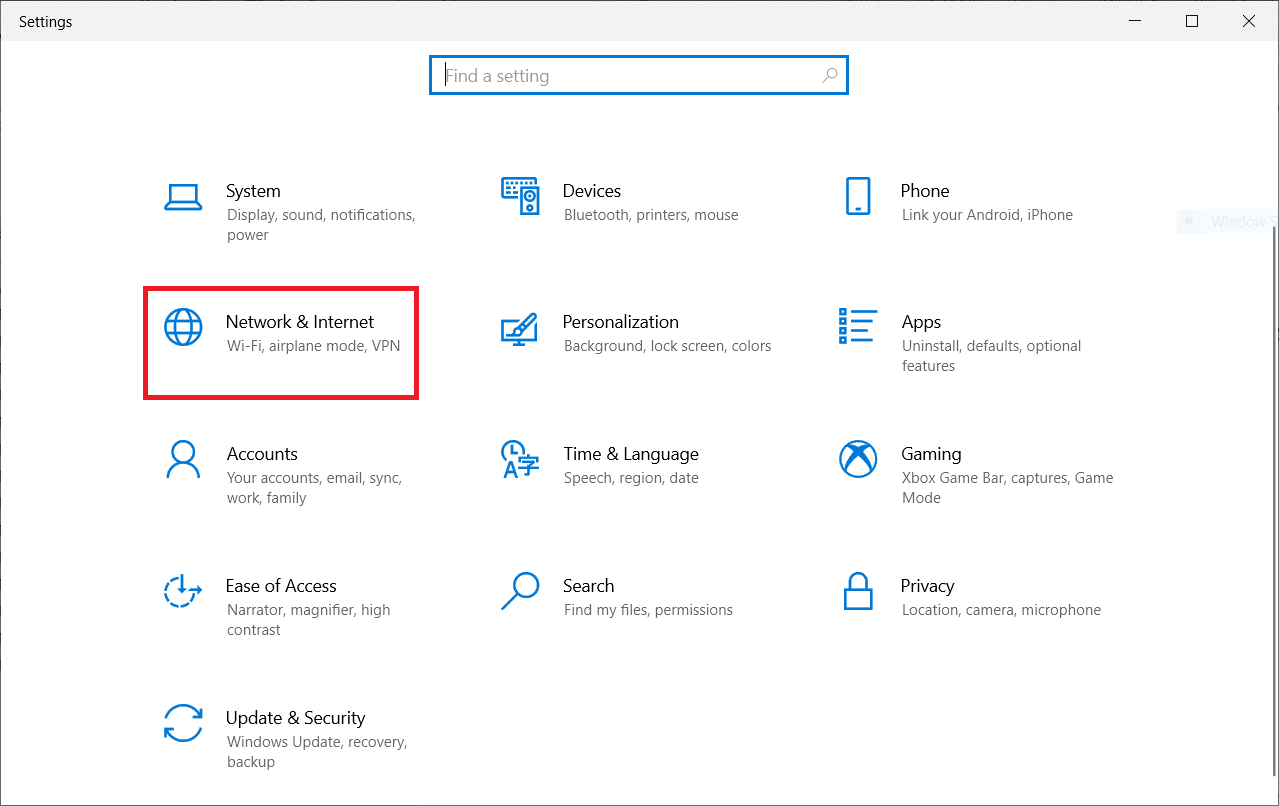
Method 11: Reset Network
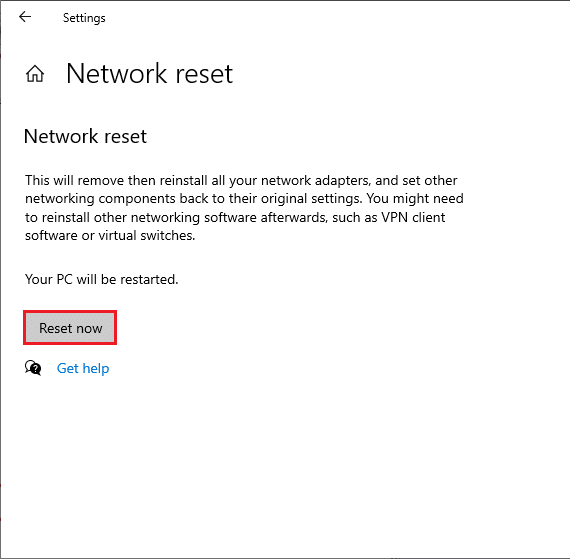
The network reset method should be considered as the last option to resolve Netflix error code UI3010. Any custom DNS changes in the network will trigger connectivity issues in browsers. This removes all the network adapters installed in your PC along with their settings. All the stored settings are stored to default settings.
Nco ntsoov: To perform a Network reset, make sure your PC runs in Windows 10 version 1607 or later. To check your version, follow this path. Nqis> Qhov System> Txog. Once you have reset your network, you have to reinstall all networking software like VPN clients or Virtual switches.
1. Nias thiab tuav Windows + I keys ua ke qhib Qhov Chaw Xaiv Lub Chaw.
2. Nias rau Network & Is Taws Nem.
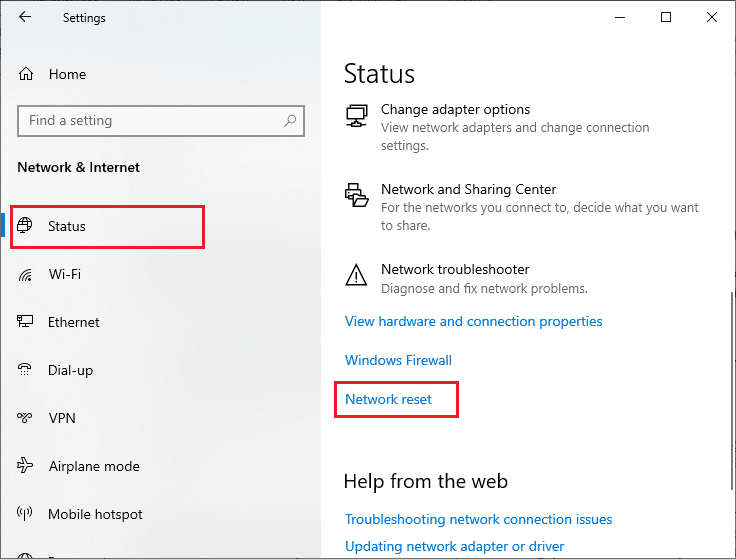
3. Nyem ntawm qhov raws li txoj cai tab thiab nias rau Network pib dua.
4. Paub meej tias qhov kev ceeb toom los ntawm nias rau Pib dua tam sim no.
Still, if you face the error again, perform a system restore of your Windows 10 PC and if you assume any abnormal connectivity issues, contact your Internet Service Provider (ISP) immediately.
pom zoo:
Peb cia siab tias phau ntawv qhia no yuav pab tau thiab koj tuaj yeem kho Netflix error UI3010. Let us know which method worked for you the best. Feel free to reach out to us with your queries and suggestions via the comments section below.
 on Windows 10")
