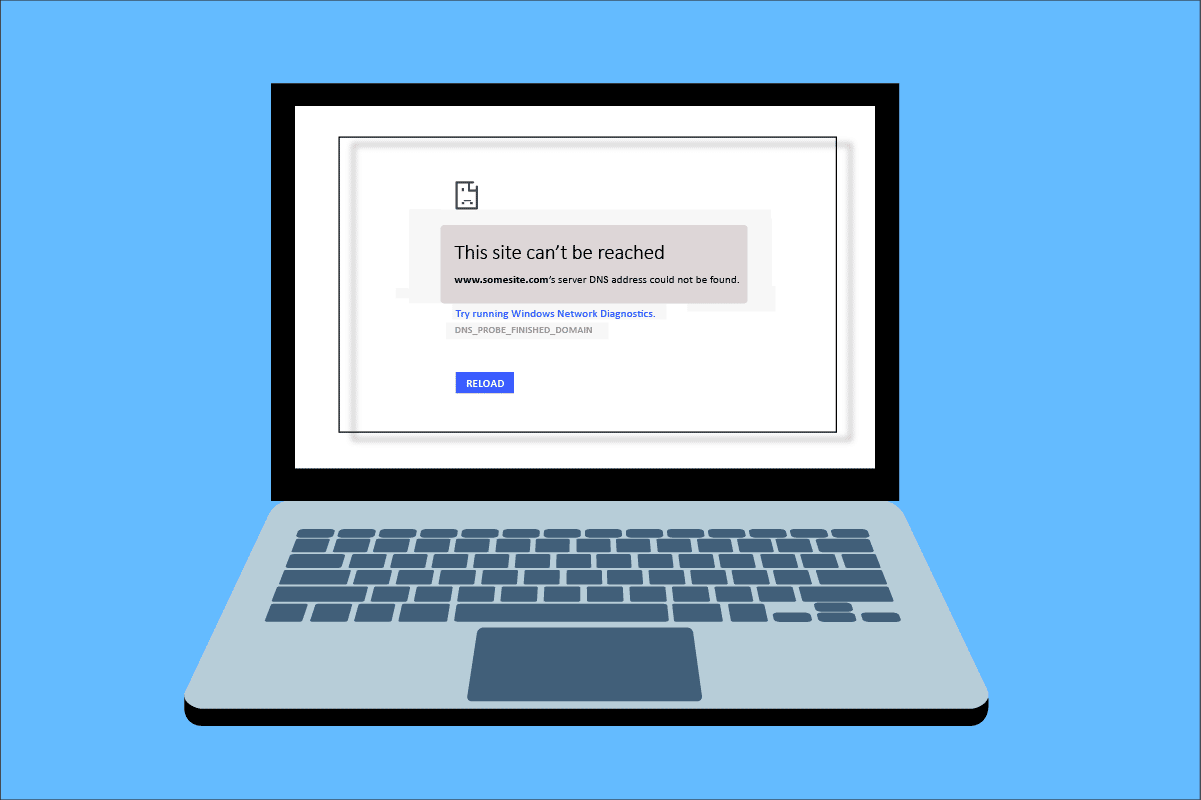
While surfing internet in your browser, you may face Server IP address could not be found error. This is a common issue for the Google Chrome users. We bring to you a helpful guide that will fix server IP address could not be found error on Windows 10. So, continue reading!
How to Fix Server IP Address Could Not be Found on Windows 10
One of the most popular web browser is Google Chrome. However if you are facing the error while browsing in the Chrome browser, then do not worry! This issue may be caused due to various reasons like;
- Nestabilna internetska veza
- Corrupt Browser Cache and Cookies
- Incorrect IP Address
- Corrupt DNS Cache
- Zastarjeli mrežni upravljački programi
Here, we have listed all possible methods to fix the said issue on Windows 10.
Method 1: Troubleshoot Network Adapter
The said issue may occur due to your network error. You can run the network adapter troubleshooter to fix any errors with your network adapter. Read our guide to troubleshoot network connectivity on Windows 10.

Metoda 2: Očistite predmemoriju preglednika
The cache files in your web browser may get corrupt. You can try to clear the cache and cookies of your browser and try to check if the error still persists or not. Follow these steps to clear browser cache.
1. Pokrenite krom browser from Windows search bar as shown.

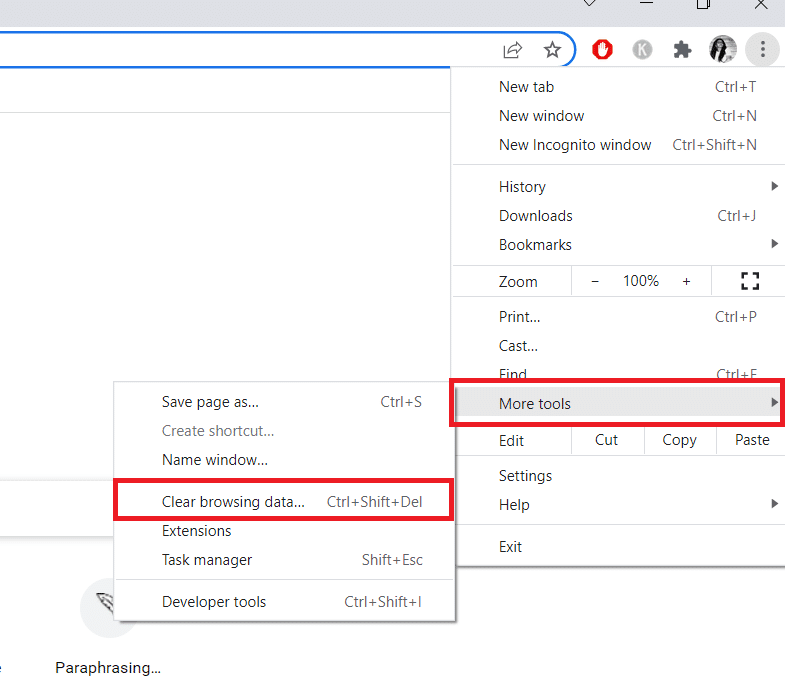
2. Sada kliknite na ikona s tri točke u gornjem desnom kutu.
3. Ovdje kliknite na Više alata opcija.
4. Zatim kliknite na Jasno pregledavanje podaci… opcija.
Bilješka: Možete tipkati chrome: // settings / clearBrowserData in the search bar to launch the browser history page directly.
5. Ovdje odaberite Vremenski raspon in the next window. Check the boxes marked:
- Kolačići i ostali podaci o web-lokaciji i
- Spremljene slike i datoteke.
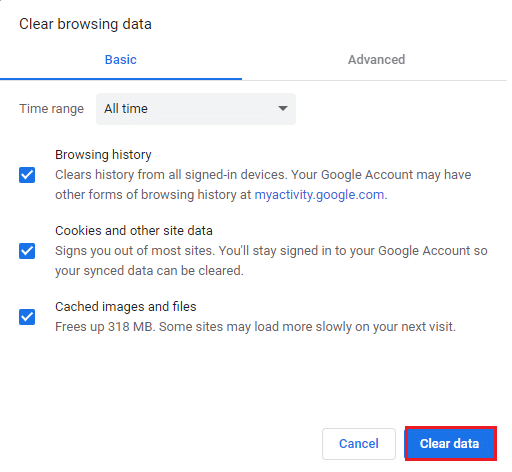
6. Na kraju kliknite na Vedro datum.
Također pročitajte: Fix This Plugin is Not Supported error in Chrome
Method 3: Clear DNS Cache
You can try to clear the DNS cache to fix server IP address could not be found error. Follow our guide to flush and reset the DNS cache in Windows 10.
Method 4: Release and Renew IP Address
Here are the steps to release and renew the IP address.
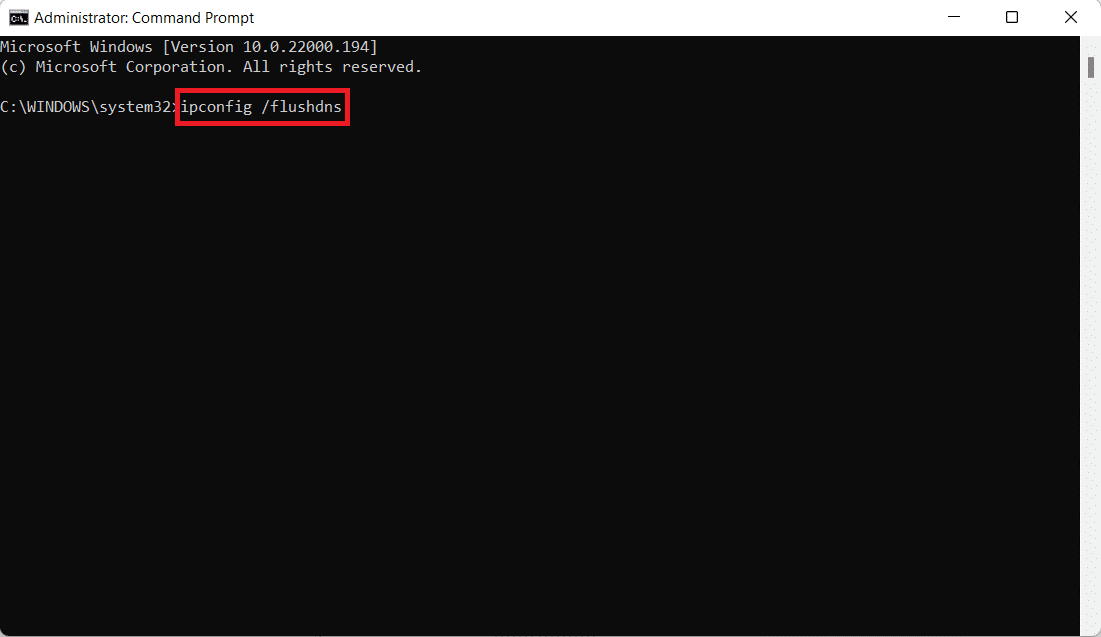
1. Pritisnite Windows tipkatipa Command Prompt, i kliknite na Pokreni kao administrator.

2. Firstly you should flush the DNS cache as shown in Metoda 2.
3. Once the above process is complete, type ipconfig / release i pritisnite ući ključ.

4. Zatim upišite ipconfig / renew i pogodio ući to renew your IP.

Također pročitajte: Fix No WiFi Networks Found in Windows 10
Method 5: Change DNS Address
Incorrect DNS address also cause this said Chrome error. You can change your DNS address to fix the error. Follow the given steps to change DNS address.
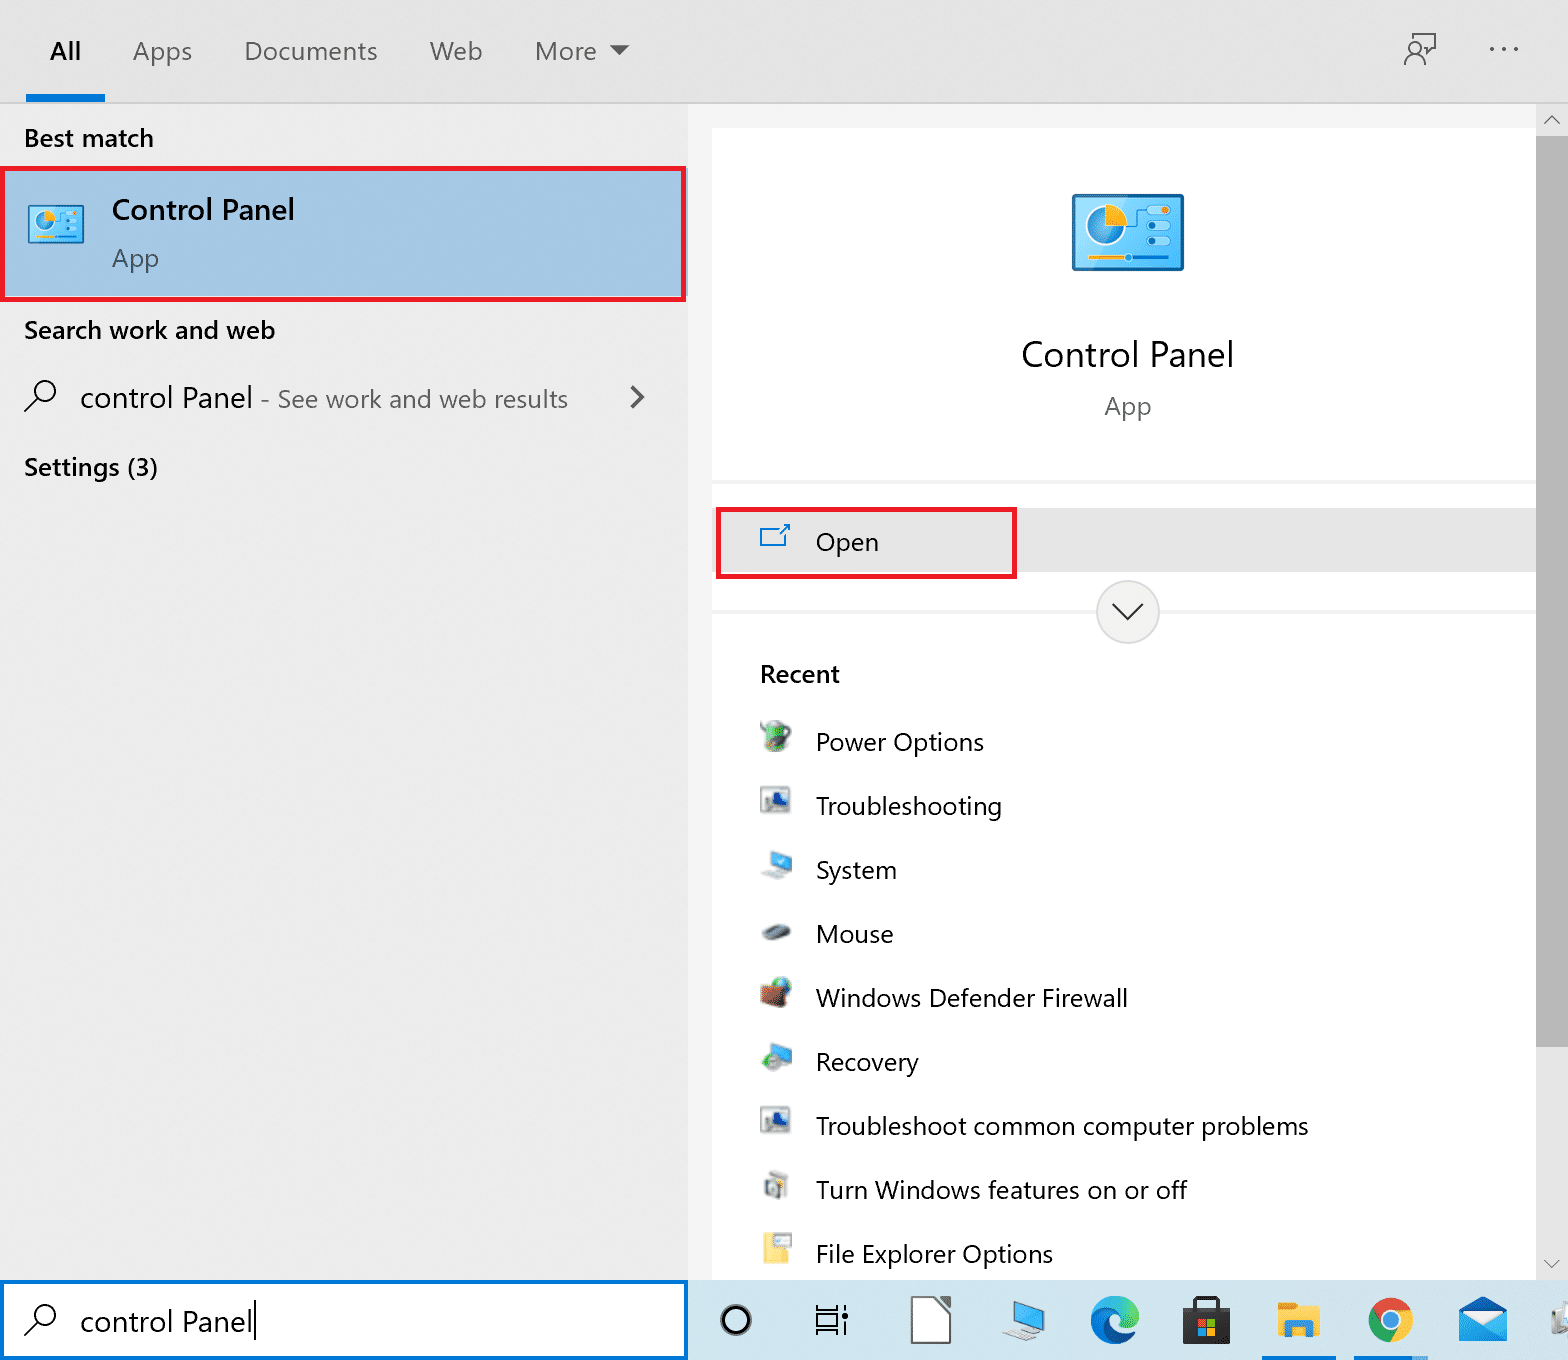
1. pritisni Windows tipkatipa Control Panel i kliknite na Otvoren.
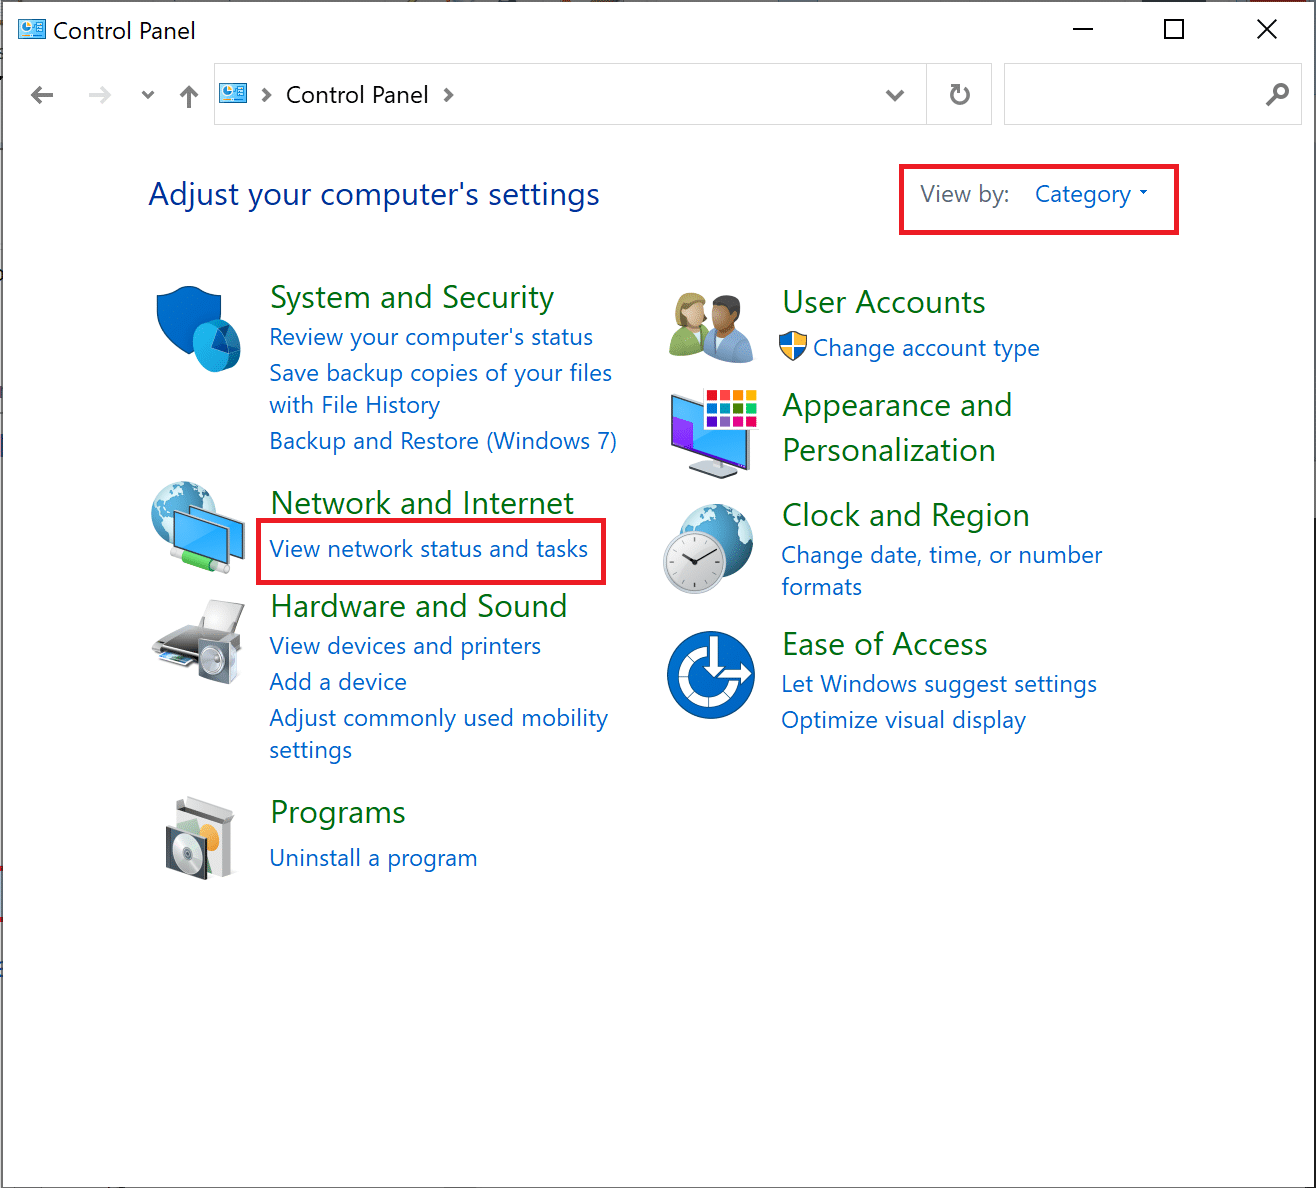
2. Set Prikaz po > Kategorija i kliknite na Pogledajte status i zadatke mreže.
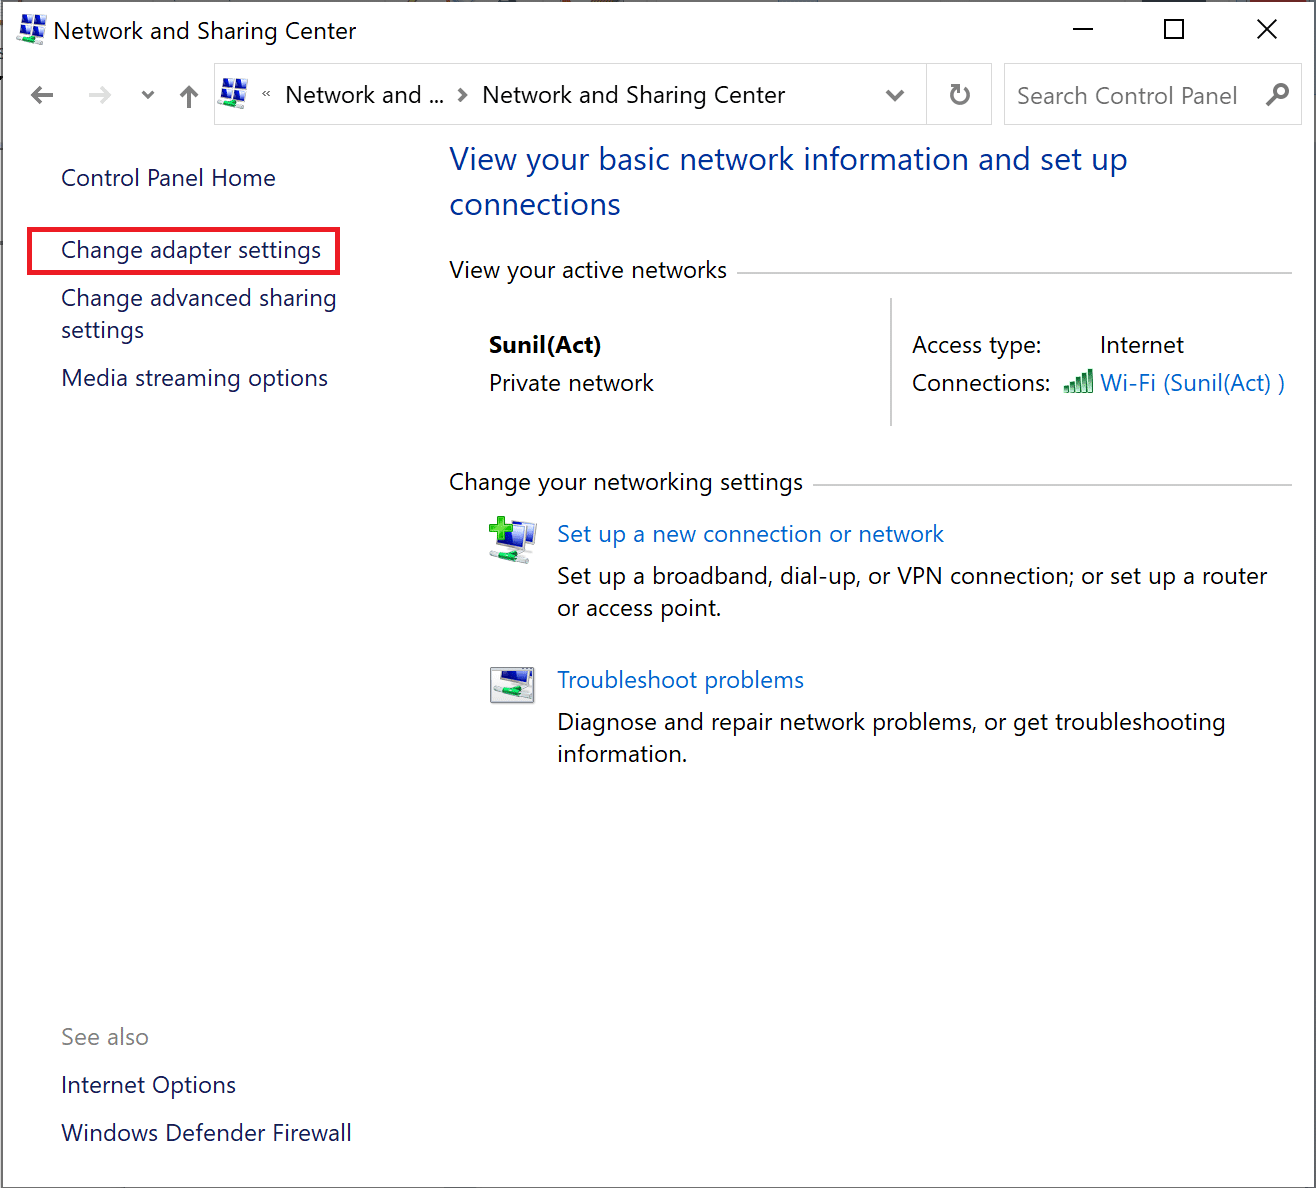
3. Sada kliknite na Promjena postavki adapter option at the left sidebar.
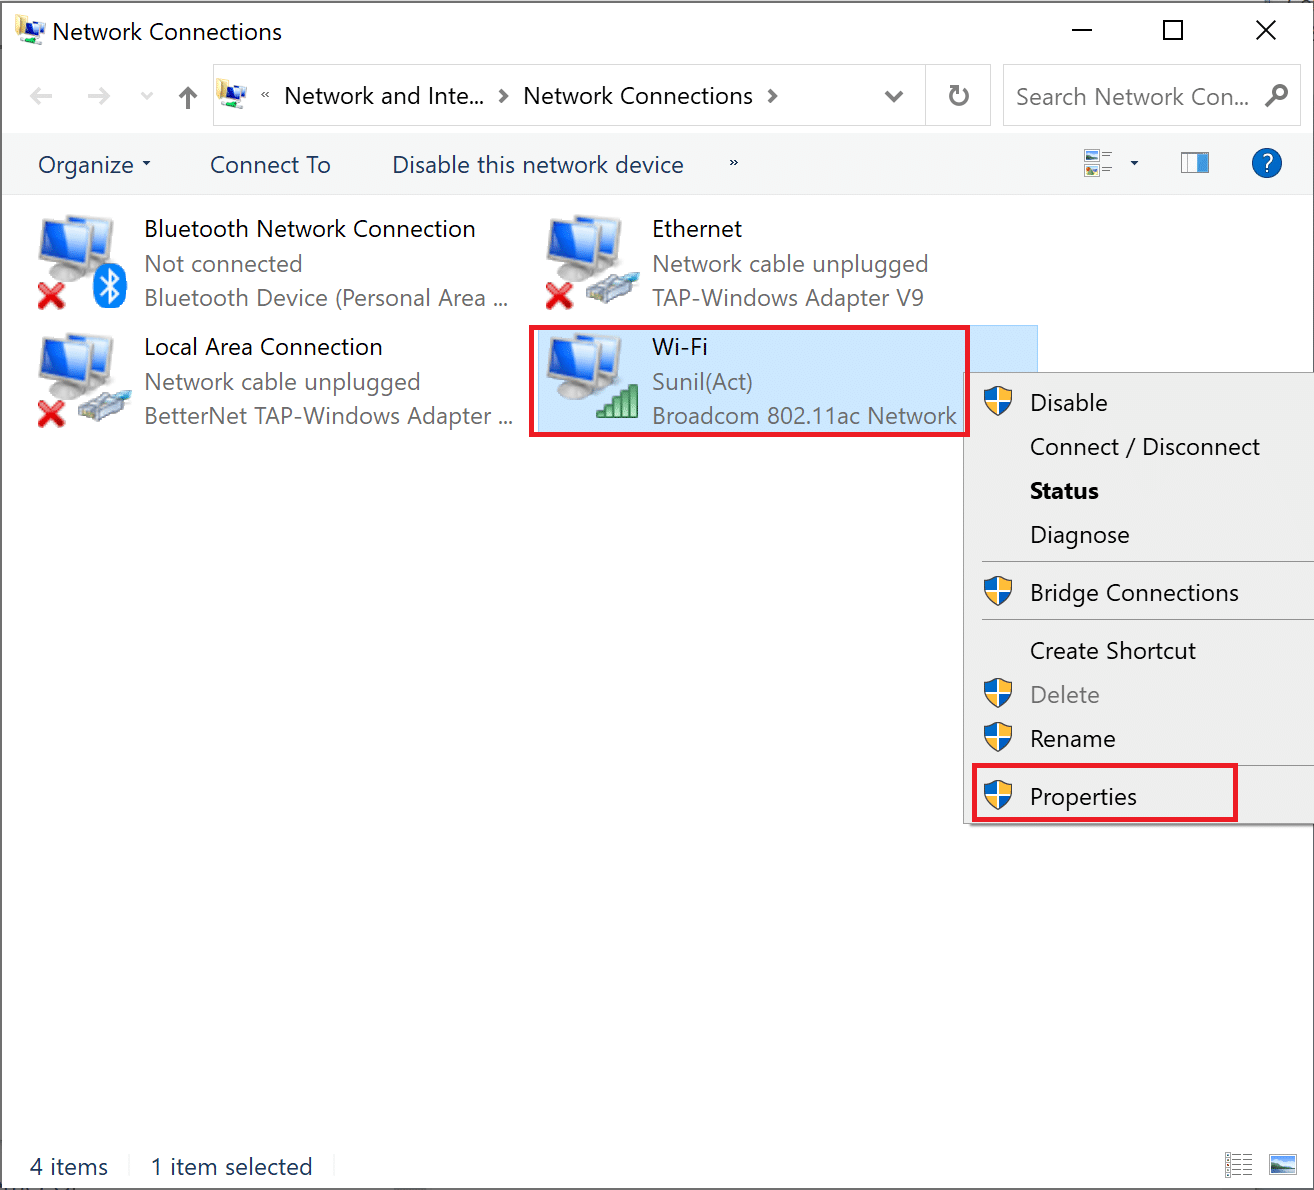
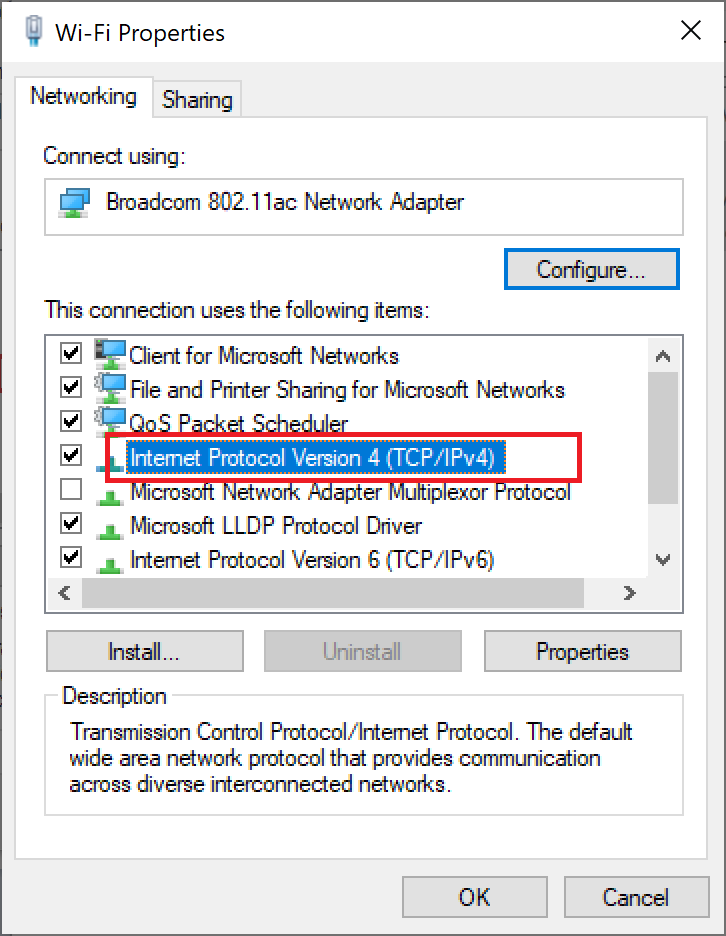
4. Next, right-click on your currently active internet connection and select Nekretnine, kako je istaknuto.
5. In the Properties window, double-click on 4 Internet Protocol Version (TCP / IPv4).
6. Next, check the options titled Automatski nabavite IP adresu i Koristite DNS poslužitelj adresa GMT, kako je istaknuto.
6a. For the Preferred DNS server, enter the Google Public DNS address as: 8.8.8.8
6b. And, In the Alternate DNS server, enter the other Google Public DNS as: 8.8.4.4
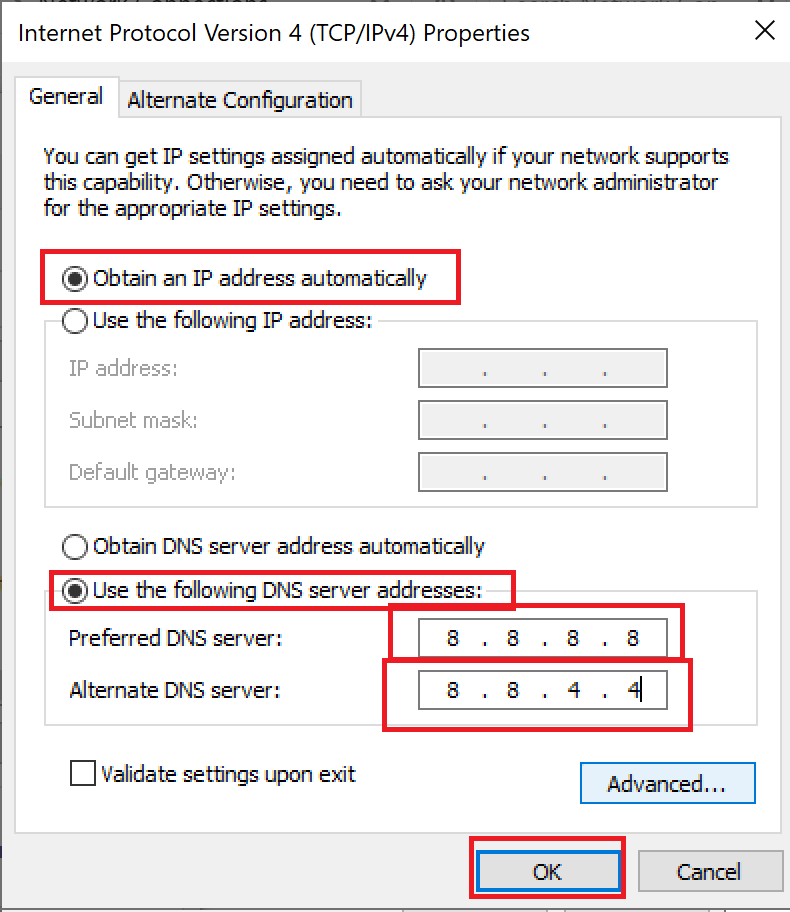
7. Na kraju, kliknite na OK to save the changes and ponovno pokrenite računalo.
Method 6: Restart DNS Cache
You can follow these steps to restart DNS cache.
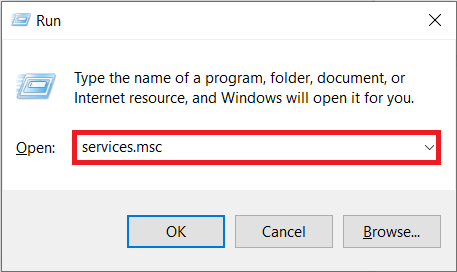
1. pritisni Tipke Windows + R zajedno otvoriti trčanje dijaloški okvir.
2. Then type services.msc i pritisnite Enter tipka za otvaranje Usluge prozor.
3. Right-click on DNS Client i odaberite Ponovno pokretanje.
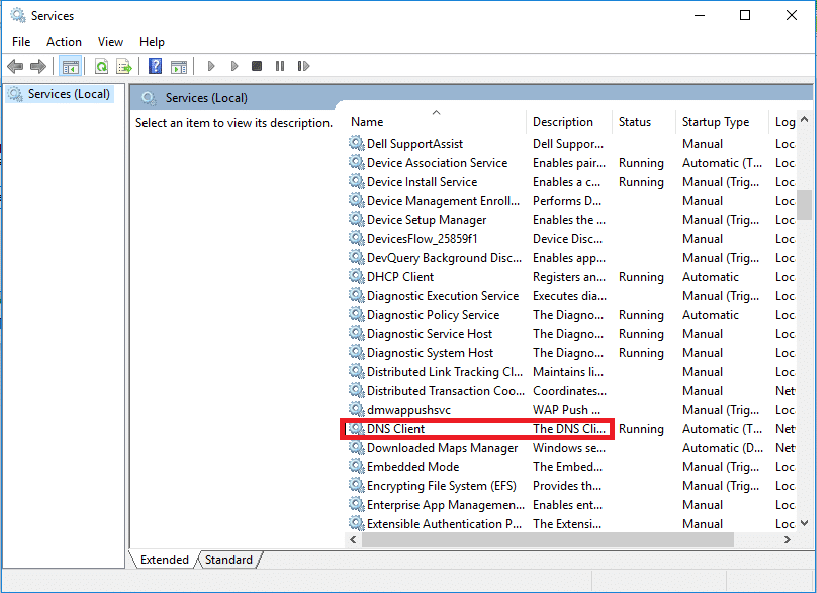
Bilješka: If you find no restart option and unable to restart it from this method, you do not need to worry. You just need to open an elevated Command Prompt on your system.
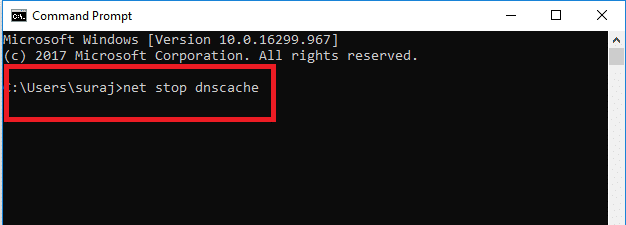
4. Upišite sljedeće naredba i pritisnite Enter tipka.
net stop dnscache
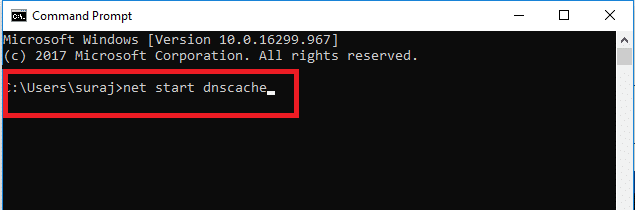
5. To start it again, type the given naredba i pogodio Enter tipka.
net start dnscache
Također pročitajte: Kako resetirati mrežne postavke na Windows 10
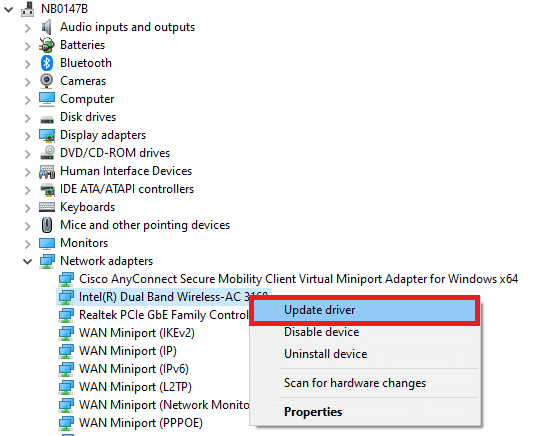
Method 7: Update Network Driver
Outdated network drive also can cause server IP address could not be found error. If you do not have the latest driver versions installed, then this may create bugs and can result in the unstable network connection. So, updating your network driver is necessary for a good network connection. Read our guide to update network drivers on Windows 10.
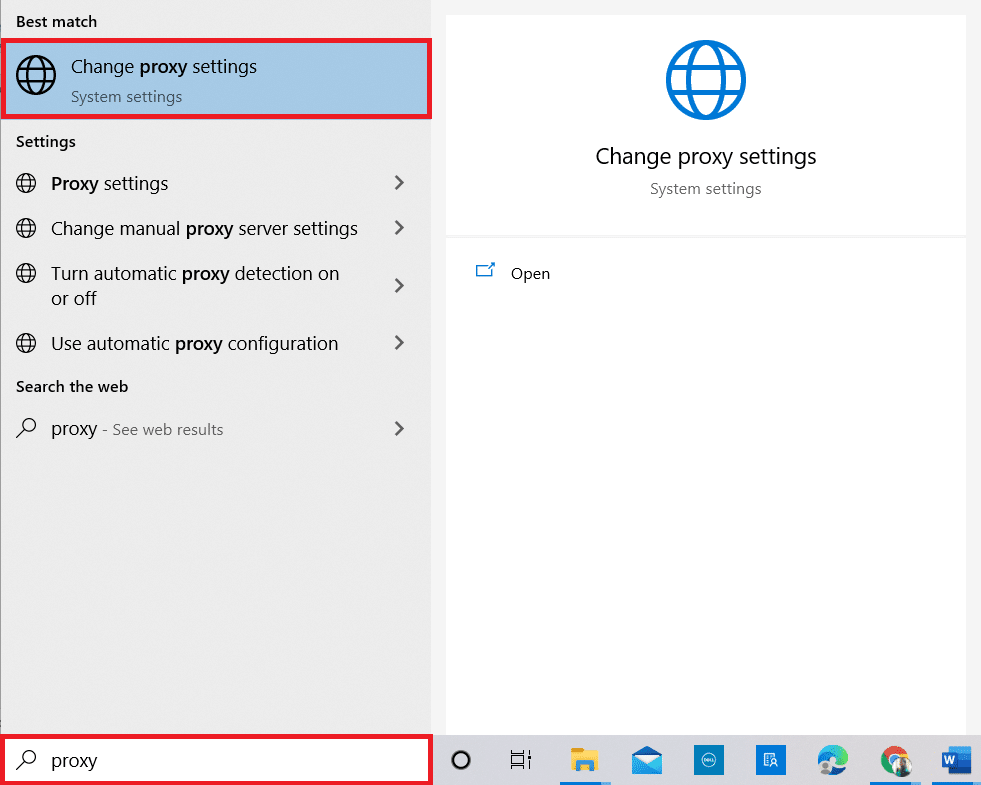
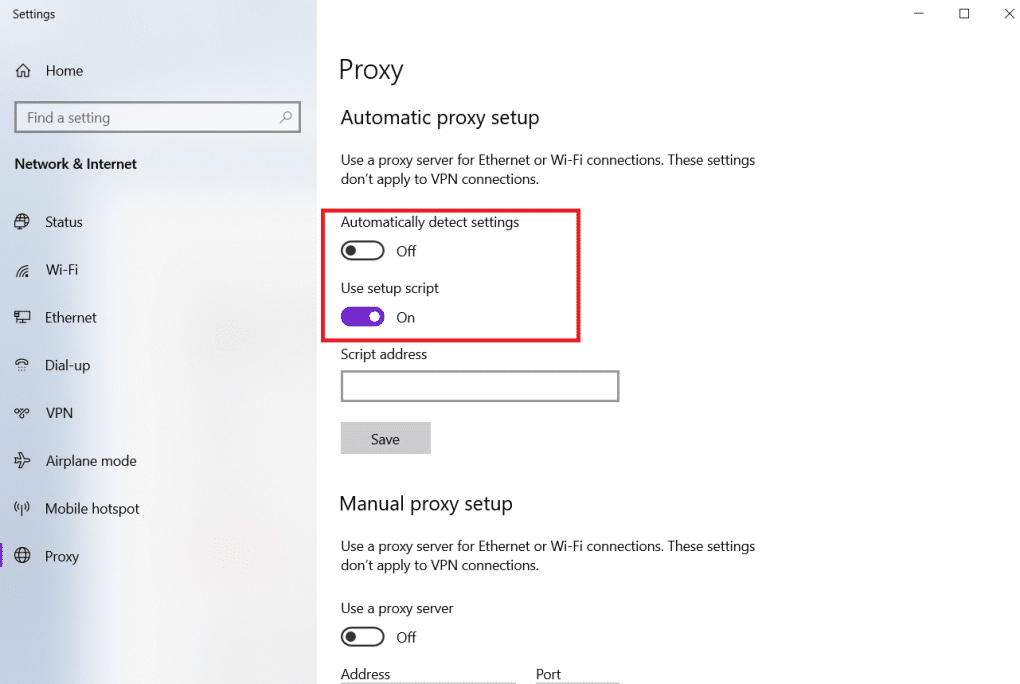
Method 8: Verify Proxy Settings
If you are using a proxy server, then using a particular proxy can create issues with your internet. You can change your proxy server to solve this problem. Follow the steps listed below to verify proxy settings.
1. Pritisnite Windows tipka i vrsta proxy i kliknite na Promijenite postavke proxyja iz rezultata pretraživanja.
2. Here, switch on the toggle for Automatsko otkrivanje postavki.
Preporučena:
We hope that you learned how to fix server IP address could not be found on Windows 10. Feel free to reach out to us with your queries and suggestions via the comments section below. Let us know what you want to learn about next.

