Process and Compressed Memory is a Windows 10 feature responsible for memory compression (also referred to as RAM compression and memory compression). This feature basically utilizes data compression to reduce the size or number of paging request to and from the auxiliary storage. In short, this feature is designed to take less amount of disk space and memory but in this case the System and Compressed Memory process start using 100% Disk and Memory, causing the affected PC to become slow.

In Windows 10, a compressions store is added to the concept of Memory Manager, which is an in-memory collection of compressed pages. So whenever the memory starts to fill up, the System and Compressed Memory process will compress the unused pages instead of writing them to the disk. The benefit of this is the amount of memory used per process is reduced, which allows Windows 10 to maintain more programs or apps in physical memory.
The problem appears to be incorrect Virtual Memory settings. Someone changed the paging file size from automatic to a particular value, virus or malware, Google Chrome or Skype, corrupt system files etc. So without wasting any time let’s see how to actually Fix 100% Disk Usage by System and Compressed Memory with the help of below-listed troubleshooting guide.
[SOLVED] 100% Disk Usage by System and Compressed Memory
Obavezno stvorite točku vraćanja, za slučaj da nešto pođe po zlu.
Metoda 1: Popravak oštećenih sistemskih datoteka
1. Otvorite naredbeni redak. Korisnik može izvesti ovaj korak traženjem "cmd" I zatim pritisnite Enter.

2. Sada upišite sljedeće u cmd i pritisnite enter:
Sfc /scannow sfc /scannow /offbootdir=c: /offwindir=c:windows (Ako gore navedeno ne uspije, pokušajte ovo)
![SFC scan now command prompt | [SOLVED] 100% Disk Usage by System and Compressed Memory](https://lbsite.org/wp-content/uploads/2023/01/SFC-scan-now-command-prompt.png)
3. Pričekajte da gore navedeni proces završi i kada završite, ponovno pokrenite računalo.
4. Ponovo otvorite cmd i upišite sljedeću naredbu i pritisnite enter nakon svake:
Dism /Online /Cleanup-Image /CheckHealth Dism /Online /Cleanup-Image /ScanHealth Dism /Online /Cleanup-Image /RestoreHealth

5. Pustite da se naredba DISM pokrene i pričekajte da završi.
6. Ako gornja naredba ne radi, pokušajte s donjom:
Dism /Image:C:offline /Cleanup-Image /RestoreHealth /Source:c:testmountwindows Dism /Online /Cleanup-Image /RestoreHealth /Source:c:testmountwindows /LimitAccess
Bilješka: Zamijenite C:RepairSourceWindows svojim izvorom popravka (Windows instalacija ili disk za oporavak).
7. Ponovno pokrenite računalo da biste spremili promjene i vidjeli možete li to učiniti Fix 100% Disk Usage by System and Compressed Memory Issue.
Method 2: Set Correct Paging File Size
1. Pritisnite tipku Windows + R, a zatim upišite sysdm.cpl i pritisnite Enter za otvaranje System Properties.

2. Prebacite se na Kartica a zatim kliknite na Postavke pod Performanse.

3. Again switch to the Advanced tab and click Change under Virtual Memory.

4. Checkmark “Automatski upravljajte veličinom stranične datoteke za sve pogone."
![Checkmark Automatically manage paging file size for all drives | [SOLVED] 100% Disk Usage by System and Compressed Memory](https://lbsite.org/wp-content/uploads/2023/02/Checkmark-Automatically-manage-paging-file-size-for-all-drives.png)
5. Click OK, then click Apply followed by OK.
6. Select Yes to Restart your PC to save changes.
Metoda 3: Onemogućite brzo pokretanje
1. Pritisnite tipku Windows + R, zatim upišite control i pritisnite Enter za otvaranje Upravljačka ploča.

2. Kliknite na Hardver i zvuk zatim kliknite na Power Options.

3. Zatim u lijevom oknu prozora odaberite "Odaberite što tipke napajanja rade."

4. Sada kliknite na "Promijenite postavke koje trenutačno nisu dostupne."

5. Odznačite “Uključite brzo pokretanje"I kliknite na Spremi promjene.
![Uncheck Turn on fast startup | [SOLVED] 100% Disk Usage by System and Compressed Memory](https://lbsite.org/wp-content/uploads/2023/01/Uncheck-Turn-on-fast-startup.png)
6. Restart your PC and see if you’re able to Fix 100% Disk Usage by System and Compressed Memory Issue.
Method 4: Disable Superfetch Service
1. Pritisnite tipku Windows + R, a zatim upišite services.msc i pritisnite tipku Enter.

2. Pronađi SuperFetch service from the list then right-click on it and select Svojstva.

3. Under Service status, if the service is running, click on Zaustavite.
4. Now, from the Stavljanje u pogon type drop-down select Onemogućeno.

5. Pritisnite Primijeni, nakon čega slijedi OK.
6. Ponovno pokrenite računalo da biste spremili promjene.
If the above method doesn’t disable Superfetch services then you can follow disable Superfetch using Registry:
1. Pritisnite tipku Windows + R, a zatim upišite regedit i pritisnite Enter da otvorite uređivač registra.

2. Dođite do sljedećeg ključa registra:
HKEY_LOCAL_MACHINESYSTEMCurrentControlSetControlSession Manager Upravljanje memorijomPrefetchParameters
3. Make sure you have selected PrefetchParameters zatim u desnom prozoru dvaput kliknite na OmogućiSuperfetch ključ i change it’s value to 0 in the Value data field.

4. Click OK and close the Registry Editor.
5. Ponovno pokrenite računalo da biste spremili promjene i vidjeli možete li to učiniti Fix 100% Disk Usage by System and Compressed Memory Issue.
Method 5: Adjust your PC for Best Performance
1. Pritisnite tipku Windows + R, a zatim upišite sysdm.cpl i pritisnite Enter za otvaranje System Properties.
2. Prebacite se na napredan karticu, a zatim kliknite na Postavke pod Izvođenje.
3. Under Visual Effects checkmark “Prilagodi za najbolju izvedbu".

4. Pritisnite Primijeni, nakon čega slijedi OK.
5. Reboot your PC and see if you’re able to Fix 100% Disk Usage by System and Compressed Memory Issue.
Method 6: Kill the Speech Runtime Executable Process
1. tisak Ctrl + Shift + Esc za pokretanje Task Managera.
2. U Kartica Procesi, pronaći Speech Runtime Executable.
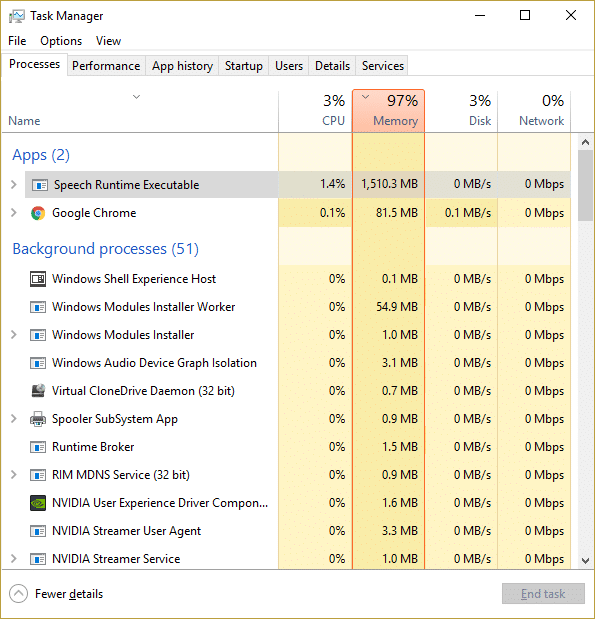
3. Desnom tipkom miša kliknite na njega i odaberite Završi zadatak.
Metoda 7: Pokrenite CCleaner i Malwarebytes
1. Preuzmite i instalirajte CCleaner & Malwarebytes.
2. Pokrenite Malwarebytes i neka skenira vaš sustav u potrazi za štetnim datotekama. Ako se pronađe zlonamjerni softver, automatski će ih ukloniti.

3. Sada pokrenite CCleaner i odaberite Prilagođeno čišćenje.
4. Pod Prilagođeno čišćenje odaberite Kartica Windows i označite zadane postavke i kliknite Analizirati.
![Select Custom Clean then checkmark default in Windows tab | [SOLVED] 100% Disk Usage by System and Compressed Memory](https://lbsite.org/wp-content/uploads/2023/01/Select-Custom-Clean-then-checkmark-default-in-Windows-tab.png)
5. Kada analiza završi, provjerite jeste li sigurni da ćete ukloniti datoteke za brisanje.

6. Na kraju, kliknite na Pokrenite Cleaner i pustite CCleaner da radi svojim tijekom.
7. Da biste dodatno očistili svoj sustav, odaberite karticu Registari provjerite je li sljedeće provjereno:

8. Kliknite na Skenirajte za probleme i dopustite CCleaneru da skenira, zatim kliknite na Popravi odabrane probleme tipku.
![Once scan for issues is completed click on Fix selected Issues | [SOLVED] 100% Disk Usage by System and Compressed Memory](https://lbsite.org/wp-content/uploads/2023/01/Once-scan-for-issues-is-completed-click-on-Fix-selected-Issues.png)
9. Kada CCleaner pita "Želite li sigurnosne kopije promjena u registru?" odaberite Da.
10. Nakon što je sigurnosna kopija dovršena, kliknite na Riješite sve odabrane probleme tipku.
11. Ponovno pokrenite računalo da biste spremili promjene.
Method 8: Change configuration of Google Chrome and Skype
Za Google Chrome: Navigate to the following under Chrome: Settings > Show Advanced Settings > Privacy > Use a prediction service to load pages more quickly. Disable the toggle next to “Use a prediction service to load pages.”

Change configuration For Skype
1. Make sure you have exited Skype, if not end task from Task Manager for Skype.
2. Press Windows Key + R then type the following and click OK:
C:Program Files (x86)SkypePhone
3. Desnom tipkom miša kliknite skype.exe i odaberite Svojstva.

4. Prebacite se na Kartica Sigurnost i kliknite Uredi.

5. odabrati ALL APPLICATION PACKAGES under Group or user names then checkmark Write pod Dopusti.

6. Click Apply, followed by OK and see if you’re able to Fix 100% Disk Usage by System and Compressed Memory Issue.
Method 9: Set Correct Permission for System and Compressed Memory Process
1. Pritisnite tipku Windows + R, a zatim upišite Taskschd.msc and hit Enter to open Task Scheduler.

2. Dođite do sljedeće staze:
Task Scheduler Library > Microsoft > Windows > MemoryDiagnostic
![Double click on ProcessMemoryDiagnostic Events | [SOLVED] 100% Disk Usage by System and Compressed Memory](https://lbsite.org/wp-content/uploads/2023/02/Double-click-on-ProcessMemoryDiagnostic-Events.png)
3. Dvaput kliknite na ProcessMemoryDiagnostic Events I zatim kliknite Promijeni korisnika ili grupu under Security Options.

4. klik napredan I zatim kliknite Find Now.

5. Odaberite svoj Administratorski račun from the list then click OK.

6.opet kliknite U redu to add your administrator account.
7. Checkmark NAJVIŠA trčanje s povlasticama a zatim kliknite U redu.

8. Follow the same steps for RunFullMemoryDiagnostic and close everything.
9. Ponovno pokrenite računalo da biste spremili promjene.
Method 10: Disable System and Compressed Memory Process
1. Pritisnite tipku Windows + R, a zatim upišite Taskschd.msc i pritisnite Enter za otvaranje Planer zadataka.
2. Dođite do sljedeće staze:
Task Scheduler Library > Microsoft > Windows > MemoryDiagnostic
3. Desnom tipkom miša kliknite RunFullMemoryDiagnostic i odaberite Onemogućiti.
![Right-click on RunFullMemoryDiagnostic and select Disable | [SOLVED] 100% Disk Usage by System and Compressed Memory](https://lbsite.org/wp-content/uploads/2023/02/Right-click-on-RunFullMemoryDiagnostic-and-select-Disable.png)
4. Close Task Scheduler and restart your PC.
Preporučena:
To je to što uspješno imate Fix 100% Disk Usage by System and Compressed Memory ali ako još uvijek imate pitanja u vezi s ovim postom, slobodno ih postavite u odjeljku za komentare.

