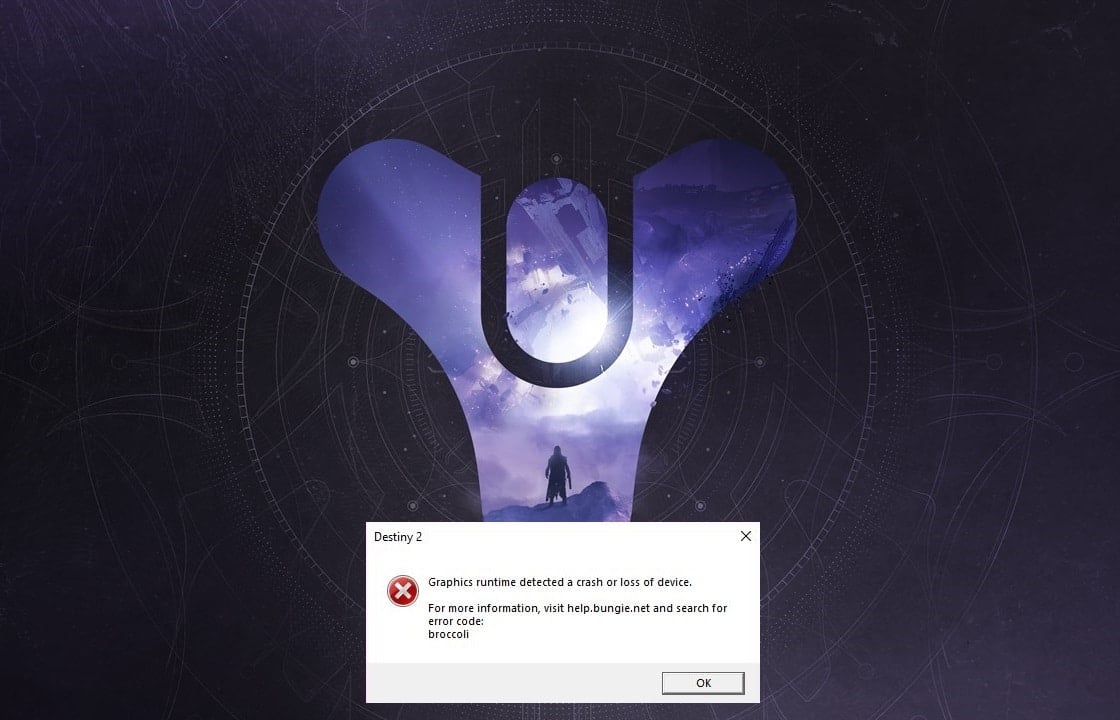
Destiny 2 is a multiplayer shooting game that is hugely popular amongst gamers today. Bungie Inc developed this game and released it in 2017. It is now available on Windows computers along with PlayStation 4/5 and Xbox models – One/X/S. Since it is an online-only game, you would require a stable and high-speed internet connection on your device to play it. Many users reported some issues while playing this game on their Windows systems, majorly: error code Bwokoli and error code Marionberry. Keep reading to learn more about Destiny 2 Error Code Broccoli and the methods to fix it.
Ki jan yo ranje Destine 2 Error Code Broccoli on Windows 10
Here are the general reasons why this error occurs while playing Destiny 2:
- Overclocked GPU: All Graphics Processing Units are set to run at a particular speed called the vitès baz which is set by the device manufacturer. On some GPUs, users can boost their performance by increasing the GPU speed to a level higher than the base speed. However, overclocking the GPU may cause the Broccoli error.
- Full-screen glitch: You are more likely to face Destiny 2 error code Broccoli if you are using NVIDIA GeForce GPU.
- Outdated Windows version: If the Windows operating system is working on an outdated version, then the system will not update the GPU drivers on the PC. You need to ensure that you have the latest version of Windows installed.
- Corrupted/Outdated Graphics card drivers: The Destiny 2 error code Broccoli can occur if the graphic drivers on your PC are outdated or corrupt. Destiny 2 requires compatible graphics card and updated graphics card drivers so that your gaming experience is smooth and error-free.
To fix Destiny 2 error code Broccoli, try the methods written below, one-by-one, to find a possible solution for your Windows 10 system.
Method 1: Run Game in Windowed Mode (NVIDIA)
This method is applicable only if you use Nvidia Eksperyans GeForce to play Destiny 2. Since GeForce Experience might force the game into Full-screen mode, leading to error code Broccoli learn How to Manually Add Game to GeForce Experience learn How to Manually Add Game to GeForce Experience. Follow the steps below to force the game to run in Windowed Mode instead:
1. Lanse a Nvidia GeForce Eksperyans aplikasyon an.
2. Ale nan la Akèy tab epi chwazi Destine 2 from the list of games displayed on the screen.
3. Scroll desann epi klike sou la Zouti icon to launch settings.
4. Klike sou Montre mòd anba Anviwònman Custom epi chwazi Fen soti nan meni an gout-desann.
5. Anfen, klike sou Aplike pou konsève pou chanjman sa yo.
6. Lanse Destine 2 ak pèmèt Full-ekran mòd from here instead. Refer highlighted section in the pic below.
Metòd 2: Mete ajou Windows
The developers named the error code Broccoli to indicate the inconsistencies with the Graphics card drivers and Windows OS. If the graphics card driver updates are handled by the Windows Update service on your PC, it is necessary to ensure that no Windows updates are pending. Follow the given steps to update Windows:
1. Kalite Dènye Nouvèl in Windows rechèch box. Launch the Windows Mizajou anviwònman from the search result, as shown.
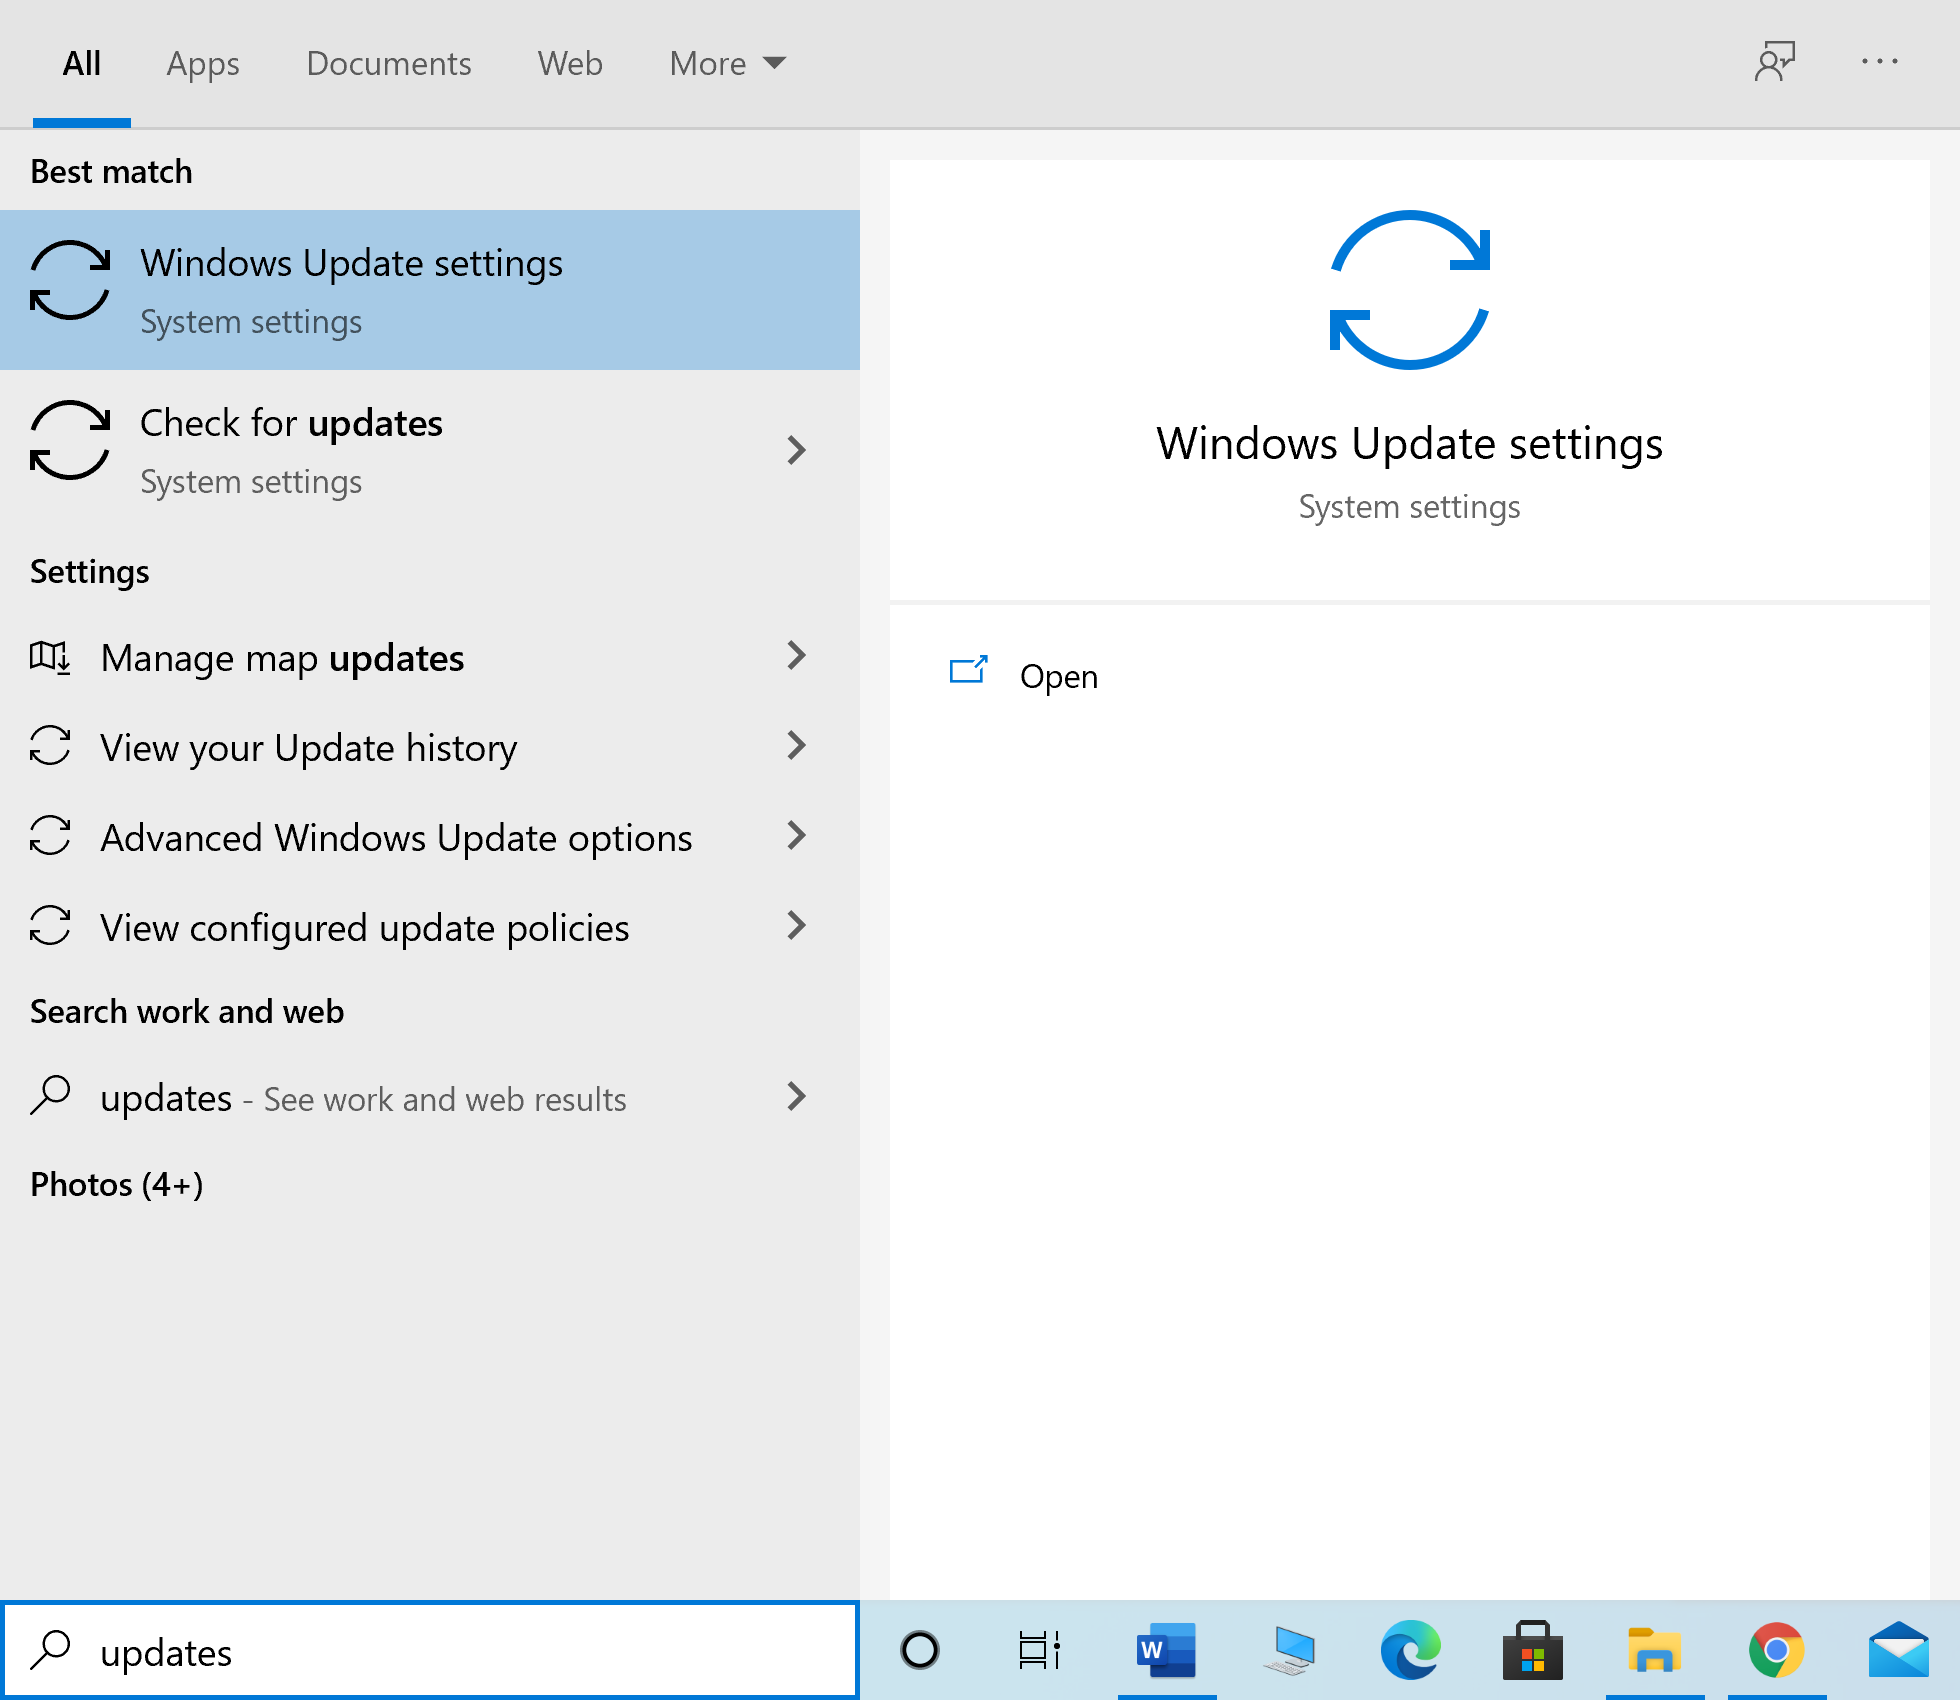
2. Klike sou Tcheke pou mizajou from the right pane, as depicted.
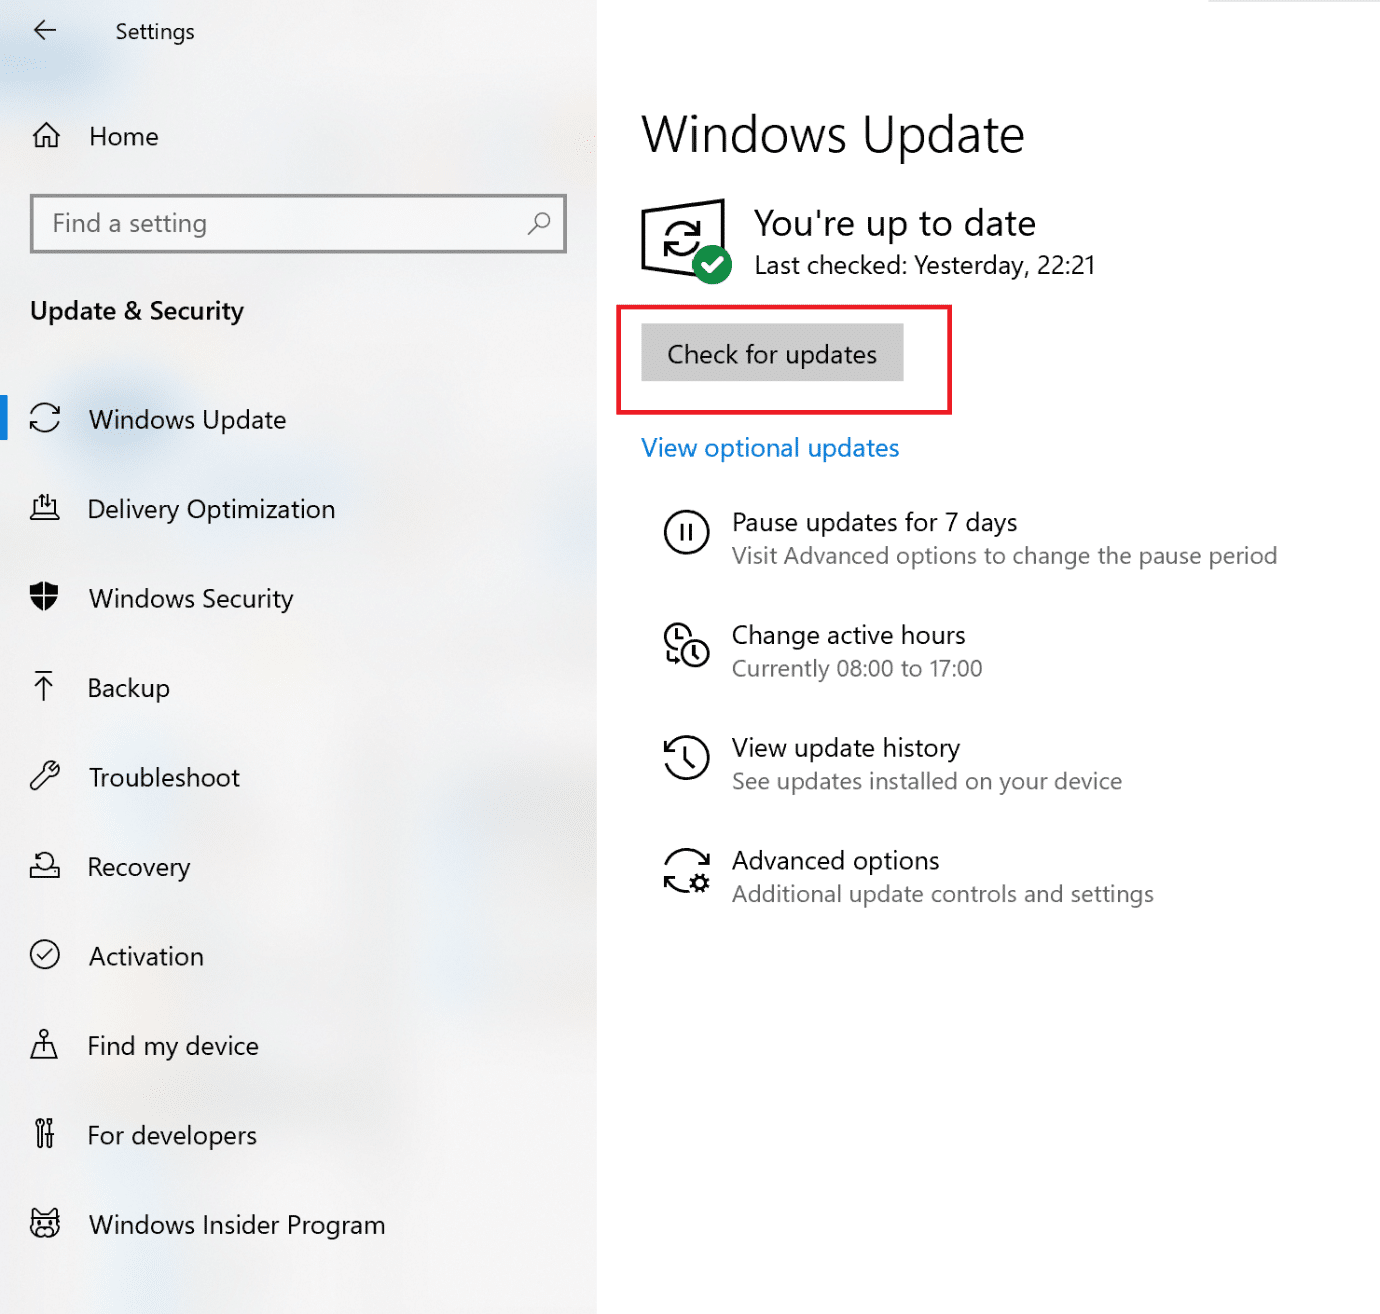
3 Rete tann for Windows to search for and install any pending updates.
Remak: Your PC may need to restart several times during the update process. Return to Windows Update settings to install all available updates, after every restart.
After the process is complete, launch Destiny 2 and see if the game launches without Broccoli error. If not, there may be issues with Graphics card drivers which will be dealt with in succeeding methods.
Epitou Li: Mizajou Windows kole? Men kèk bagay ou ta ka eseye!
Method 3: Reinstall Graphics Card Drivers
If the above methods did not work for you, you need to update Graphics card drivers on your PC to eliminate the issue of corrupt and/or outdated drivers. This can possibly resolve Destiny 2 error code Broccoli.
Given below are two options:
- update graphics card drivers using Device Manager.
- update the drivers by reinstalling them manually.
Option 1: Automatically Update Graphics Card Drivers
1. Kalite Manadjè aparèy nan Windows rechèch box and launch the app from there.
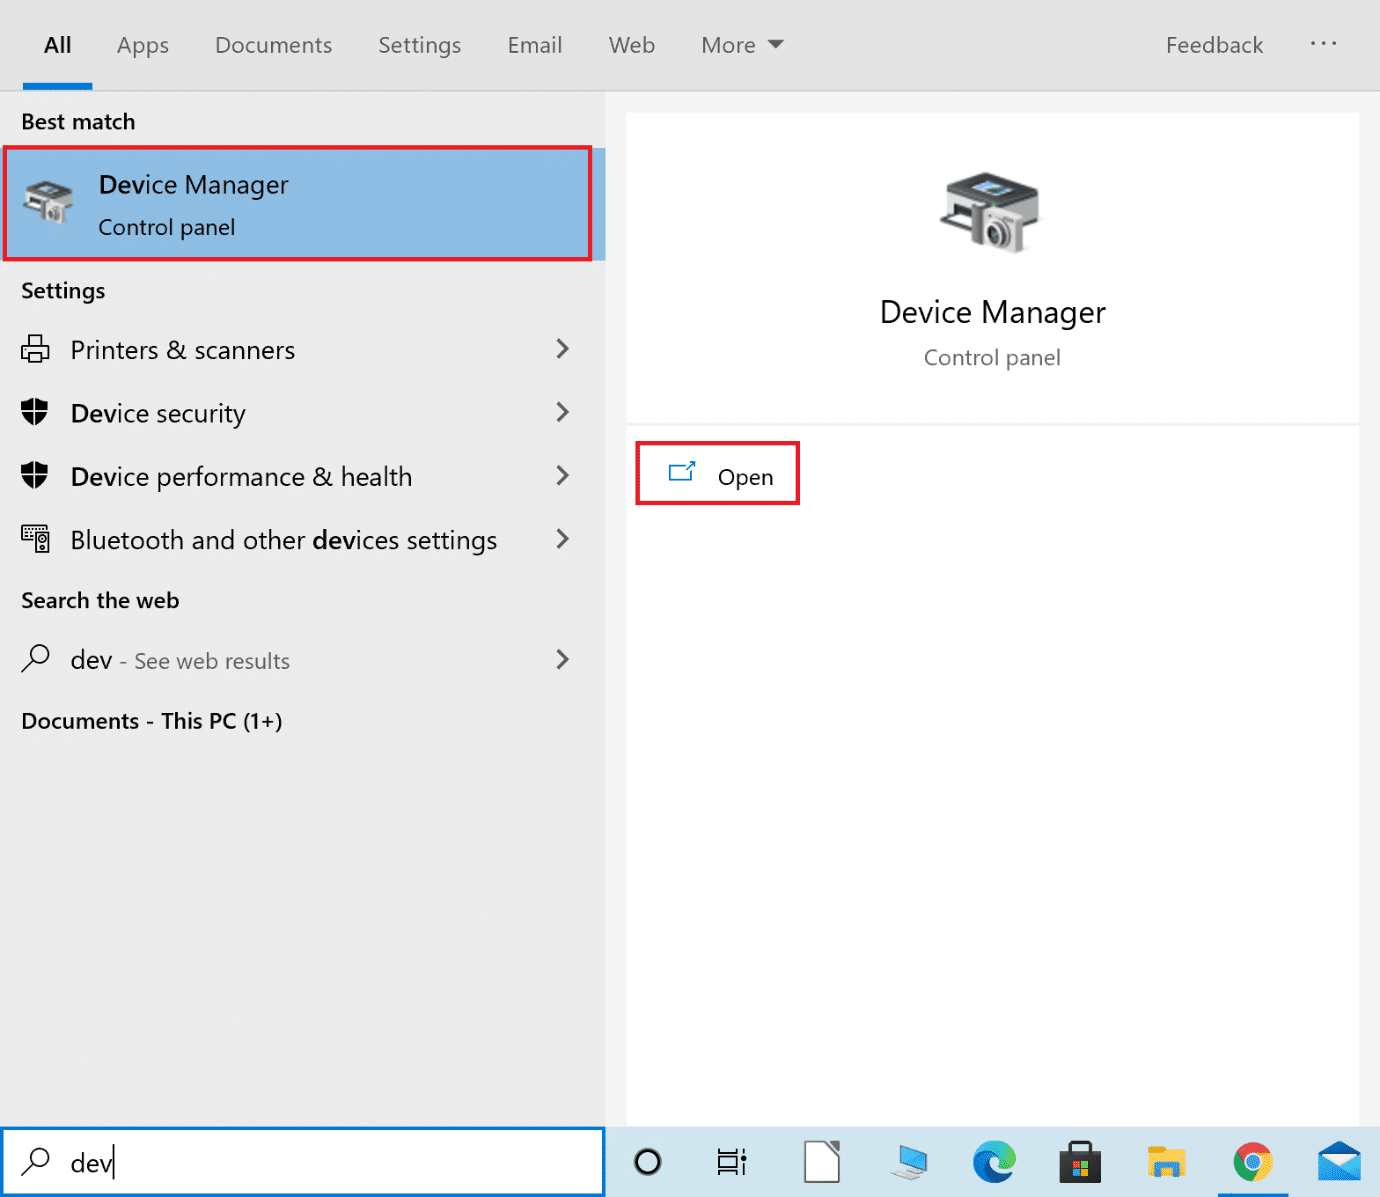
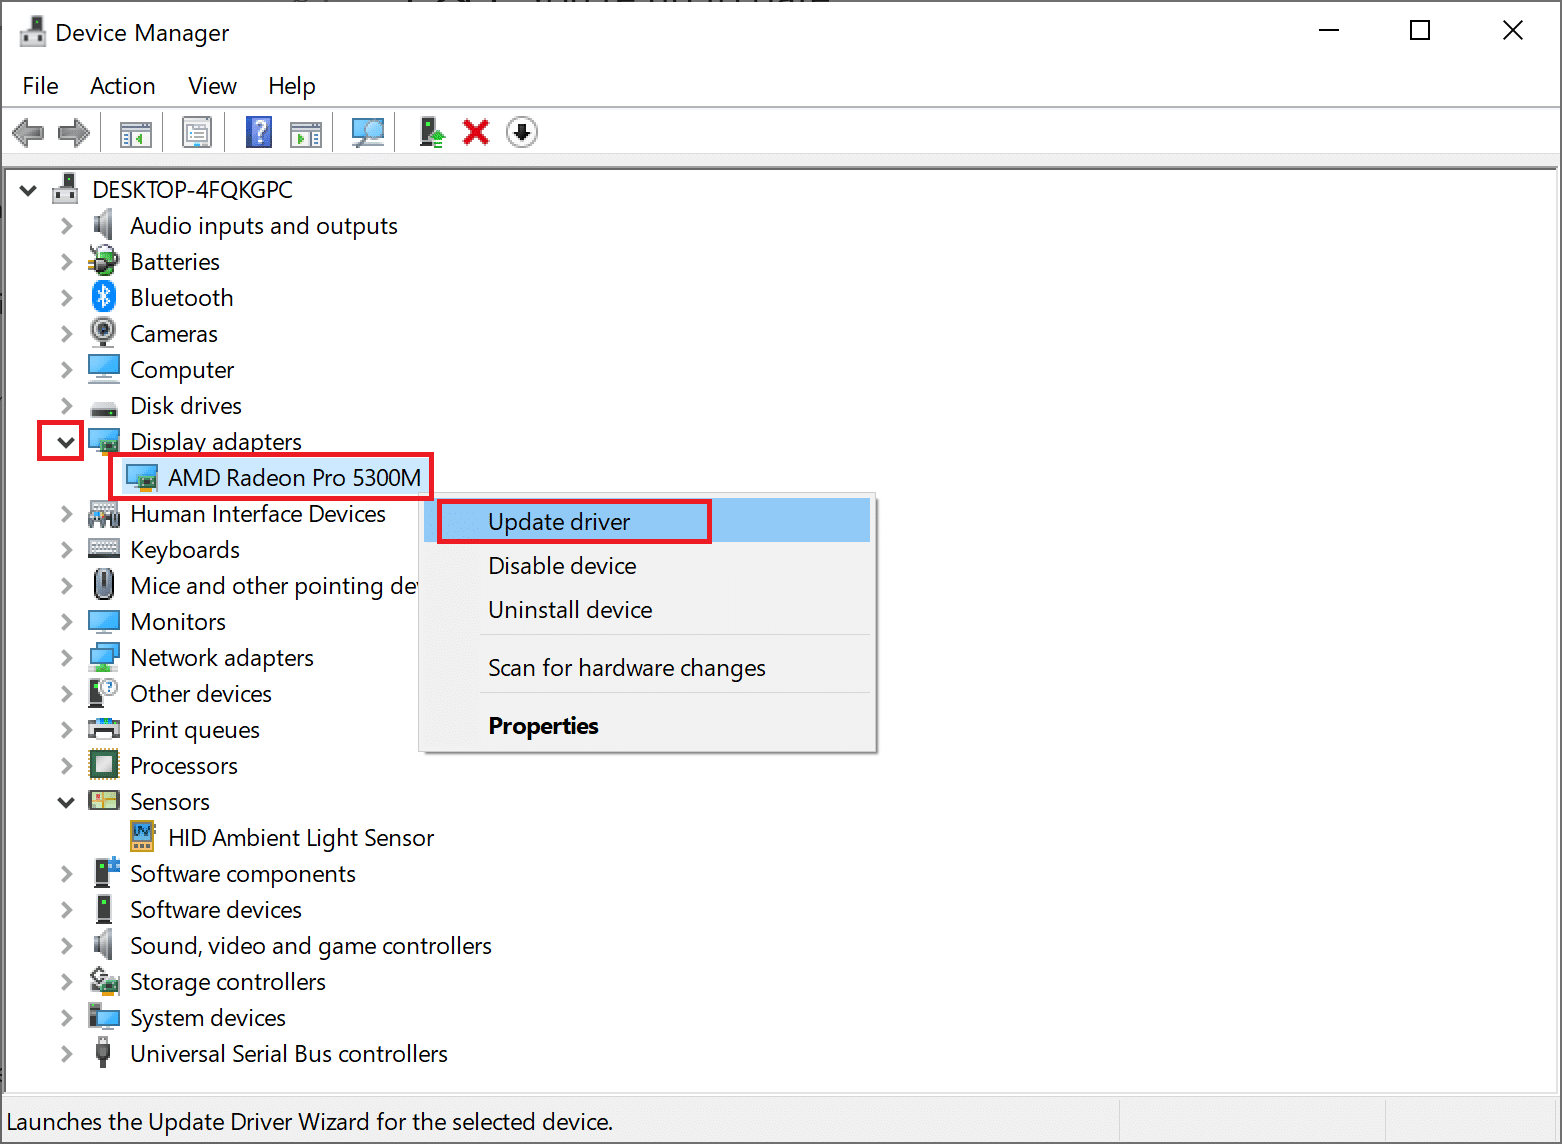
2. Klike sou la flèch anba akote Montre cartes yo elaji li.
3. Right-click on your Graphics card driver and select Mete ajou chofè soti nan meni an drop-down, jan sa montre anba a.
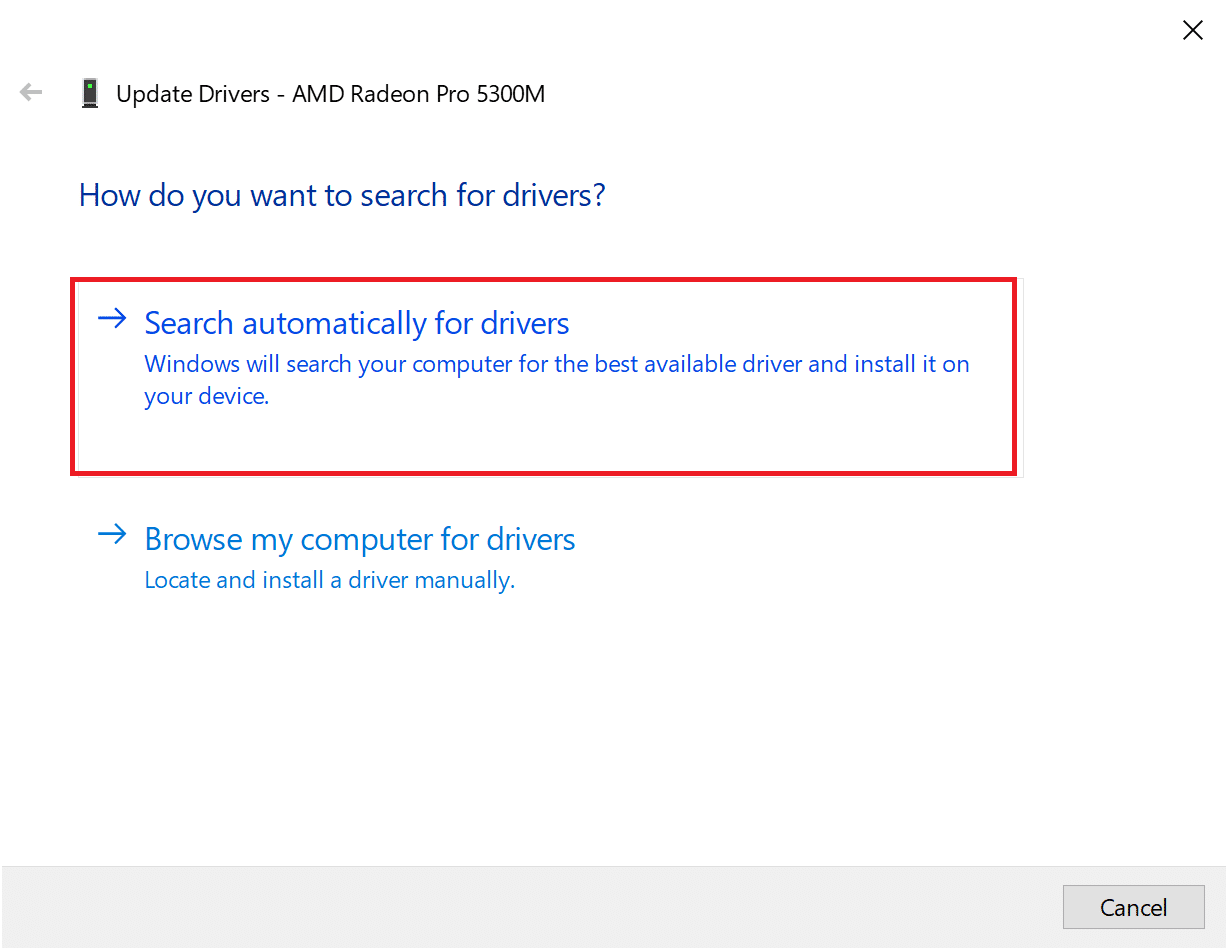
4. In the pop-up box that follows, click on the option titled Rechèch otomatikman pou chofè yo, jan yo mete aksan sou anba a.
5. Rete tann for your PC to install updated drivers if any are found.
6. Restart the computer and launch the game.
If the above option did not work, you need to manually update the graphics card drivers by reinstalling them on your computer. Read below to do so.
Option 2: Manually Update Drivers by Reinstallation
This process has been explained for users of AMD graphic cards and NVIDIA graphics cards. If you use any other graphics card, ensure to follow the correct steps to reinstall those.
Reinstall AMD Graphic Drivers
1. Download AMD Cleanup Utility soti isit la.
2. Once the file is downloaded, right-click on it and select Kouri kòm administratè.
3. Klike sou Wi sou AMD sèvis piblik netwayaj pop-up box to enter Anviwònman Recovery Windows.
4. Once in Safe Mode, follow the instructions on the screen to complete the uninstallation process.
5. The AMD Cleanup Utility will completely remove AMD drivers without leaving leftover files on your system. Of course, if there are any corrupt AMD files, those will be removed too. After the process is complete, your machine will rekòmanse otomatikman. Klike la a li plis ...
6. Vizite nan official AMD website epi klike sou la Download Koulye a, option displayed at the bottom of the screen, to download the latest drivers for your PC.
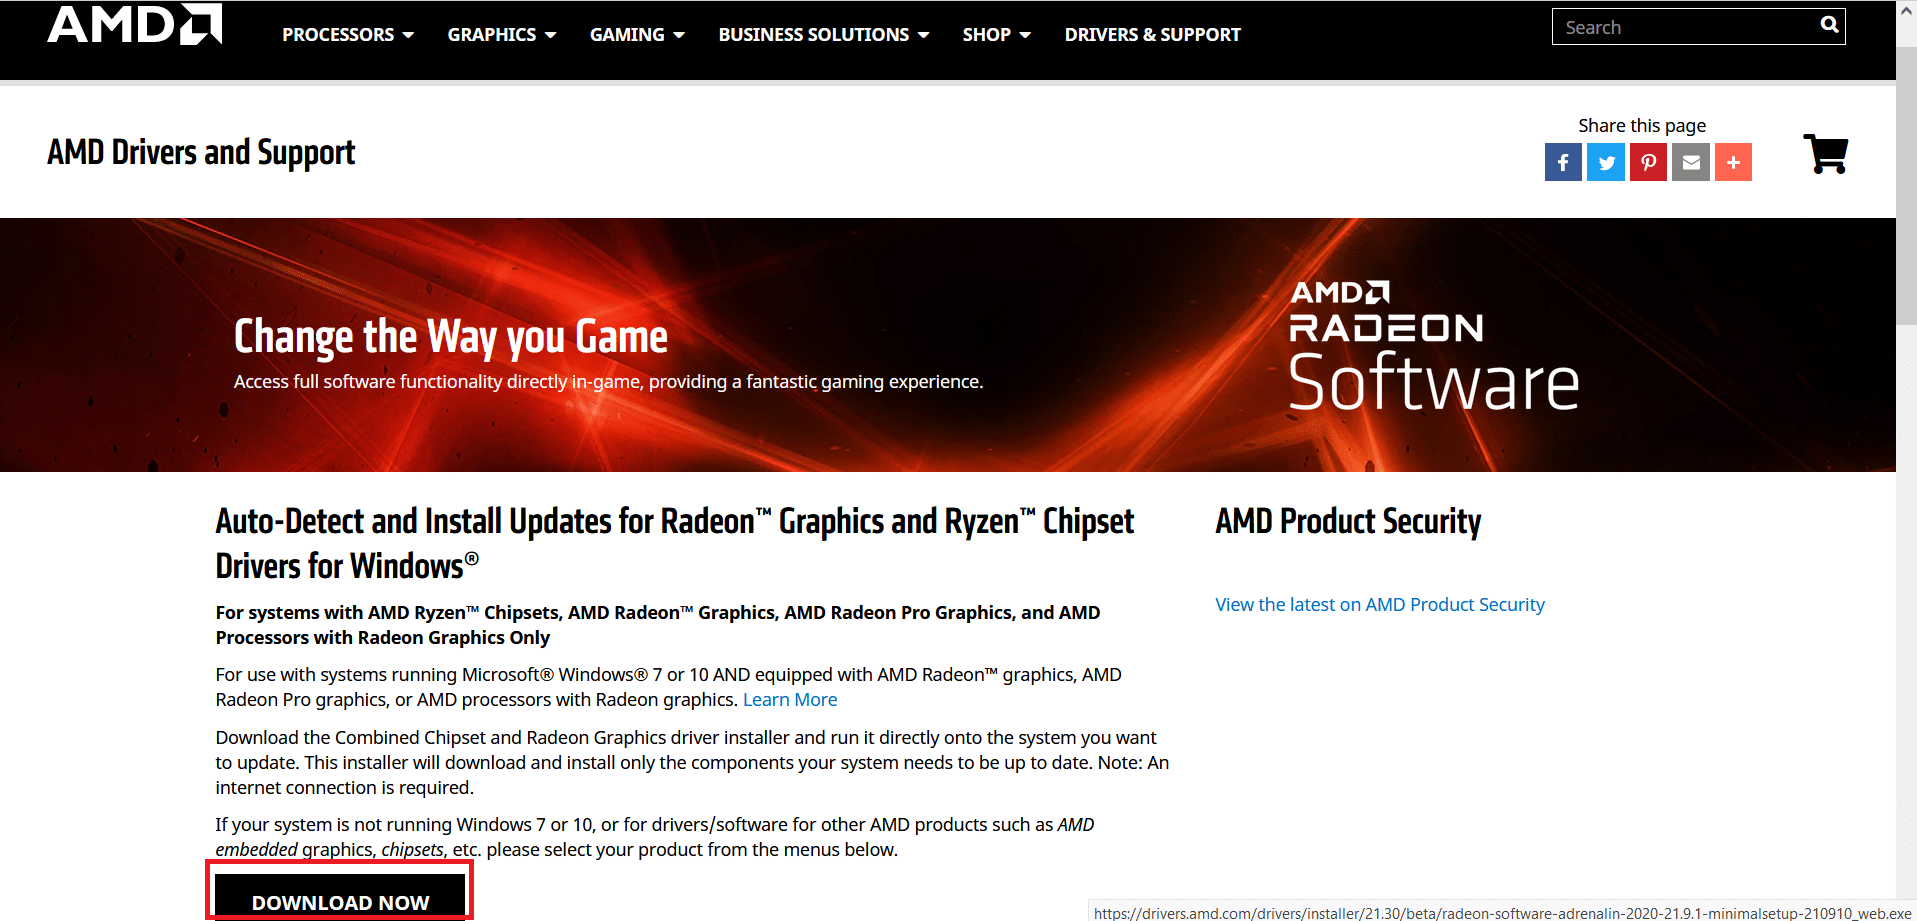
7. On the AMD Radeon Software Installer, click on Rekòmande vèsyon to determine the most suitable drivers for the AMD hardware on your PC. Enstale Yo.
8. Follow the instruction on-screen to finish the installation. Once done, restart the computer and enjoy playing Destiny 2.
Reinstall NVIDIA Graphics Cards
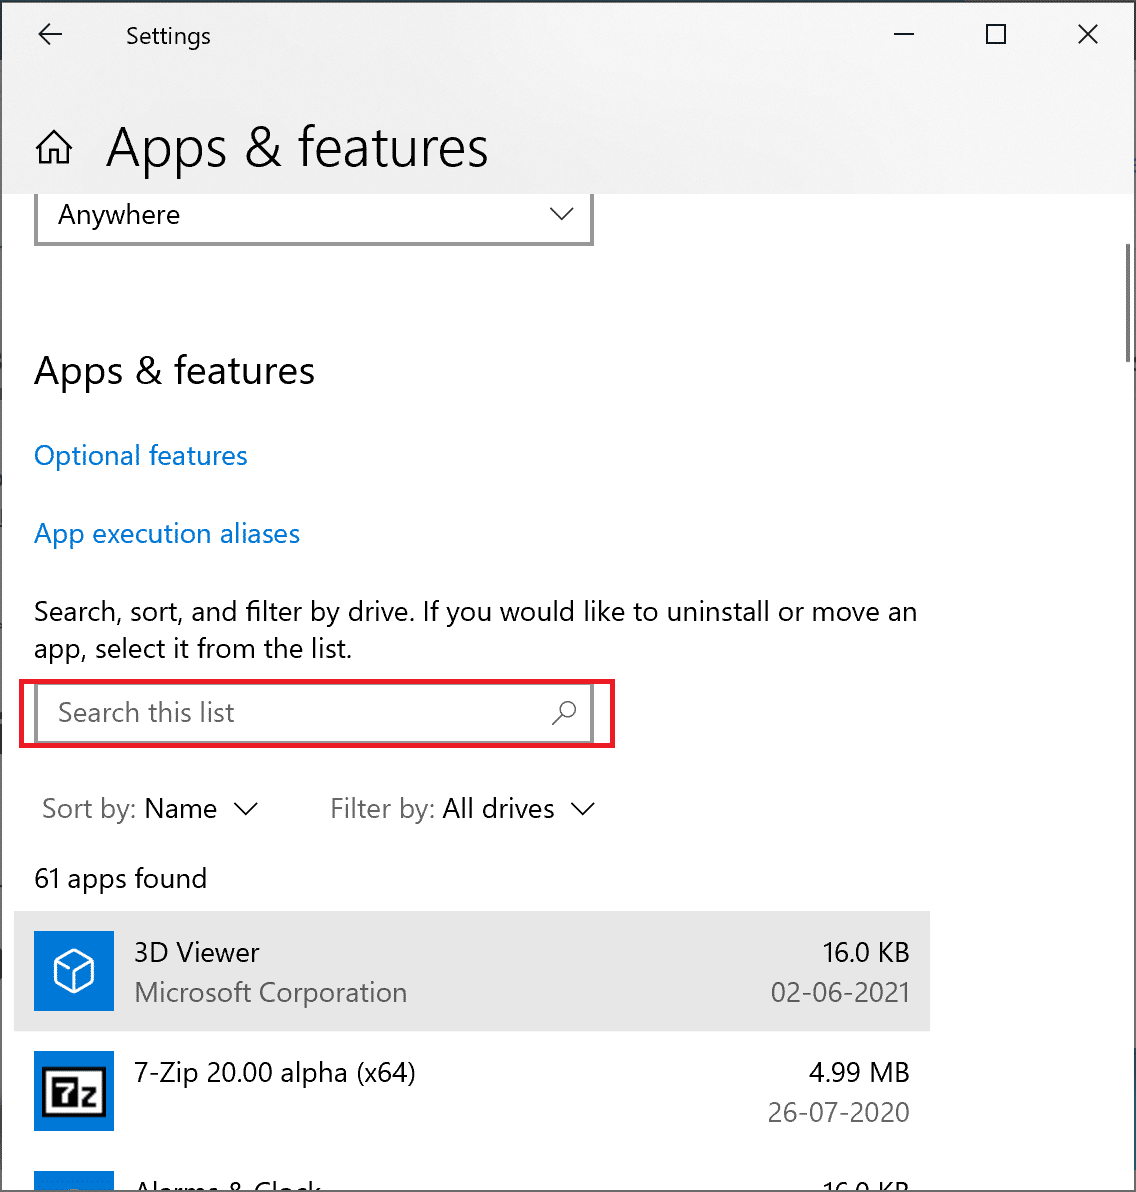
1. Kalite Ajoute oswa retire pwogram yo nan Windows rechèch box and launch it from the search result, as shown.
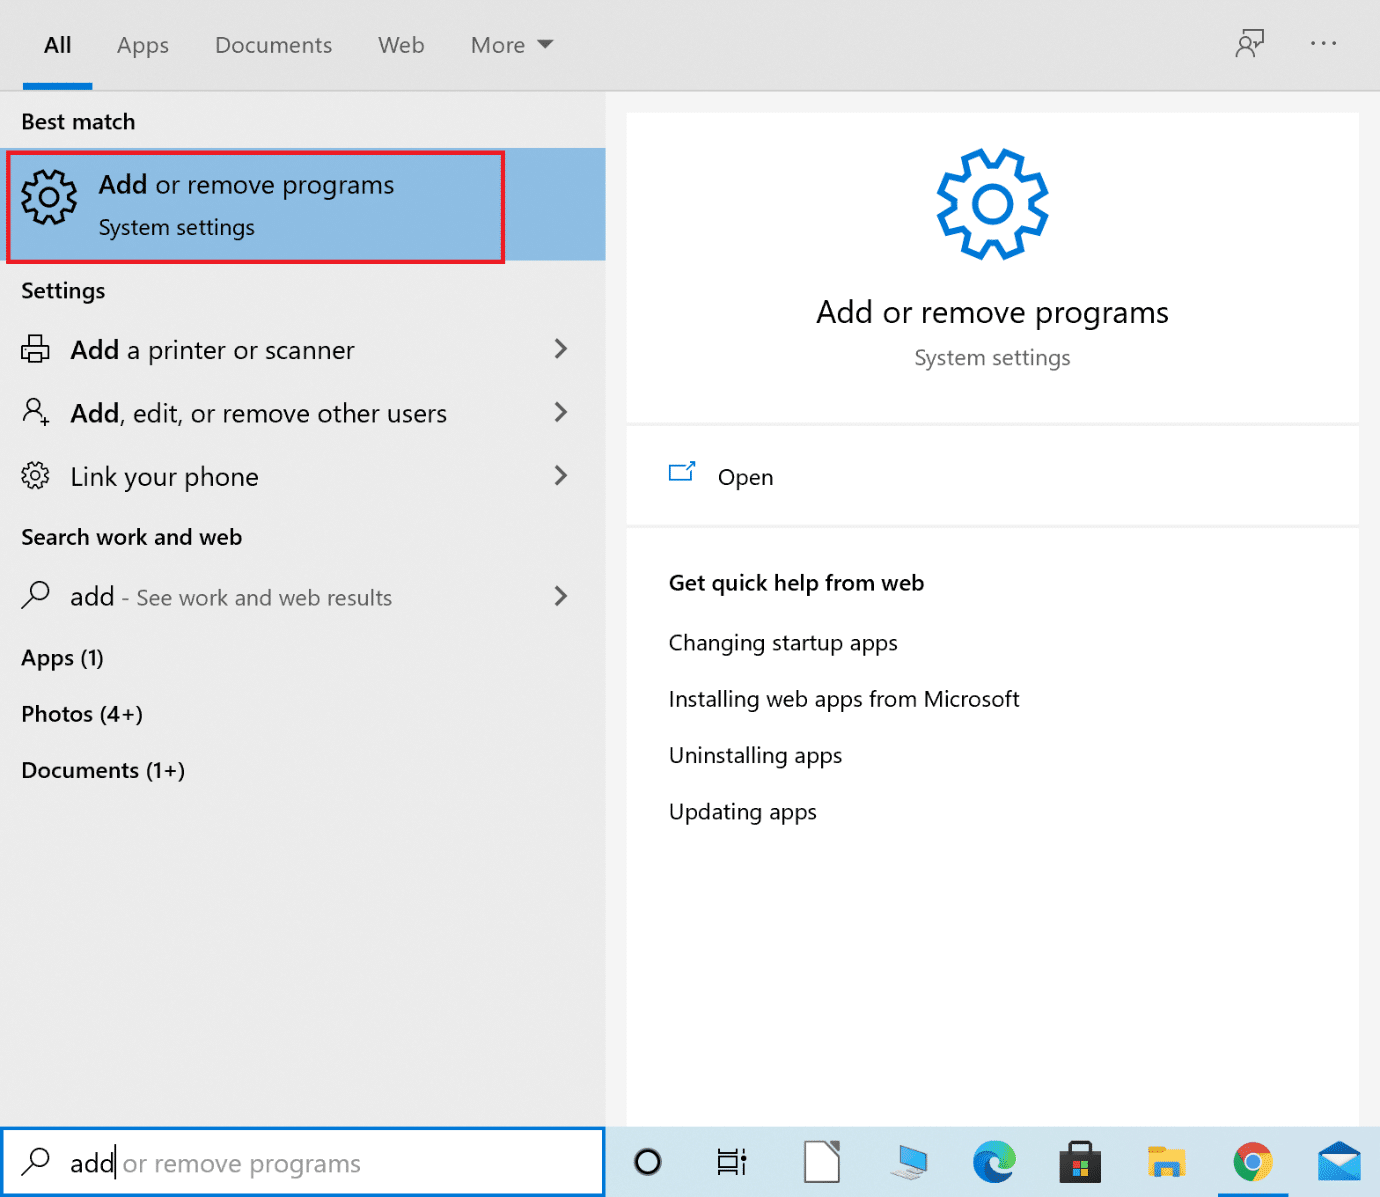
2. Klike sou Pwogram ak Karakteristik anba Anviwònman ki gen rapò from the right side of the screen.
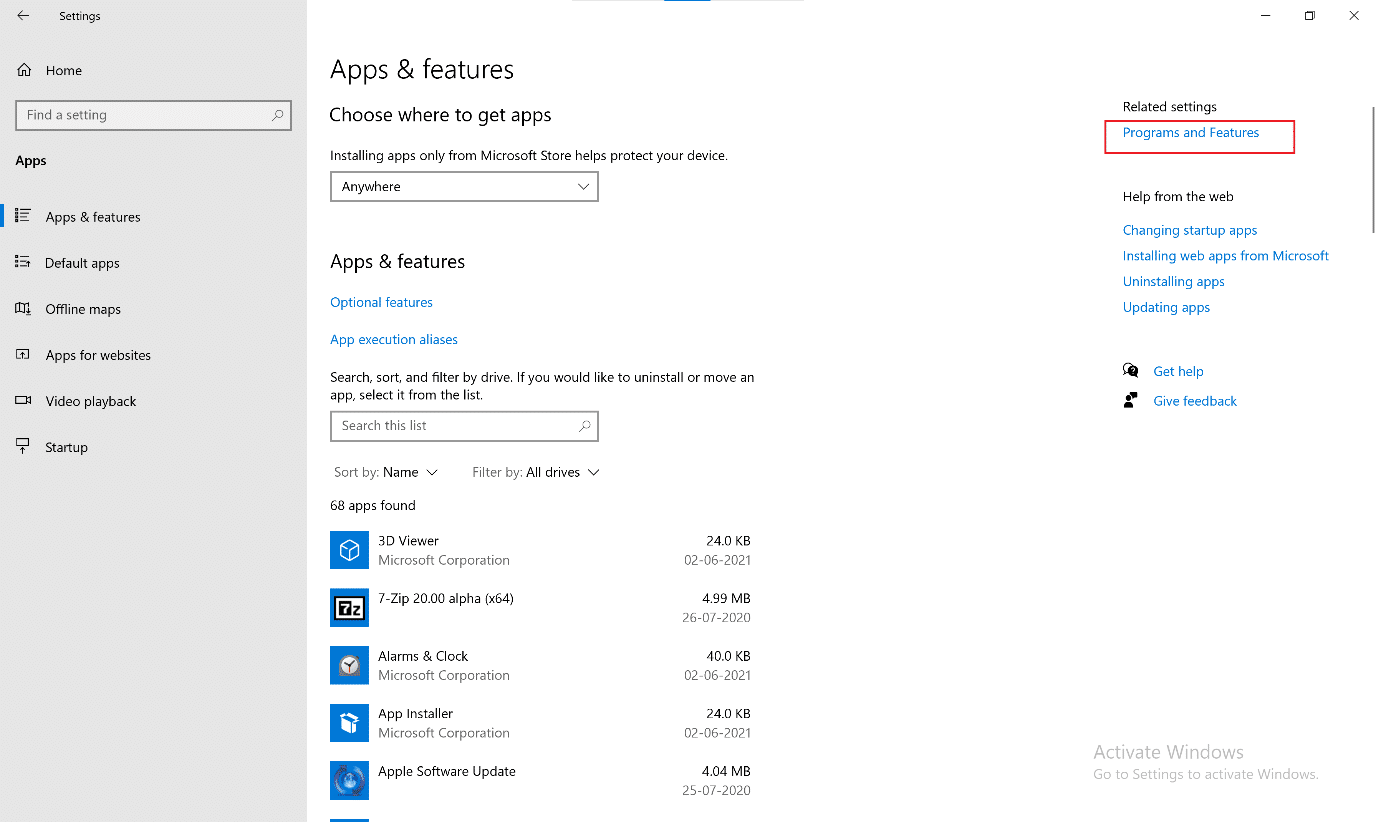
3. Klike sou la flèch anba akote Change your view icon jan yo montre.
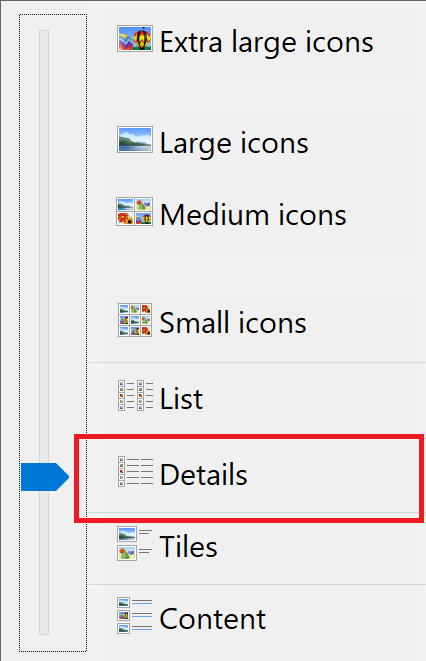
4. Chwazi Detay from the list to view apps along with the name of the publisher, date of installation, and the version installed.
![]()
5. Select all instances of apps and programs published by NVIDIA. Right-click on each and select Enstriksyon.
Remak: Altènativman, ou ka itilize Montre chofè dezenstalasyon to uninstall NVIDIA GeForce as well.
6. Rekòmanse òdinatè a yon fwa fè.
7. Lè sa a, vizite a Nvidia official website , epi klike sou download to download the latest GeForce Experience.

8. Click on the downloaded file to kouri the set-up utility.
9. Apre sa, ouvri sesyon an to your Nvidia account and click on the Chofè tab. Install all the recommended drivers.
Epitou Li: Ranje kat grafik pa detekte sou Windows 10
Method 4: Toggle off Game Mode
The Windows 10 feature of Game Mode can boost the gaming experience and performance of your PC. Nevertheless, many users have reported that disabling this feature is a potential Destiny 2 error code Broccoli fix. Here’s how you can turn off Game Mode in Windows 10 systems:
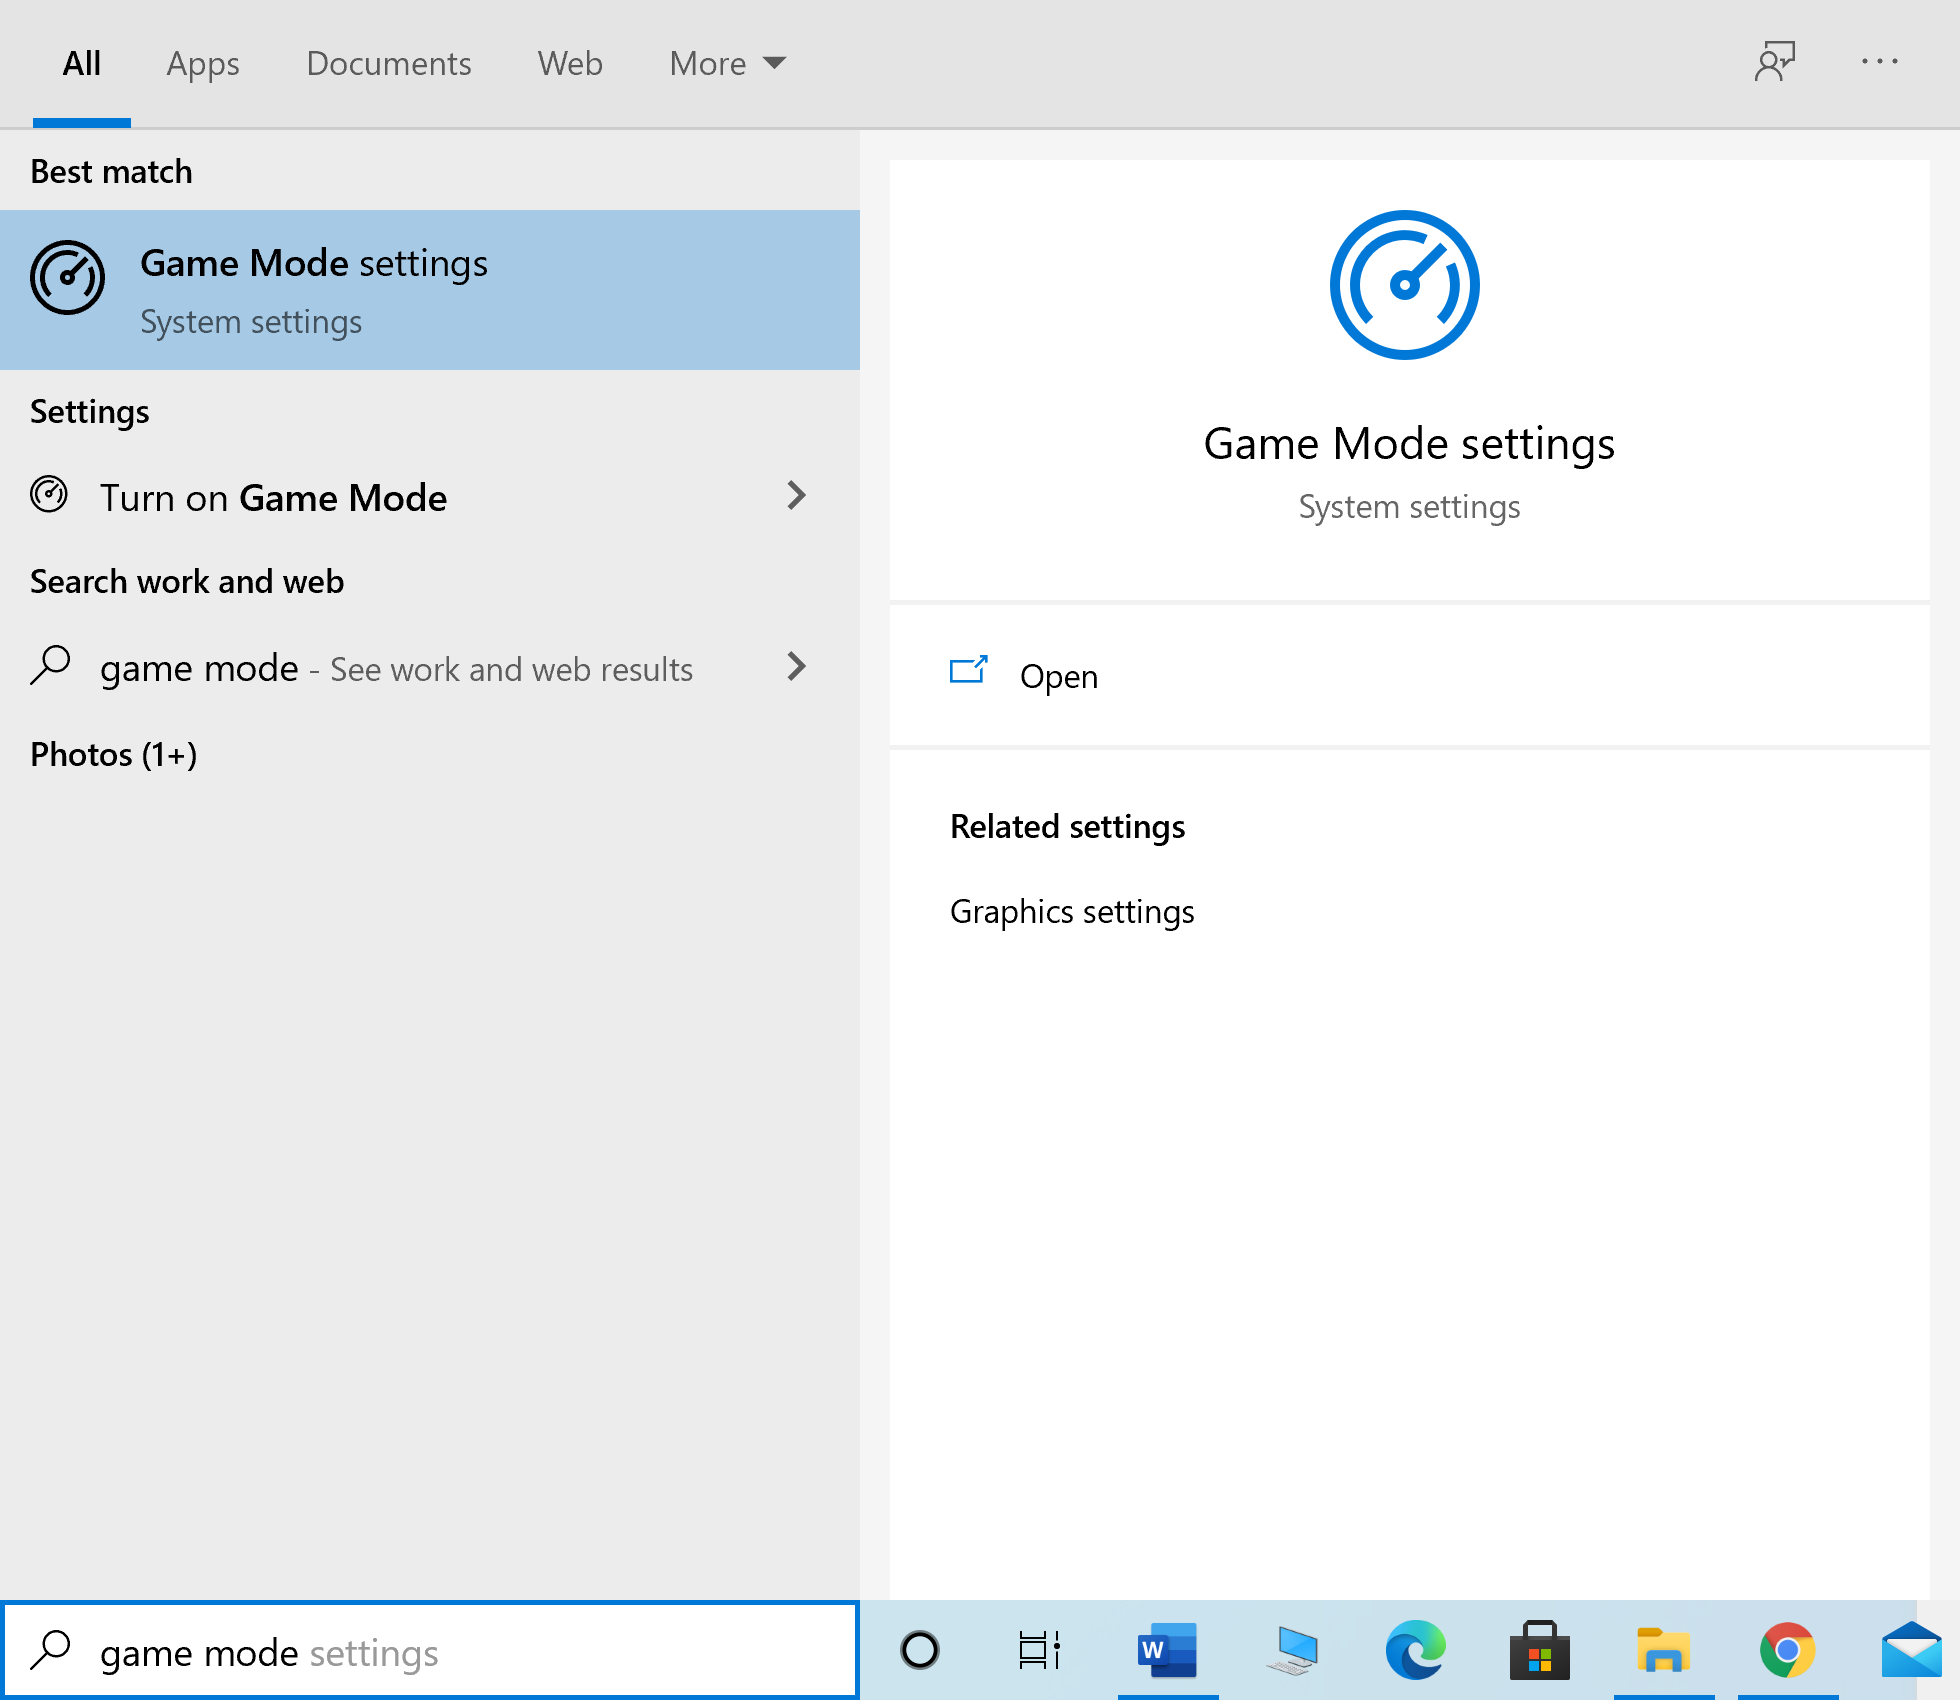
1. Kalite Game mode settings nan Windows rechèch box. Click on Open from the right window.
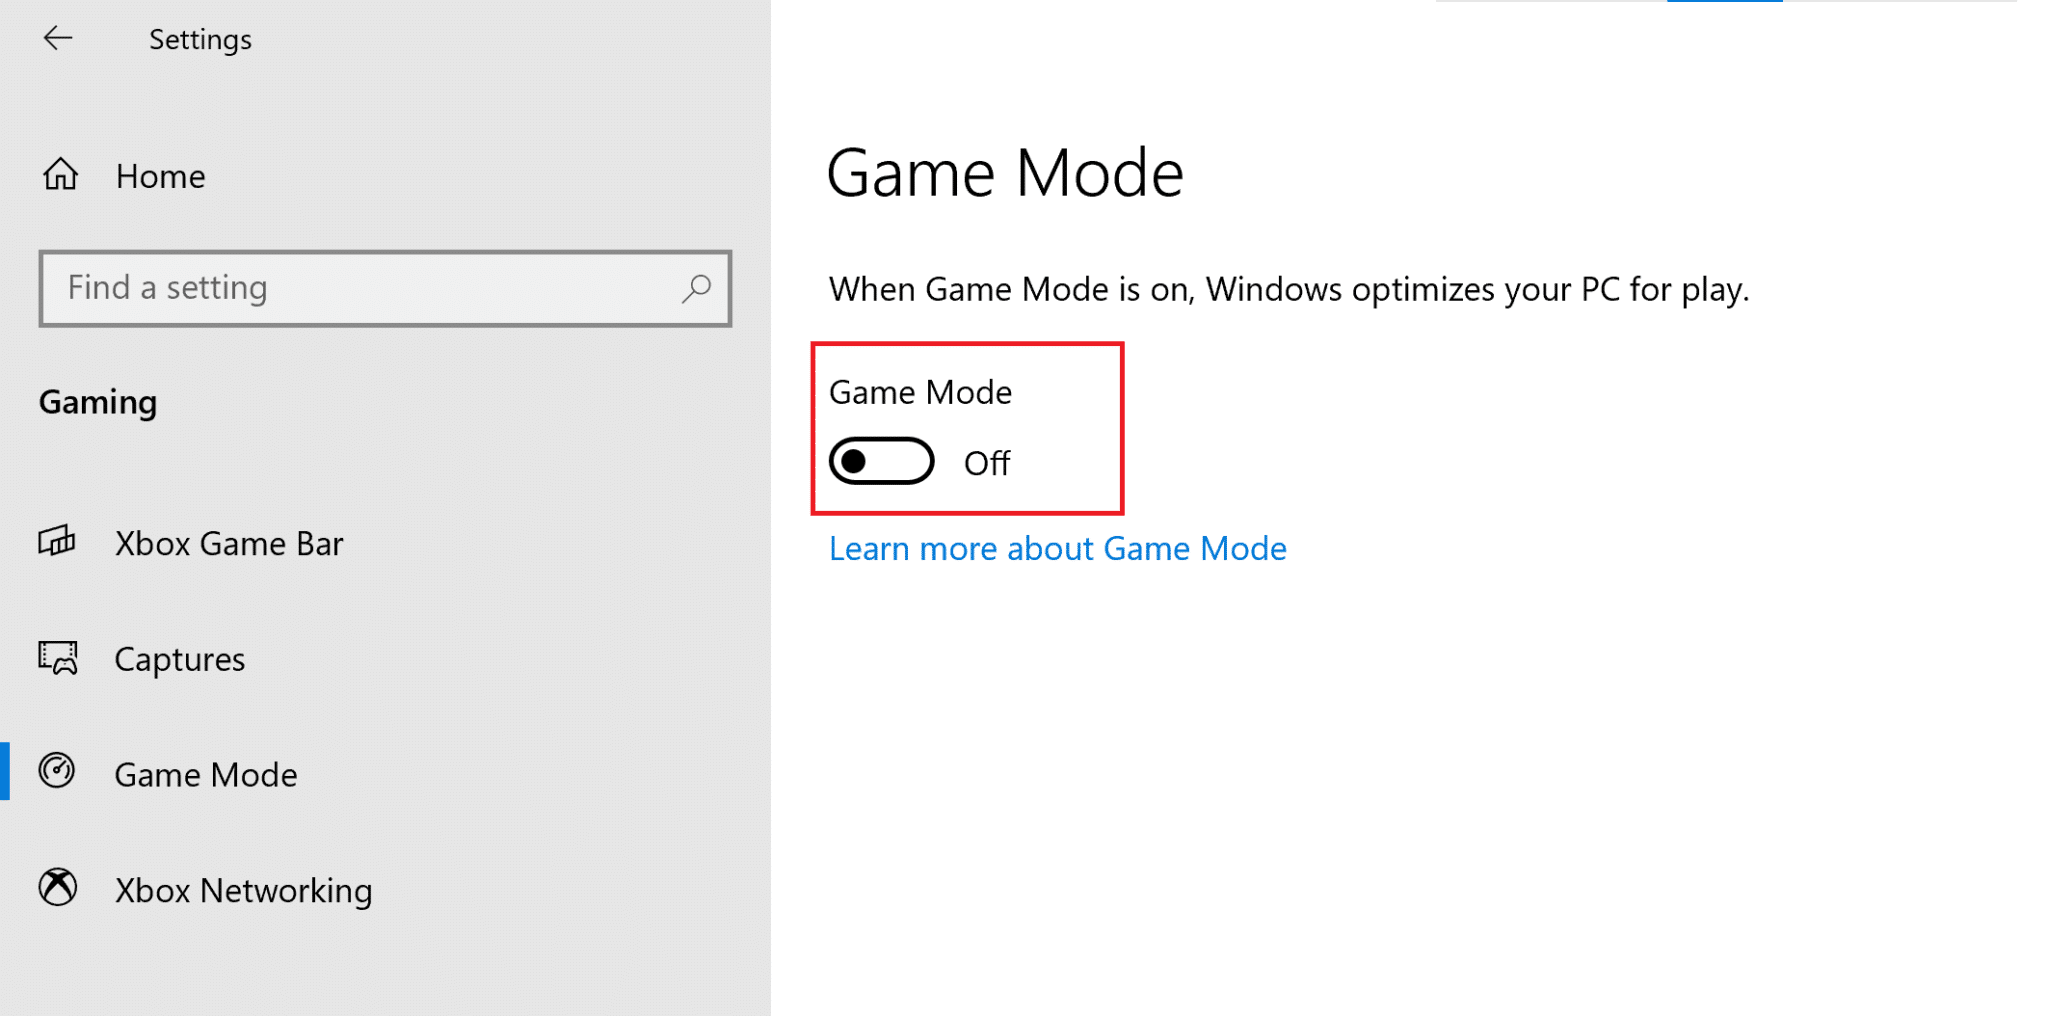
2. Baskile la Game Mode off jan yo montre anba a.
Method 5: Check Integrity of Destiny 2 Files (For Steam)
If you use Steam to play Destiny 2, you need to verify the integrity of game files so that the installed version of the game matches the latest version available on Steam servers. Read our guide on How to Verify the Integrity of Game Files on Steam here.
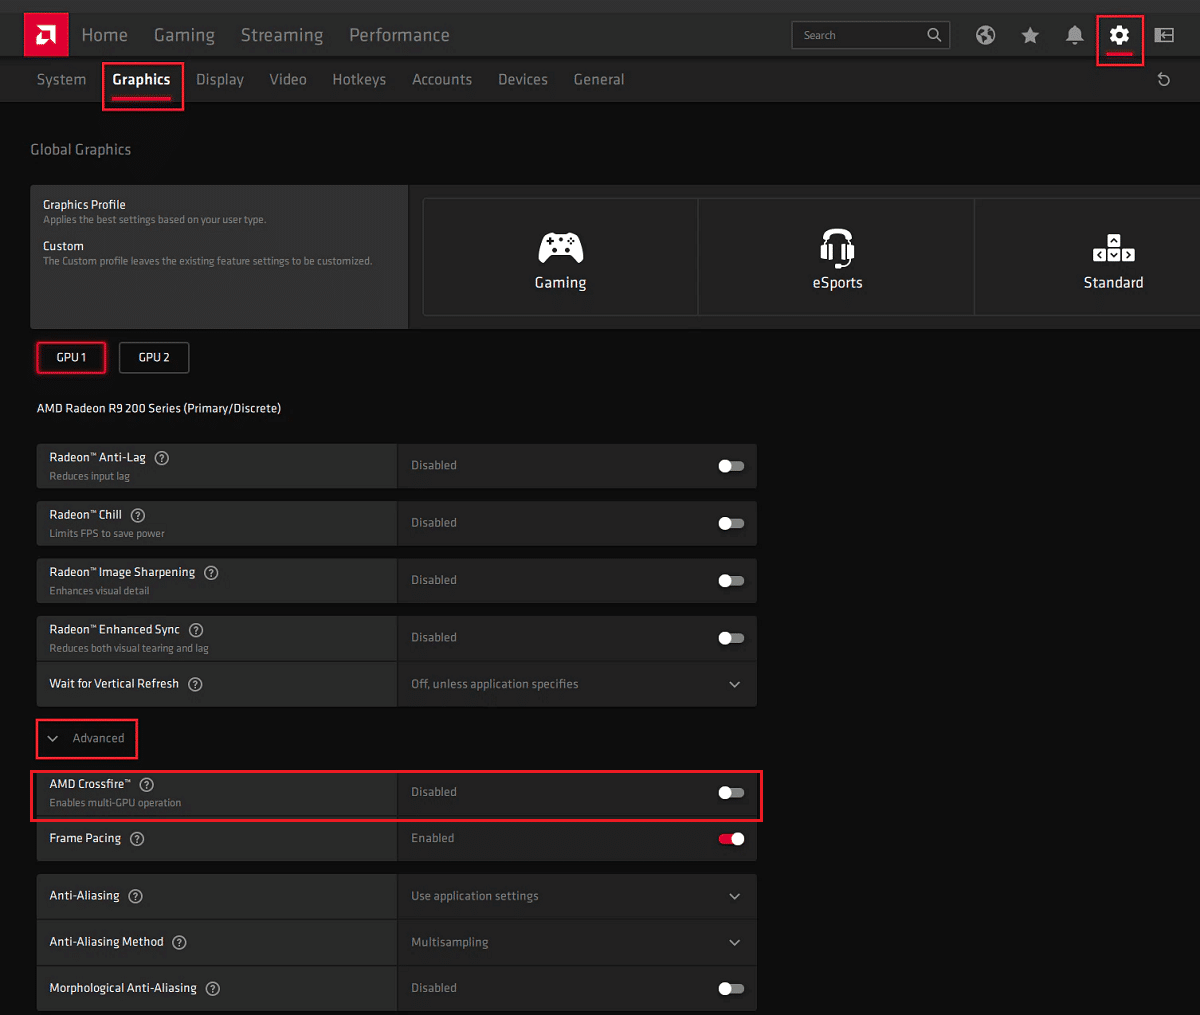
Method 6: Enable Multi-GPU settings (If applicable)
This method is applicable if you use two graphic cards and are facing the Destiny 2 Broccoli error. These settings allow the PC to combine multiple graphic cards and use combined graphics processing power. Follow the listed steps to enable the said settings for NVIDIA and AMD, as the case may be.
Pou NVIDIA
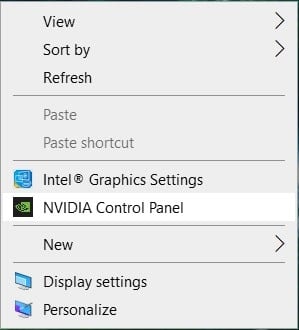
1. Dwa-klike sou la Desktop epi chwazi NVIDIA Kontwòl Panel.
2. Klike sou Konfigirasyon SLI, Surround, PhysX, from the left pane of the NVIDIA Control Panel.
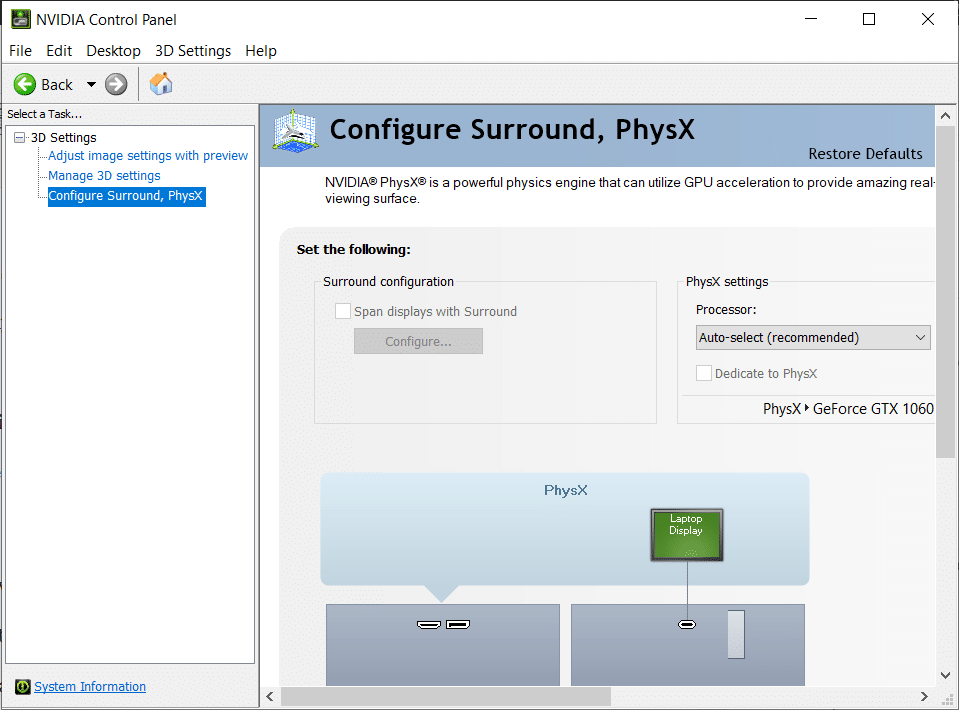
3. Klike sou Maximize 3D performance anba SLI konfigirasyon. Save chanjman yo.
Remak: The Scalable Link Interface (SLI) is the brand name for the NVIDIA multi-GPU setting.
4. Rekòmanse sistèm ou an and launch the game to check if the issue is resolved.
Pou AMD
1. Dwa-klike sou ou Desktop , epi klike sou AMD Radeon Software.
2. Klike sou la Anviwònman icon from the top right corner of the AMD Software window.
3. Apre sa, ale nan la Grafik tab.
4. Scroll desann nan la avanse section and toggle on AMD Crossfire to enable multi-GPU settings.
Remak: CrossFire is the brand name for the AMD multi-GPU setting.
5. Rekòmanse the PC, and launch Destiny 2. Check if you’re able to fix Destiny 2 Error Code Broccoli.
Method 7: Change Graphic Settings on Destiny 2
In addition to modifying graphics settings associated with GPU, you can do similar modifications in the game itself. This will help avoid issues arising out of graphics inconsistency like Destiny 2 error code Broccoli. Here’s how to alter graphics settings in Destiny 2:
1. Lanse Destine 2 sou PC ou.
2. Klike sou Louvri Anviwònman to view the available settings.
3. Apre sa, klike sou la Videyo tab soti nan fenèt gòch la.
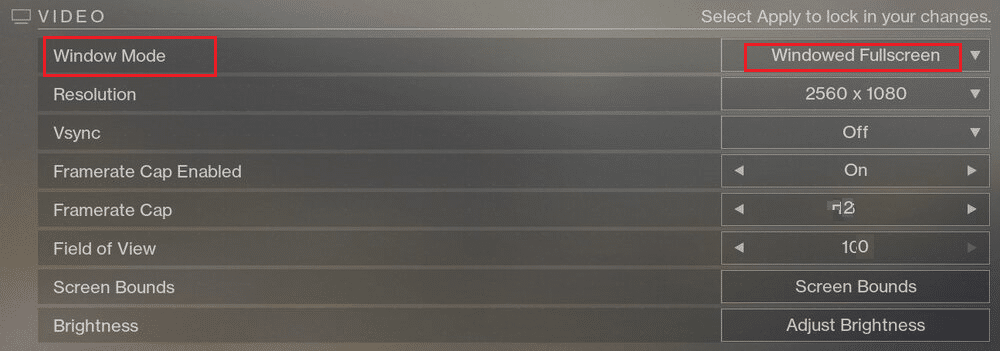
4. Apre sa, chwazi v-sync from Off to Sou.
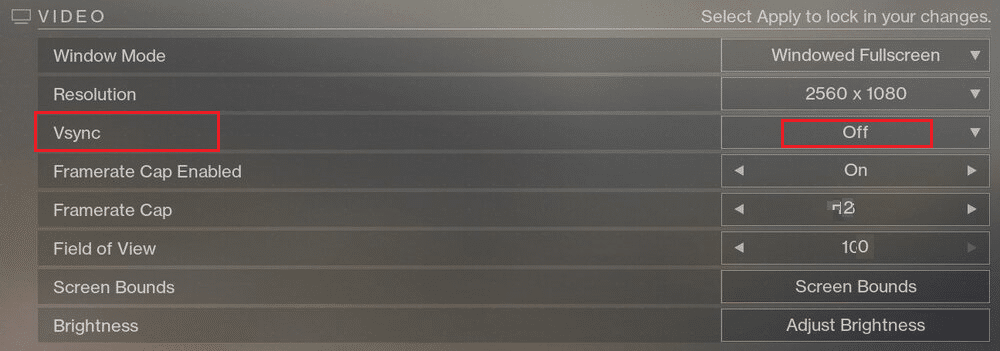
5. Lè sa a, Enable Framerate Cap epi mete li nan 72 from the drop-down, as illustrated below.
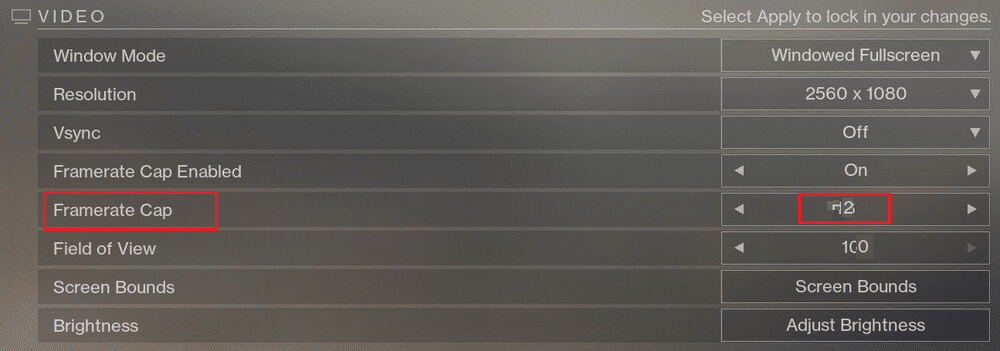
6. Save the settings and launch the game.
Epitou Li: Fix Unreal Engine Exiting Due To D3D Device Being Lost
Method 8: Change Game Properties
You can change settings for the executable file of the game to potentially fix the Broccoli error code. Follow the given steps to do the same.
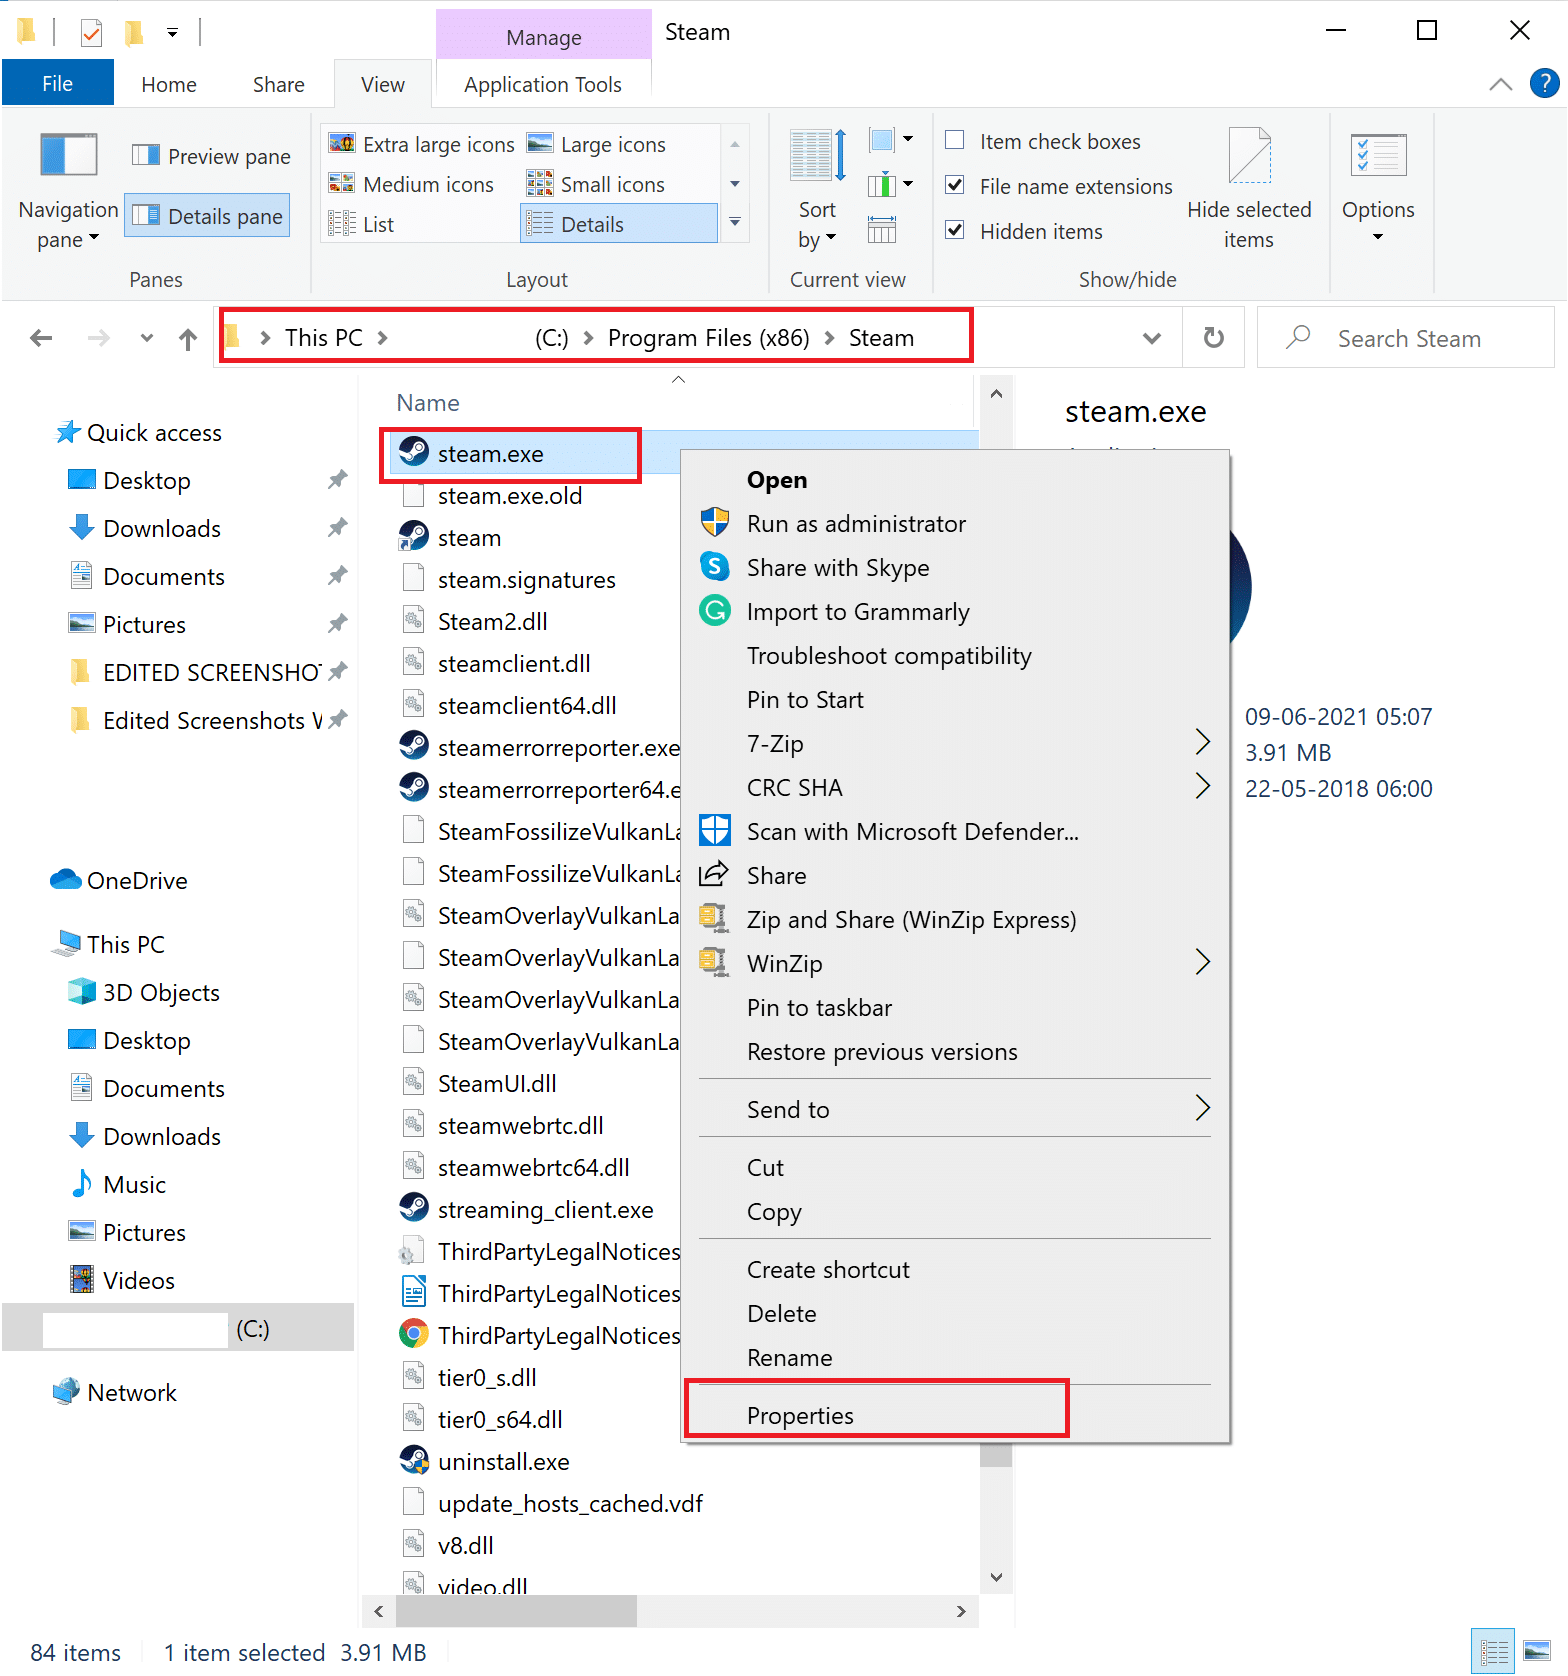
1. Launch File Explorer and go to C: > Program files (x86).
Remak: If you have installed the game elsewhere, navigate to the appropriate directory.
2. louvri nan Destiny 2 folder. Dwa-klike sou la .exe dosye of the game and select Pwopriyete.
Remak: Below is an example shown using Machin vapè.
3. Apre sa, ale nan la sekirite tab nan la Pwopriyete window. Click on the option titled Edit.
4. asire sa Tout kontwòl is enabled for all users, as depicted below.
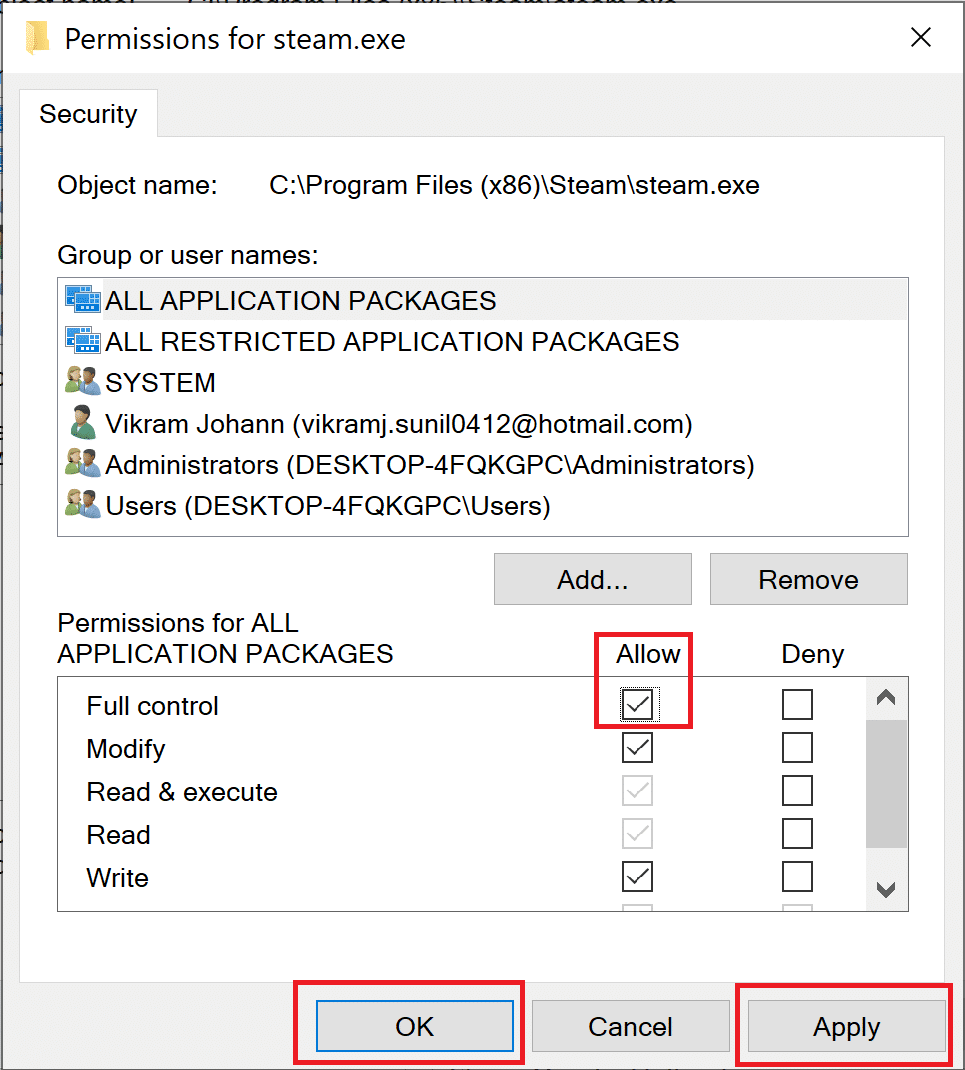
5. Klike sou Aplike> OK to save changes as highlighted above.
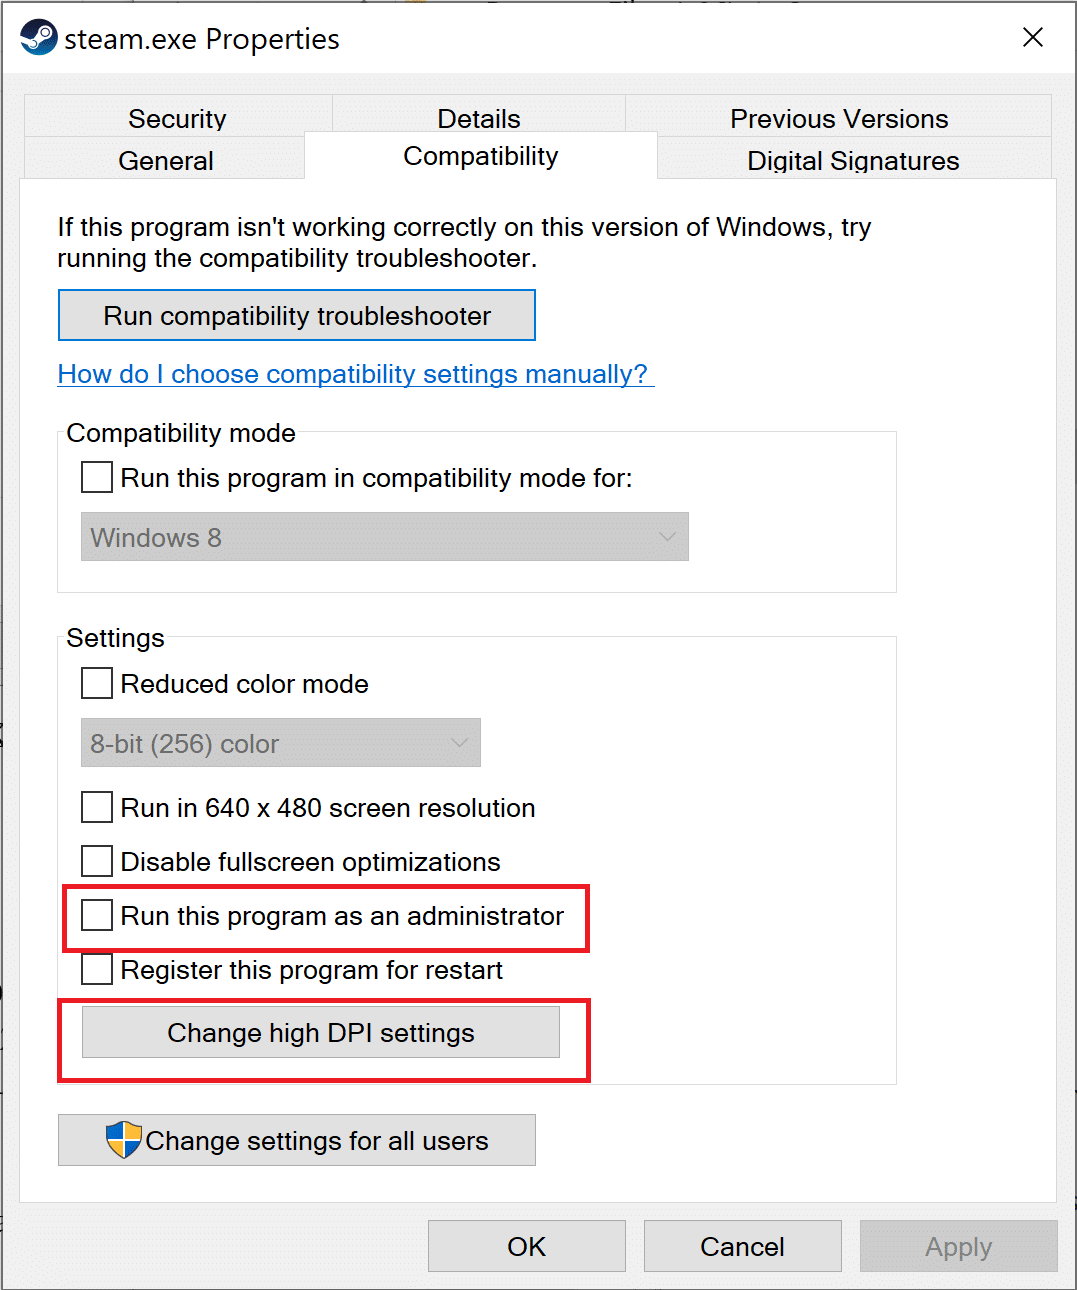
6. Apre sa, chanje a Konpatibilite tab and check the box next to the option titled Kouri pwogram sa a kòm yon administratè.
7. Lè sa a, klike sou Chanje paramèt DPI segondè yo jan yo montre make.
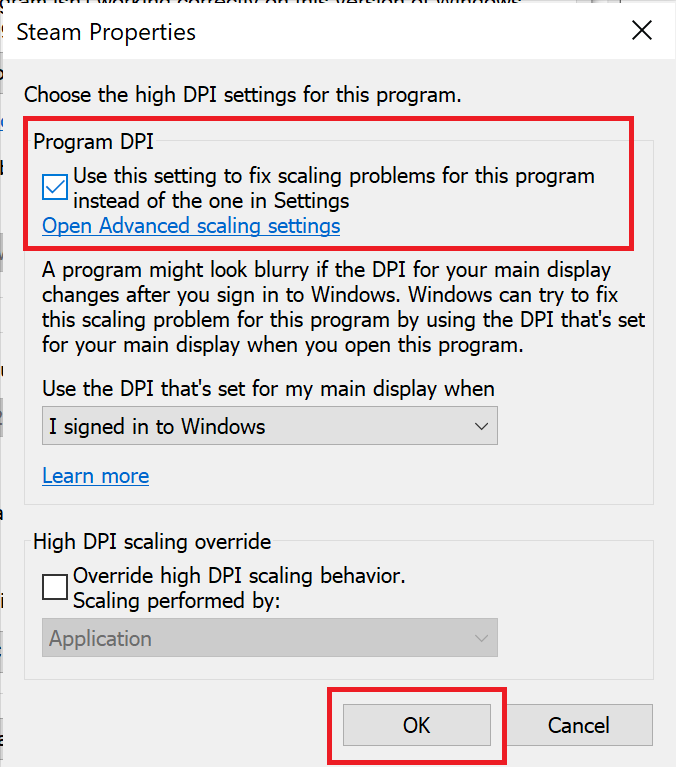
8. Here check the box under Program DPI. Klike sou OK pou konsève pou anviwònman yo.
Method 9: Set Destiny 2 as High Priority
To ensure that the CPU resources are reserved for Destiny 2 gameplay, you need to set it as a high-priority task in Task Manager. When your PC prefers to utilize the CPU for Destiny 2, there are lesser chances that the game will crash. Follow these steps to prioritize Destiny 2 and in turn, fix Destiny 2 Error Code Broccoli on Windows 10:
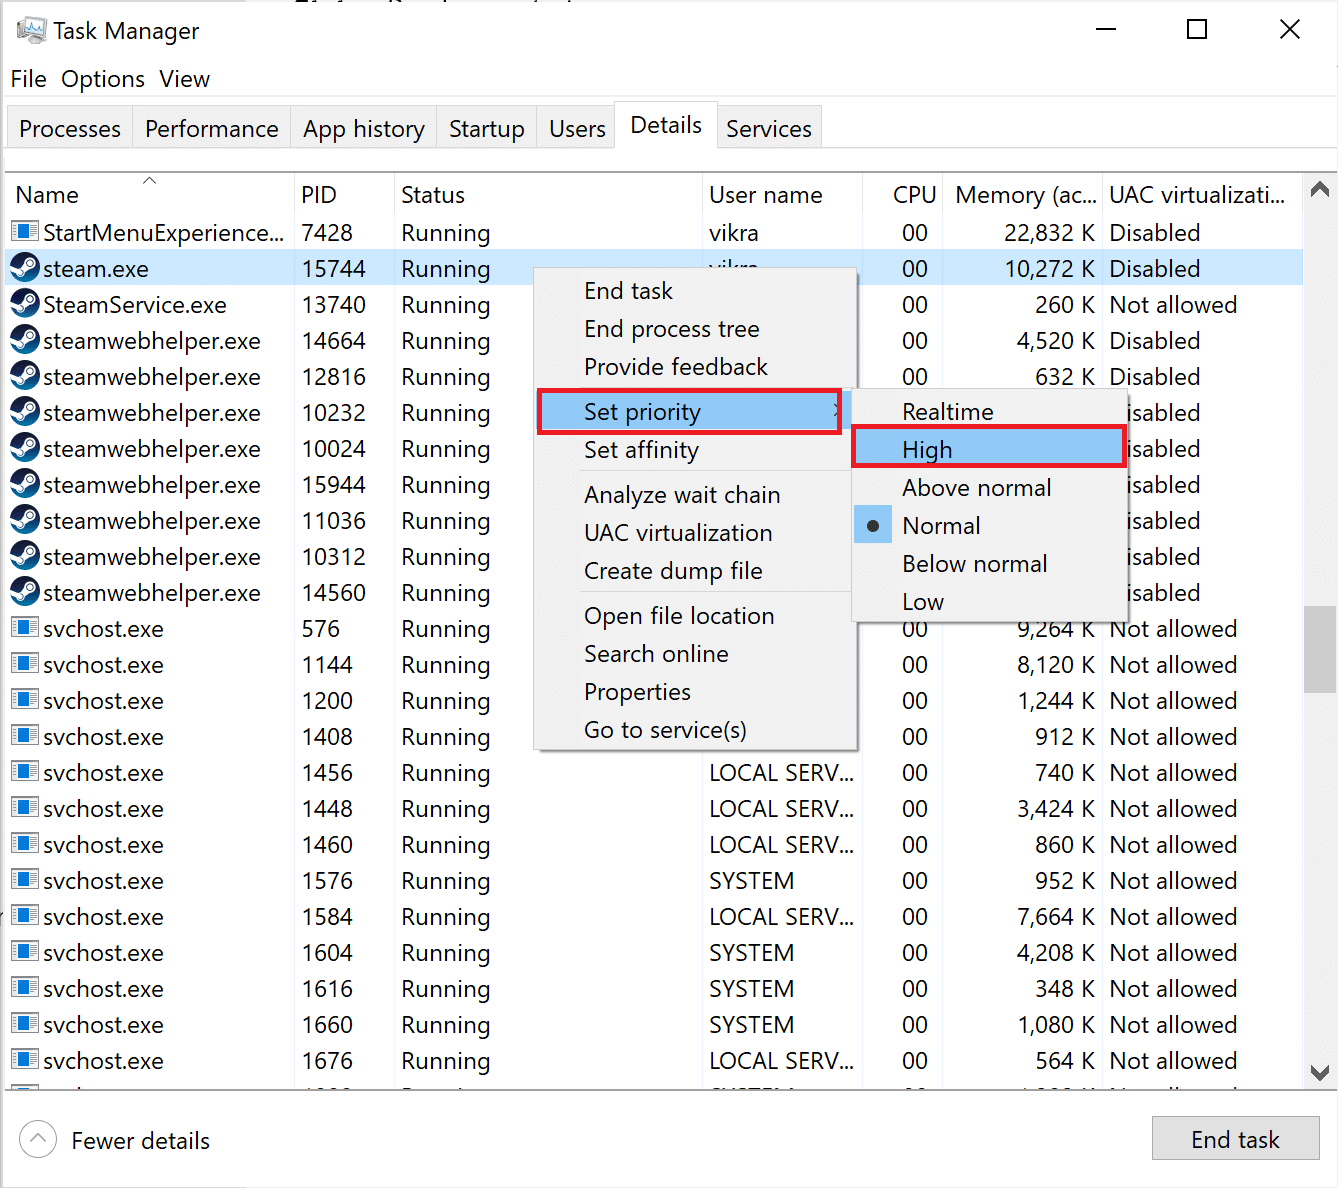
1. Kalite Objektif Travay la Manadjè in Windows rechèch box. Launch it from the search result by clicking louvri.

2. Ale nan la Detay tab nan la Objektif Travay la Manadjè fenèt.
3. Dwa-klike sou Destine 2 , epi klike sou Set priority > High, as explained in the given pic.
4. Repeat the same process for Battle.net, Machin vapè, or any application that you use to launch Destiny 2.
Epitou Li: Ki jan yo chanje priyorite pwosesis CPU nan Windows 10
Method 10: Reinstall Destiny 2
There might be corrupt installation files or game files. To clean your system of corrupt game files, you need to reinstall the game, as follows:
1. Lanse Ajoute oswa retire pwogram yo window as explained in Metòd 3 during Reinstallation of Graphics drivers.
2. Kalite Destine 2 nan Chèche lis sa a text box, as shown.
3. Klike sou Destine 2 in the search result and select Enstriksyon.
Remak: Below is an example is given using Machin vapè.
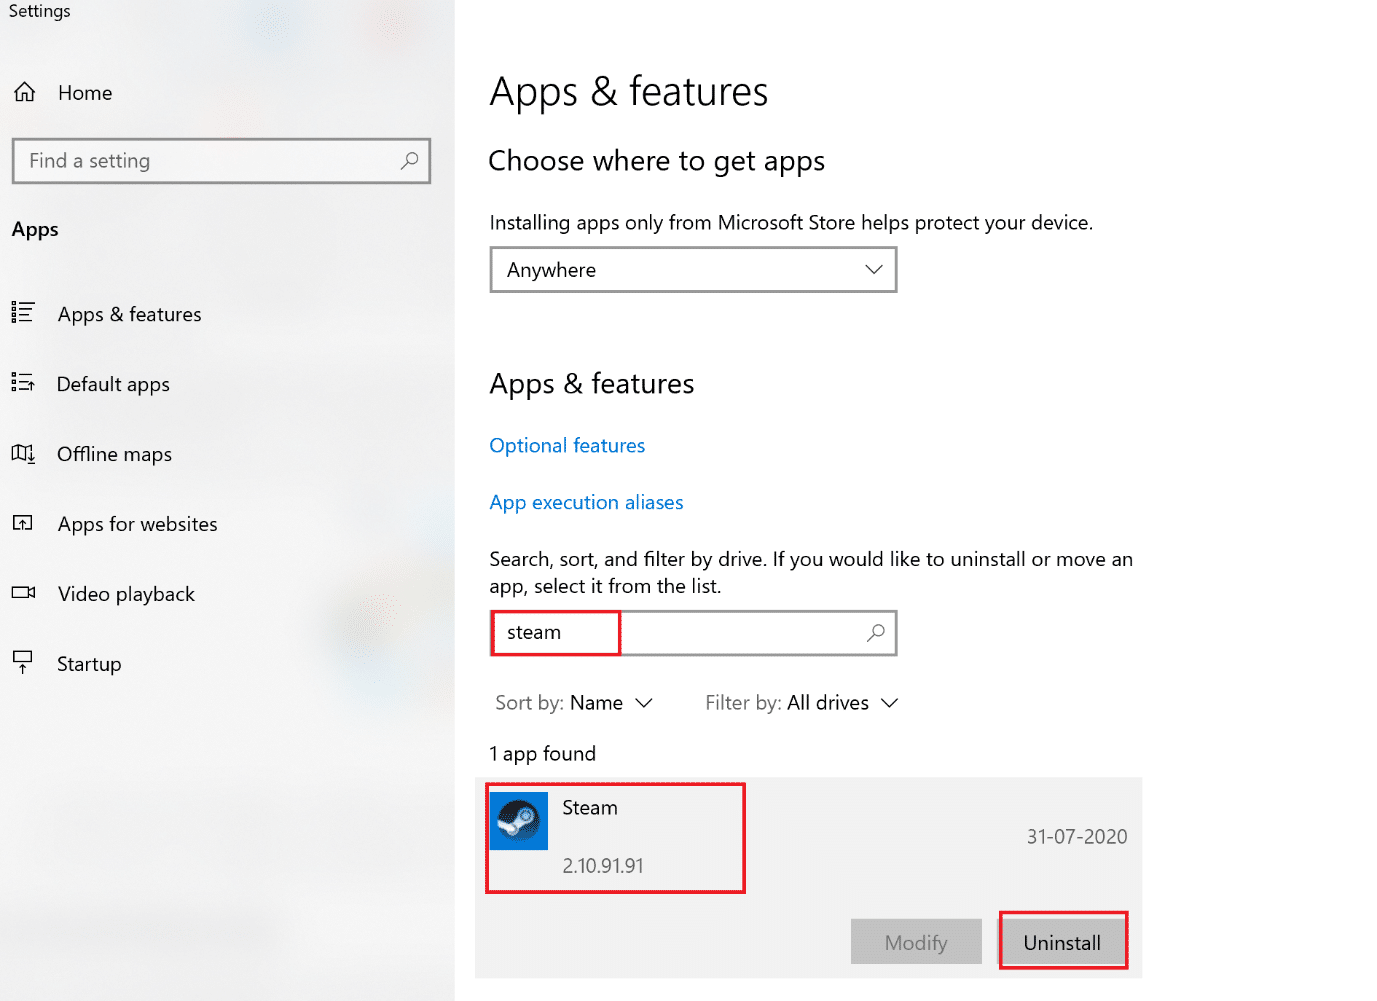
4. Rete tann for the game to be uninstalled.
5. Lanse machin vapè or the application that you use to play games and reinstall Destiny 2.
Corrupt game files on your PC, if any, are now deleted and the Destiny 2 Broccoli error code rectified.
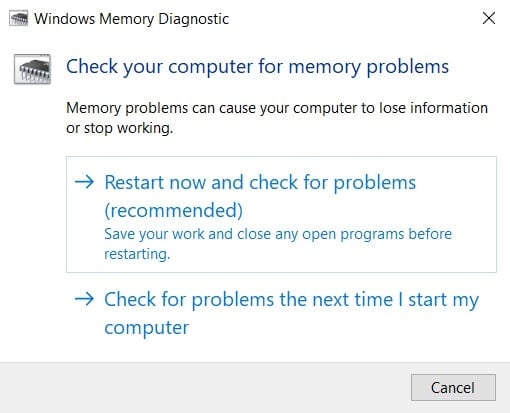
Metòd 11: Kouri Windows memwa dyagnostik
In case, the said error still persists, there is a probability of hardware problems with your computer. To diagnose these problems, implement this method. The Windows Memory Diagnostic app will scan the hardware components of your computer to search for problems. For example, if the RAM on your PC is malfunctioning, the diagnostic app will give information about it so that you can get the RAM checked or replaced. Similarly, we shall run this tool to have problems diagnosed with system hardware that is affecting gameplay.
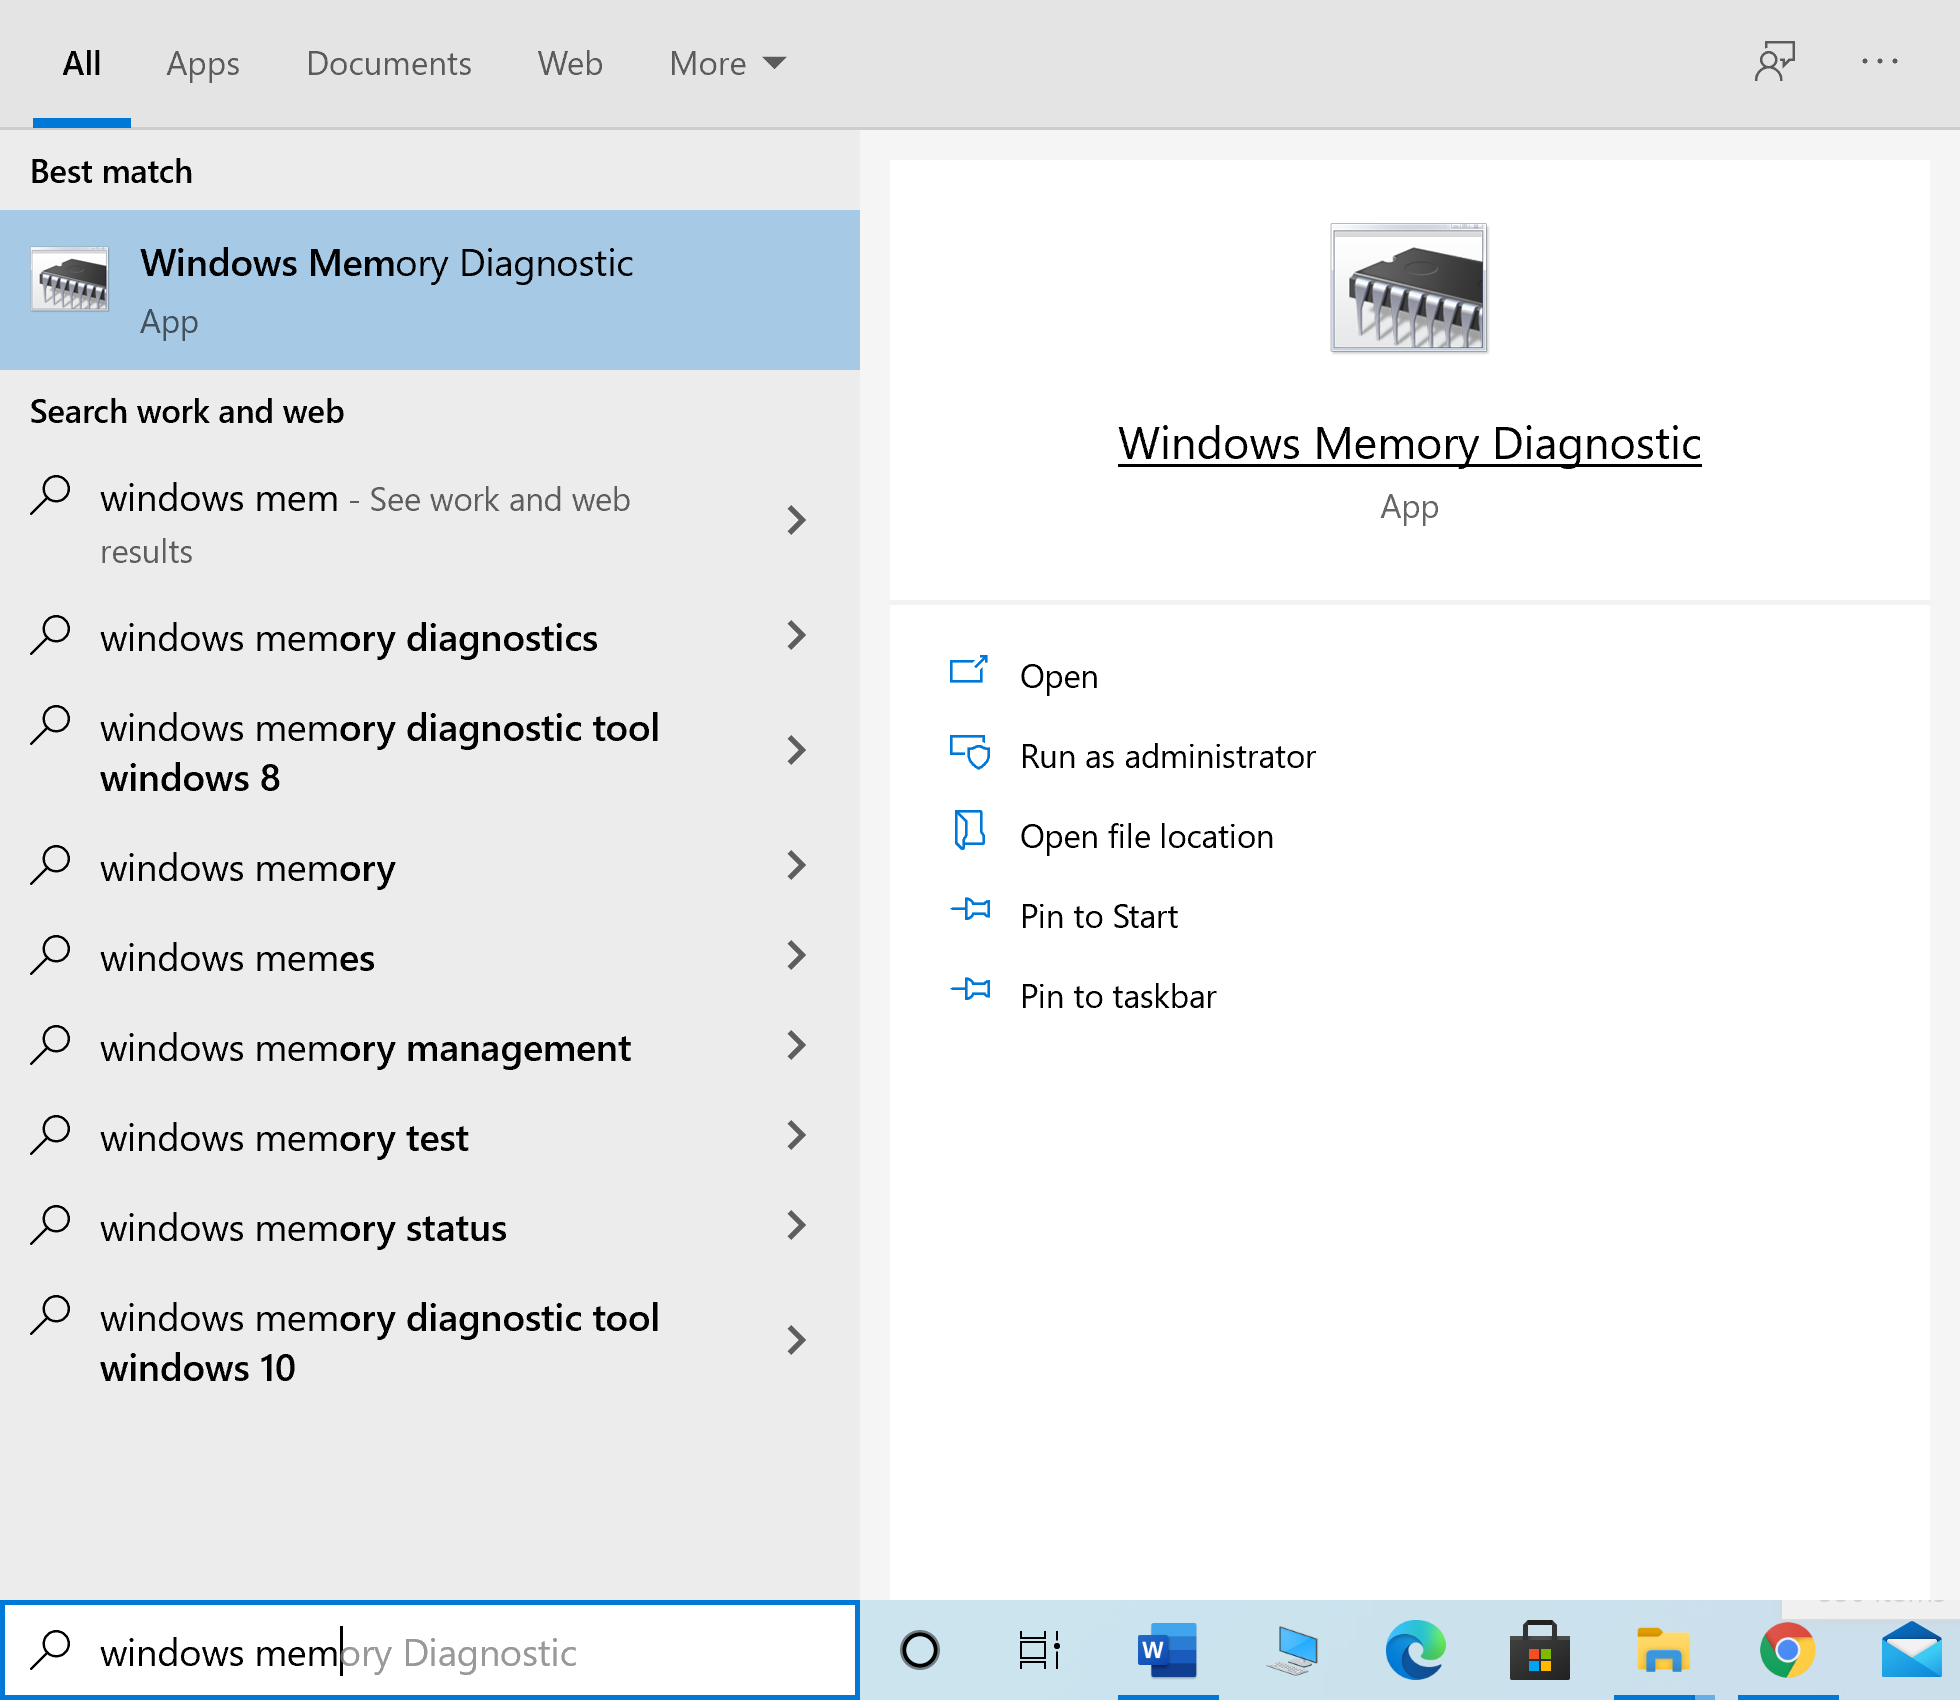
1. Kalite Windows Memory Diagnostic nan Windows rechèch box. Open it from here.
2. Klike sou Rekòmanse kounye a epi tcheke pou pwoblèm (rekòmande) nan fenèt pop-up.
3. The computer will rekòmanse and begin the diagnostics.
Remak: The process may take a while. Do not switch off the machine during the process.
4. The computer will rdemare lè pwosesis la fini.
5. To view the diagnostic information, go to Evènman Viewer, jan yo montre sa.
NAN. Navige nan Fenèt mòso bwa> Sistèm from the left pane of the Event Viewer window.
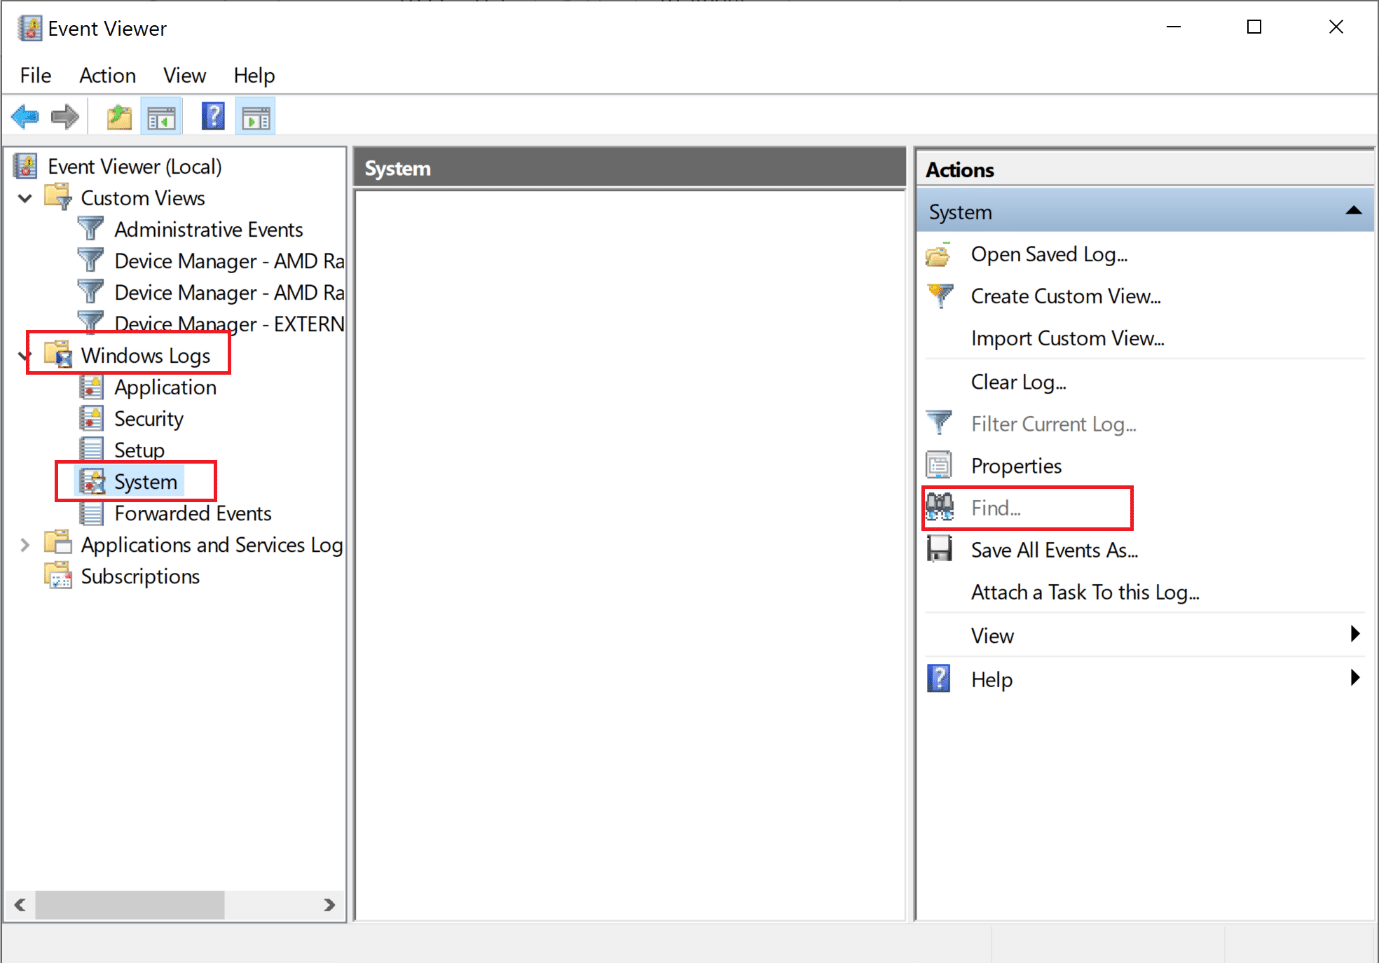
7. Klike sou Jwenn ki soti nan Aksyon pane on the right-hand side.
8. Kalite Dyagnostik memwa epi chwazi Jwenn Next.
9. Check the Event Viewer window for information displayed about pyès ki nan konpitè defo, Si nenpòt.
10. If the hardware is found to be defective, get it checked or replaced by a technician.
Rekòmande:
Nou espere ke gid sa a te itil epi ou te kapab fix Destiny 2 error code Broccoli on your Windows 10 laptop/desktop. Do let us know which method worked the best for you. Also, if you have any questions or suggestions regarding this article, feel free to drop them in the comments section below.

