Fix Background Intelligent Transfer Service won’t start: For Windows Update to function Background Intelligent Transfer Service (BITS) is very important as it basically acts as a download manager for Windows Update. BITS transfers files between client and server in the background and also provide progress information when needed. Now if you are having issues in downloading updates then it will be most probably caused because of BITS. Either the configuration of BITS is corrupted or BITS is not able to start.
If you will go to services window you will find out that Background Intelligent Transfer Service (BITS) won’t start. These are the type of errors which you will face while trying to start BITS:
Background intelligent transfer service did not start properly
Background intelligent transfer service will not start
Background intelligent transfer service has stopped working
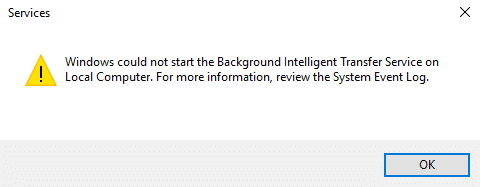
Windows could not start the Background Intelligent Transfer service on the local computer. For more information review the system event log. If this is a non-Microsoft service contact the service vendor and refer to service-specific error code -2147024894. (0x80070002)
Now if you are facing a similar issue with BITS or with Windows update then this post is for you. Without wasting any time let’s see how to actually Fix Background Intelligent Transfer Service won’t start issue with the below-listed troubleshooting guide.
Fix Background Intelligent Transfer Service won’t start
Győződjön meg róla, hogy hozzon létre egy visszaállítási pontot arra az esetre, ha valami baj lenne.
Method 1: Start BITS from Services
1.Press Windows Keys + R then type services.msc és nyomja meg az Enter billentyűt.

2.Now find BITS and then double click on it.
3.Make sure the Startup type is set to Automatikus and the service is running, if not then click on Start gomb.

4. Kattintson az Alkalmaz, majd az OK gombra.
5.Reboot your PC and again try to update Windows.
Method 2: Enable dependent Services
1.Press Windows Keys + R then type services.msc és nyomja meg az Enter billentyűt.
2.Now find the below-listed services and double click on each of them to change their properties:
Terminal Services
Távoli eljáráshívás (RPC)
Rendszer eseményjelző
Windows Management Instrumentation Driver Extensions
COM + esemény rendszer
DCOM szerver folyamatindító
![]()
3.Make sure their Startup type is set to Automatikus and the above services are running, if not then click on Start gomb.
4. Kattintson az Alkalmaz, majd az OK gombra.
5. Indítsa újra a számítógépet a módosítások mentéséhez, és ellenőrizze, hogy képes-e rá Fix Background Intelligent Transfer Service won’t start.
3. módszer: Futtassa a Rendszerfájl-ellenőrzőt
1. Nyomja meg a Windows Key + X billentyűket, majd kattintson a gombra Parancssor (Adminisztrátor).

2. Most írja be a következőket a cmd-be, és nyomja meg az Enter billentyűt:
Sfc /scannow sfc /scannow /offbootdir=c: /offwindir=c:windows (Ha a fenti sikertelen, próbálja meg ezt)

3. Várja meg, amíg a fenti folyamat befejeződik, majd indítsa újra a számítógépet.
Method 4: Run Windows Update Troubleshooter
1. Írja be a „hibaelhárítás” szót a Windows keresősávjába, és kattintson a gombra Hibaelhárítás.

2. Ezután a bal oldali ablaktáblában válassza ki a lehetőséget Összes megtekintése.
3. Ezután a Számítógépes problémák elhárítása listából válassza ki a lehetőséget Windows Update.

4.Follow on-screen instructions and let the Windows Update Troubleshoot run.

5.Restart your PC and see if you are able to Fix Background Intelligent Transfer Service won’t start.
Method 5: Run DISM Tool
1. Nyomja meg a Windows Key + X billentyűkombinációt, és válassza a Parancssor (Adminisztrátor) lehetőséget.
2. Írja be a következő parancsot a cmd-be, és mindegyik után nyomja meg az Enter billentyűt:
a) Dism /Online /Cleanup-Image /CheckHealth b) Dism /Online /Cleanup-Image /ScanHealth c) Dism /Online /Cleanup-Image /RestoreHealth

3. Hagyja futni a DISM parancsot, és várja meg, amíg befejeződik.
4. Ha a fenti parancs nem működik, próbálkozzon az alábbiakkal:
Dism /Image:C:offline /Cleanup-Image /RestoreHealth /Source:c:testmountwindows Dism /Online /Cleanup-Image /RestoreHealth /Source:c:testmountwindows /LimitAccess
Jegyzet: Cserélje ki a C:RepairSourceWindows fájlt a javítási forrás helyére (Windows telepítő vagy helyreállító lemez).
5. Indítsa újra a számítógépet a módosítások mentéséhez, és ellenőrizze, hogy képes-e rá Fix Background Intelligent Transfer Service won’t start, ha nem, akkor folytassa a következő módszerrel.
Method 6: Reset the Download Queue
1. Nyomja meg a gombot Windows billentyű + R then type the following and hit Enter:
%ALLUSERSPROFILE%Application DataMicrosoftNetworkDownloader
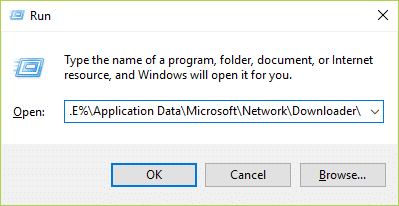
2.Now look for qmgr0.dat and qmgr1.dat, if found make sure to delete these files.
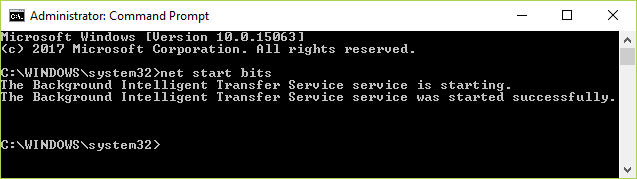
3. Nyomja meg a Windows Key + X billentyűkombinációt, majd válassza ki Parancssor (Admin).
4. Írja be a következő parancsot a cmd-be, és nyomja meg az Enter billentyűt:
net start bitek
5.Again try to update window and see if it works.
7. módszer: Rendszerleíró adatbázis javítás
1. Nyomja meg a Windows Key + R billentyűkombinációt, majd írja be regedit és nyomja meg az Enter billentyűt a megnyitáshoz Nyilvántartás-szerkesztő.

2. Navigáljon a következő beállításkulcshoz:
HKEY_LOCAL_MACHINESYSTEMCurrentControlSetControlBackupRestoreFilesNotToBackup
3.If the above key exists then continues, if not then right-click on Biztonsági mentés visszaállítása és válassza ki a Új > Kulcs.
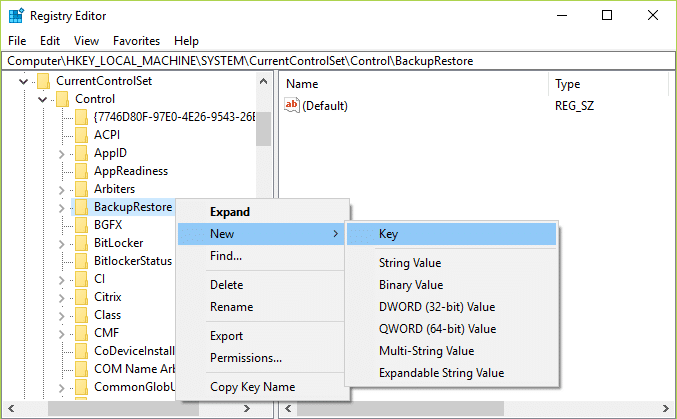
4.Type FilesNotToBackup and then hit Enter.
5.Exit Registry Editor and press Windows Key + R then type services.msc és nyomja meg az Enter billentyűt.
6.Find BITS and double-click on it. Then in the Általános lap, kattintson Rajt.
Neked ajánlott:
Ez az, ami sikeresen megvan Fix Background Intelligent Transfer Service won’t start de ha továbbra is kérdései vannak ezzel az útmutatóval kapcsolatban, nyugodtan kérdezze meg őket a megjegyzés részben.

