If you have 2 in 1 Windows device such as Tablets, you would be familiar with the importance of the screen rotation feature. Users report that the screen rotation feature has stopped working & the Screen Rotation Lock option is greyed out. If you’re facing this issue, then don’t worry as this is just a setting issue which means it can be easily fixed. This guide will walk you through the steps to fix rotation lock greyed out in Windows 10.
Here are issues which can be resolved using this guide:
- Rotation lock missing
- Auto Rotate not working
- Rotation lock greyed out.
- Screen rotation not working
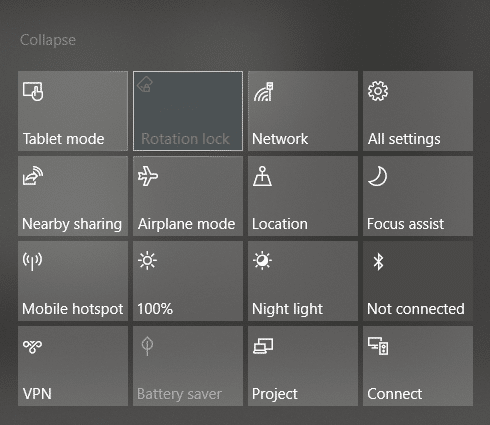
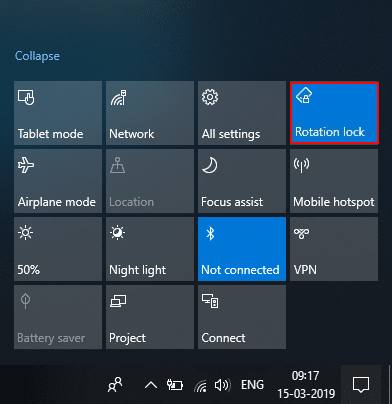
Fix Rotation Lock greyed out in Windows 10
Համոզվեք, որ ստեղծեք վերականգնման կետ, եթե ինչ-որ բան սխալ լինի:
Method – 1: Enable Portrait Mode
One of the methods to fix this problem is to rotate your screen in portrait mode. Once you rotate it to portrait mode, most probably your rotation lock would start working, i.e. clickable again. In case your device is not rotating into portrait mode automatically, try to do it manually.
1. Մամուլ Windows Key + I- ը to open Settings then click on the համակարգ icon.

2. Make sure to select ցուցադրել ձախակողմյան մենյուից:
3. Տեղադրեք Orientation section where you need to choose Դիմանկար բացվող մենյուից:
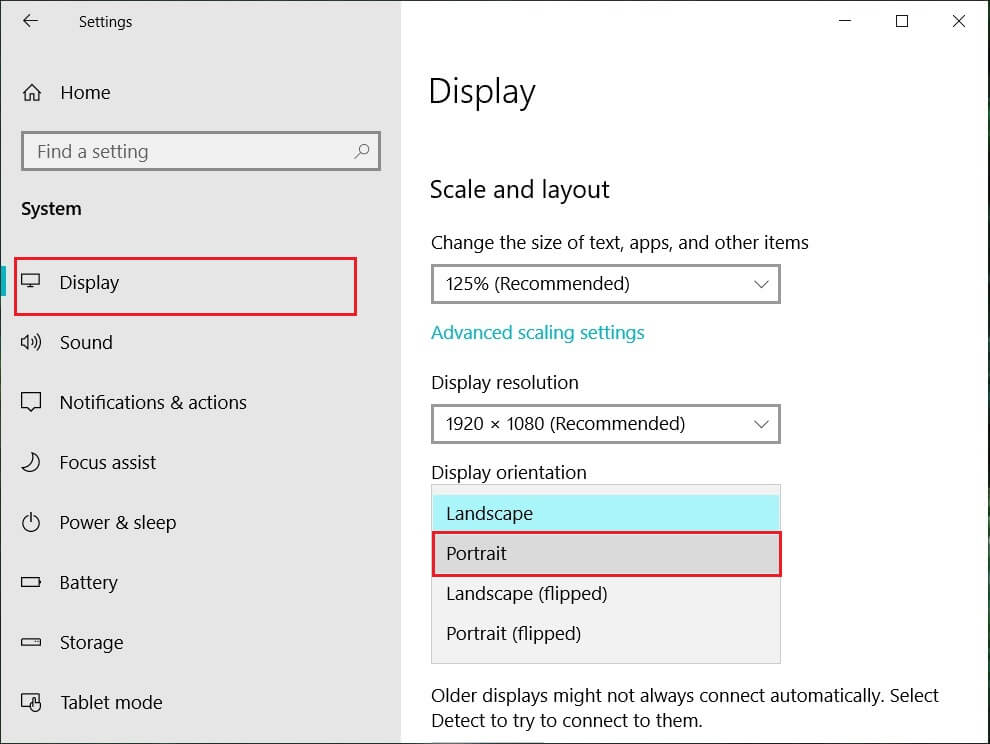
4. Your device will automatically turn into portrait mode.
Method – 2: Use your device in tent mode
Some users, particularly Dell Inspiron, experienced that when their rotation lock is greyed out, the only way to solve this problem is to put your device in Tent Mode.
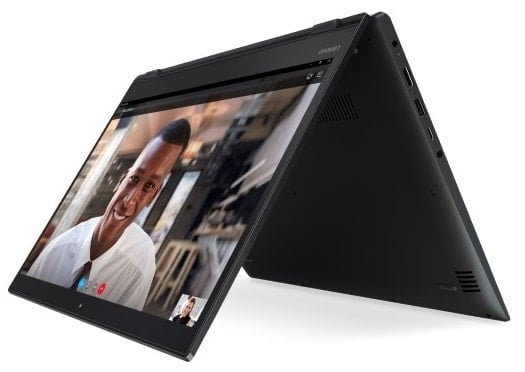
Պատկեր Վարկային: Microsoft
1. You need to put your device in Tent Mode. If your display is upside down, you need not worry.
2. Այժմ կտտացրեք կոճակին Windows գործողությունների կենտրոն, Պտտման կողպեք will be working. Here you need to turn it off if you want so that your device rotate properly.
Method – 3: Disconnect your keyboard
If rotation lock is greyed in your Dell XPS and Surface Pro 3 (2-in-1 device), you need to disconnect your keyboard, and many users reported that disconnecting the keyboard solves the rotation lock problem. If you own different devices, you can still use this method to fix rotation lock greyed out in Windows 10 issue.
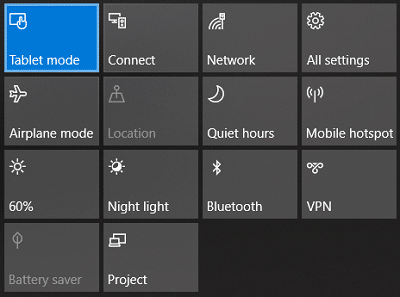
Method – 4: Switch to Tablet Mode
Many users experienced that this rotation greyed out the problem by switching their device into Tablet Mode. If it is switched automatically, it is good; otherwise, you can do it manually.
1. Սեղմեք Windows գործողությունների կենտրոն.
2. Այստեղ դուք կգտնեք Պլանշետի ռեժիմ option, Click on It.
OR
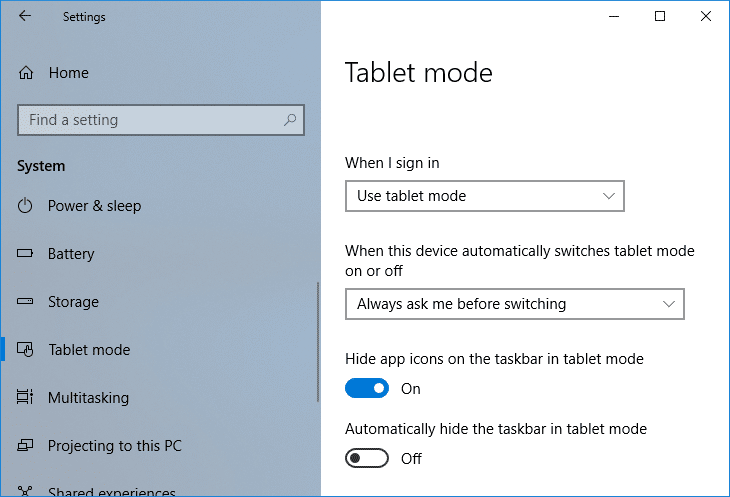
1. Բանալու համար սեղմեք Windows Key + I Կարգավորումներ ապա սեղմեք այն համակարգ icon.
2. Here it would help if you located Պլանշետի ռեժիմ option under the left window pane.
3. Now from the “When I sign in” drop-down, select “Օգտագործեք պլանշետի ռեժիմը".
Method – 5: Change LastOrientation Registry Value
If you still experience a problem, you can solve it by changing some registry values.
1. Press Windows +R and enter regedit ապա մուտքագրեք Enter:

2. Once registry editor opens, you need to navigate to the below path:
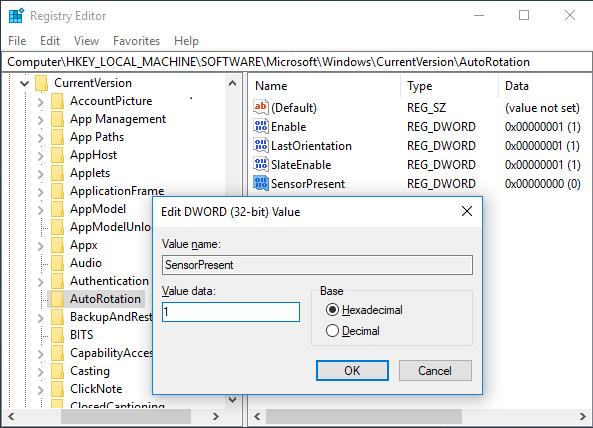
HKEY_LOCAL_MACHINESOFTWAREMicrosoftWindowsCurrentVersionAutoRotation
Նշում: Follow the above folders one by one to locate Auto Rotation.
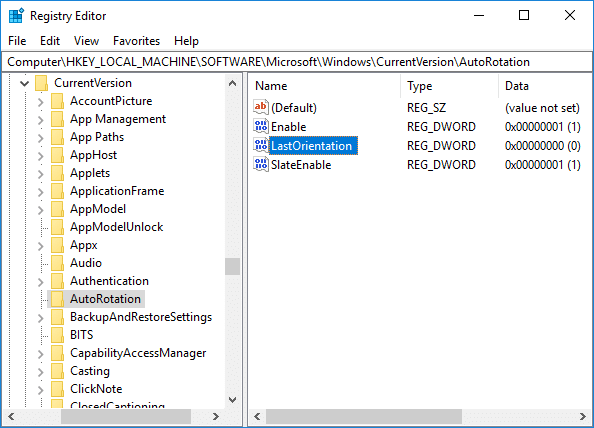
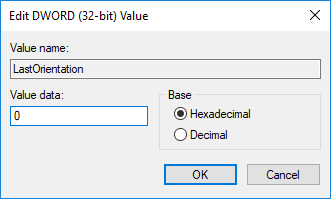
3. Համոզված եղեք select AutoRotation այնուհետև աջ պատուհանի պատուհանում կրկնակի կտտացրեք Last Orientation DWORD.
4. Now enter 0 under Value data field եւ սեղմեք OK:
5. Եթե կա SensorPresent DWORD, double-click on it and set its արժեքը 1-ին:
Method – 6: Check Sensor Monitoring Service
Sometimes services of your device can cause a rotation lock problem. Therefore, we can get it sorted with Windows Monitoring services feature.
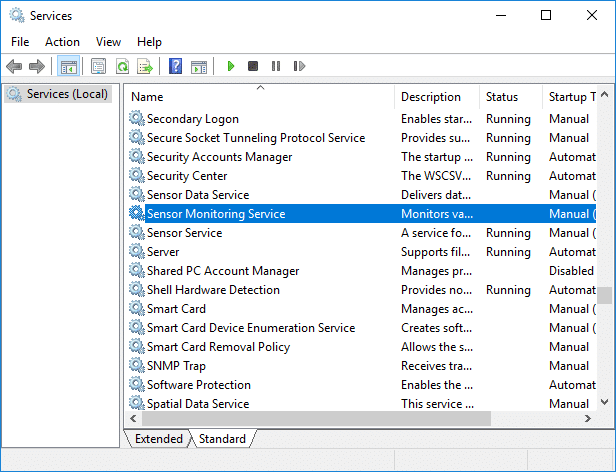
1. Սեղմեք Windows + R և մուտքագրեք services.msc եւ հարվածել Enter:

2. Once the services window opens, find the Sensor Monitoring services option and double click on it.
3. Now, from the Startup type drop-down select Ավտոմատ եւ ապա սեղմեք Սկսել կոճակը to start the service.
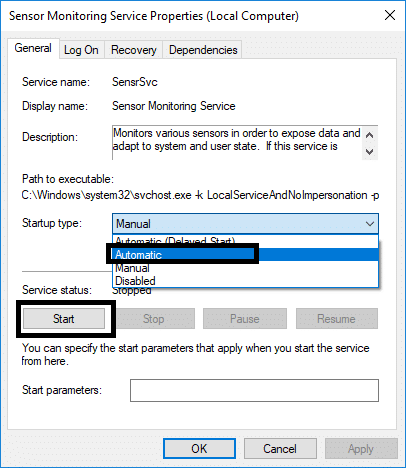
4. Finally, click Apply followed by OK to save the settings, and you can reboot the system to apply the changes.
Method – 7: Disable YMC service
If you are using a Lenovo Yoga device and experiencing this problem, you can fix rotation lock grayed out in the Windows 10 issue by disabling YMC service.
1. Windows + R type services.msc եւ հարվածել Enter:
2. Գտեք YMC services և կրկնակի սեղմեք այն:
3. Set the Startup type to Անաշխատունակ and click Apply, followed by OK.
Method – 8: Update Display Drivers
One reason for this problem could be the driver update. If your respective driver for the monitor is not updated, it can cause the Rotation Lock greyed out in Windows 10 Issue.
Manually Update Graphics Drivers using Device Manager
1. Սեղմեք Windows Key + R, ապա մուտքագրեք devmgmt.msc և բացելու համար սեղմեք enter Սարք մենեջեր.

2. Հաջորդը, ընդլայնել Ցուցադրել adapters և աջ սեղմեք ձեր Գրաֆիկական քարտի վրա և ընտրեք Միացնել:

3. Դա անելուց հետո աջ սեղմեք ձեր գրաֆիկական քարտի վրա և ընտրեք «Թարմացրեք վարորդը".

4: Ընտրեք «Որոնեք ավտոմատ կերպով նորացված վարորդական ծրագրակազմի համար», և թող ավարտի գործընթացը:

5. If the above steps helped fix the issue then very good, if not then continue.
6. Կրկին աջ սեղմեք ձեր գրաֆիկական քարտի վրա և ընտրեք «Թարմացրեք վարորդըբայց այս անգամ հաջորդ էկրանին ընտրեք «Տեսեք իմ համակարգիչը վարորդների համար:"

7. Այժմ ընտրեք «Թույլ տվեք ընտրել իմ համակարգչի վրա հասանելի վարորդների ցանկից».

8. Վերջապես, ընտրեք վերջին վարորդը ցանկից եւ սեղմեք Next.
9. Թող վերը նշված գործընթացը ավարտվի և վերագործարկեք ձեր համակարգիչը՝ փոփոխությունները պահպանելու համար:
Հետևեք նույն քայլերին ինտեգրված գրաֆիկական քարտի համար (այս դեպքում՝ Intel)՝ դրա դրայվերները թարմացնելու համար: Տեսեք, թե արդյոք կարող եք Fix Rotation Lock greyed out Issue, եթե ոչ, ապա շարունակեք հաջորդ քայլով:
Ավտոմատ կերպով թարմացրեք գրաֆիկական դրայվերները արտադրողի կայքից
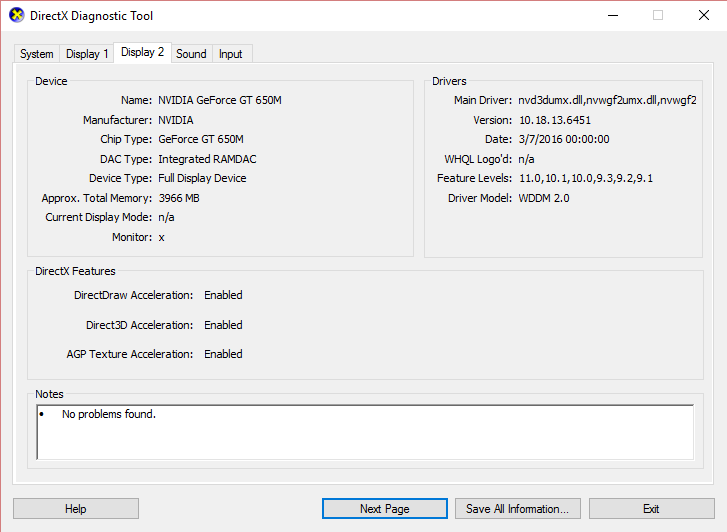
1. Սեղմեք Windows Key + R և երկխոսության վանդակում մուտքագրեք «dxdiag» և սեղմեք enter:

2. Դրանից հետո ցուցադրման ներդիրը փնտրելուց հետո (կլինեն երկու ցուցադրման ներդիր մեկը ինտեգրված գրաֆիկական քարտի համար, մյուսը կլինի Nvidia-ի) սեղմեք Display ներդիրը և պարզեք ձեր գրաֆիկական քարտը:
3. Այժմ անցեք Nvidia-ի դրայվերին ներբեռնման կայք և մուտքագրեք ապրանքի մանրամասները, որոնք մենք պարզում ենք:
4. Տեղեկությունները մուտքագրելուց հետո փնտրեք ձեր դրայվերները, սեղմեք «Համաձայն եմ» և ներբեռնեք դրայվերները:

5. Հաջող ներբեռնումից հետո տեղադրեք դրայվերը, և դուք հաջողությամբ թարմացրել եք ձեր Nvidia դրայվերները ձեռքով:
Method – 9: Remove Intel Virtual Buttons Driver
Some users reported that Intel Virtual button drivers cause rotation lock problem on your device. To solve this problem, you can uninstall the driver.
1. Open Device manager on your device by pressing Windows + R and type devmgmt.msc and hit Enter or press Windows X and choose Device Manager from the options list.
2. Once Device manager box is opened locate Intel virtual buttons driver.
3. Right-click on it and choose Տեղահանեք:
Խորհուրդ է տրվում:
Հուսով եմ, որ այս հոդվածը օգտակար էր, և այժմ դուք կարող եք հեշտությամբ Fix Rotation Lock greyed out in Windows 10, but if you still have any questions regarding this tutorial then feel free to ask them in the comment’s section.
")
