Process and Compressed Memory is a Windows 10 feature responsible for memory compression (also referred to as RAM compression and memory compression). This feature basically utilizes data compression to reduce the size or number of paging request to and from the auxiliary storage. In short, this feature is designed to take less amount of disk space and memory but in this case the System and Compressed Memory process start using 100% Disk and Memory, causing the affected PC to become slow.

In Windows 10, a compressions store is added to the concept of Memory Manager, which is an in-memory collection of compressed pages. So whenever the memory starts to fill up, the System and Compressed Memory process will compress the unused pages instead of writing them to the disk. The benefit of this is the amount of memory used per process is reduced, which allows Windows 10 to maintain more programs or apps in physical memory.
The problem appears to be incorrect Virtual Memory settings. Someone changed the paging file size from automatic to a particular value, virus or malware, Google Chrome or Skype, corrupt system files etc. So without wasting any time let’s see how to actually Fix 100% Disk Usage by System and Compressed Memory with the help of below-listed troubleshooting guide.
[SOLVED] 100% Disk Usage by System and Compressed Memory
Pastikan untuk membuat titik pemulihan, kalau-kalau terjadi kesalahan.
Metode 1: Perbaiki File Sistem yang Rusak
1. Buka Prompt Perintah. Pengguna dapat melakukan langkah ini dengan mencari 'cmd' Lalu tekan Enter.

2. Sekarang ketik yang berikut di cmd dan tekan enter:
Sfc /scannow sfc /scannow /offbootdir=c: /offwindir=c:windows (Jika di atas gagal, coba yang ini)
![SFC scan now command prompt | [SOLVED] 100% Disk Usage by System and Compressed Memory](https://lbsite.org/wp-content/uploads/2023/01/SFC-scan-now-command-prompt.png)
3. Tunggu proses di atas selesai dan setelah selesai, restart PC Anda.
4. Again open cmd and type the following command and hit enter after each one:
Dism /Online /Cleanup-Image /CheckHealth Dism /Online /Cleanup-Image /ScanHealth Dism /Online /Cleanup-Image /RestoreHealth

5. Biarkan perintah DISM berjalan dan tunggu sampai selesai.
6. Jika perintah di atas tidak berhasil, coba perintah di bawah ini:
Disme /Gambar:C:offline /Cleanup-Image /RestoreHealth /Sumber:c:testmountwindows Disme /Online /Cleanup-Image /RestoreHealth /Sumber:c:testmountwindows /LimitAccess
Catatan: Ganti C:RepairSourceWindows dengan sumber perbaikan Anda (Instalasi Windows atau Disk Pemulihan).
7. Nyalakan ulang PC Anda untuk menyimpan perubahan dan lihat apakah Anda bisa Fix 100% Disk Usage by System and Compressed Memory Issue.
Method 2: Set Correct Paging File Size
1. Tekan Tombol Windows + R lalu ketik sysdm.cpl dan tekan Enter untuk membuka Properti sistem.

2. Beralih ke Lanjutan tab dan kemudian klik Pengaturan di bawah Kinerja.

3. Again switch to the Advanced tab and click Change under Virtual Memory.

4. Checkmark “Secara otomatis mengelola ukuran file paging untuk semua drive."
![Checkmark Automatically manage paging file size for all drives | [SOLVED] 100% Disk Usage by System and Compressed Memory](https://lbsite.org/wp-content/uploads/2023/02/Checkmark-Automatically-manage-paging-file-size-for-all-drives.png)
5. Click OK, then click Apply followed by OK.
6. Select Yes to Restart your PC to save changes.
Metode 3: Nonaktifkan Fast Startup
1. Tekan Tombol Windows + R lalu ketik kontrol dan tekan Enter untuk membuka Control Panel.

2. Klik Hardware dan Suara lalu klik Power Options.

3. Kemudian, dari panel jendela kiri pilih "Pilih apa yang dilakukan tombol daya."

4. Sekarang klik "Ubah pengaturan yang saat ini tidak tersedia."

5. Hapus centang “Hidupkan startup cepat"Dan klik Simpan perubahan.
![Uncheck Turn on fast startup | [SOLVED] 100% Disk Usage by System and Compressed Memory](https://lbsite.org/wp-content/uploads/2023/01/Uncheck-Turn-on-fast-startup.png)
6. Restart your PC and see if you’re able to Fix 100% Disk Usage by System and Compressed Memory Issue.
Method 4: Disable Superfetch Service
1. Tekan Tombol Windows + R lalu ketik services.msc dan tekan Enter.

2. Temukan SuperFetch service from the list then right-click on it and select Properties.

3. Under Service status, if the service is running, click on Berhenti.
4. Sekarang, dari startup type drop-down select Cacat.

5. Klik Terapkan, diikuti oleh OK.
6. Reboot PC Anda untuk menyimpan perubahan.
If the above method doesn’t disable Superfetch services then you can follow disable Superfetch using Registry:
1. Tekan Tombol Windows + R lalu ketik regedit dan tekan Enter untuk membuka Registry Editor.

2. Navigasikan ke kunci registri berikut:
HKEY_LOCAL_MACHINESYSTEMCurrentControlSetControlSession ManagerMemory ManagementPrefetchParameters
3. Make sure you have selected Parameter Prefetch lalu di jendela kanan klik dua kali AktifkanSuperfetch kunci dan change it’s value to 0 in the Value data field.

4. Click OK and close the Registry Editor.
5. Restart PC Anda untuk menyimpan perubahan dan lihat apakah Anda bisa Fix 100% Disk Usage by System and Compressed Memory Issue.
Method 5: Adjust your PC for Best Performance
1. Tekan Tombol Windows + R lalu ketik sysdm.cpl dan tekan Enter untuk membuka Properti sistem.
2. Beralih ke Advanced tab dan kemudian klik Settings bawah Kinerja.
3. Under Visual Effects checkmark “Adjust for best performance".

4. Klik Terapkan, diikuti oleh OK.
5. Nyalakan ulang PC Anda dan lihat apakah Anda bisa Fix 100% Disk Usage by System and Compressed Memory Issue.
Method 6: Kill the Speech Runtime Executable Process
1. tekan Ctrl + Shift + Esc untuk meluncurkan Pengelola Tugas.
2. Dalam tab proses, cari Speech Runtime Executable.
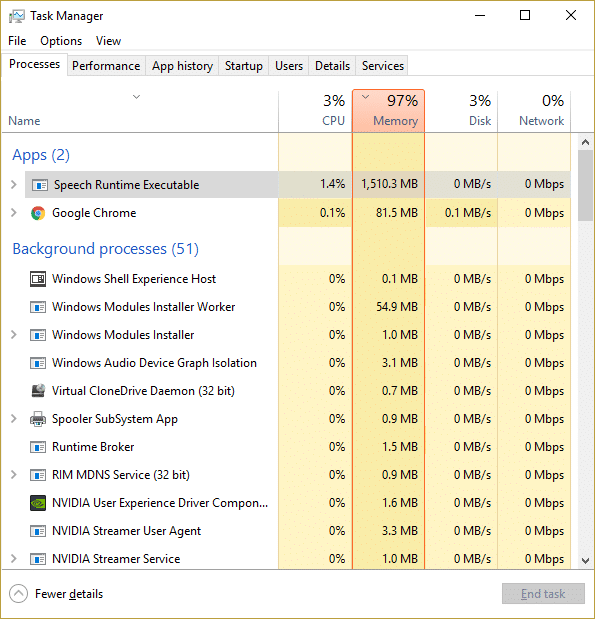
3. Klik kanan padanya dan pilih Tugas akhir.
Metode 7: Jalankan CCleaner dan Malwarebytes
1. Unduh dan pasang CCleaner & Malwarebytes.
2. Jalankan Malwarebytes dan biarkan ia memindai sistem Anda untuk mencari file berbahaya. Jika malware ditemukan, maka secara otomatis akan menghapusnya.

3. Sekarang jalankan CCleaner dan pilih Pembersihan Kustom.
4. Di bawah Custom Clean, pilih tab jendela dan tanda centang default dan klik Menganalisa.
![Select Custom Clean then checkmark default in Windows tab | [SOLVED] 100% Disk Usage by System and Compressed Memory](https://lbsite.org/wp-content/uploads/2023/01/Select-Custom-Clean-then-checkmark-default-in-Windows-tab.png)
5. Setelah Analisis selesai, pastikan Anda yakin untuk menghapus file yang akan dihapus.

6. Terakhir, klik Jalankan Cleaner tombol dan biarkan CCleaner berjalan dengan sendirinya.
7. Untuk lebih membersihkan sistem Anda, pilih tab Registri, dan pastikan hal berikut dicentang:

8. Klik pada Pindai Masalah tombol dan izinkan CCleaner untuk memindai, lalu klik Perbaiki Masalah yang Dipilih .
![Once scan for issues is completed click on Fix selected Issues | [SOLVED] 100% Disk Usage by System and Compressed Memory](https://lbsite.org/wp-content/uploads/2023/01/Once-scan-for-issues-is-completed-click-on-Fix-selected-Issues.png)
9. Saat CCleaner bertanya “Apakah Anda ingin membuat cadangan perubahan ke registri?" pilih ya.
10. Setelah pencadangan Anda selesai, klik Perbaiki Semua Masalah yang Dipilih .
11. Restart PC Anda untuk menyimpan perubahan.
Method 8: Change configuration of Google Chrome and Skype
Untuk Google Chrome: Navigate to the following under Chrome: Settings > Show Advanced Settings > Privacy > Use a prediction service to load pages more quickly. Disable the toggle next to “Use a prediction service to load pages.”

Change configuration For Skype
1. Make sure you have exited Skype, if not end task from Task Manager for Skype.
2. Press Windows Key + R then type the following and click OK:
C:Program Files (x86)SkypePhone
3. Klik kanan pada skype.exe dan pilih Properties.

4. Beralih ke Tab keamanan dan klik Edit.

5. Memilih SEMUA PAKET APLIKASI under Group or user names then checkmark Write bawah Mengizinkan.

6. Click Apply, followed by OK and see if you’re able to Fix 100% Disk Usage by System and Compressed Memory Issue.
Method 9: Set Correct Permission for System and Compressed Memory Process
1. Tekan Tombol Windows + R lalu ketik taskchd.msc and hit Enter to open Task Scheduler.

2. Arahkan ke jalur berikut:
Task Scheduler Library > Microsoft > Windows > MemoryDiagnostic
![Double click on ProcessMemoryDiagnostic Events | [SOLVED] 100% Disk Usage by System and Compressed Memory](https://lbsite.org/wp-content/uploads/2023/02/Double-click-on-ProcessMemoryDiagnostic-Events.png)
3. Klik dua kali ProcessMemoryDiagnostic Events dan kemudian klik Ubah Pengguna atau Grup under Security Options.

4. klik Advanced dan kemudian klik Find Now.

5. Pilih Anda Akun administrator from the list then click OK.

6. Sekali lagi klik OK to add your administrator account.
7. Tanda centang Dijalankan dengan hak istimewa tertinggi dan kemudian klik OK.

8. Follow the same steps for RunFullMemoryDiagnostic and close everything.
9. Reboot PC Anda untuk menyimpan perubahan.
Method 10: Disable System and Compressed Memory Process
1. Tekan Tombol Windows + R lalu ketik taskchd.msc dan tekan Enter untuk membuka Penjadwal Tugas.
2. Arahkan ke jalur berikut:
Task Scheduler Library > Microsoft > Windows > MemoryDiagnostic
3. Klik kanan pada JalankanFullMemoryDiagnostic dan pilih Nonaktifkan.
![Right-click on RunFullMemoryDiagnostic and select Disable | [SOLVED] 100% Disk Usage by System and Compressed Memory](https://lbsite.org/wp-content/uploads/2023/02/Right-click-on-RunFullMemoryDiagnostic-and-select-Disable.png)
4. Close Task Scheduler and restart your PC.
Rekomendasi:
Itu saja Anda telah berhasil Fix 100% Disk Usage by System and Compressed Memory tetapi jika Anda masih memiliki pertanyaan tentang posting ini, silakan tanyakan di bagian komentar.

