Windows repeatedly waking up PC from sleep mode can be irritating and cause several issues. MoUSO Core Worker Process is responsible for this error. It is a program that coordinates Windows Update operation. It exclusively works in the back end and doesn’t hinder regular processes. But, sometimes in sleep mode it often wakes your system without permission. We bring to a perfect guide to fix MoUsoCoreWorker.exe process issue in Windows 10.
How to Fix MoUSO Core Worker Process in Windows 10
Here are some plausible reasons why MoUSO Core Worker Process may wake up your PC from sleep.
- Gamaldags Windows
- Incorrect Power Settings
- Interference by third party applications
- Orchestrator Service issues
After understanding why MoUsoCoreWorker.exe keeps waking up your PC from sleep, let us go to into the method for resolving this MoUsoCoreWorker.exe process error in Windows 10.
Method 1: Uninstall GoodSync
Syncing third-party applications can keep your PC engaged causing MoUSO Core Worker Process to run continuously. They may cause this MoUsoCoreWorker.exe process error. GoodSync app is well-known for causing such issues. You can fix this by disabling or uninstalling such programs using the steps below.
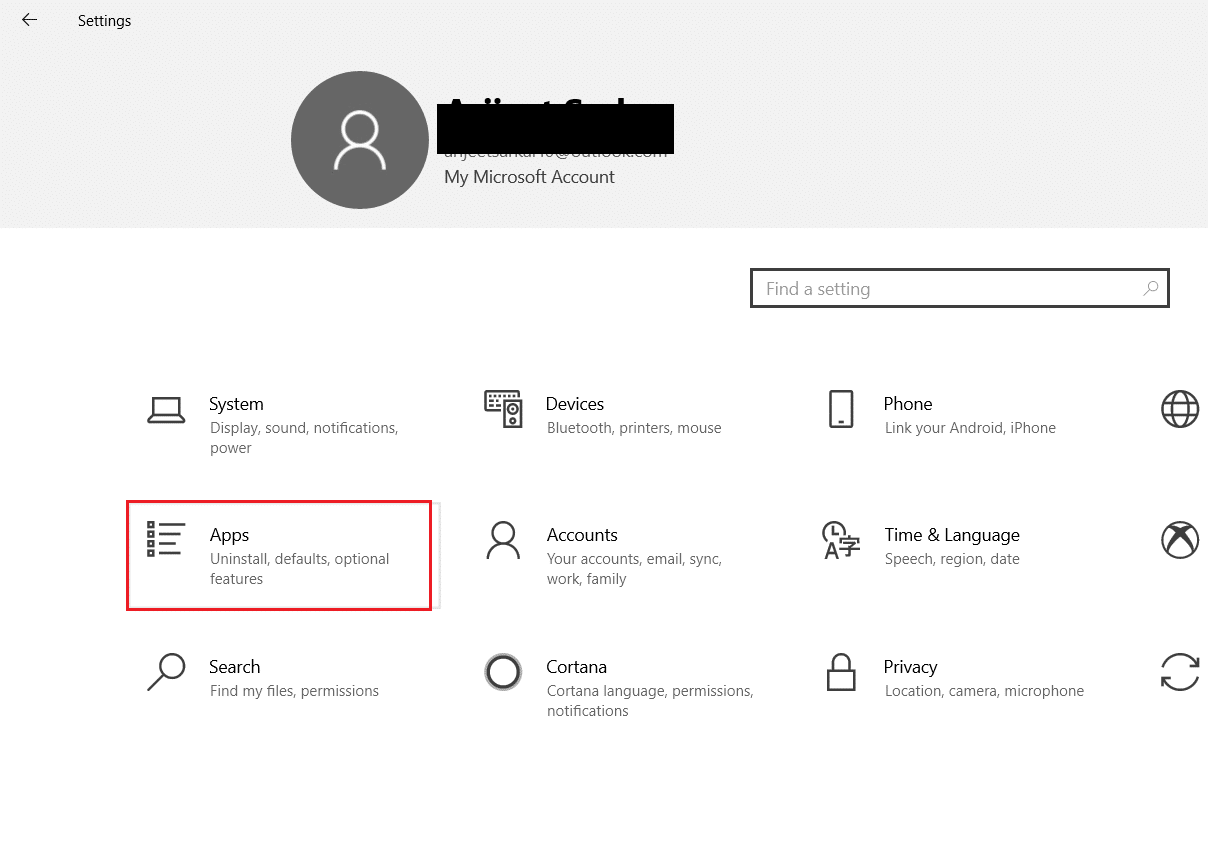
1. Ýttu á Windows + I lyklar saman til að opna Stillingar.
2. Veldu forrit valkostur frá Stillingar gluggi.
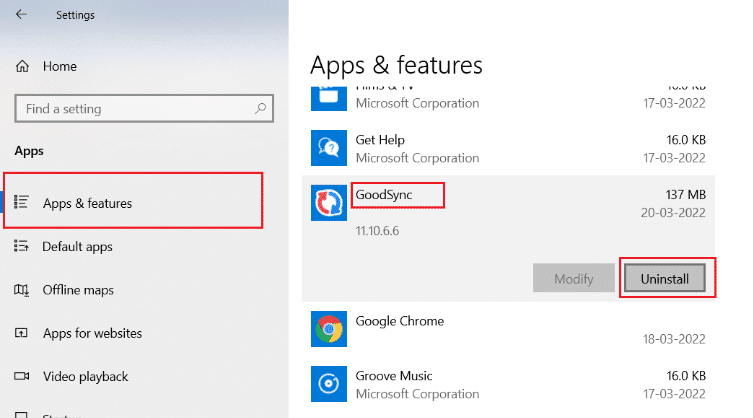
3. Veldu Forrit og eiginleikar on the left pane. After that, scroll down in the right pane and select GoodSync app og smelltu á Uninstall hnappinn.
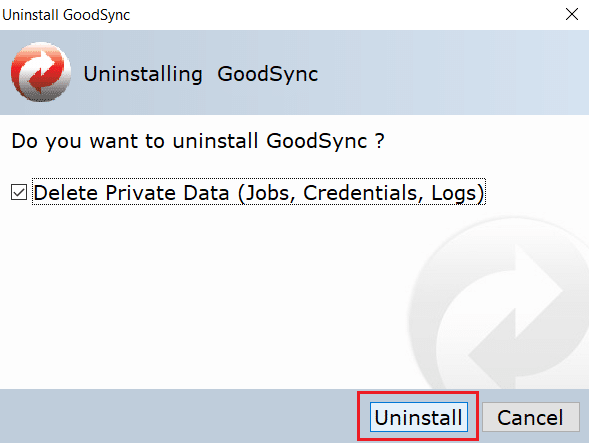
4. smellur Uninstall á staðfestingarbeiðni.

5. Again, click Uninstall on Uninstall GoodSync gluggi.
Athugaðu: You can check the box marked Delete Private Data (Jobs, Credentials, Logs) if you have a backup of your private data.
6. smellur Já on GoodSync Runner skjóta upp kollinum.

7. After uninstallation is complete, endurræsa PC.
Einnig lesið: Fix the Trust Relationship Between This Workstation and the Primary Domain Failed
Method 2: Disable Wake Timers
Wake timers are used for waking your PC automatically to complete specified tasks at a certain time. Sometimes they can disturb PC when it is on Sleep mode, thus causing this MoUsoCoreWorker.exe process error. Follow the steps given below and disable them.
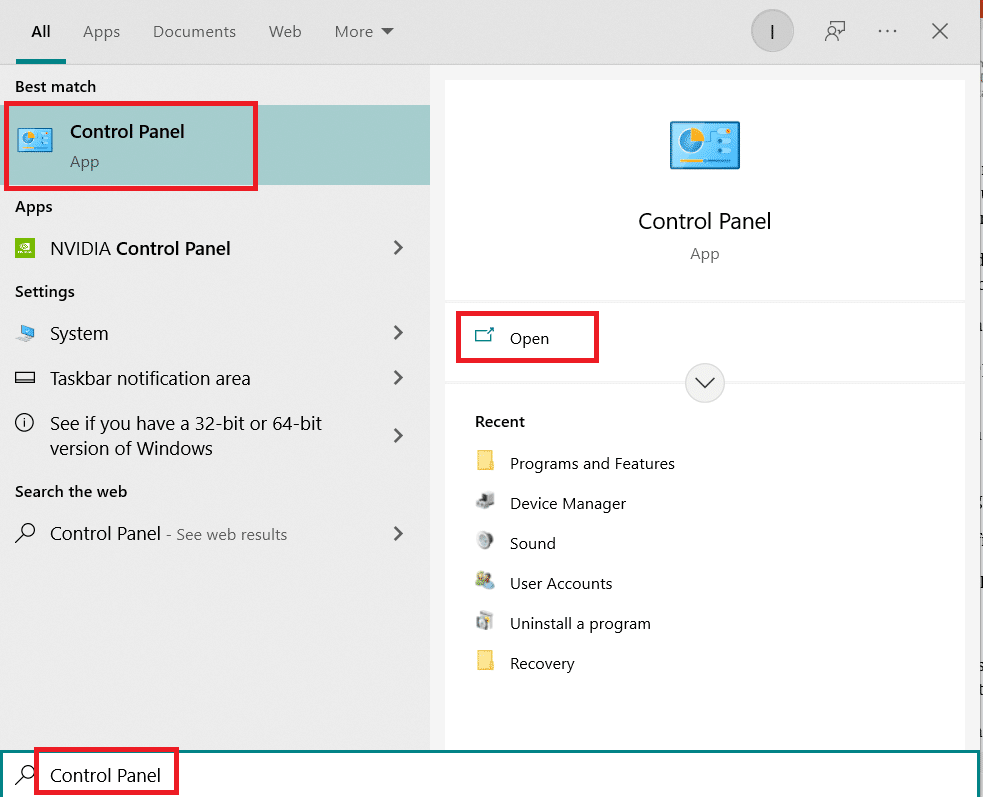
1. Ýttu á Windows lykill og tegund stjórnborðið, og smelltu á Opna.
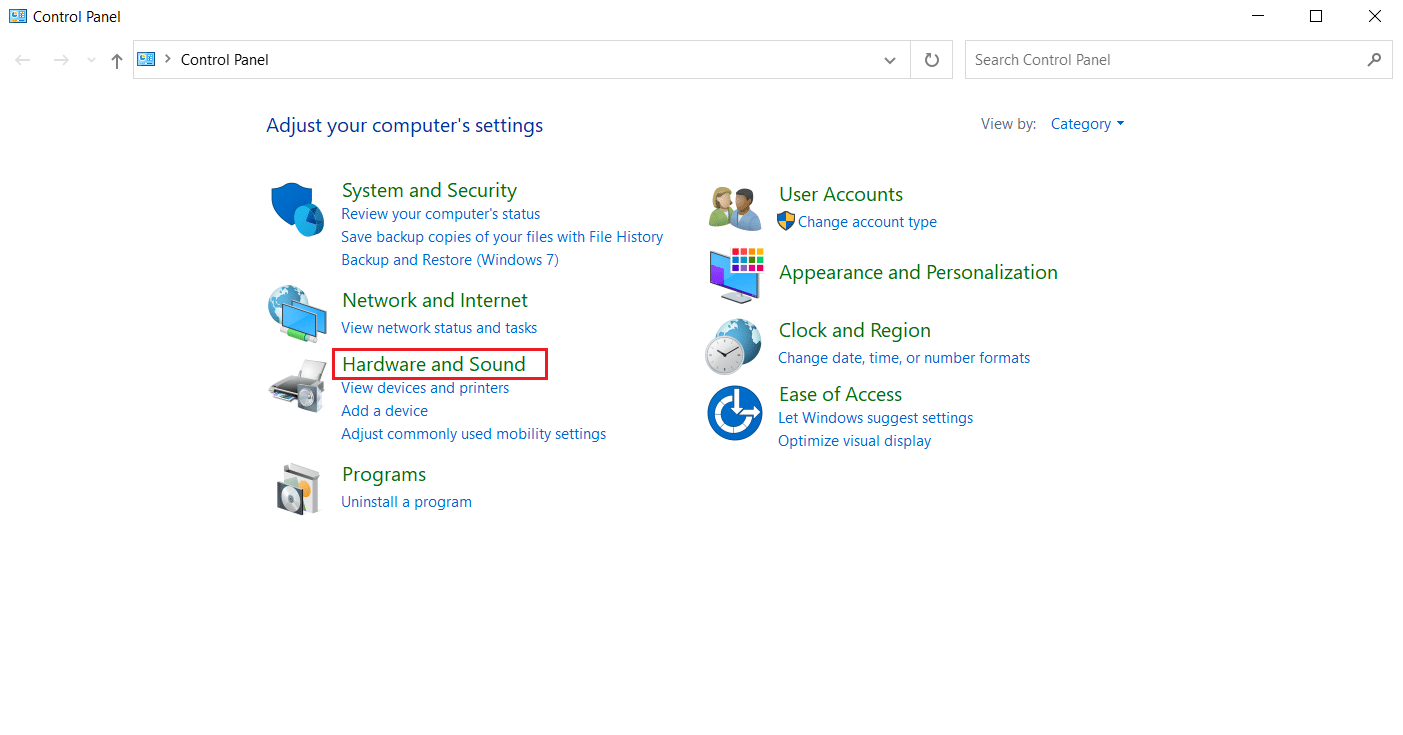
2. Veldu Vélbúnaður og hljóð valkostur.
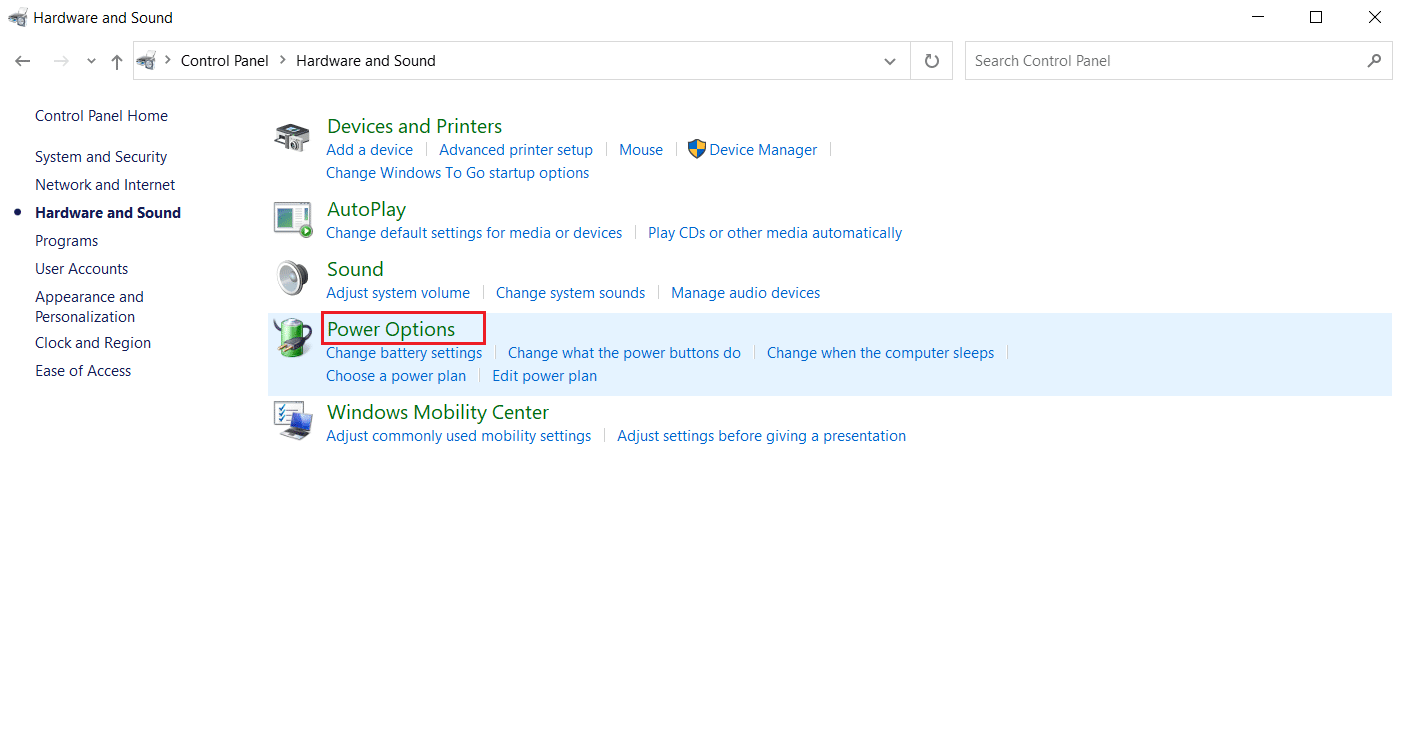
3. Veldu Power Options on Vélbúnaður og hljóð síðu.
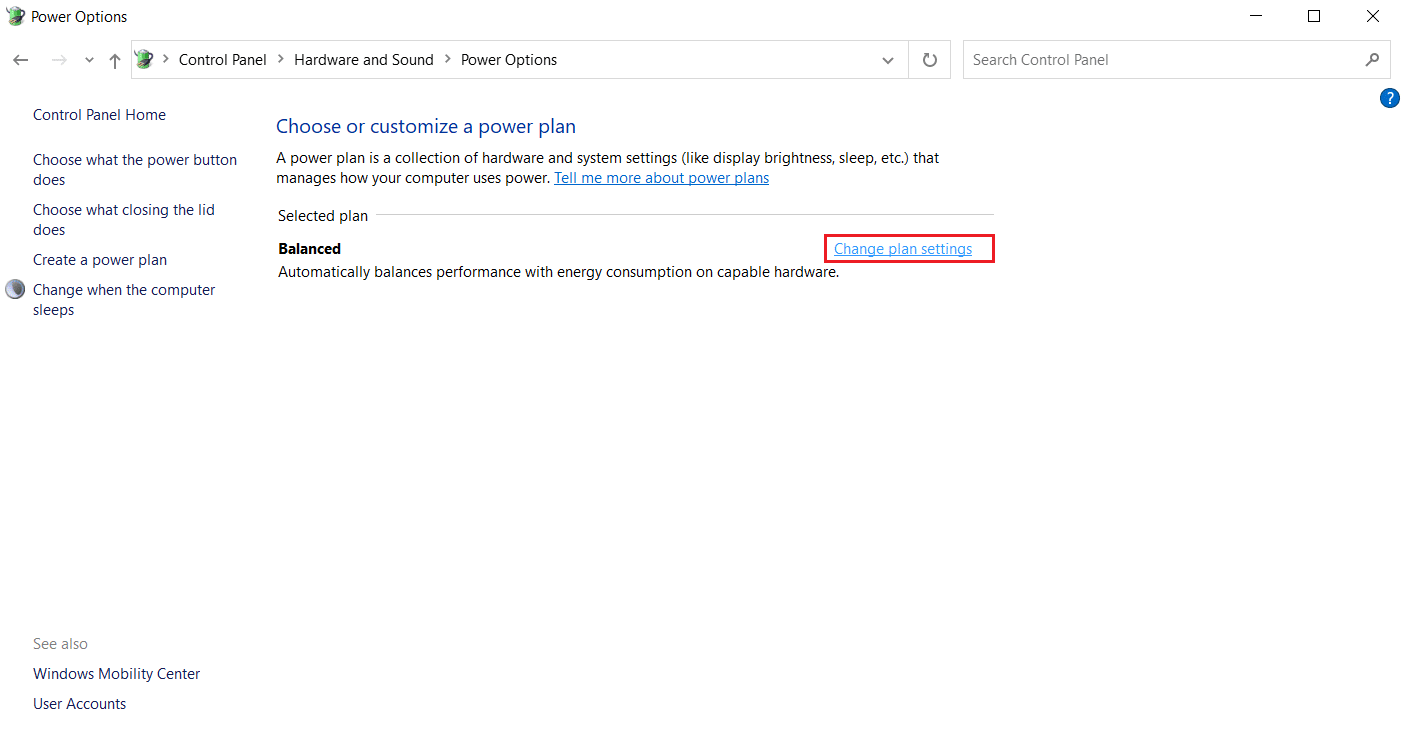
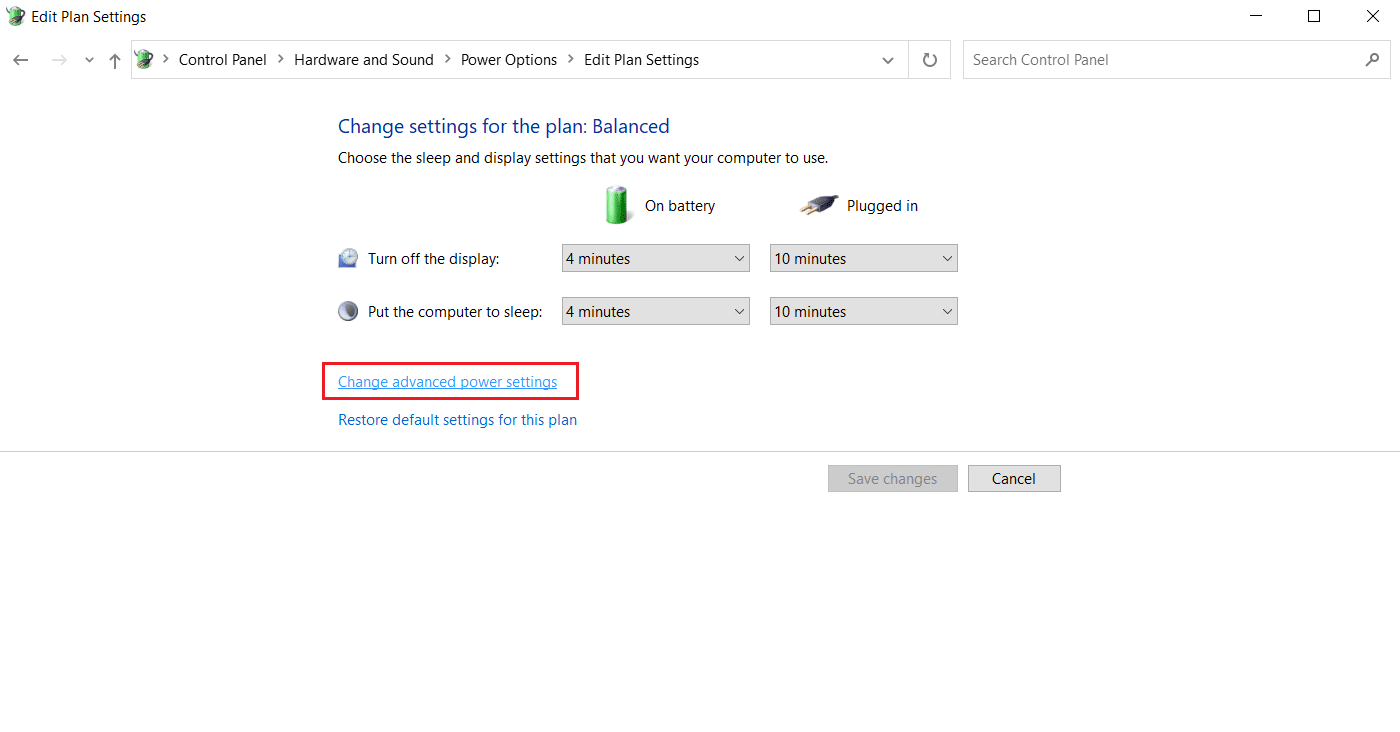
4. smellur Breyta áætluninni eins og sýnt er.
5. smellur Breyta háþróaða orkusparnaði. Power Options gluggi opnast.
Athugaðu: You can directly open Power Options from Desktop by running control.exe powercfg.cpl,,3 skipun inn Hlaupa valmynd.
6. Finndu Sleep og smelltu á + tákn to expand it. You will see Allow Wake Timers valkostur.
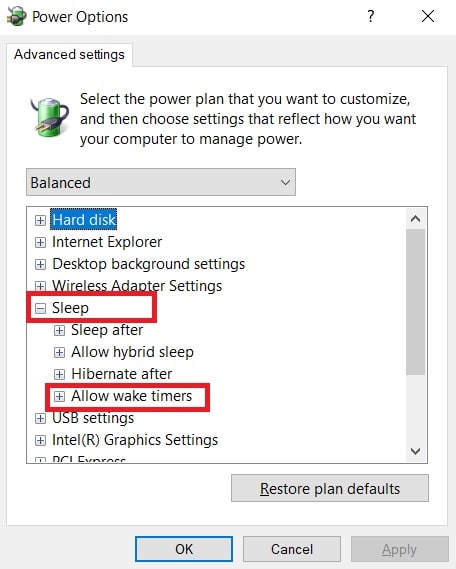
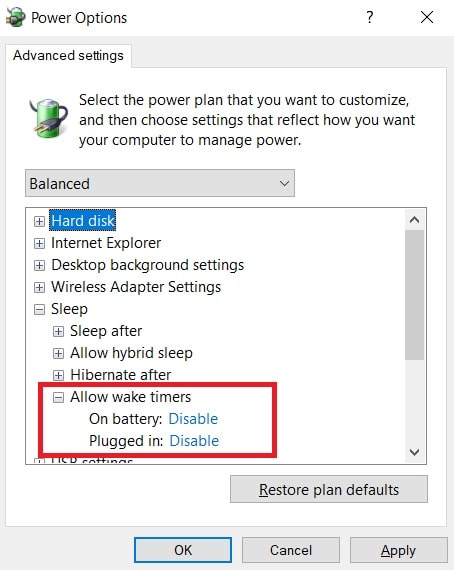
7. Smelltu aftur á + tákn að stækka Allow Wake Timers og velja Slökkva bæði Á rafhlöðu og Tengt inn.
8. smellur gilda og OK til að vista breytingar.
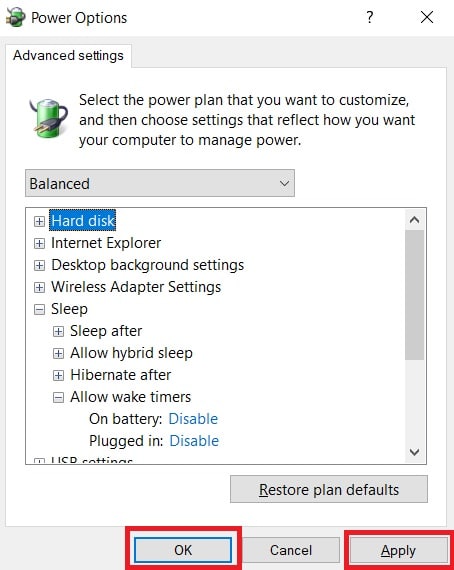
9. Eftir það endurræstu tölvuna.
Check if this MoUsoCoreWorker.exe process error is fixed.
Einnig lesið: Fix Multiple Google Chrome Processes Running
Method 3: Stop Update Orchestrator Service
UsoSVC or Update Orchestrator Service organises updates released by Windows and does tasks like downloading, verifying and installing updates. It may trigger MoUSO Core Worker Process and could be the cause behind this error. To fix this issue, you can disable UsoSVC by following these steps.
Athugaðu: You will need to enable update orchestrator service whenever you update your PC.
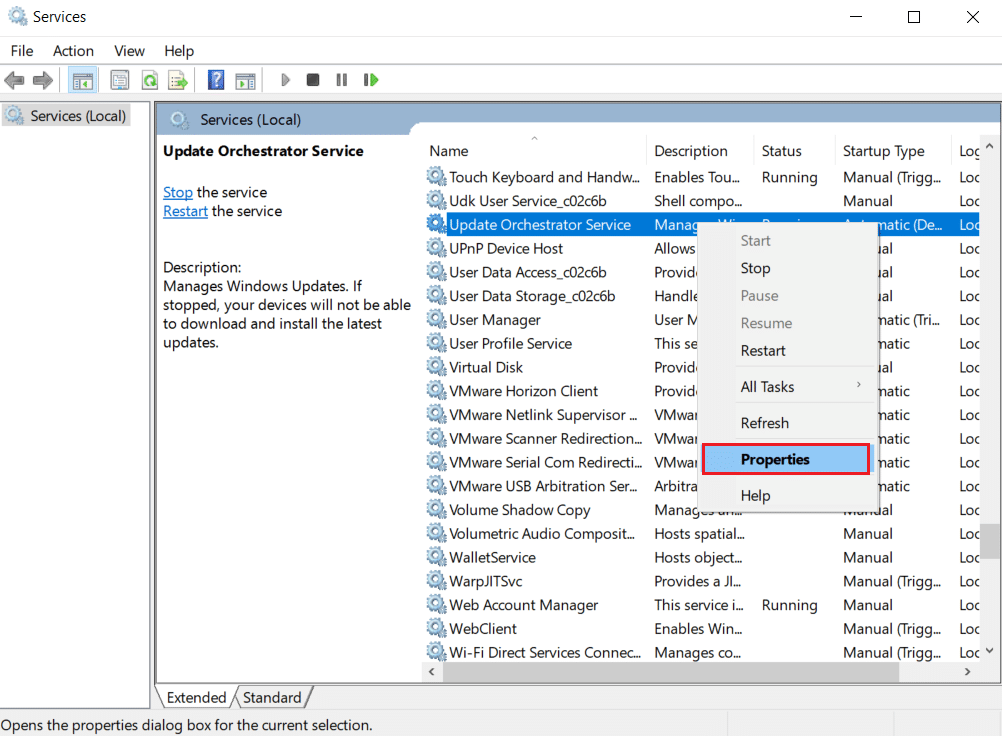
1. Sláðu á Windows lykill, gerð Þjónusta, og smelltu á Hlaupa sem stjórnandi.

2. Finndu og hægrismelltu á Uppfærðu Orchestrator þjónustu og velja Eiginleikar.
3. Í almennt flipi, breyta Gangsetning tegund til Óvirk.
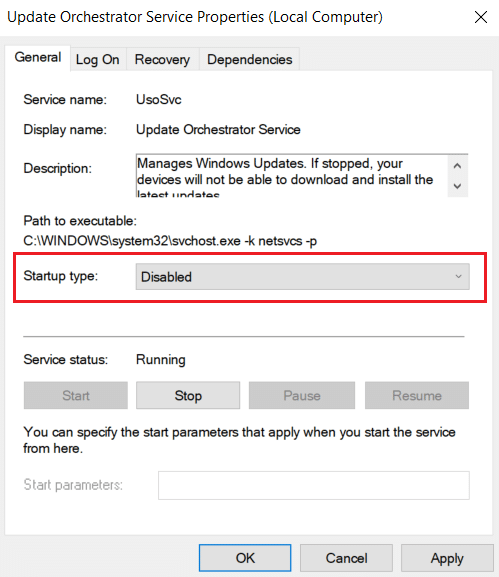
4. smellur gilda og OK til að staðfesta breytingar.
Method 4: Disable Task Scheduler
Task Scheduler is a service that enables you to schedule and perform any task on your PC without manual intervention at any specific time. Sometimes a planned automated task can wake PC from sleep, causing this MoUsoCoreWorker.exe process issue. Follow the instructions below to turn off Task Scheduler.
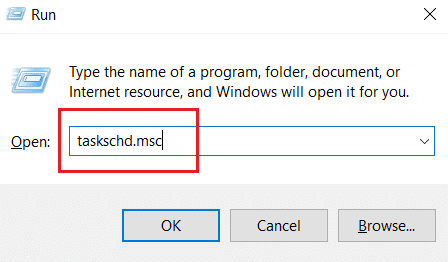
1. Ýttu á Windows + R lyklar samtímis til að opna Hlaupa valmynd.

2. Gerð taskschd.msc on Run Dialog Box og ýttu Sláðu inn að hleypa af stað Task Tímaáætlun.
3. Í Task Tímaáætlun Window, navigate to the Task Scheduler Library > Microsoft > Windows > UpdateOrchestrator folder on the left pane.
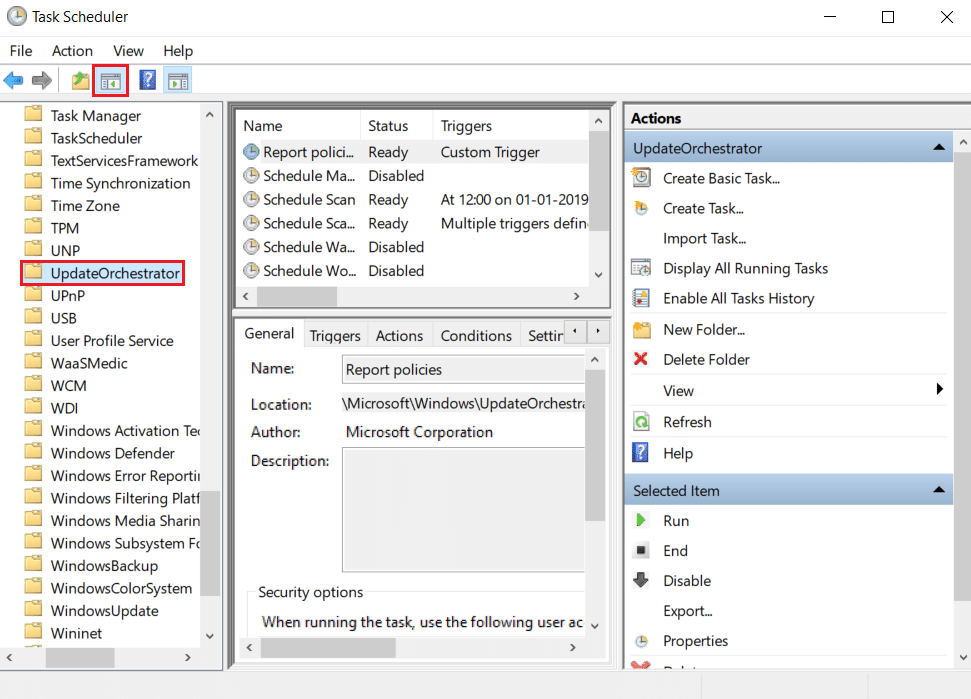
4. Í UpdateOrchestrator folder, find and right-click Schedule scan task og velja Slökkva.
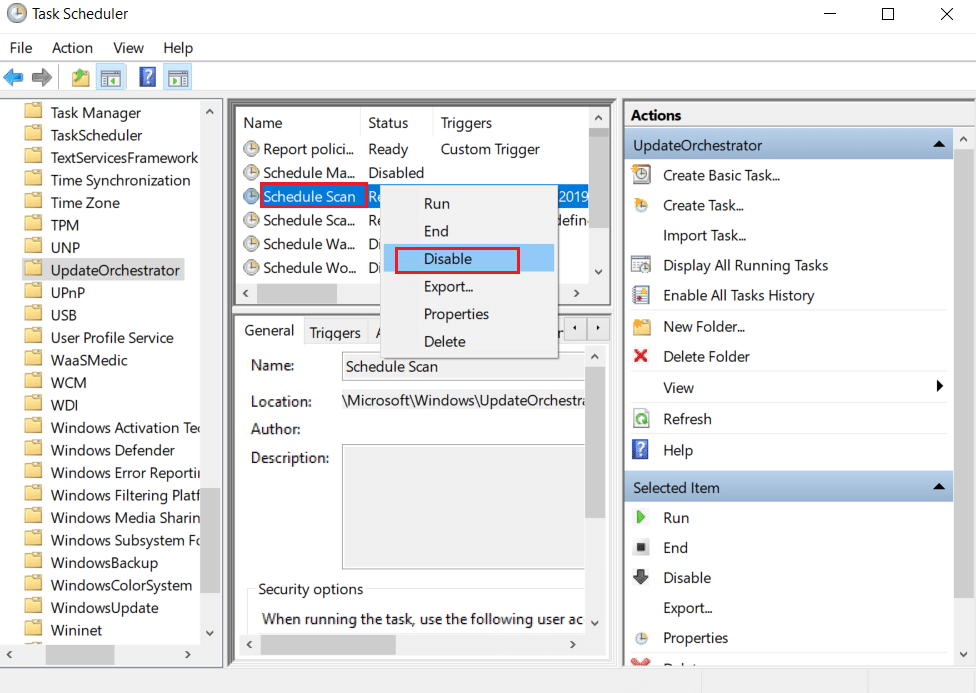
5. Exit Task Scheduler and endurræsa tölvuna.
Einnig lesið: How to Check How Much VRAM Do I Have on Windows 10
Aðferð 5: Uppfærðu Windows
Outdated Windows PC can create compatibility issues. Microsoft team releases updates to fix bugs and add other useful features. Updating Windows may fix this MoUsoCoreWorker.exe process issue. Follow these to do so.
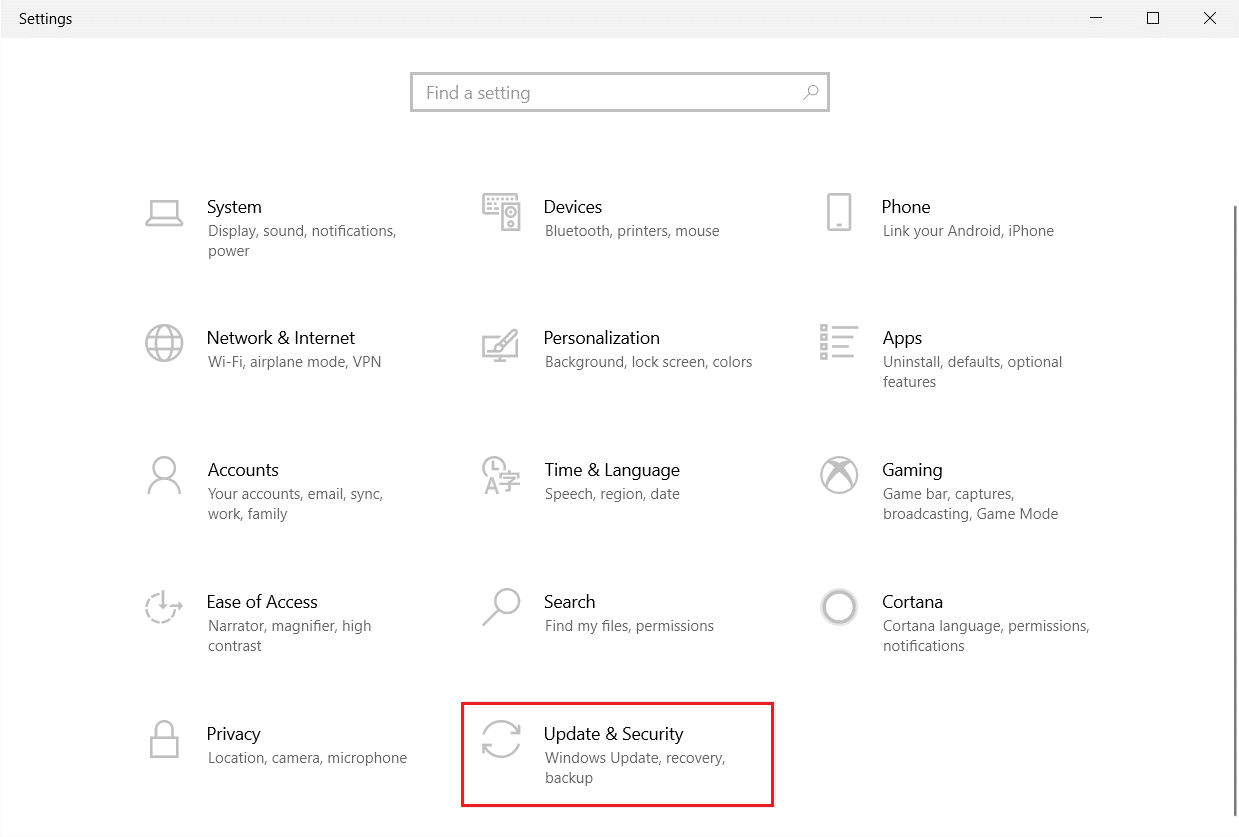
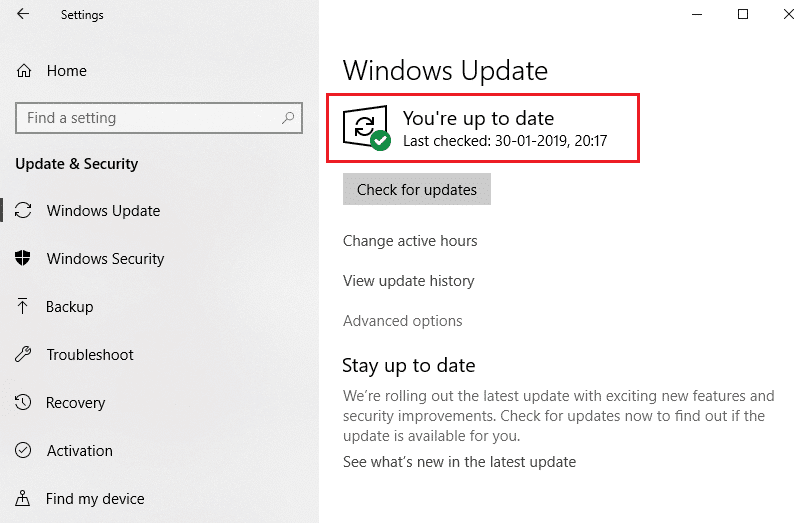
1. Ýttu á Windows + I lyklar samtímis að hefjast handa Stillingar.
2. Smelltu á Uppfærsla og öryggi flísar, eins og sýnt er.
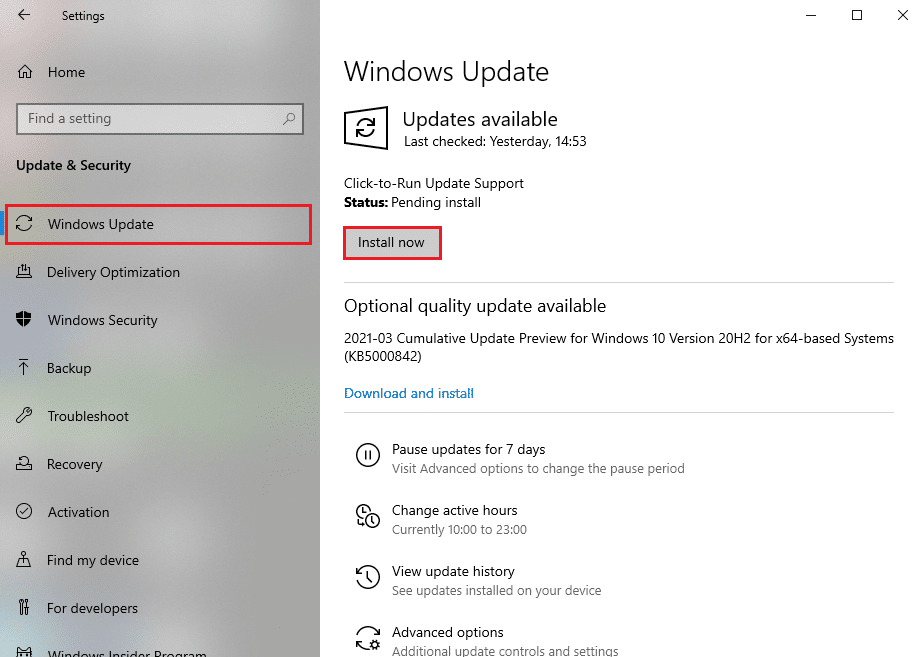
3. Í Windows Update flipann, smelltu á Athugaðu með uppfærslur hnappinn.
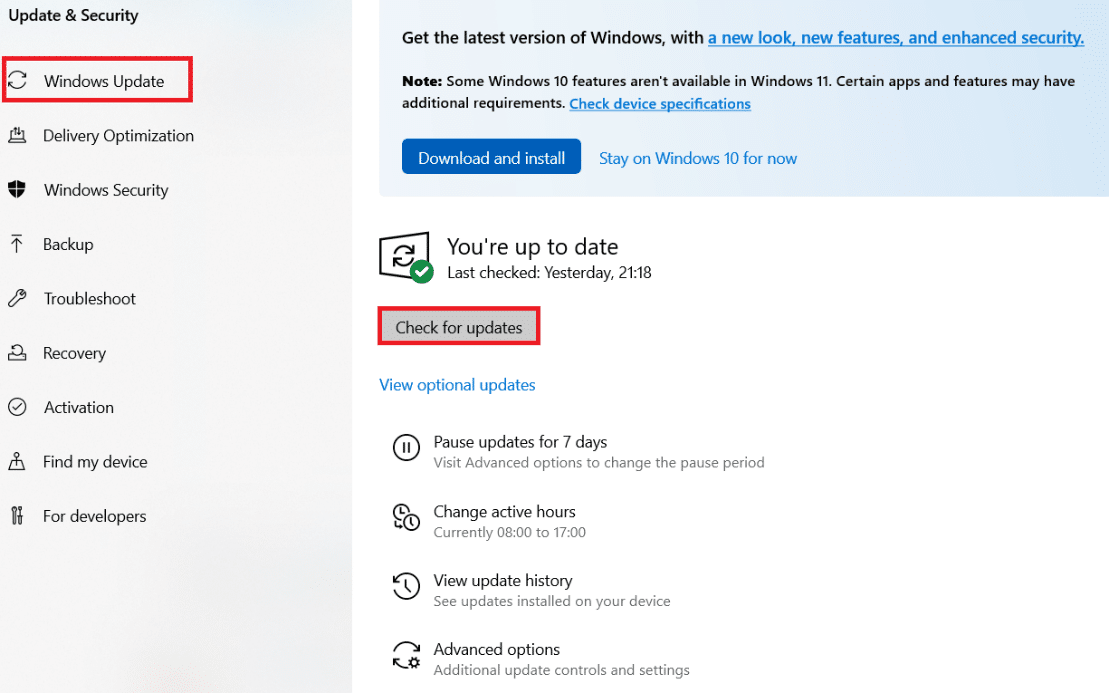
4A. Ef ný uppfærsla er tiltæk skaltu smella á setja Nú og fylgdu leiðbeiningunum til að uppfæra.
4B. Annars, ef Windows er uppfært, þá mun það birtast Þú ert uppfærður skilaboð.
Aðferð 6: Notaðu Registry Editor
Registry Editor is a repository containing all configurations, values and settings for Windows. We can use it to create NoAutoRebootWithLoggedOnUsers DWORD which will stop PC from auto rebooting and may fix this MoUsoCoreWorker.exe MoUSO Core Worker process error. Follow the below-mentioned steps to do it.
Athugaðu: Modifying Registry Editor may cause issues. Create Registry backup before following this method as shown below.
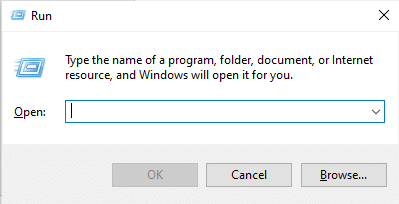
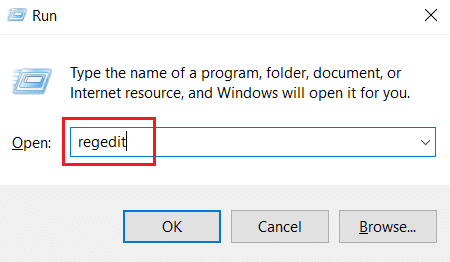
1. Ýttu á Windows + R lyklar saman til að opna Hlaupa valmynd.
2. Gerð ríkisstjóratíð og smelltu OK að hleypa af stað Registry Editor.
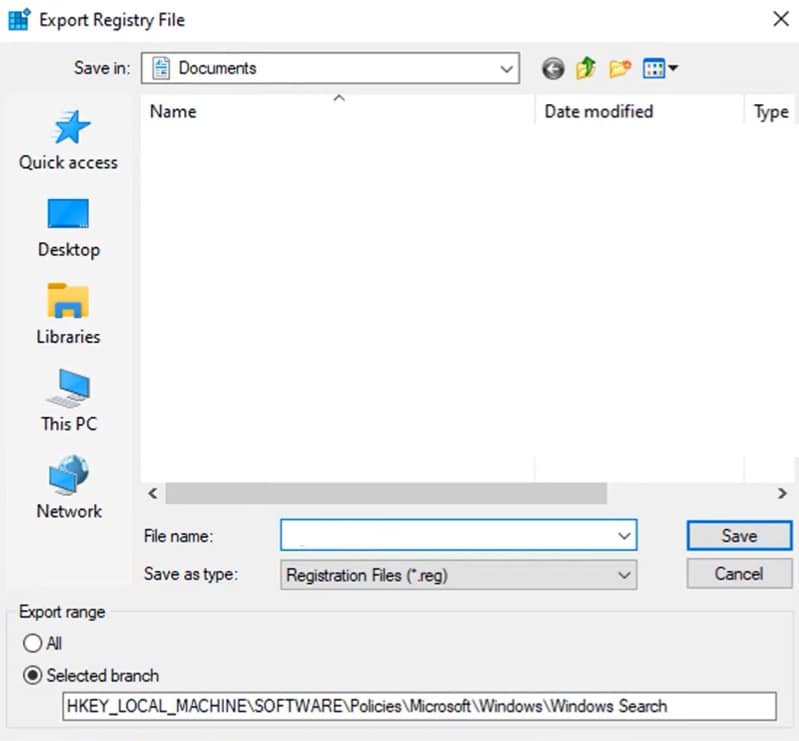
3. Smelltu á File Og veldu Flytja út... option. It will open Flytja út skráaskrá gluggi.
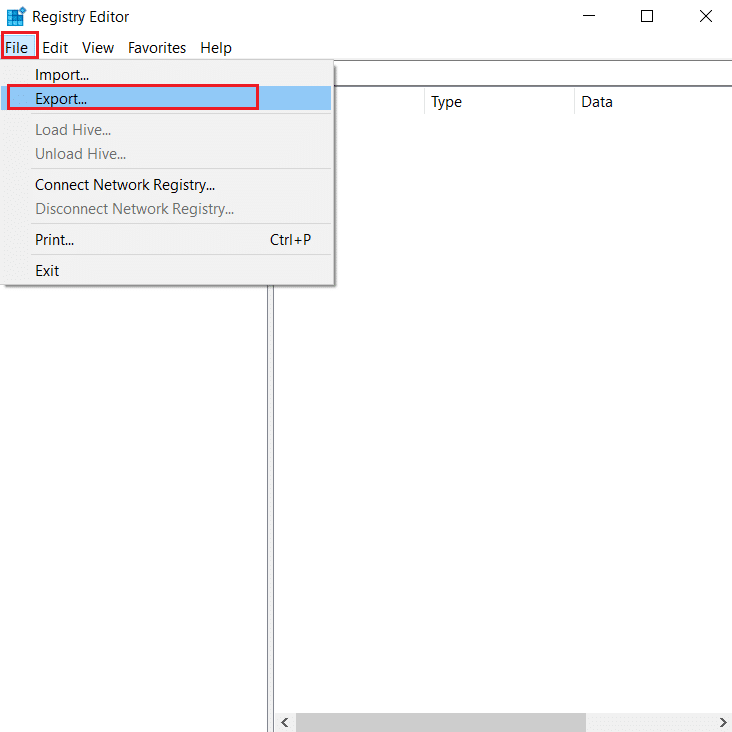
4. Name it accordingly and click on Vista. Registry Backup will be created which you can import if things go wrong.
5. After creating backup, navigate to the following path in Registry Editor.
HKEY_LOCAL_MACHINESOFTWAREPolicies MicrosoftWindowsWindowsUpdateAU
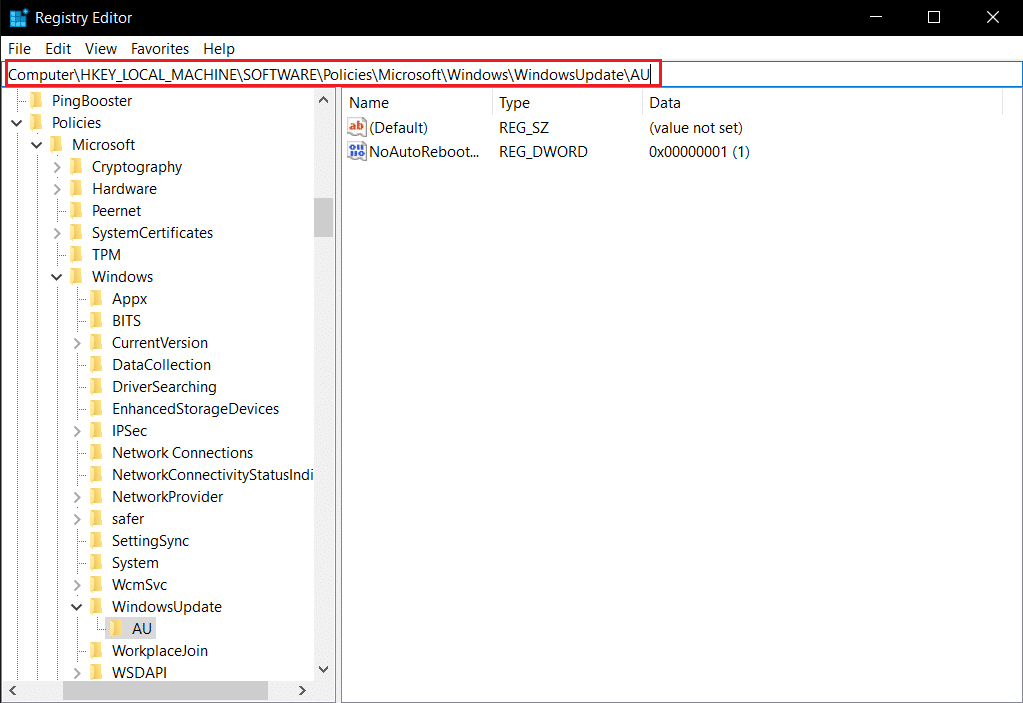
6. In the right pane, locate and double click NoAutoRebootWithLoggedOnUsers lykillinn.
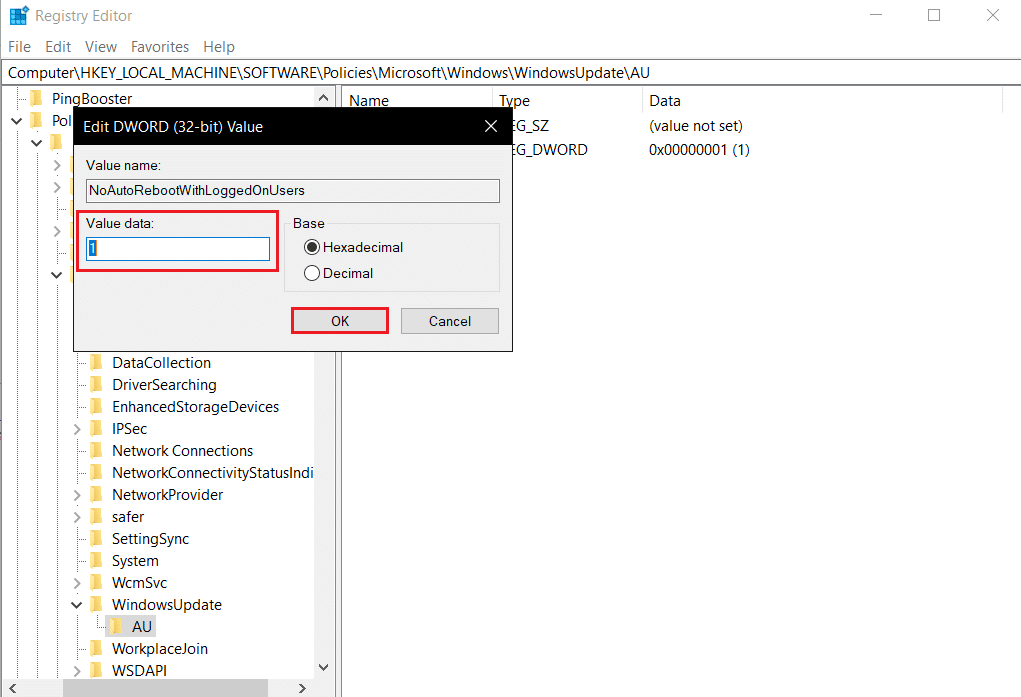
7. Setja Gildi gagna as 1 on the popup and click OK til að vista breytingar.
8. Exit Registry Editor and endurræsa tölvuna.
Einnig lesið: How to Fix hkcmd High CPU Usage
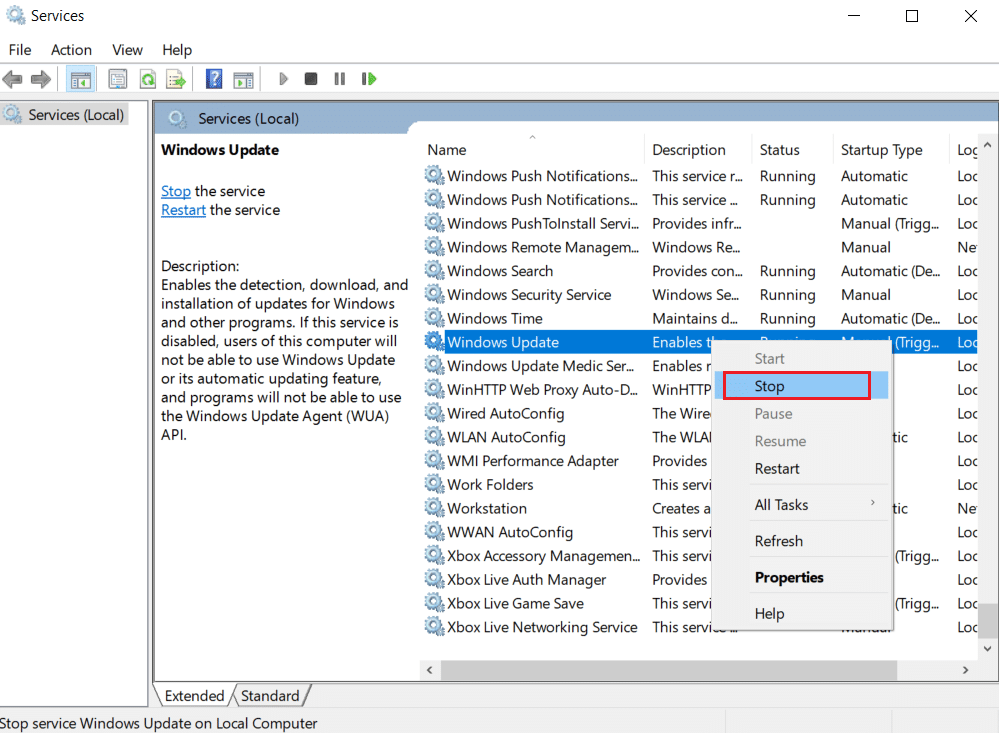
Aðferð 7: Endurræstu Windows Update Service
If your PC is unable to Sleep it may be because Windows Update service not working properly because of various errors. To resolve this, restart Windows Update service by following these steps.
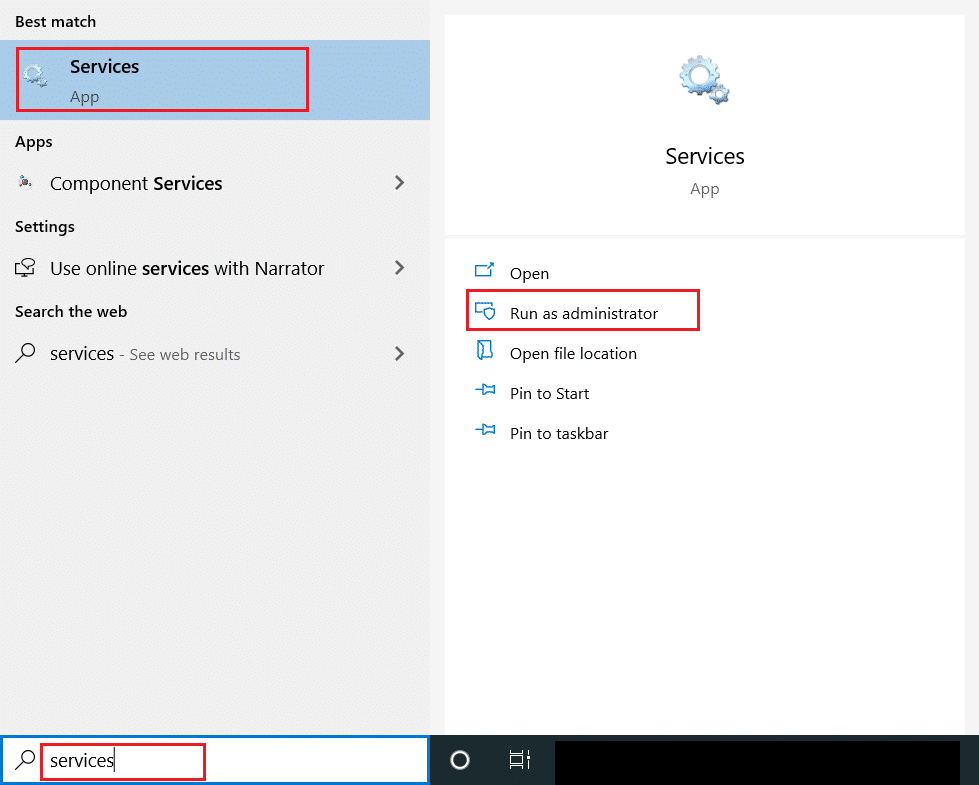
1. Ýttu á Windows lykill og tegund Þjónusta og smelltu á Hlaupa sem stjórnandi að hleypa af stað Þjónusta gluggi.
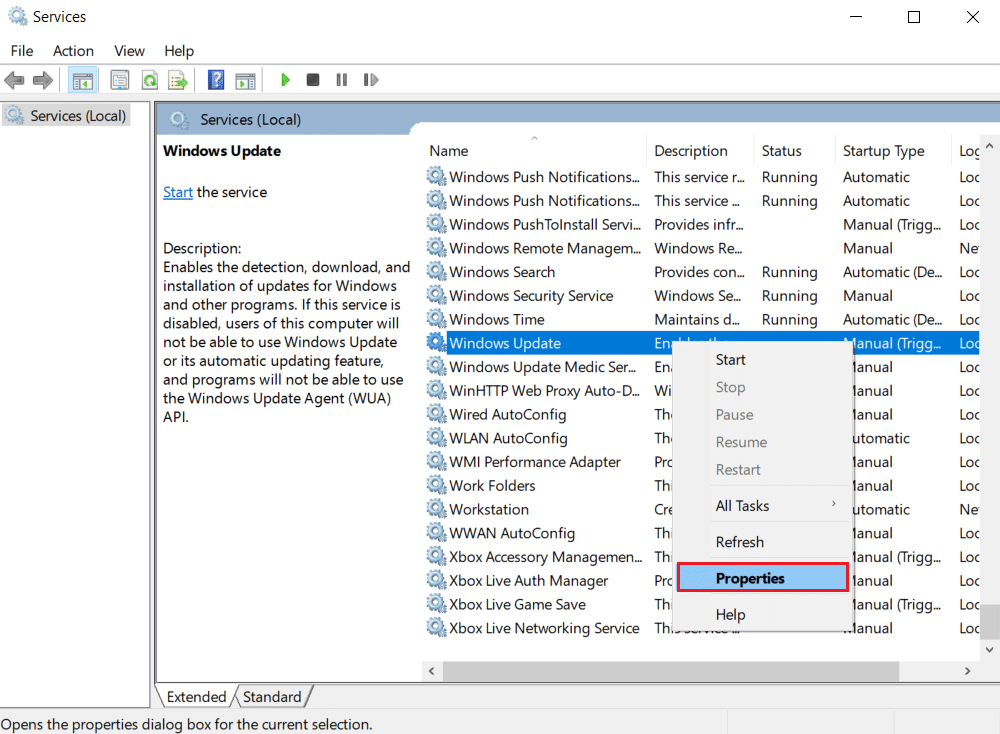
2. Finndu og hægrismelltu á Windows Update þjónustu og veldu Hætta.
3. After that, minimize þjónusta gluggi.
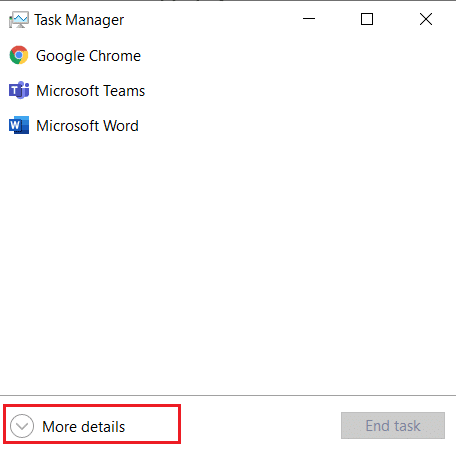
4. Ýttu á Ctrl + Shift + Esc lyklar samtímis að opna Verkefnisstjóri.
5. Smelltu á Nánari upplýsingar.
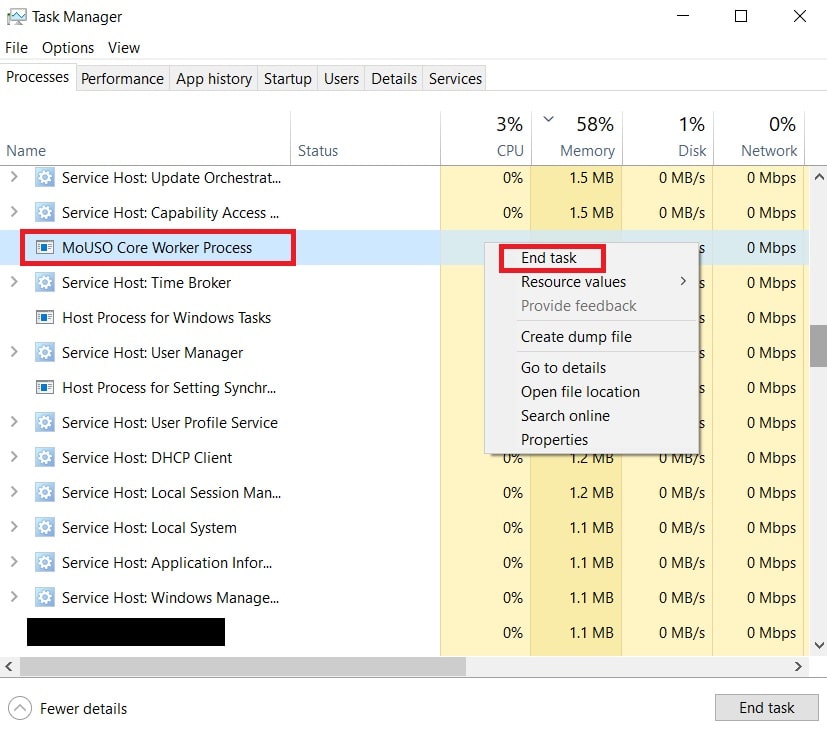
6. Finndu og hægrismelltu á MoUSO Core Worker Process og velja Lokaverkefni.
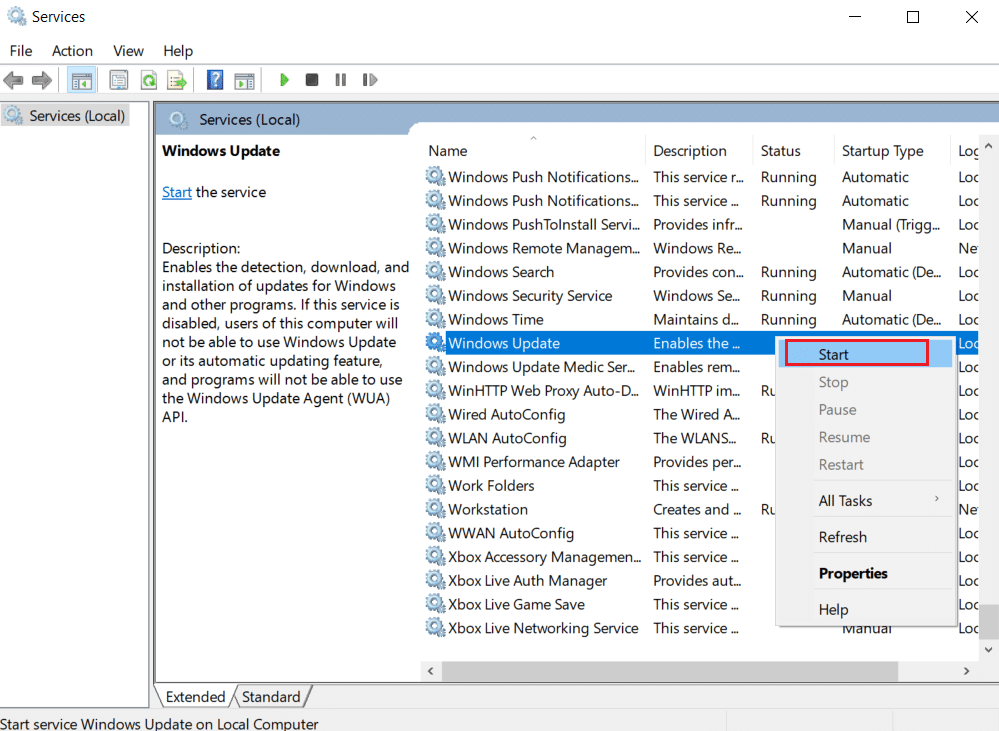
7. Close Task Manager and maximize Þjónusta gluggi.
8. Hægri smelltu á Windows Update og velja Home.
After restarting Windows Update service, check if this MoUsoCoreWorker.exe process error is resolved.
Method 8: Change Windows Update Service Startup Mode
If the Windows Update service is set as manual in Startup type, it can sometimes freeze during its processes which may trigger PC to wake up from sleep. You can fix this issue by changing its Startup type to Automatic and to do that follow the steps below.
1. Fylgja Step 1 frá Aðferð 7 til að opna Þjónusta.
2. Finndu og hægrismelltu Windows Update þjónustu og veldu Eiginleikar to open Properties window.
3. Í almennt flipi, breyta Uppsetningartegund til Sjálfvirk from drop down list.
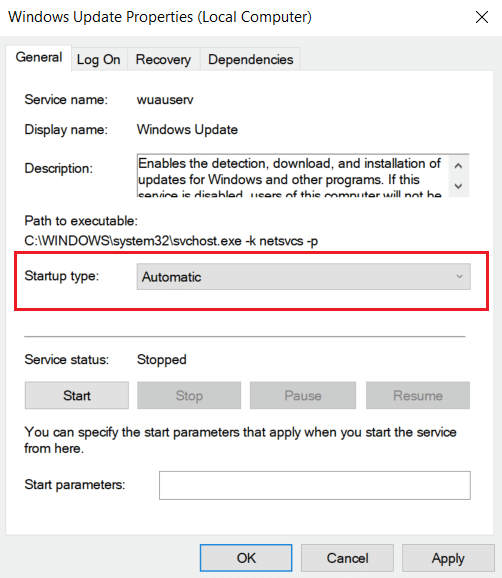
4. smellur gilda og OK til að vista breytingar.
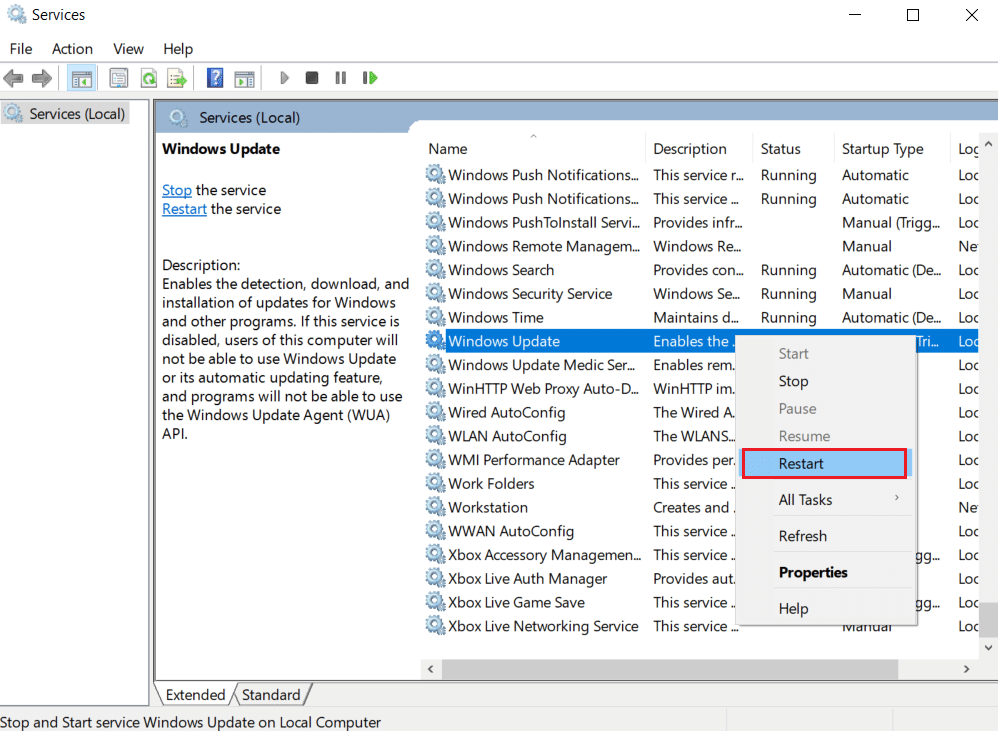
5. Í Þjónusta window right-click on Windows Update þjónustu aftur og veldu Endurræsa.
6. When Windows update has restarted, close Þjónusta gluggi.
Athugaðu: If the error persists, try to stop automatic updates and check if it works for you.
Method 9: Run Windows Update Troubleshooter and Power
Troubleshooting detects and resolves any problem present within a program. As MoUSO Core Worker Process is related to Windows updates, running Windows update troubleshooter can resolve the error. You can do it by following our guide to Run Windows Update Troubleshooter.
Einnig lesið: Fix .NET Runtime Optimization Service High CPU Usage
Method 10: Run Power Troubleshooter
If you are still facing this issue after running Windows Update Troubleshooter, try running Power troubleshooter to see if it resolves it. Follow the steps to do the same.
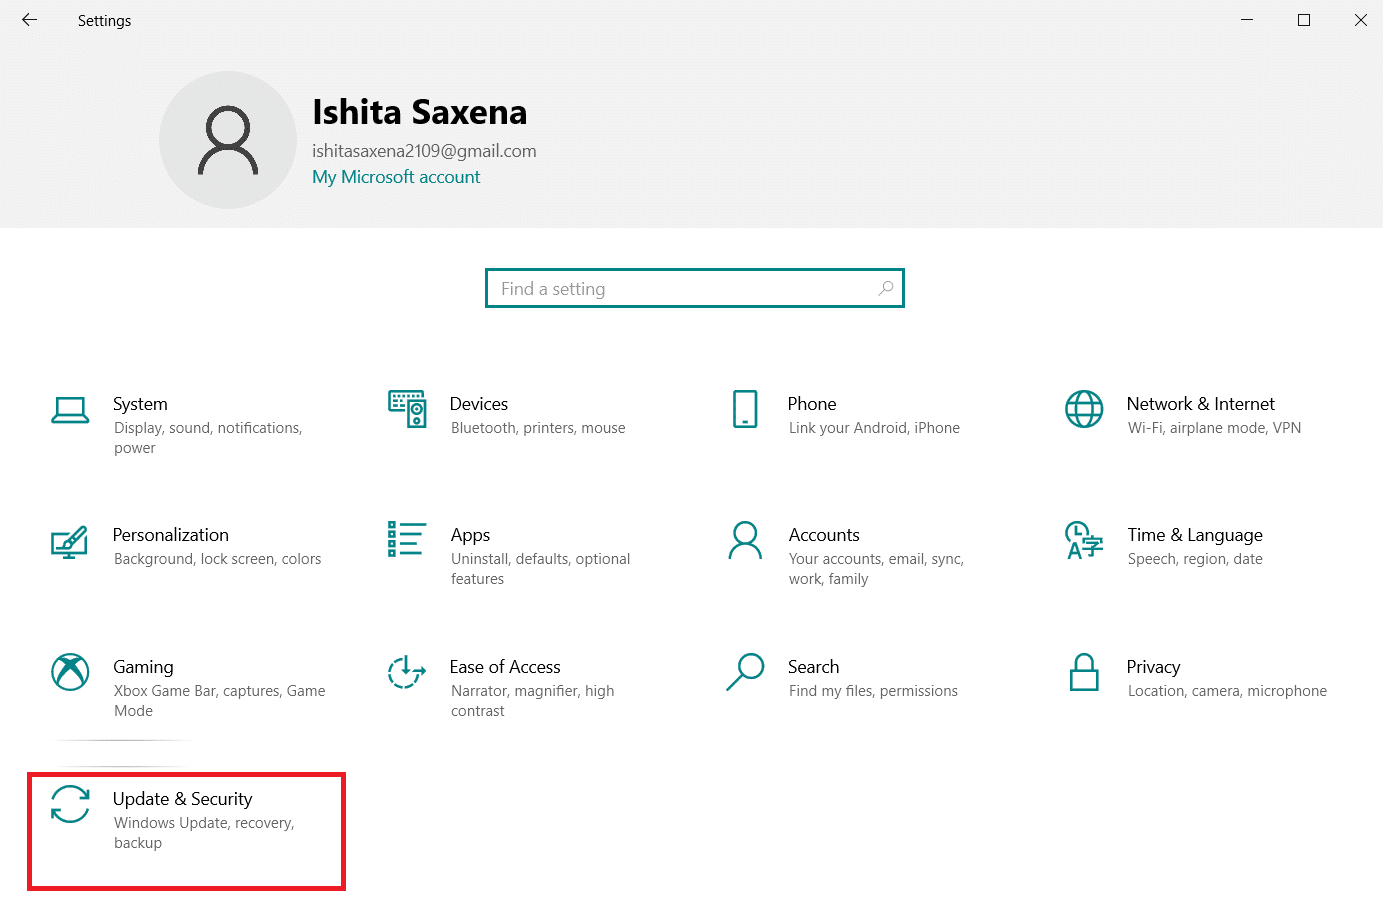
1. Sláðu á Windows + I lyklar saman til að opna Stillingar.
2. Veldu Uppfærslur og öryggisupplýsingar on Stillingar síðu.
3. Smelltu á leysa menu on the left pane.
4. Veldu síðan Power valkostur undir Finndu og lagaðu önnur vandamál kafla og smelltu á Hlaupa úrræðunni hnappinn.
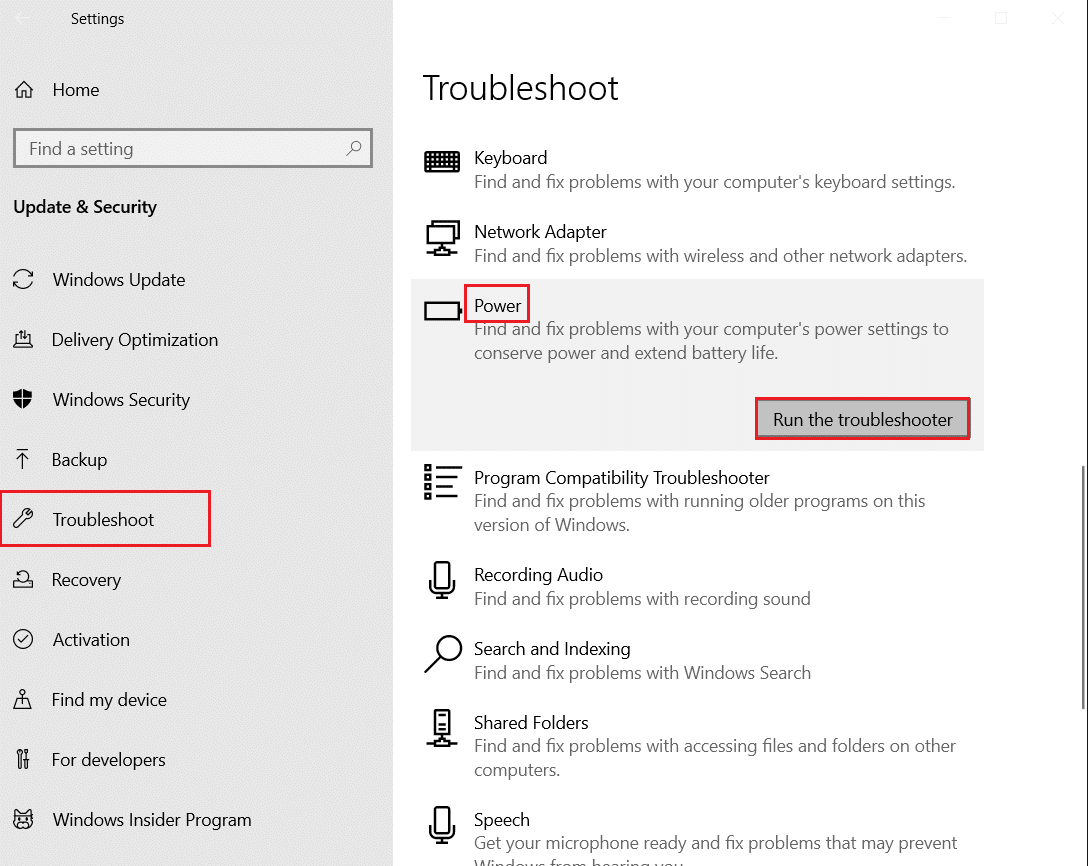
5. Wait for the troubleshooting process to complete and endurræsa tölvuna.
Method 11: Restore Default Power Settings
If power settings are misconfigured, then can affect functioning of sleep mode on PC. Try changing power settings to default and see if it fixes this MoUsoCoreWorker.exe process issue. To do so, follow the given steps.
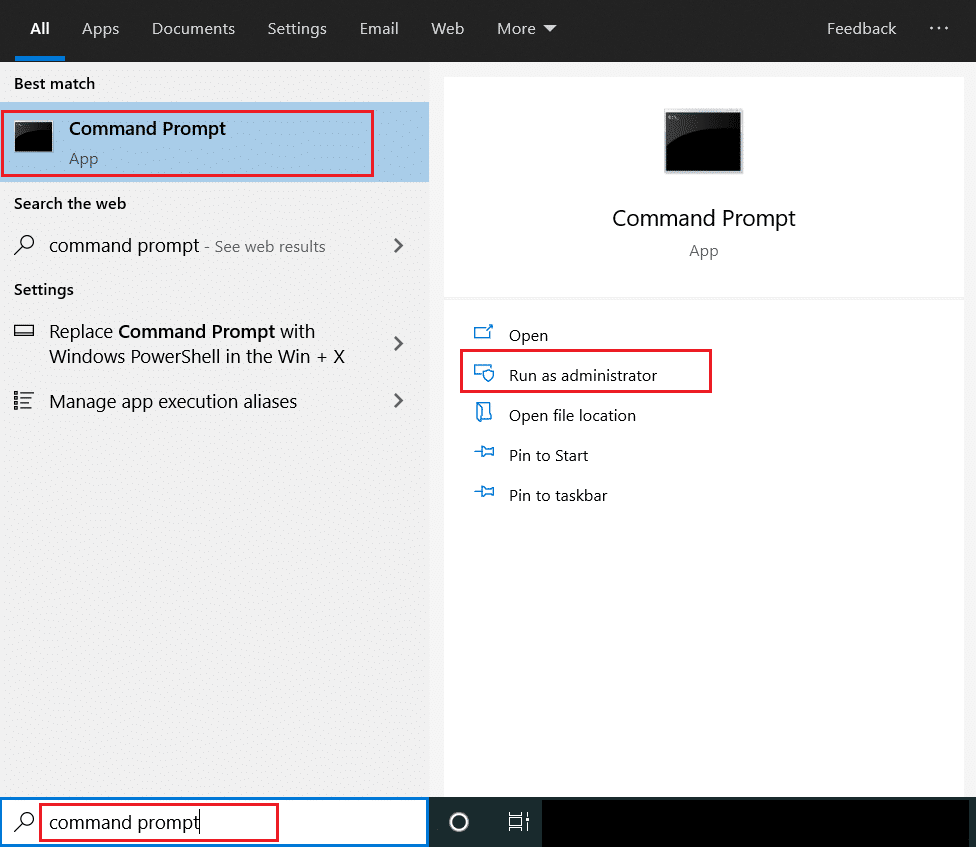
1. Ýttu á Windows lykill og tegund Stjórn hvetja og velja Hlaupa sem stjórnandi að hleypa af stað Stjórn Hvetja.
2. Type the following command in Stjórn Hvetja og ýttu Sláðu inn lykilinn to execute it. Once command is executed, power settings will revert to default settings.
powercfg -restoredefaultschemes
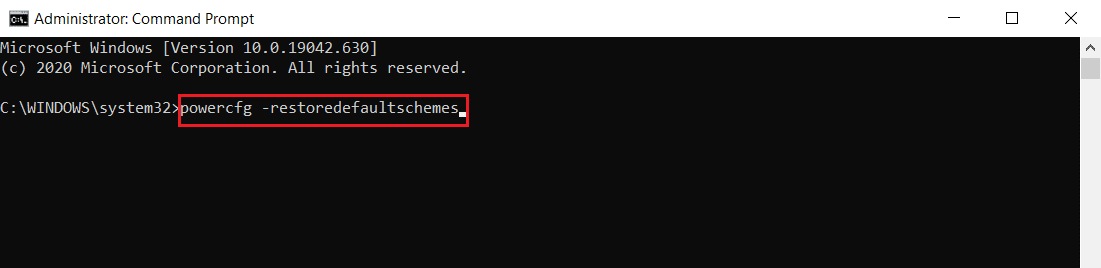
3. Exit Command Prompt and endurræstu tölvuna.
Method 12: Overrule MoUSO Core Worker Process Request
Another way to fix this issue is by modifying your power settings to overrule MoUSO Core Worker Process request. To do it, follow these instructions carefully.
1. Fylgja Step 1 frá Aðferð 11 til að opna Stjórn Hvetja sem stjórnandi.
2. Type the following command to overrule MoUSO Core Worker Process request and press the Sláðu inn lykilinn.
powercfg /requestsoverride process MoUsoCoreWorker.exe execution
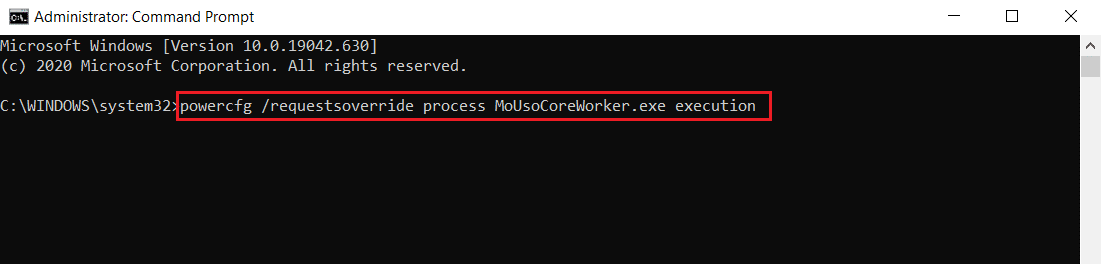
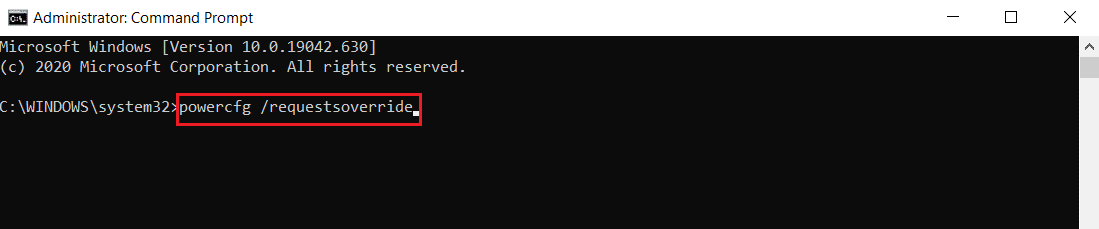
3. After executing the previous command, type the following command to verify the overrule process and press the Sláðu inn lykilinn.
powercfg /requestsoverride
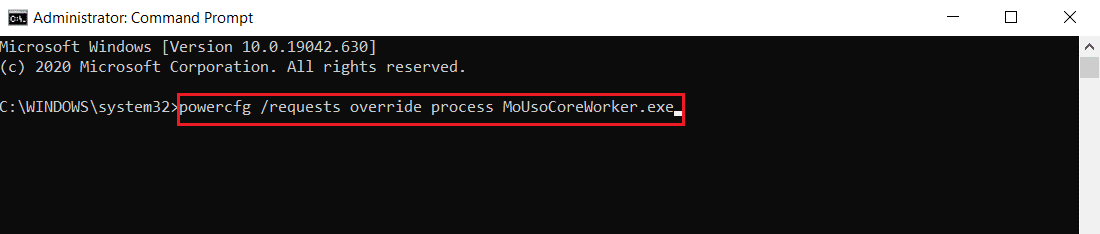
Athugaðu: In case you want to stop overruling MoUSO Core Worker Process request, simply execute this command in Stjórn Hvetja.
powercfg /requests override process MoUsoCoreWorker.exe
Einnig lesið: Lagfærðu DISM Host Service Process High CPU notkun
Method 13: Disable Troublesome Hardware Components
MoUSO Core Worker Process may stay if it is unable to power off certain hardware components. It can be fixed by disconnecting such hardware devices by enabling PC to power them off. Follow the steps below do the same
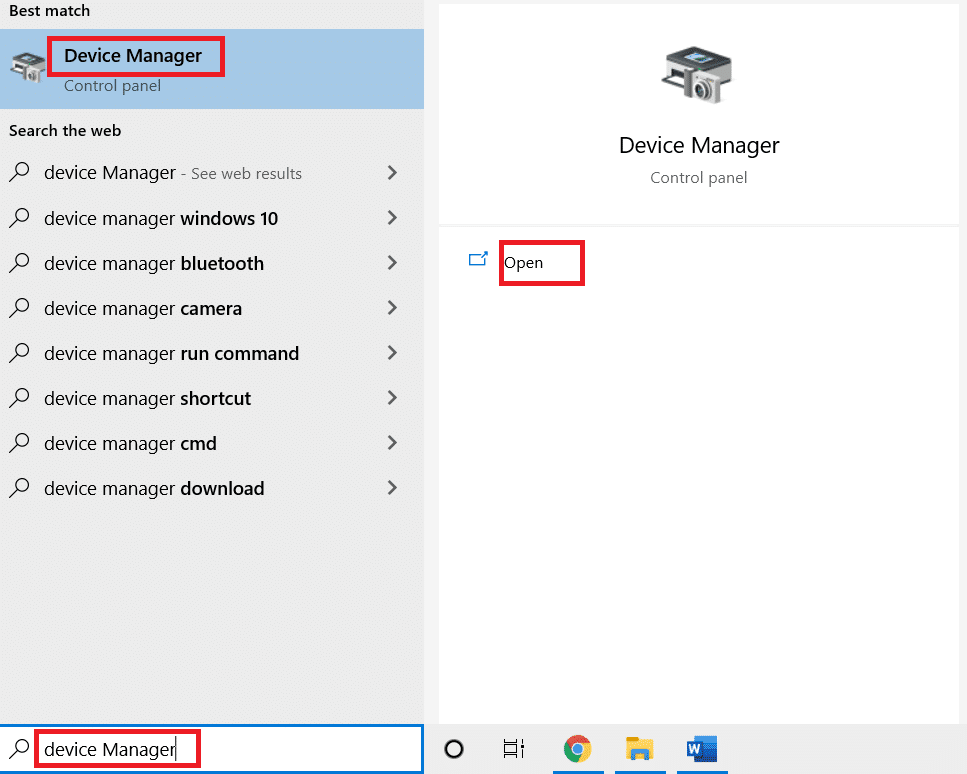
1. Ýttu á Windows lykill, gerð Tækjastjórnun og smelltu á Opna.
2. Veldu og stækkaðu Universal Serial Bus Controllers. Choose a device, right-click on it and select Eiginleikar. It will open Properties window.
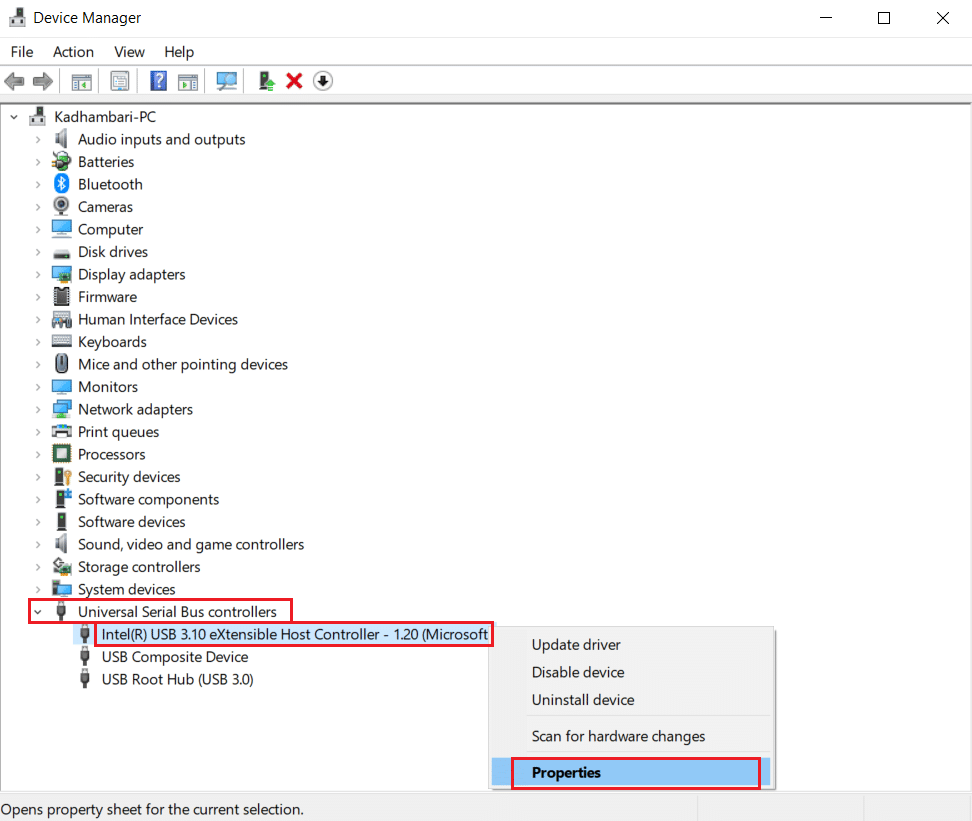
3. Fara til Power Management tab, check the box marked Leyfa tölvunni að slökkva á þessu tæki til að spara orku og smelltu OK til að vista breytingar.
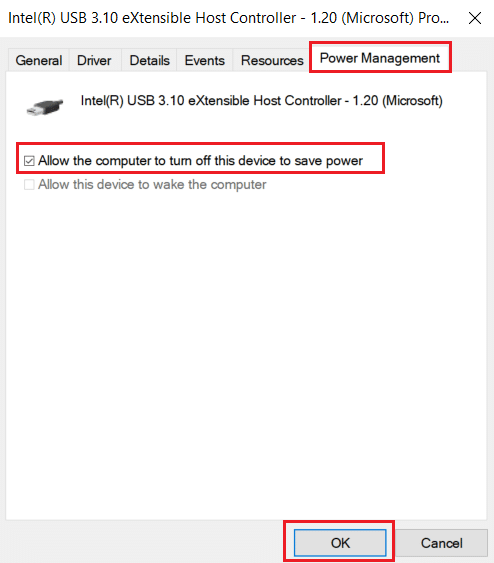
4. Repeat the process for all other devices to identify which ones are the problematic hardware devices and disable them.
5. If the issue persists, you can run the following command to check which devices are not powered off and hit the Sláðu inn lykilinn.
powercfg-tæki fyrirspurn vakna
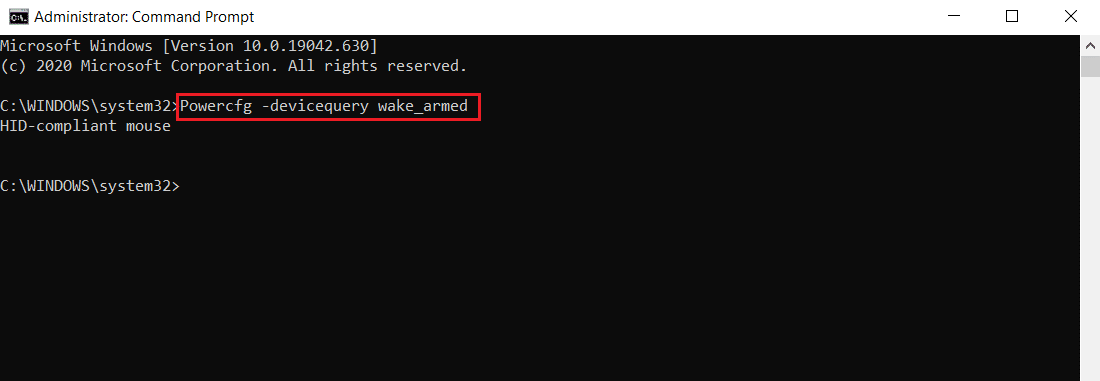
6. After this command is executed unplug the device mentioned in Command Prompt or modify its properties by going to the Power Management flipa eins og sýnt er í Step 3.
Aðferð 14: Framkvæmdu System Restore
If none of the above solutions works, your final option is to perform System Restore. If you are unable to identify any program or driver causing MoUSO Core Worker Process to constantly wake up PC from sleep, restore your PC to a previous date by following our guide to Use System Restore on Windows 10. This method will surely fix the issue.
Mælt með:
We hope that this guide was helpful and you were able to stop MoUSO Core Worker Process from waking your PC from sleep. Let us know which method worked for you the best. If you have any queries or suggestions then feel free to drop them in the comments section.

