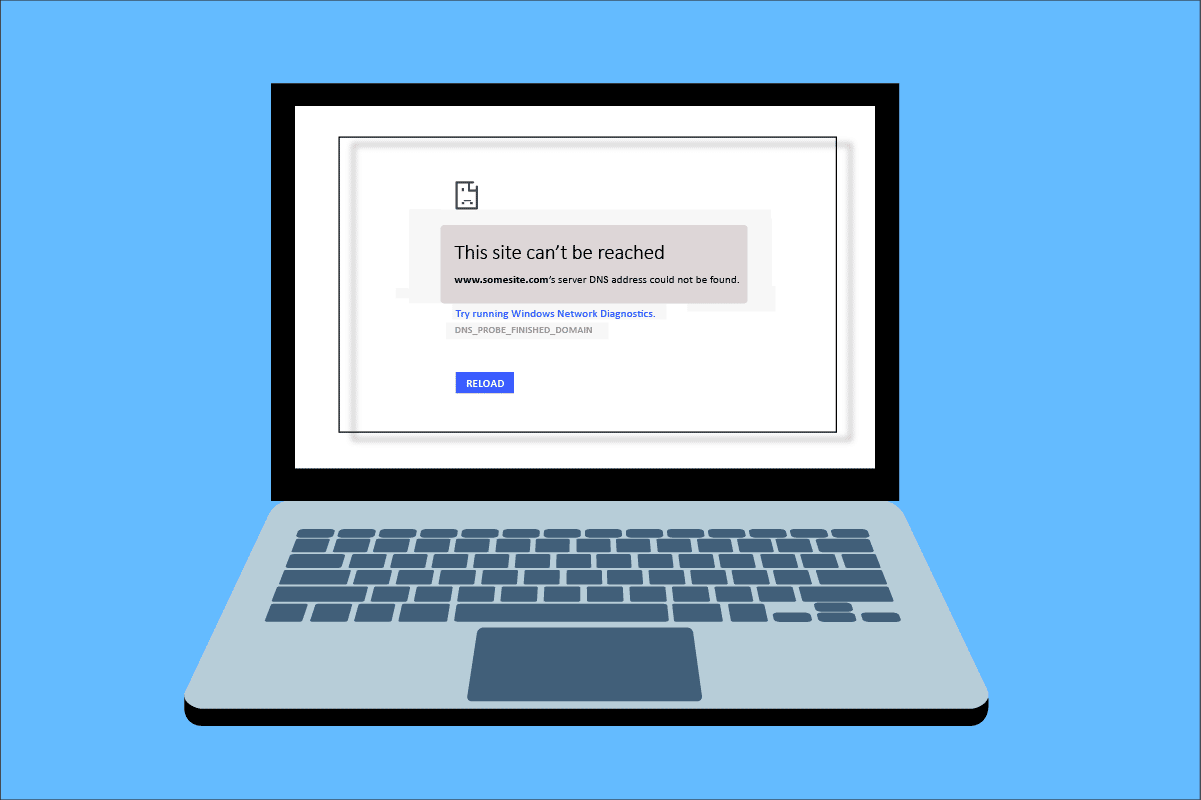
While surfing internet in your browser, you may face Server IP address could not be found error. This is a common issue for the Google Chrome users. We bring to you a helpful guide that will fix server IP address could not be found error on Windows 10. So, continue reading!
How to Fix Server IP Address Could Not be Found on Windows 10
One of the most popular web browser is Google Chrome. However if you are facing the error while browsing in the Chrome browser, then do not worry! This issue may be caused due to various reasons like;
- Óstöðug nettenging
- Corrupt Browser Cache and Cookies
- Incorrect IP Address
- Corrupt DNS Cache
- Outdated Network Drivers
Here, we have listed all possible methods to fix the said issue on Windows 10.
Method 1: Troubleshoot Network Adapter
The said issue may occur due to your network error. You can run the network adapter troubleshooter to fix any errors with your network adapter. Read our guide to troubleshoot network connectivity on Windows 10.

Aðferð 2: Hreinsaðu skyndiminni vafra
The cache files in your web browser may get corrupt. You can try to clear the cache and cookies of your browser and try to check if the error still persists or not. Follow these steps to clear browser cache.
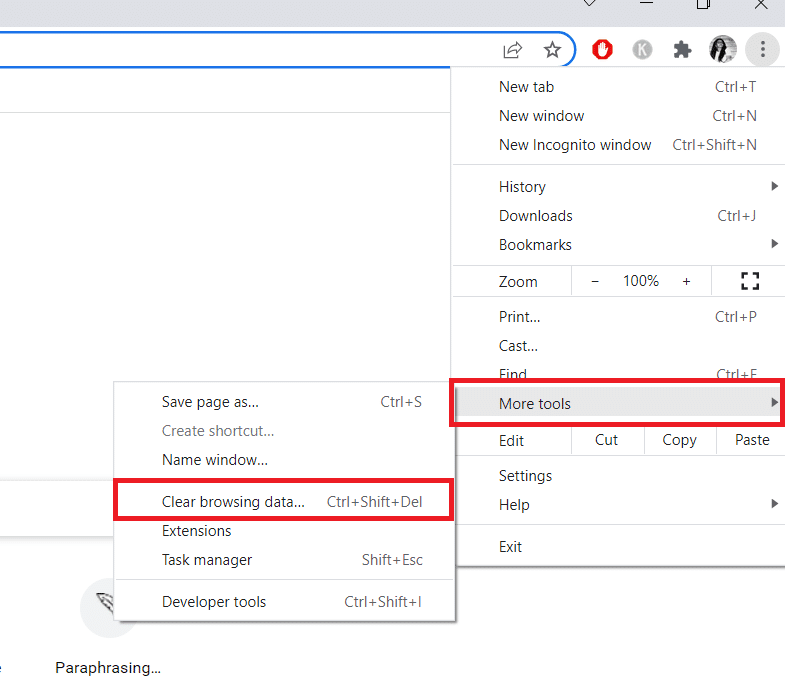
1. Sjósetja Chrome browser from Windows search bar as shown.

2. Nú, smelltu á þriggja punkta táknmynd efst í hægra horninu.
3. Hér, smelltu á Fleiri verkfæri valkostur.
4. Næst skaltu smella á Hreinsa vafra gögn… valkostur.
Athugaðu: Þú getur slegið inn króm: // stillingar / clearBrowserData in the search bar to launch the browser history page directly.
5. Veldu hér Tímabil in the next window. Check the boxes marked:
- Kökur og aðrar upplýsingar um síðuna og
- Cached myndir og skrár.
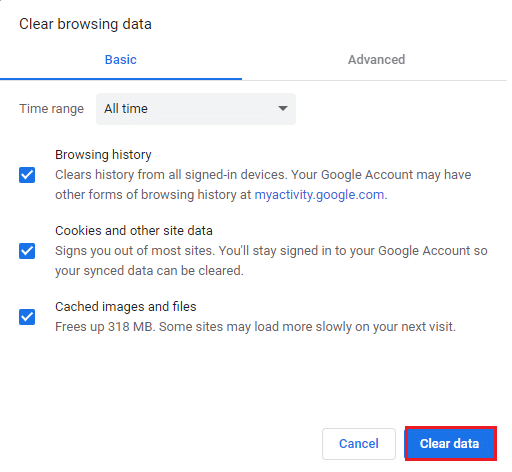
6. Að lokum, smelltu á Hreinsa gögn.
Einnig lesið: Fix This Plugin is Not Supported error in Chrome
Method 3: Clear DNS Cache
You can try to clear the DNS cache to fix server IP address could not be found error. Follow our guide to flush and reset the DNS cache in Windows 10.
Method 4: Release and Renew IP Address
Here are the steps to release and renew the IP address.
1. Sláðu á Windows lykill, gerð Stjórn Hvetja, og smelltu á Hlaupa sem stjórnandi.

2. Firstly you should flush the DNS cache as shown in Aðferð 2.
3. Once the above process is complete, type ipconfig / release og ýttu á Sláðu inn lykill.

4. Sláðu síðan inn ipconfig / endurnýja og högg Sláðu inn to renew your IP.

Einnig lesið: Lagfærðu engin WiFi netkerfi í Windows 10
Method 5: Change DNS Address
Incorrect DNS address also cause this said Chrome error. You can change your DNS address to fix the error. Follow the given steps to change DNS address.
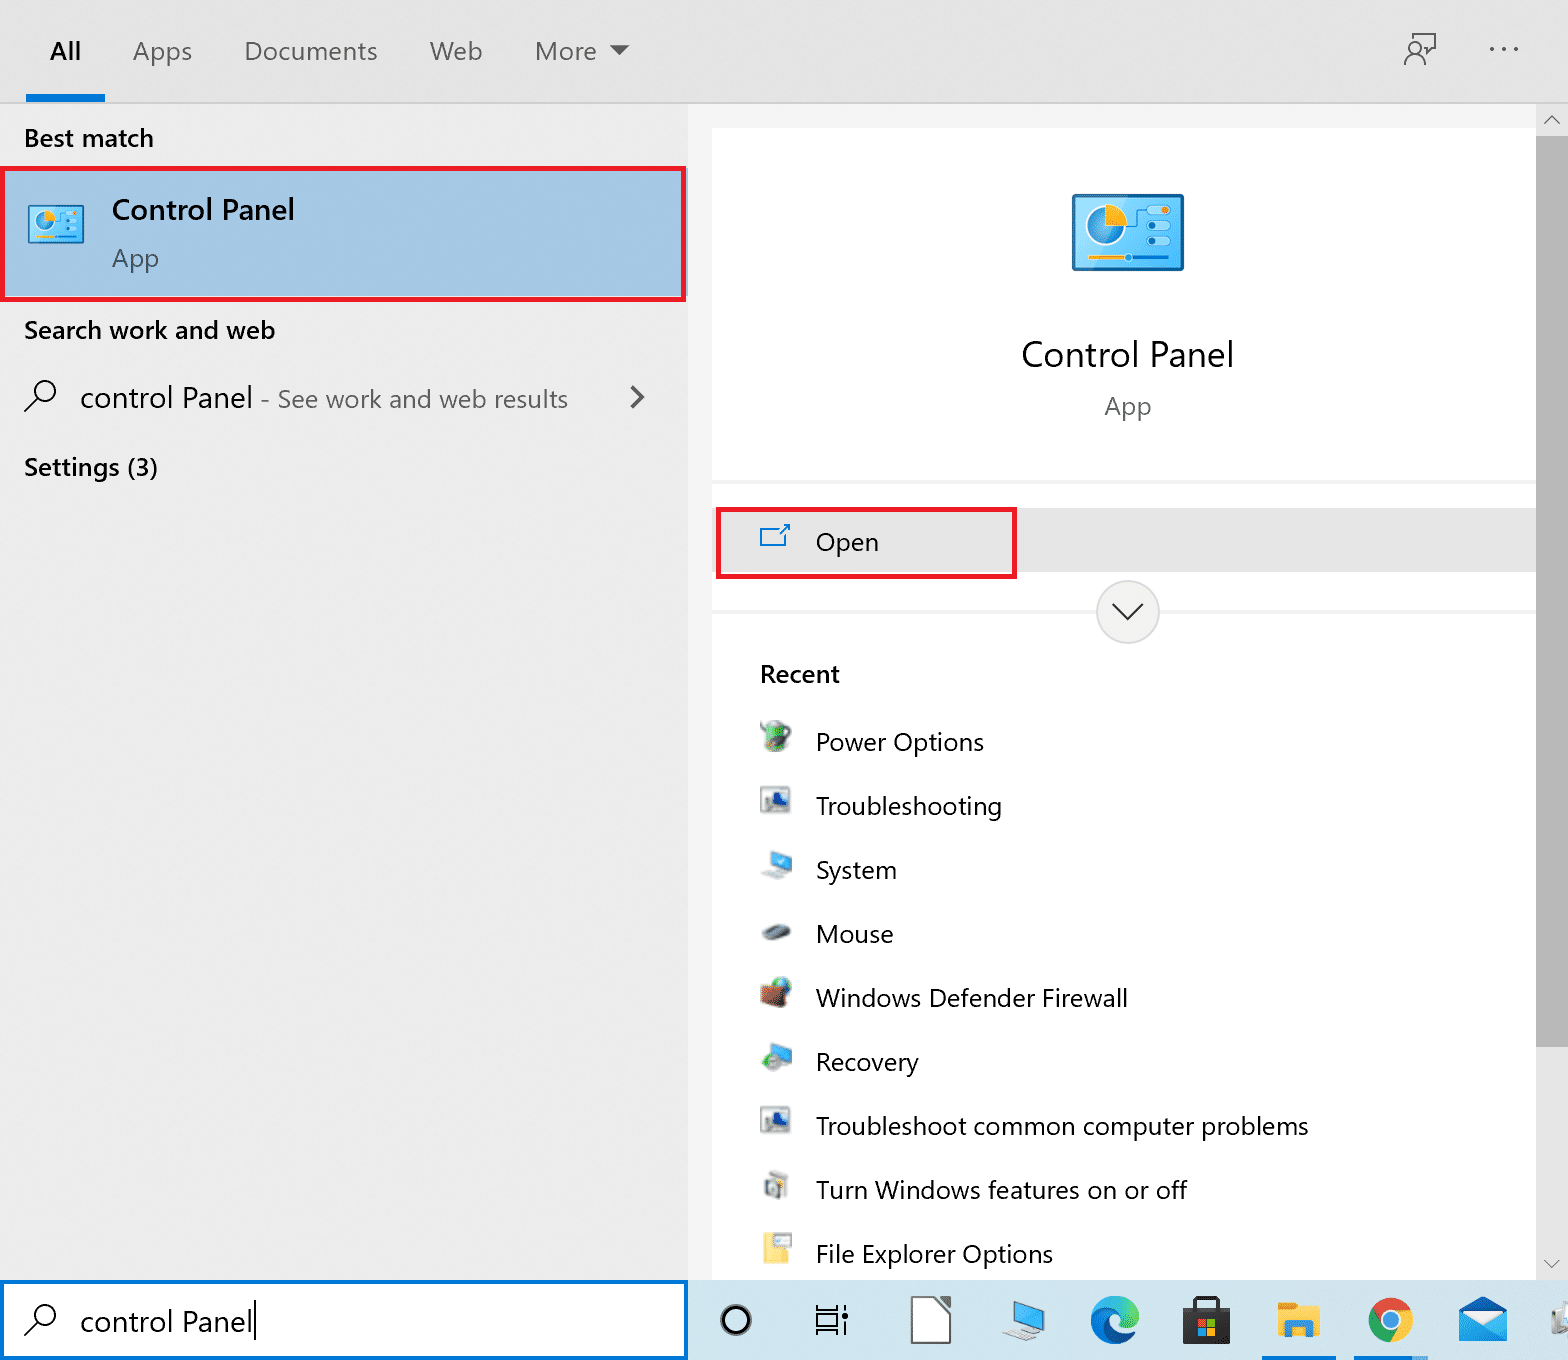
1. Ýttu á Windows lykill, gerð Stjórnborð og smelltu á Opna.
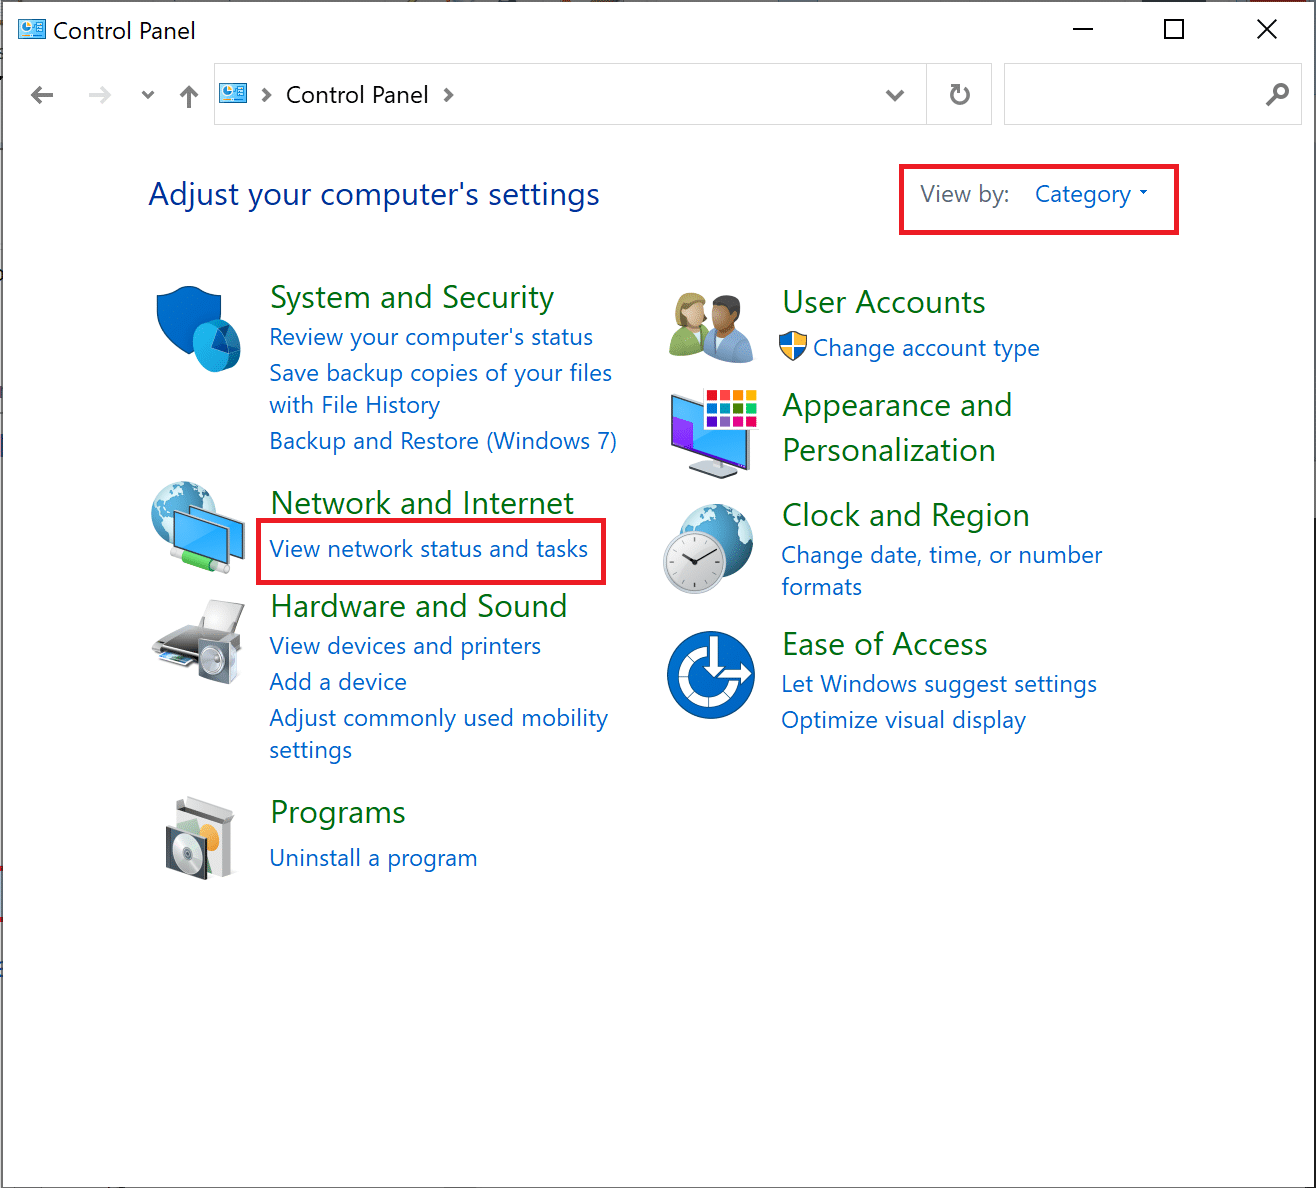
2. Setja Skoða eftir > Flokkur og smelltu á Skoðaðu stöðu nets og verkefni.
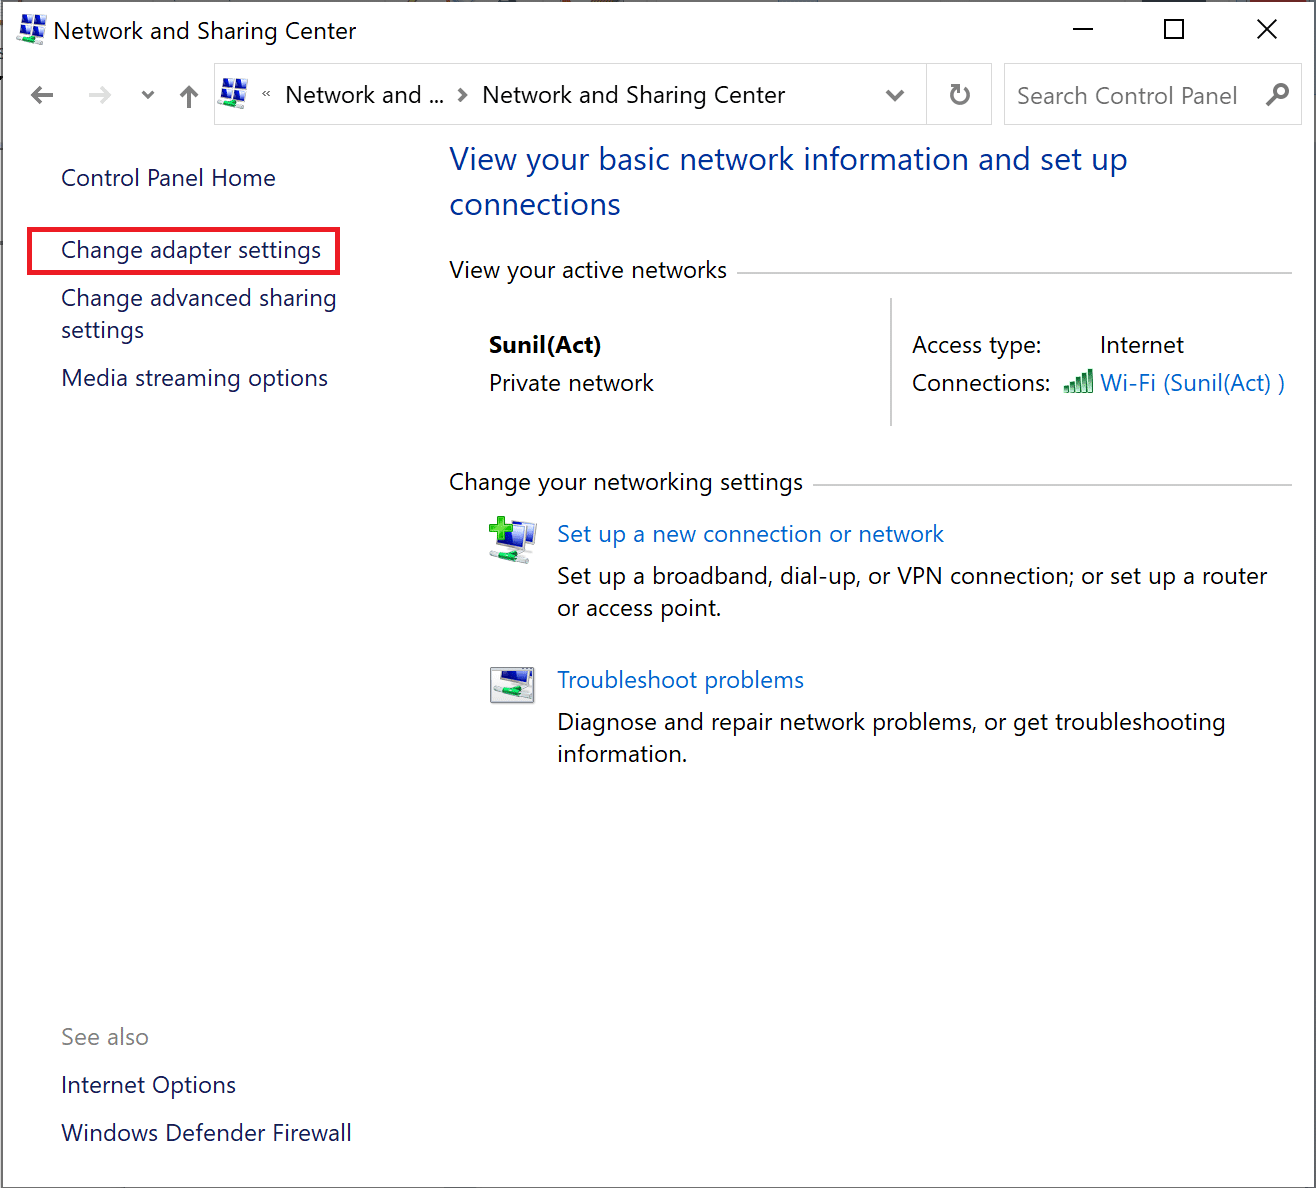
3. Nú, smelltu á Breyta millistillingum option at the left sidebar.
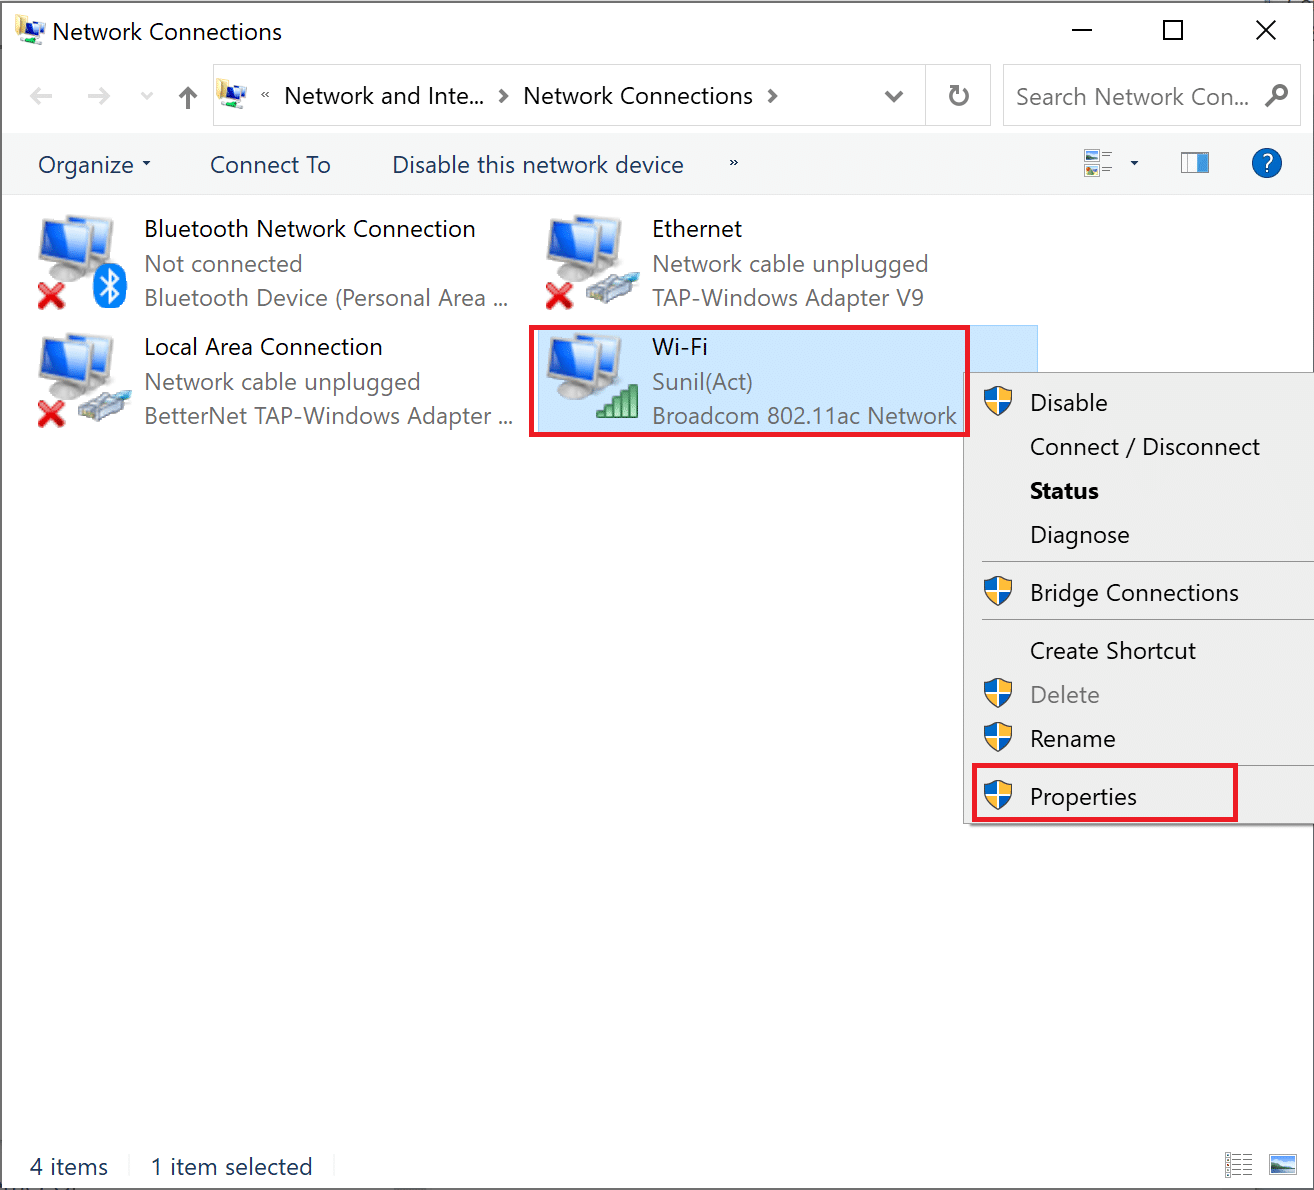
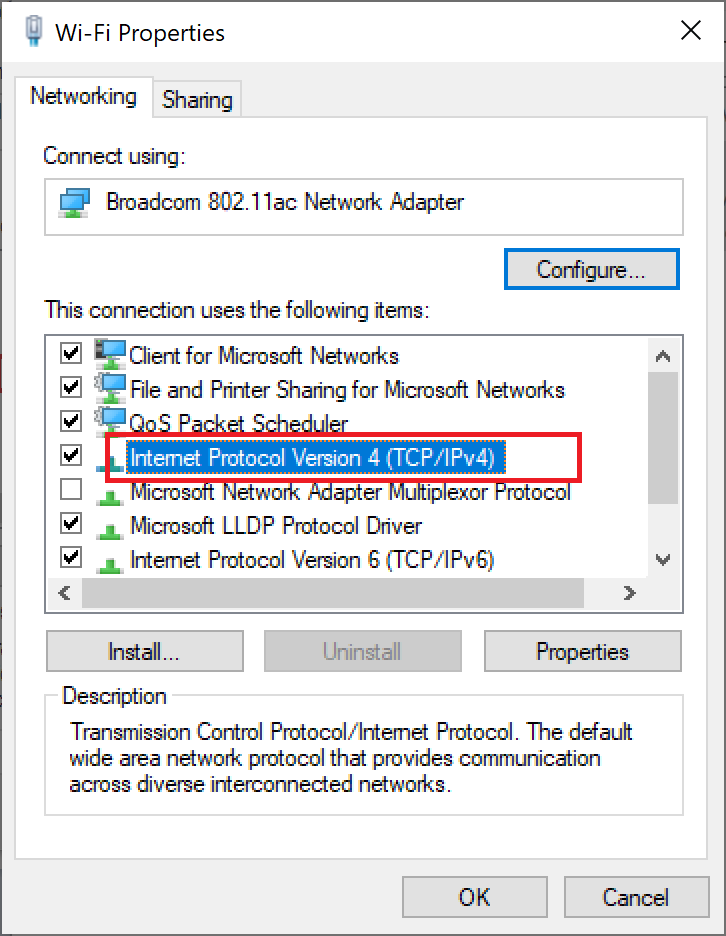
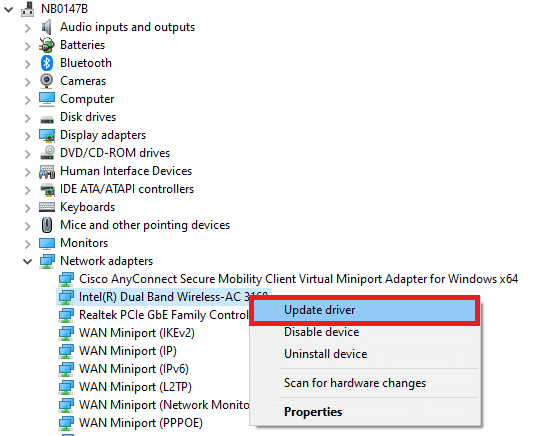
4. Next, right-click on your currently active internet connection and select Eiginleikar, eins og bent er á.
5. In the Properties window, double-click on Internet Protocol Version 4 (TCP / IPv4).
6. Next, check the options titled Fáðu IP-tölu sjálfkrafa og Notaðu eftirfarandi DNS miðlara heimilisföng, eins og bent er á.
6a. For the Preferred DNS server, enter the Google Public DNS address as: 8.8.8.8
6b. And, In the Varamaður DNS miðlara, enter the other Google Public DNS as: 8.8.4.4
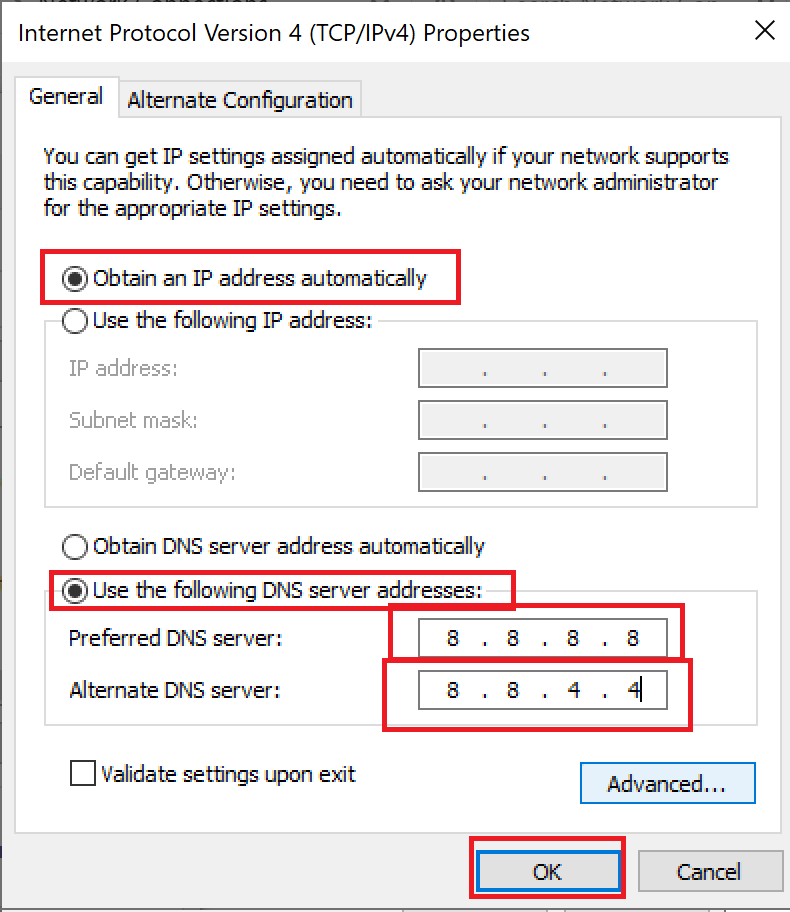
7. Loksins, smelltu á OK til að vista breytingarnar og endurræstu tölvuna.
Method 6: Restart DNS Cache
You can follow these steps to restart DNS cache.
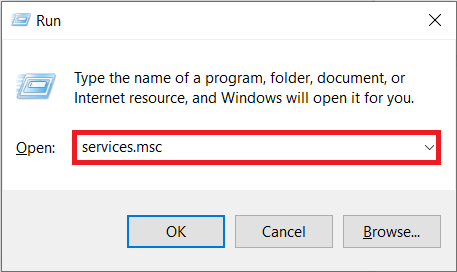
1. Ýttu á Windows + R lyklar saman til að opna Hlaupa valmynd.
2. Then type services.msc og ýttu á Sláðu inn lykilinn til að opna Þjónusta gluggi.
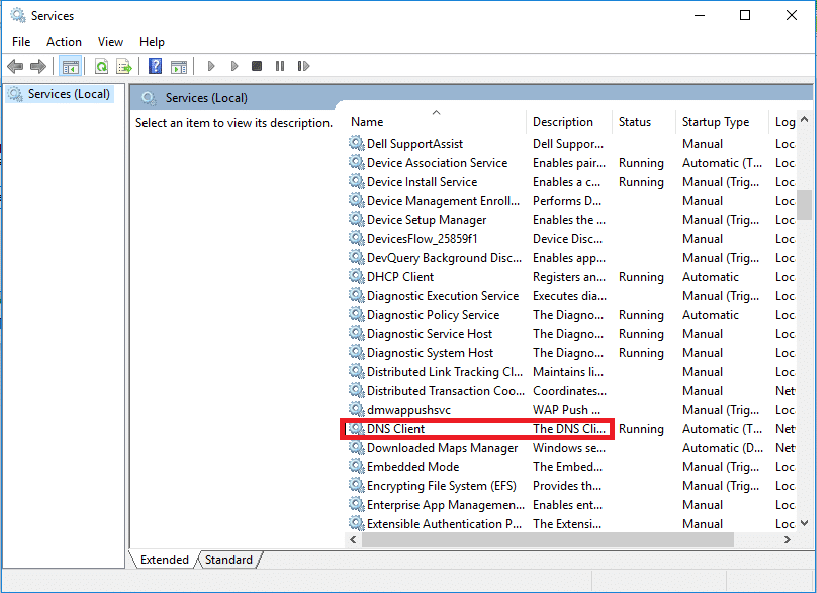
3. Right-click on DNS viðskiptavinur og velja Endurræsa.
Athugaðu: If you find no restart option and unable to restart it from this method, you do not need to worry. You just need to open an elevated Command Prompt on your system.
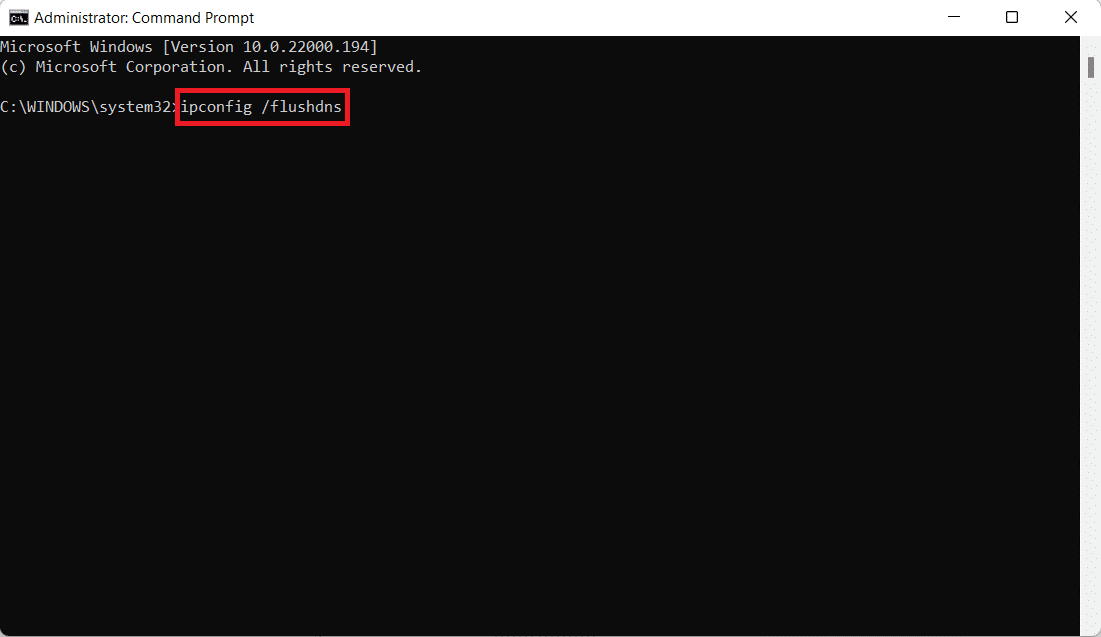
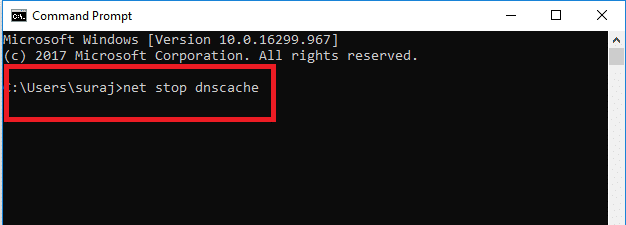
4. Sláðu inn eftirfarandi stjórn og ýttu á Sláðu inn lykilinn.
net stöðva dnscache
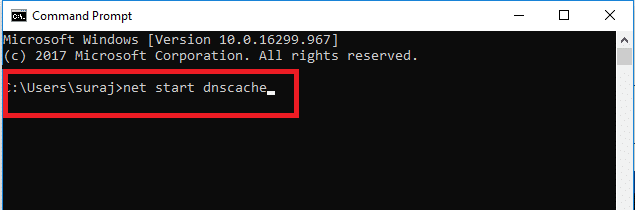
5. To start it again, type the given stjórn og högg the Sláðu inn lykilinn.
net byrjun dnscache
Einnig lesið: Hvernig á að endurstilla netstillingar á Windows 10
Method 7: Update Network Driver
Outdated network drive also can cause server IP address could not be found error. If you do not have the latest driver versions installed, then this may create bugs and can result in the unstable network connection. So, updating your network driver is necessary for a good network connection. Read our guide to update network drivers on Windows 10.
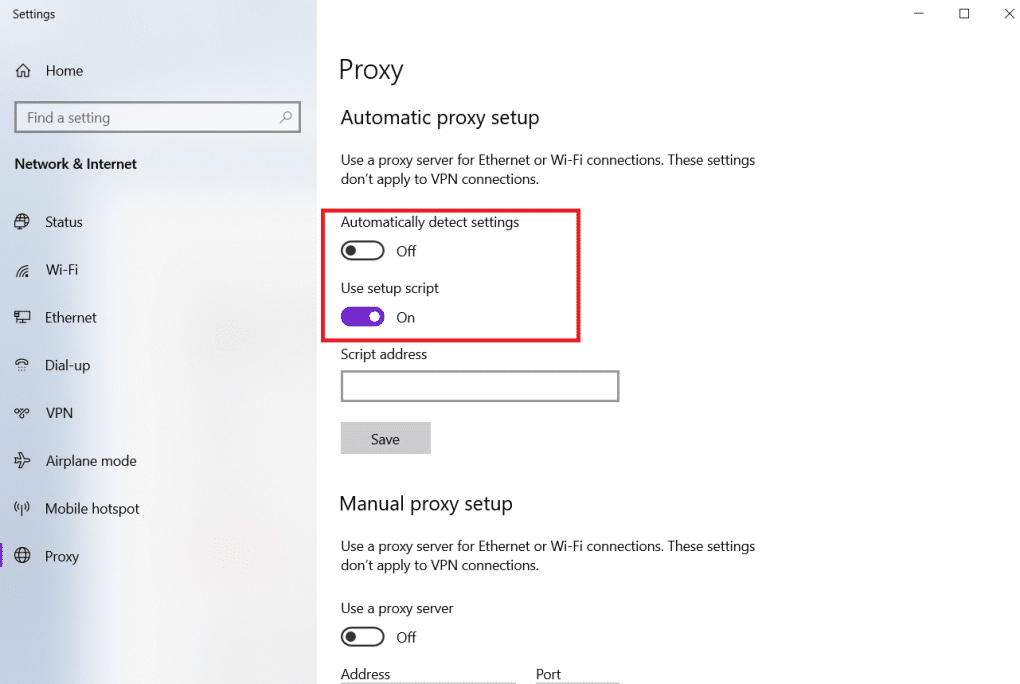
Method 8: Verify Proxy Settings
If you are using a proxy server, then using a particular proxy can create issues with your internet. You can change your proxy server to solve this problem. Follow the steps listed below to verify proxy settings.
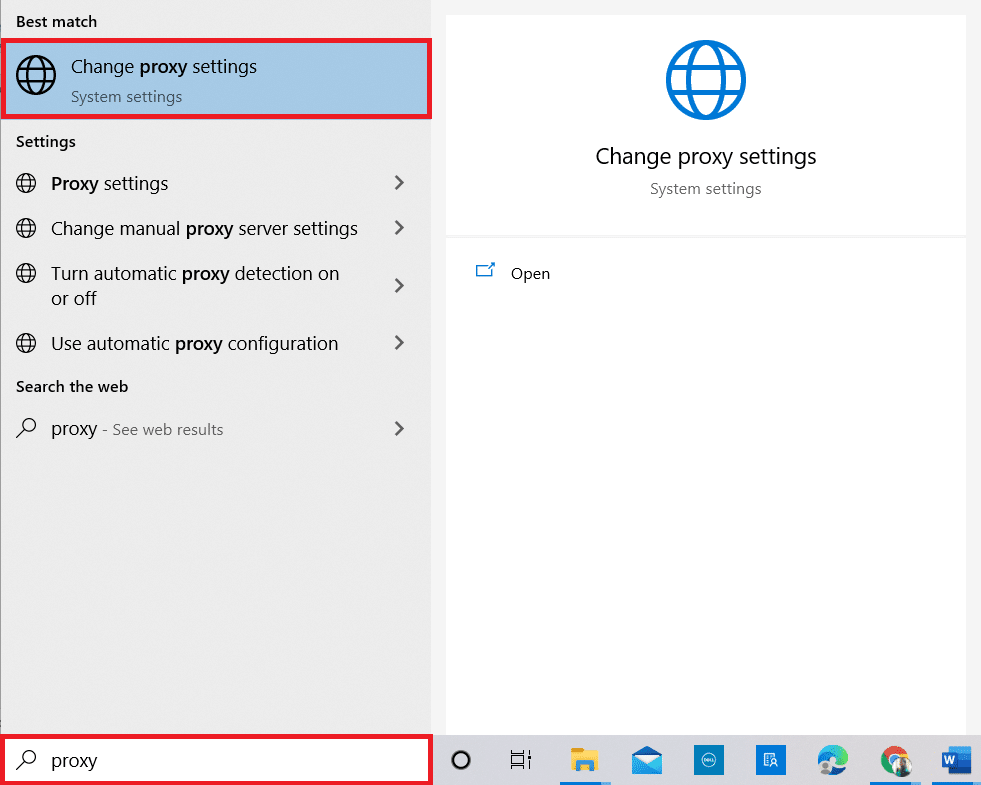
1. Sláðu á Windows key og tegund Proxy og smelltu á Breyttu umboðsmannastillingum úr leitarniðurstöðunum.
2. Here, switch on the toggle for Finna sjálfkrafa stillingar.
Mælt með:
We hope that you learned how to fix server IP address could not be found on Windows 10. Feel free to reach out to us with your queries and suggestions via the comments section below. Let us know what you want to learn about next.

