When you try to install apps on Windows Store, you may face Error Code 0x80073cf9, which can be very frustrating as Windows Store is a reliable source to install apps. If you try to install 3rd party apps from any other source, you risk your machine to malware or infections but what other option you have if you cannot install apps from Windows Store. Well, that’s where you’re wrong this error can be fixed, and that’s what exactly we are going to teach you in this article.
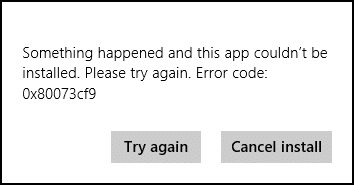
Something happened, and this app couldn’t be installed. Please try again. Error code: 0x80073cf9
There is no single cause as to why this error occurs so that various methods can fix this error. Most of the times it completely depends on the user machine configuration as to which method might work for them, so without wasting any time, let’s see how to fix this error.

Fix Windows 10 Store Error 0x80073cf9
Gakktu úr skugga um að búa til endurheimtarpunkt ef eitthvað fer úrskeiðis.
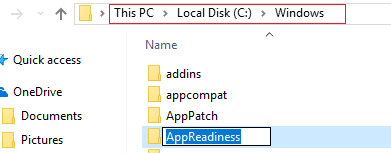
Method 1: Create A Folder AppReadiness
1. Ýttu á Windows Key + R og sláðu síðan inn C: Windows og ýttu á Enter.
2. Find the folder AppReadniess in the Windows folder, if you can’t follow the next step.
3. Right-click in an empty area and select Ný > Mappa.
4. Name the newly created folder as App reiðubúin og ýttu á Enter.
5. Reboot your PC to save changes. Again try to access the Store, and this time it might work perfectly.
Aðferð 2: Settu upp Windows Store aftur
1. Open Command Prompt as an Stjórnandi.

2. Run below PowerShell command
Get-AppxPackage -AllUsers | Foreach {Add-AppxPackage -DisableDevelopmentMode -Register “$ ($ _. InstallLocation) AppXManifest.xml”}

3. Once done, close command prompt and Restart your PC.
This step re-register Windows Store apps which should automatically Fix Windows 10 Store Error 0x80073cf9.
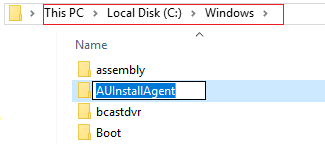
Method 3: Create a folder AUInstallAgent
1. Ýttu á Windows Key + R og sláðu síðan inn C: Windows og ýttu á Enter.
2. Find the folder AUInstallAgent in the Windows folder, if you can’t then follow the next step.
3. Right-click in an empty area and select Ný > Mappa.
4. Name the newly created folder as AAUInstallAgent og ýttu á Enter.
5. Reboot your PC to save changes. This step may fix Windows 10 Store Error 0x80D05001 or 0x80073cf9 but if it didn’t then continue.
Method 4: Allow Full System Access to Packages in AppRepository
1. Ýttu á Windows takkann + R og sláðu síðan inn C:ProgramDataMicrosoftWindows og ýttu á Enter.
2. Now double click on AppRepository folder to open it, but you will receive an error:
You have been denied permission to access this folder.
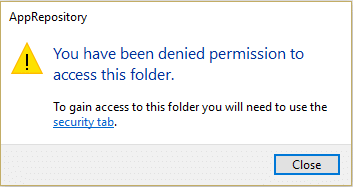
3. This means you need to take ownership of this folder before you can access it.
4. You can take ownership of the folder via the following method: How To Fix Destination Folder Access Denied Error.
5. Now you need to give the SYSTEM account, and the APPLICATION PACKAGES account full control on the folder C:ProgramDataMicrosoftWindowsAppRepositoryPackages. To this follow the next step.
6. Hægri smelltu á Packages folder og velja Eiginleikar.
7. Veldu Öryggisflipi og smelltu síðan á Ítarlegri.
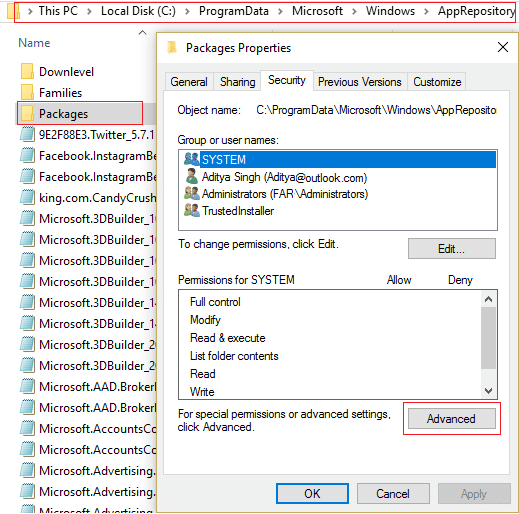
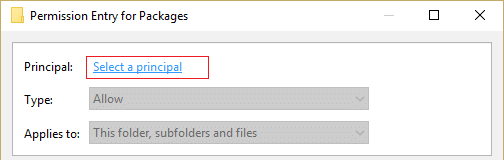
8. In Advanced Security Settings, click Bæta við and click on Select a helstu.
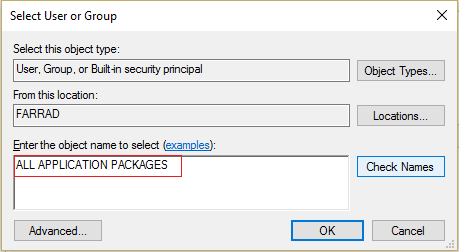
9. Næst skaltu slá inn “ALLIR UMSÓKNARPAKKAR” (without quote) in the field Enter the object name to select and click OK.
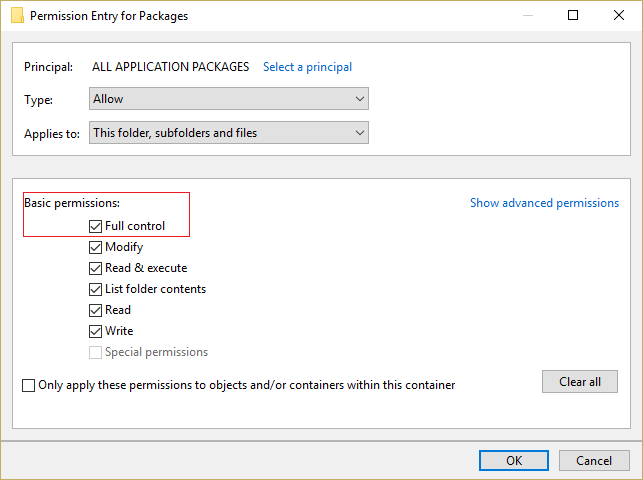
10. Now, on the next window check mark Full control and then click OK.
11. Do the same with the SYSTEM account. Reboot your PC to save changes.
Method 5: Rename Software Distribution Folder
1. Press Windows Key + Q to open Charms Bar and type cmd.
2. Right-click on cmd and select Hlaupa sem stjórnandi.
3. Type these commands and hit enter:
net stop wuauserv
ren c:windowsSoftwareDistribution softwaredistribution.old
net start wuauserv
exit
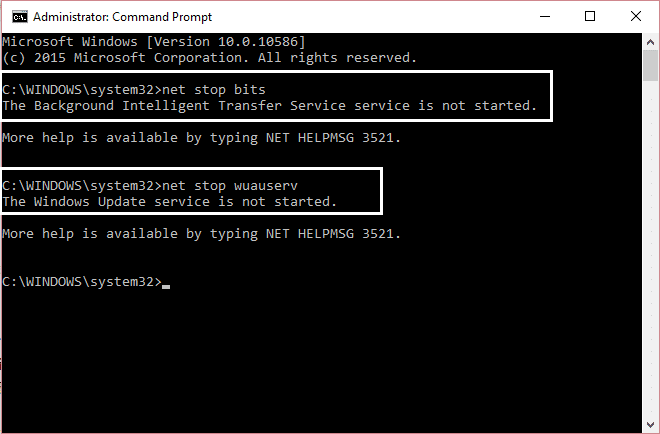
4. Reboot your PC to saves changes and again try to download updates.
Aðferð 6: Keyrðu DISM (dreifingarmyndaþjónusta og stjórnun)
1. Ýttu á Windows Key + X og veldu síðan Skipunarlína (Admin).

2. Enter the following command in cmd and hit enter:
mikilvægt: Þegar þú DISM þarftu að hafa Windows uppsetningarmiðil tilbúinn.
DISM.exe / Online / Cleanup-Image / RestoreHealth / Heimild: C: RepairSourceWindows / LimitAccess
Athugaðu: Skiptu um C:RepairSourceWindows með staðsetningu viðgerðaruppsprettunnar

3. Press enter to run the above command and wait for the process to complete; usually, it takes 15-20 minutes.
ATH: Ef skipunin hér að ofan virkar ekki, reyndu þá eftirfarandi: Dism /Image:C:offline /Cleanup-Image /RestoreHealth /Source:c:testmountwindows Dism /Online /Cleanup-Image /RestoreHealth /Source:c:testmountwindows /LimitAccess
4. After the DISM process is complete, type the following in the cmd and hit Enter: sfc / scannow
5. Let System File Checker run and once it’s complete, restart your PC.
Aðferð 7: Keyrðu CCleaner og Malwarebytes
1. Hlaða niður og setja upp CCleaner & Malwarebytes.
2. Keyra Malwarebytes og láttu það skanna kerfið þitt fyrir skaðlegum skrám. Ef spilliforrit finnst mun það sjálfkrafa fjarlægja þá.

3. Keyrðu nú CCleaner og veldu Sérsniðið hreint.
4. Undir Custom Clean, veldu Windows flipi og merktu við sjálfgefna stillingar og smelltu Greindu.

5. Þegar greiningu er lokið skaltu ganga úr skugga um að þú sért viss um að fjarlægja skrárnar sem á að eyða.

6. Að lokum, smelltu á Keyra Cleaner hnappinn og láttu CCleaner ganga sinn gang.
7. Til að þrífa kerfið þitt enn frekar, veldu Registry flipann, og tryggðu að eftirfarandi sé athugað:

8. Smelltu á Leitaðu að vandamálum hnappinn og leyfðu CCleaner að skanna, smelltu síðan á Lagfærðu valin vandamál hnappinn.

9. Þegar CCleaner spyr “Viltu breytingar á öryggisafriti á skránni?" veldu Já.
10. Þegar öryggisafritinu er lokið skaltu smella á Lagfærðu öll valin vandamál hnappinn.
11. Endurræstu tölvuna þína til að vista breytingar.
Method 8: Clear Windows Store cache
1. Ýttu á Windows Key + R og sláðu síðan inn Wsreset.exe og sláðu inn.
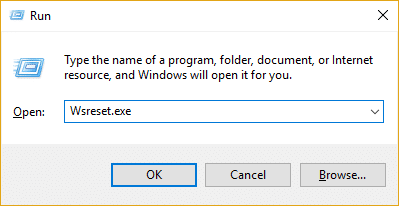
2. One the process is finished restart your PC.
Method 9: Run Windows Update and Windows Store Apps troubleshooter
1. Gerð bilanaleit í Windows leitarstikunni og smelltu á Troubleshooter.
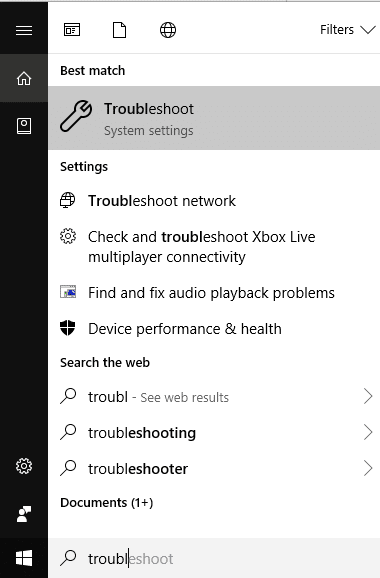
2. Næst, frá vinstri glugganum, veldu rúðu Sjá allt.
3. Veldu síðan úr listanum Úrræðaleit við tölvuvandamál Windows Update.

4. Follow on-screen instruction and let the Windows Update Troubleshoot run.

5. Now again go back to the View all window but this time select Windows Store Apps. Run the troubleshooter and follow on-screen instructions.
6. Endurræstu tölvuna þína og reyndu aftur að setja upp forrit frá Windows Store.
Mælt með:
Það er það sem þú hefur með góðum árangri Fix Windows 10 Store Error 0x80073cf9 en ef þú hefur enn einhverjar spurningar varðandi þessa færslu skaltu ekki hika við að spyrja þær í athugasemdareitnum.

