Chrome is one of the most-used browsers in the world. Millions of users love it because of its incredible customization and easy-to-use interface. But like a coin of two sides, Chrome also faces some errors sometimes. One such common error is Aw Snap! Chrome ran out of memory. As the name indicates, when Google Chrome consumes more RAM in your PC, you will face this error. We bring to you a perfect guide that will help you fix Chrome out of memory issues. So, continue reading!
How to Fix Chrome Ran Out of Memory in Windows 10
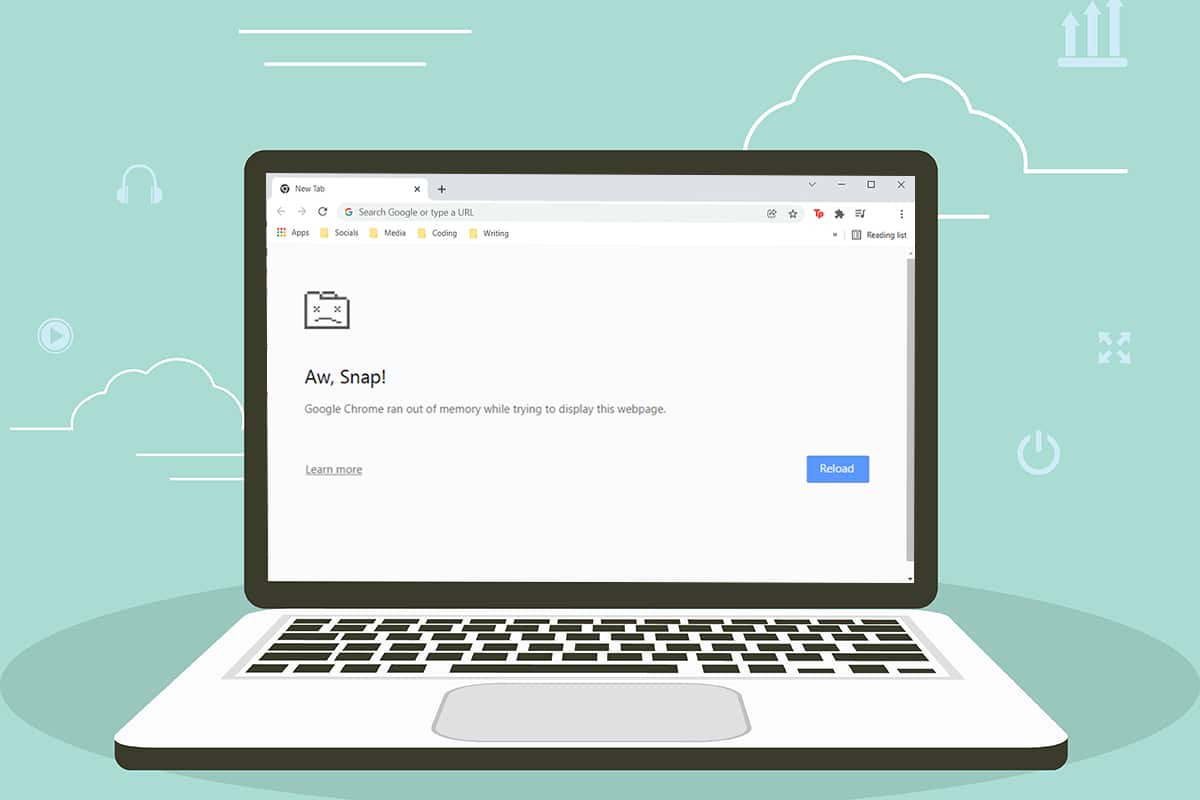
Following is the error that you may face if Chrome runs out of memory on Windows 10.
Aw, Snap!
Google Chrome ran out of memory while trying to display this webpage.
The reason for this error is not very obvious. Yet, there are some root causes for this Chrome browser out of memory issue listed below. Either random or specific, if you face this error in your browser, we will help you resolve the same by this guide.
- Vandamál með nettengingu
- Damaged or bulky browser cache
- Ósamrýmanlegar viðbætur
- Bulged temporary files in PC
- A glitch in the User profile
- Unwanted or incompatible programs in PC
- Gamaldags vafri
- Site blocked by firewall
Grundvallar bilanaleit
Here are some basic troubleshooting steps are given below to fix this error. You should follow these points before going through the methods given in this article.
- Endurræstu tölvuna þína: Í flestum tilfellum, a simple restart may fix the issue without any challenging layouts. Alternatively, you can entirely shut down the system using the Power options and turn it on again.
- Ensure Proper Internet Connectivity: This is the most apparent reason that causes the discussed error. When your internet connectivity is not optimum, the connection interrupts more frequently. You can run a speed test to know the optimum level of network speed required for the proper connection. You can also prefer a new faster internet package and buy it from your network provider.
- Close Unwanted Tabs: This might help in fixing the error. If none of these basic troubleshooting tips helped you, then close all the tabs and restart the Chrome browser.
Still, if you face the same error, go ahead with the troubleshooting methods given below. Follow them in the same order to attain quicker results.
Method 1: Update to 64-bit Version of Chrome
First, check if you use the 64-bit version of Chrome. If the browser consumes a lot of RAM from your processors, you must be sure of using a 64-bit version instead of a 32-bit version. This manages more computer resources, thereby resolving the said problem. Here are a few instructions to check and update the version of Google Chrome.
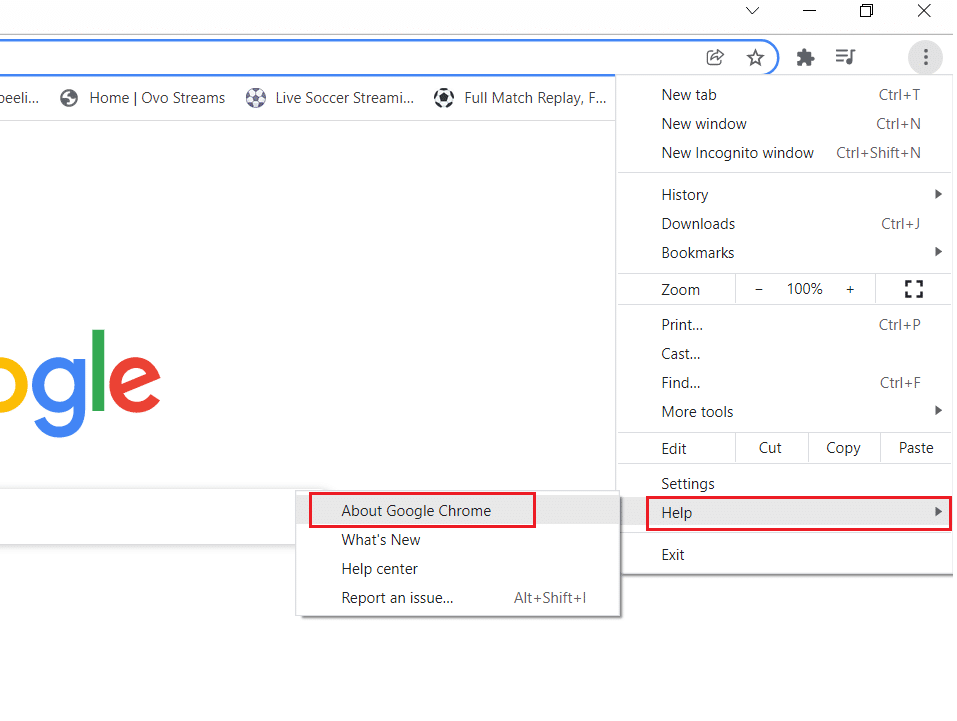
1. Sjósetja Google Króm Vafri.
2. Smelltu á þriggja punkta táknmynd and hover to Hjálp Og veldu Um Google Chrome valkostur.
3. Here, check if Google Chrome is of 64-bit version or not.
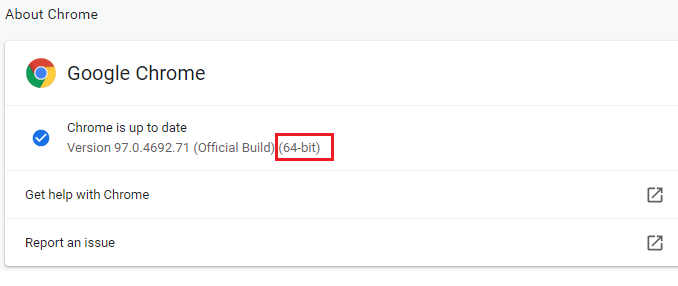
4. Ef það er 32-bita given next to the version of Chrome, you have to download the 64-bita útgáfu of Google Króm.
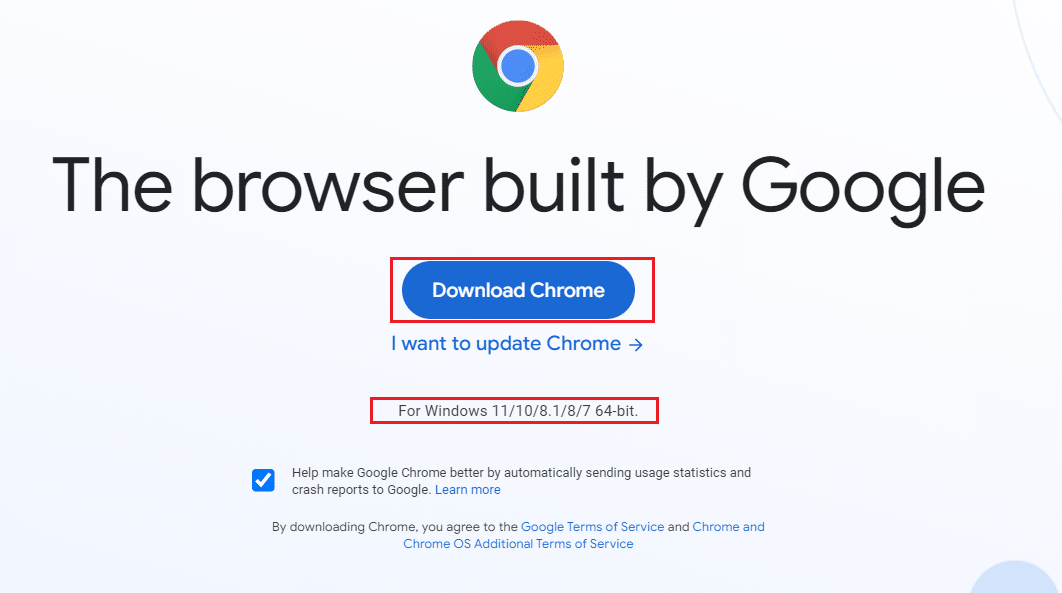
5. Run the downloaded setup file to install Google Chrome 64-bit version.
Method 2: End Google Chrome Processes
Like Windows, Chrome also has Task Manager that allows you to manage its tabs and extensions. The interface of this setting is very straightforward, and you can abort or end any high resource-consuming Chrome tasks. For example, you can distinguish which process consumes allocated memory contributing to this error. Thus, you can eliminate that particular tab instead of closing all the tabs. Here are a few instructions to manage tabs in Chrome.
1. Opna Google Króm og ýttu Shift + Esc keys saman til að opna Task Manager – Google Chrome.
2. Now, scroll down and check if you have an unusual Minnisfótspor gildi.
3. If so, click on the Lokaferli button for the respective Verkefni.
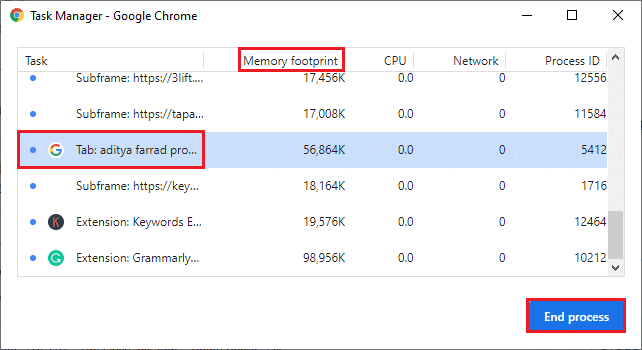
4. Nú, endurhlaða the site and check if you face the error again.
Einnig lesið: How to Fix Chrome Keeps Crashing
Method 3: Restart Google Chrome Process
If you did not attain a fix by terminating specific Chrome tabs and extensions from the above method, try to force shutdown all the Chrome tasks you do regularly in Task Manager. There may be plenty of applications that run in the background. This will increase the CPU and memory space, thereby affecting the performance of the system. Follow the below-mentioned steps to close the Chrome background tasks.
1. Sjósetja Verkefnisstjóri með því að slá Ctrl + Shift + Esc lyklar samtímis.
2. Í Ferli tab, search and select the Chrome ferli.
3. Smelltu síðan á Lokaverkefni button as depicted in the below picture.
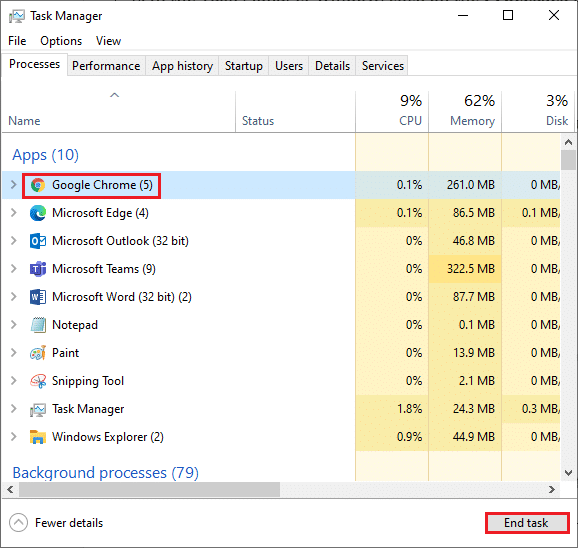
4. Nú, endurræsa Google Chrome and check if you have fixed the issue.
Method 4: Clean up Temporary Files
When your system has any corrupt temporary files or folders, you may encounter this Chrome out of memory error. You can sort out this error by clearing the temporary files in your system. Then, follow the instructions to implement the same.
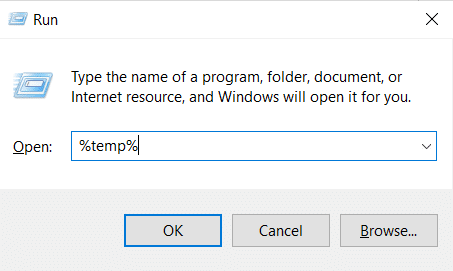
1. Ýttu á Windows + R lyklar samtímis að opna Hlaupa valmynd.
2. Gerð % temp% og högg Sláðu inn lykilinn til að opna AppDataLocalTemp mappa.
3. Ýttu á Ctrl + A takkarnir together to select all the unrequired files and right-click on the file and select the eyða valkostur.
Athugaðu: Some files cannot be deleted coz they are being used, so you can skip these.
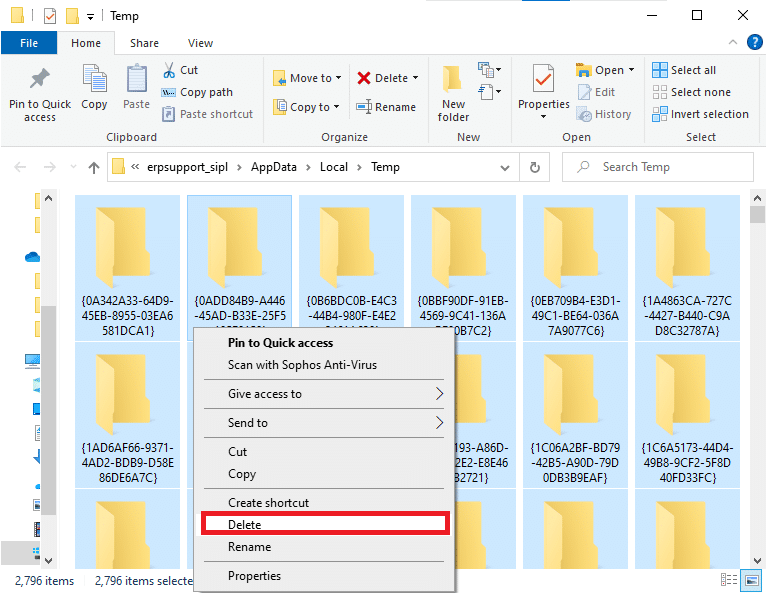
4. Finally, redirect to the Ruslafötuna and permanently delete the files and folders you have deleted now.
Method 5: Use Private Browsing
In some cases, using private surfing mode could resolve this error since some details of the web pages are hidden in it. Below are some advantages of using Incognito mode in Chrome. The Incognito Mode in Chrome & Edge browsers is primarily designed for secure and private browsing.
- Það er made for users who do not want their search history or recent pages saved on their device.
- Due to its privacy policy, this mode does not allow users to record their screens or take screenshots.
- It blocks cookies, hides search history, but provides the freedom to browse the desired website.
Follow the below-mentioned steps to open desired web page in private mode:
1A. Go to Google Króm og smelltu á þriggja punkta táknmynd. Here, select the Nýr huliðsgluggi valmöguleika eins og sýnt er.
![]()
1B. Alternatively, you can also press Ctrl + Shift + N keys saman til að hleypa af stokkunum Nýr huliðsgluggi.
Einnig lesið: Hvernig á að laga PDF skjöl sem opnast ekki í Chrome
Method 6: Clear Cache and Cookies in Chrome
Try clearing cache and cookies to fix Chrome ran out of memory error by implementing the following steps.
1. Sjósetja Google Króm.
2. Smelltu síðan á þriggja punkta táknmynd > Fleiri verkfæri > Hreinsa vafrasögu… eins og sýnt er hér að neðan.
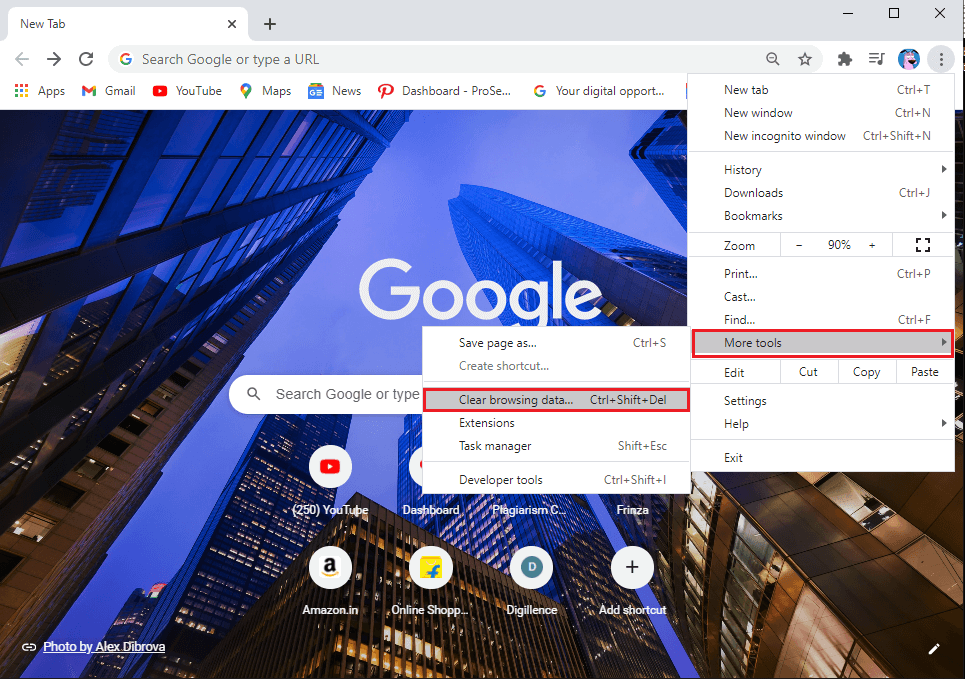
3. Check the following options.
- Kökur og aðrar upplýsingar um síðuna
- Cached myndir og skrár
4. Nú skaltu velja Allra tíma valkostur fyrir Tímabil.
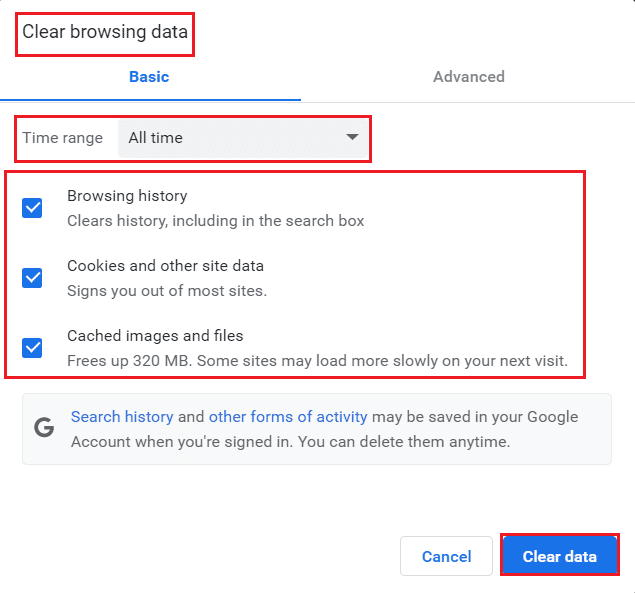
5. Að lokum, smelltu á Hreinsa gögn.
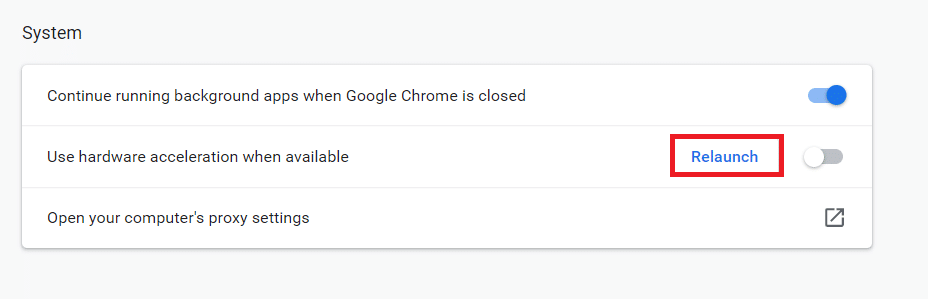
Aðferð 7: Slökktu á vélbúnaðarhröðun
Sometimes, web browsers may run in the background, and this will consume the CPU resources. Hence, it is better to disable the hardware acceleration in the browser to fix Chrome out of memory error.
1. Sjósetja Google Króm og smelltu á þriggja punkta táknmynd present at the top right corner.
2. Nú skaltu smella á Stillingar as depicted in the below picture.
![]()
3. Stækkaðu nú Ítarlegri section in the left pane and click on System, eins og sýnt er.
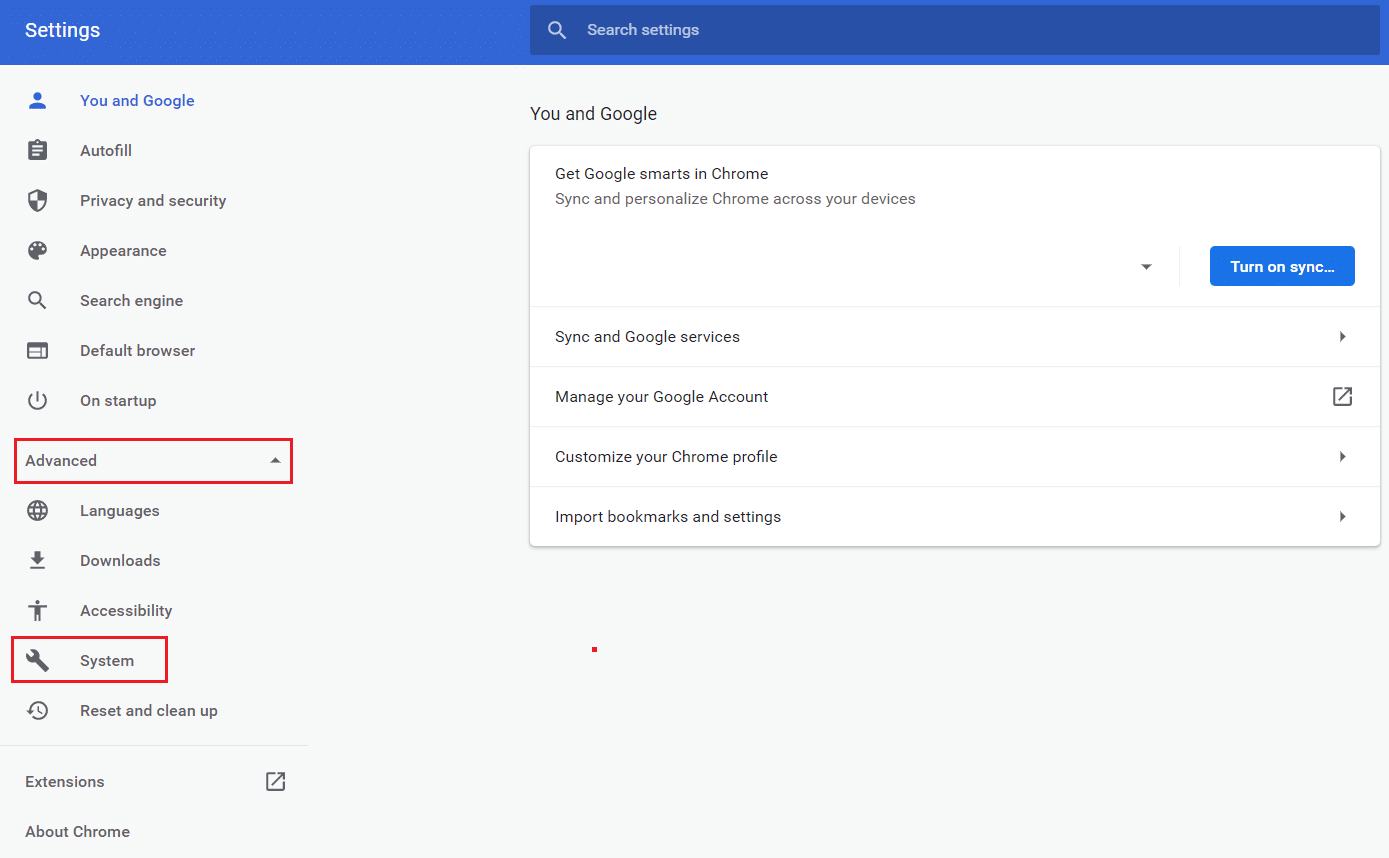
4. Here, switch Off skiptin fyrir Notaðu hröðun vélbúnaðar þegar það er tiltækt valkostur.
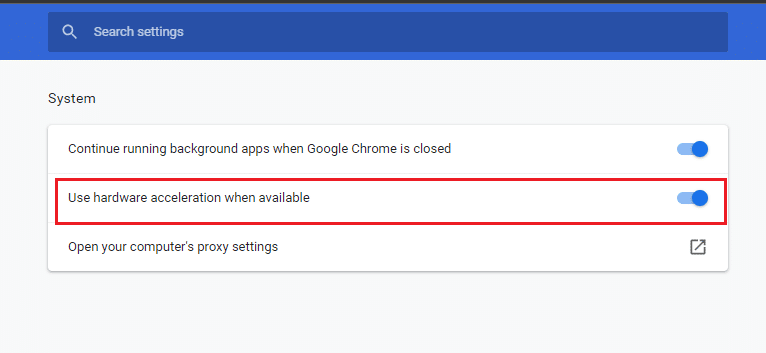
5. Smelltu síðan á relaunch valkostur.
Einnig lesið: How to Remove Chrome Themes
Aðferð 8: Slökktu á viðbótum (ef við á)
Follow these steps to disable the extensions which has high memory usage to fix Chrome out of memory error.
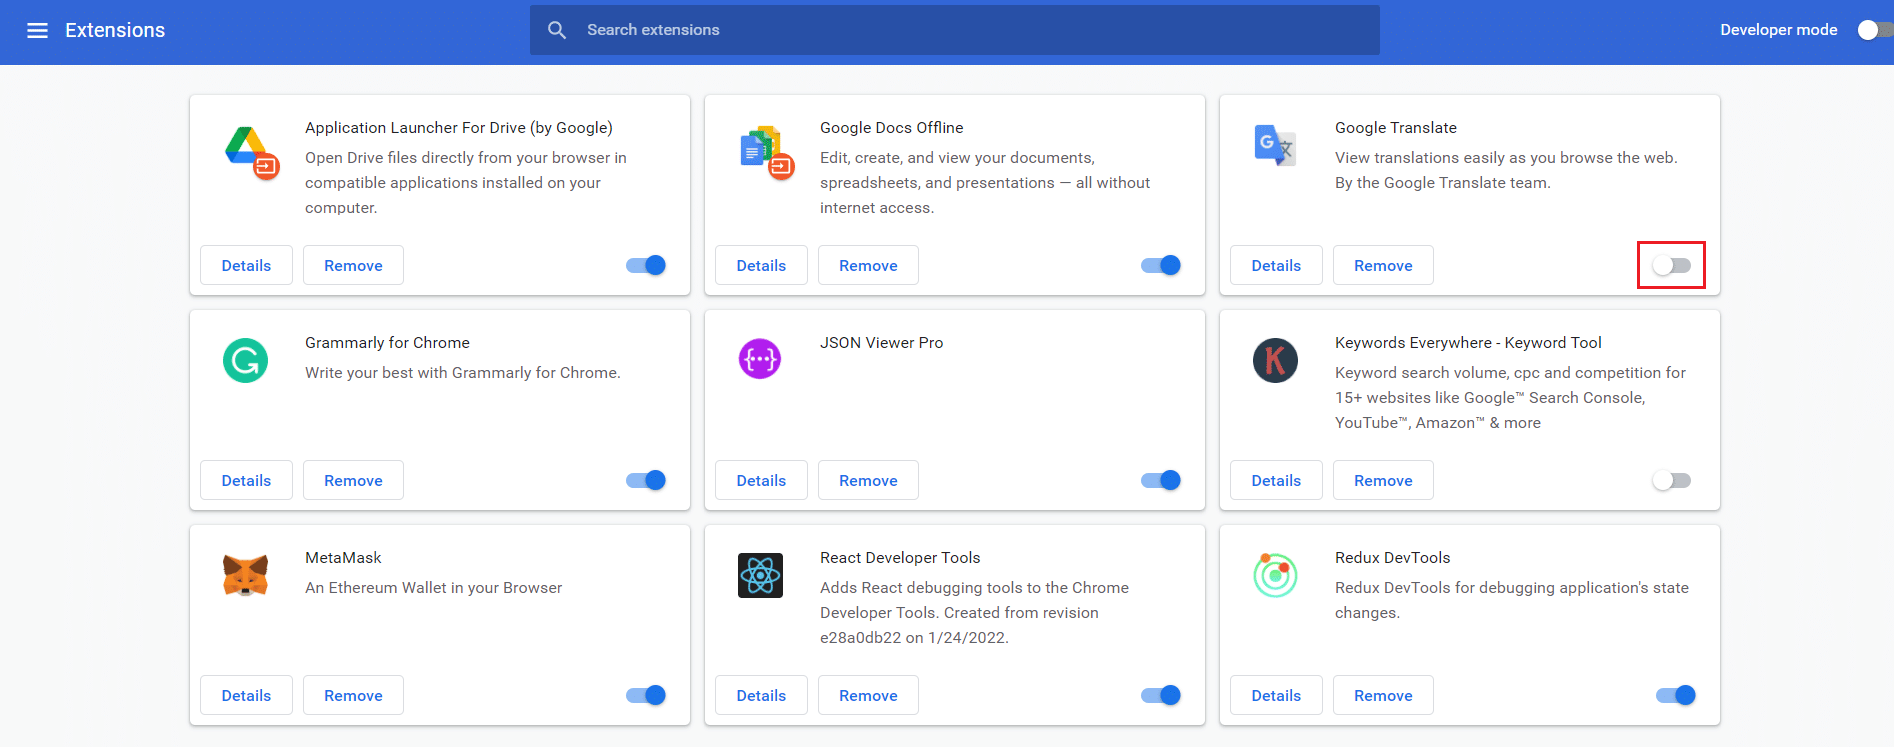
1. Sjósetja Chrome og tegund króm: // eftirnafn in URL Bar. Högg Sláðu inn til að fá lista yfir allar uppsettar viðbætur.
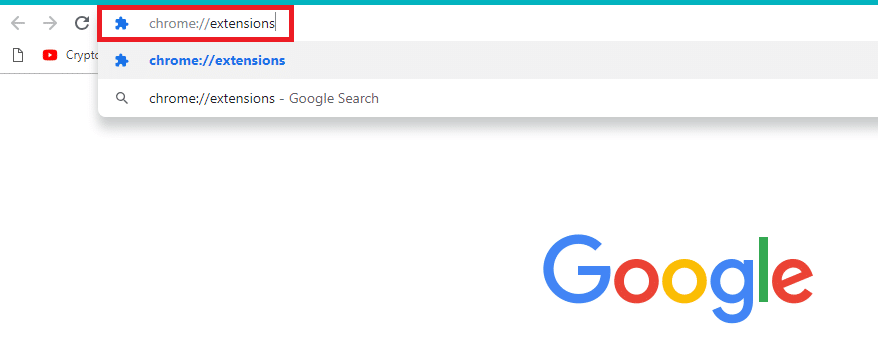
2. Switch Off the toggle for the extension you want to disable.
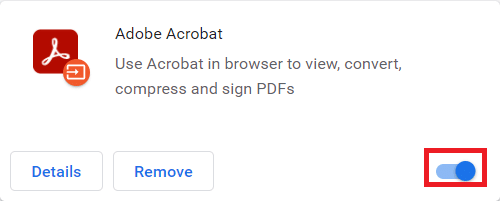
Method 9: Remove Extensions (If Applicable)
A web app extension in the Chrome browser might also cause this error. You should remove those unwanted apps extension individually to check whether the issue still persists or not. Follow the below-mentioned instructions to delete the extensions from Google Chrome.
1. Sjósetja Chrome og tegund króm: // eftirnafn in URL Bar. Högg Sláðu inn til að fá lista yfir allar uppsettar viðbætur.
2. Skipta Off skiptin fyrir recently installed extension til að gera það óvirkt.
3. Endurtaka the same one by one for each extension, until you find the corrupt extension.
4. Once found, click on the Fjarlægja button to uninstall the corrupt extension.
Athugaðu: We have shown the MetaMask extension as an example.
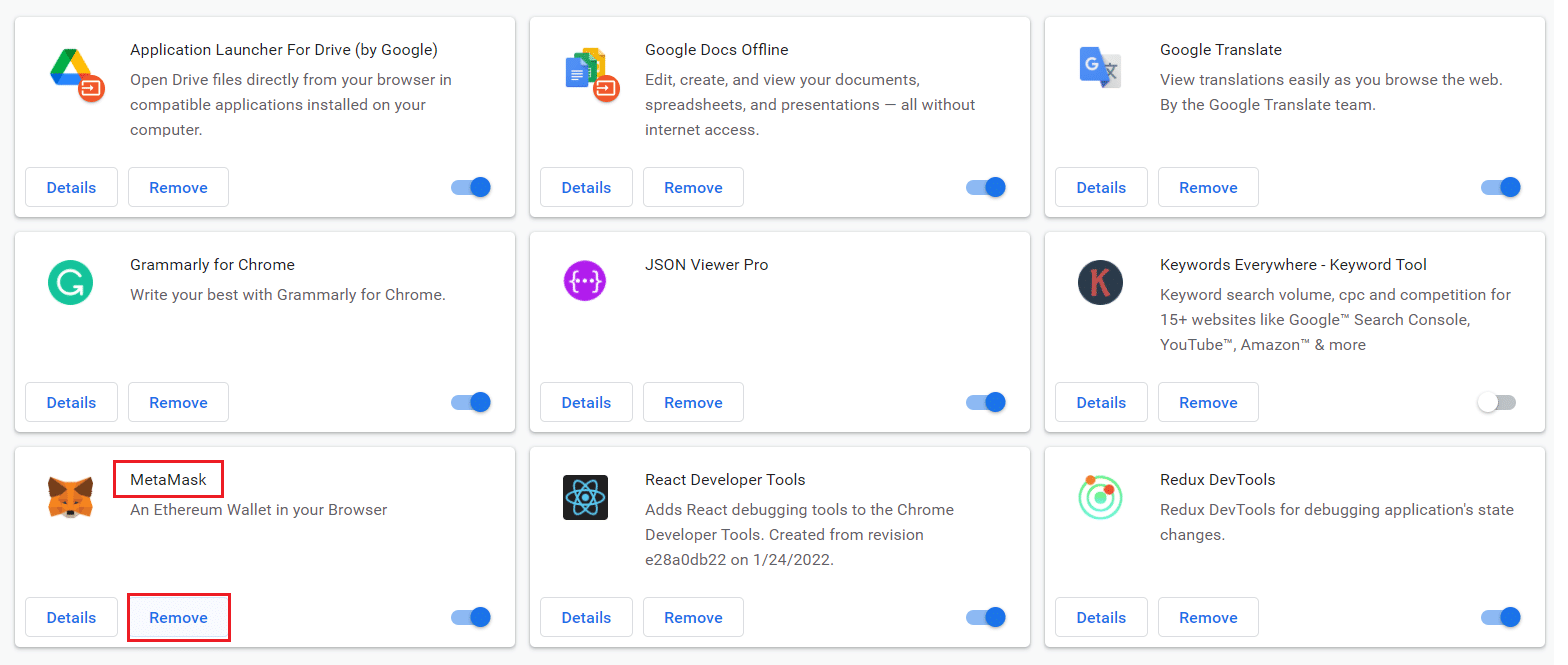
Refresh your browser and check if the issue is fixed now.
Method 10: Remove Harmful Software from Chrome
The Chrome Cleanup Tool is an antivirus program for your browser.
- It scans your PC for malicious programs that affect the browser.
- Since Google has assured privacy over data scanned by the tool thus, it cannot access them in any way.
Only the harmful programs are detected by the tool, and the tool warns you with an alert. Usually, the tool alerts you for malicious programs after sending the metadata files to Google. If you do not want your files to be sent to Google, you can uncheck the box Tilkynna upplýsingar til Google kassi.
Here’s how to run Chrome Cleanup Tool to fix Chrome ran out of memory issue:
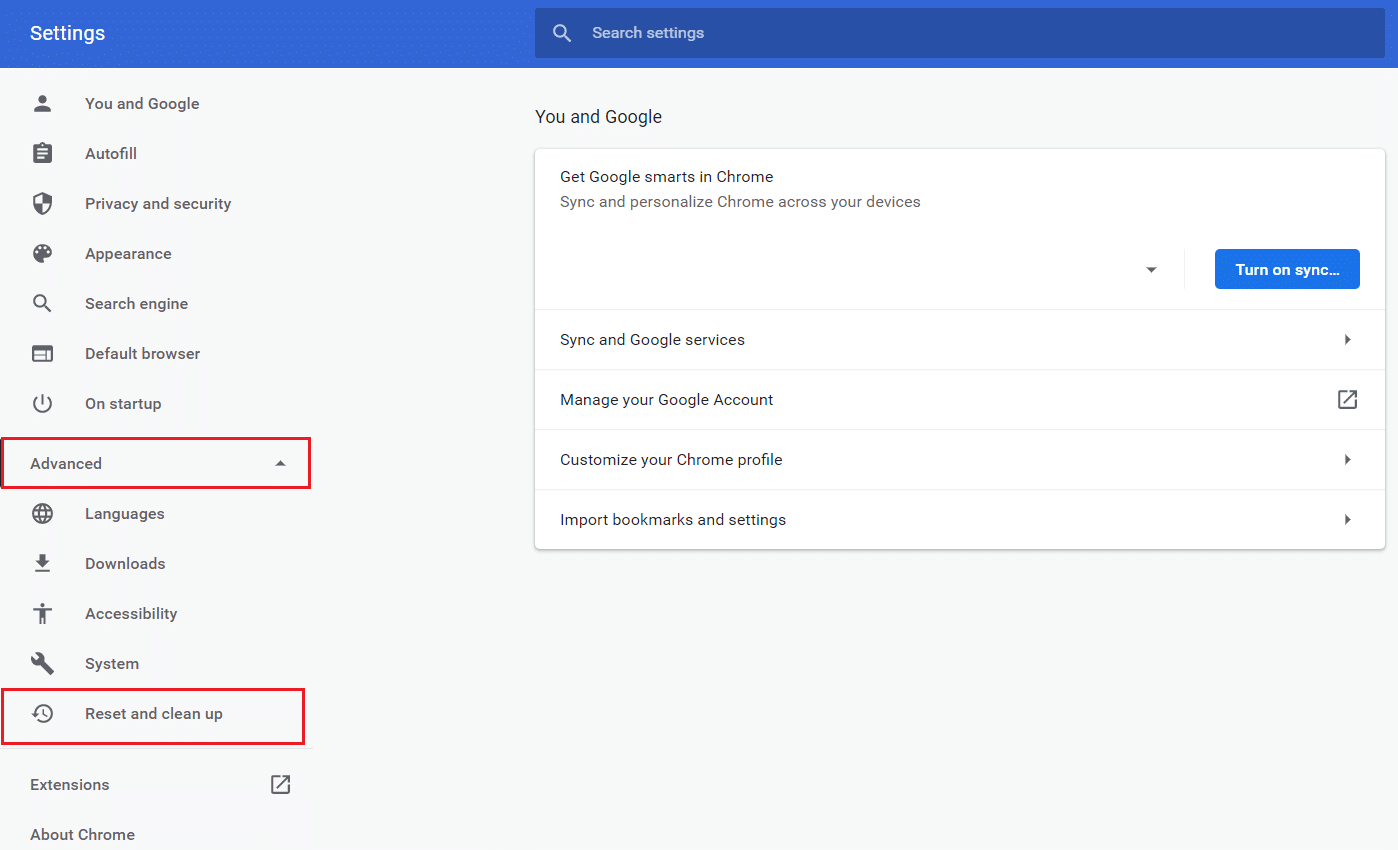
1. Sjósetja Google Króm og smelltu á þriggja punkta táknmynd > Stillingar eins og sýnt er auðkennt.
![]()
2. Hér, smelltu á Ítarlegri setting in the left pane and select Endurstilla og hreinsa upp valkostur.
3. Nú skaltu velja Hreinsunartölva valmöguleika eins og sýnt er hér að neðan.
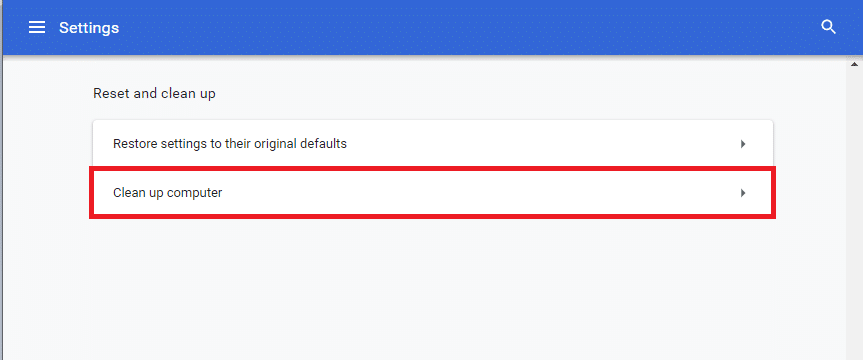
4. Hér, smelltu á finna button to enable Chrome to find harmful software á tölvunni þinni.

5. Bíddu for the process to be completed and fjarlægja the harmful programs detected by Google Chrome.
6. Endurræstu tölvuna þína og athuga hvort málið sé leyst.
Einnig lesið: Fix Crunchyroll Not Working on Chrome
Aðferð 11: Búðu til nýjan notandaprófíl
If there are any damaged files or glitches in data stored by Google Chrome on your PC, then renaming the default folder might help you resolve Chrome out of memory error. This may also occur when you have a damaged user profile. Here are a few instructions to rename your user profile folder.
Athugaðu: Renaming the folder will not affect the functionality. The folder will be recreated once you restart the browser.
1. Haltu inni Windows + E lyklar saman til að opna File Explorer.
2. Límdu nú eftirfarandi leið í veffangastikunni og ýttu á Sláðu inn lykilinn.
% LOCALAPPDATA% GoogleChromeUser Data
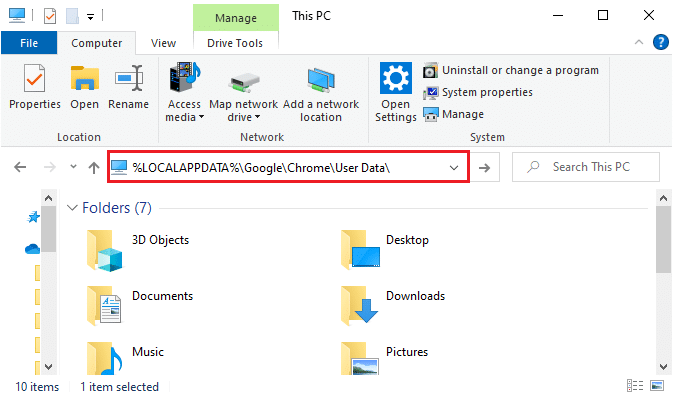
3. Finndu Sjálfgefið folder and right-click on it.
4. Veldu síðan Endurnefna valmöguleika eins og sýnt er.
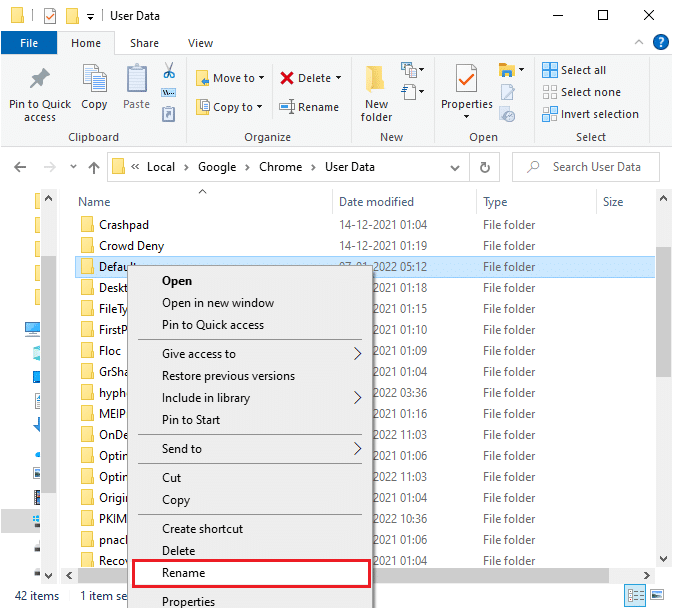
5. Next, rename the folder to Gamalt sjálfgefið og högg the Sláðu inn lykilinn.
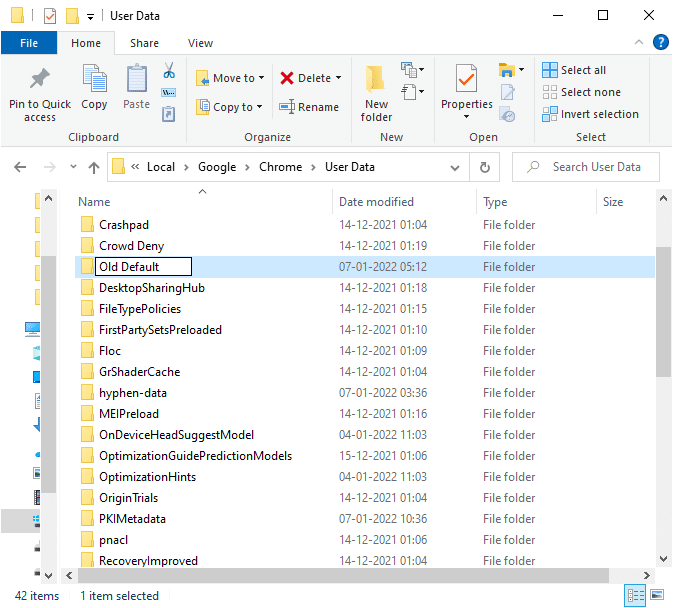
6. Að lokum, endurræsa Chrome and check if you have fixed the issue.
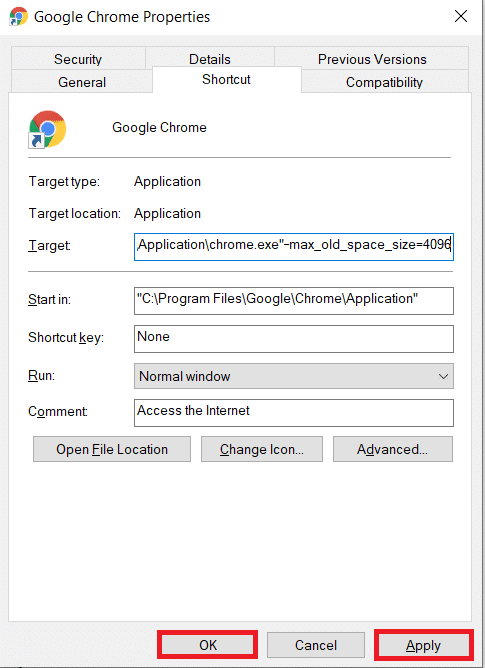
Method 12: Increase Memory Limit of Chrome
If you are handling web pages that require high memory, you can increase the memory limit of the browser by modifying the target link as instructed below to fix Chrome ran out of memory problem.
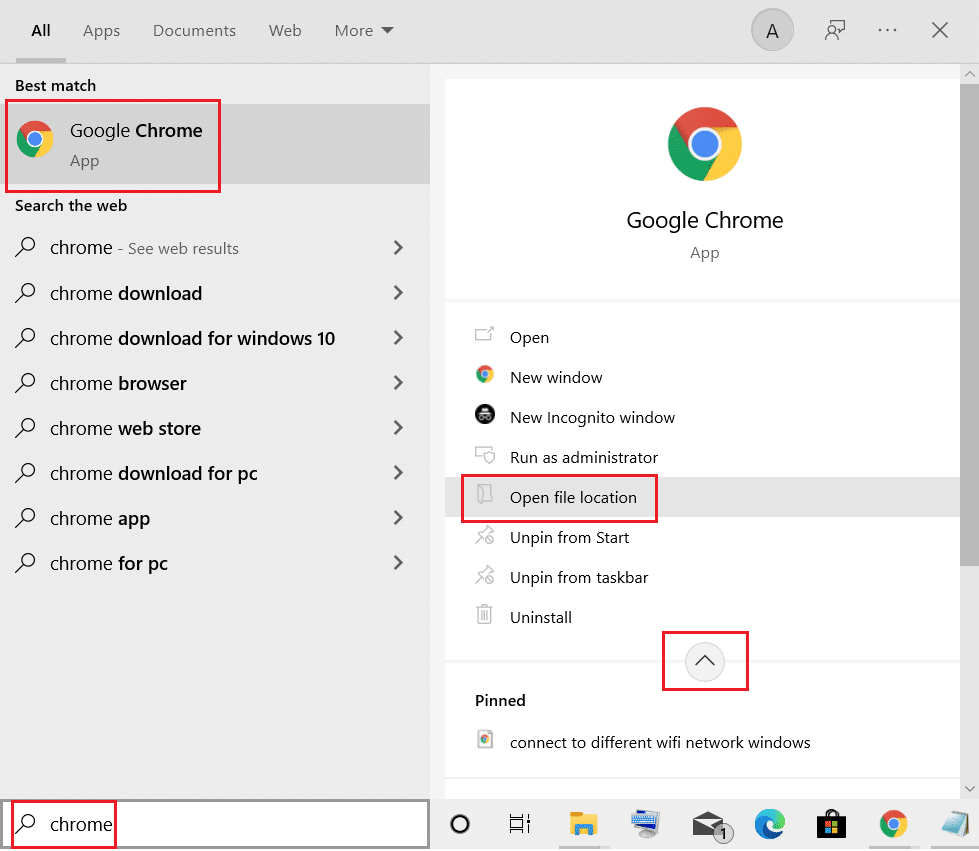
1. Sláðu á Windows lykill, gerð Chrome, og smelltu á Opna skrá staðsetningu valkostur.
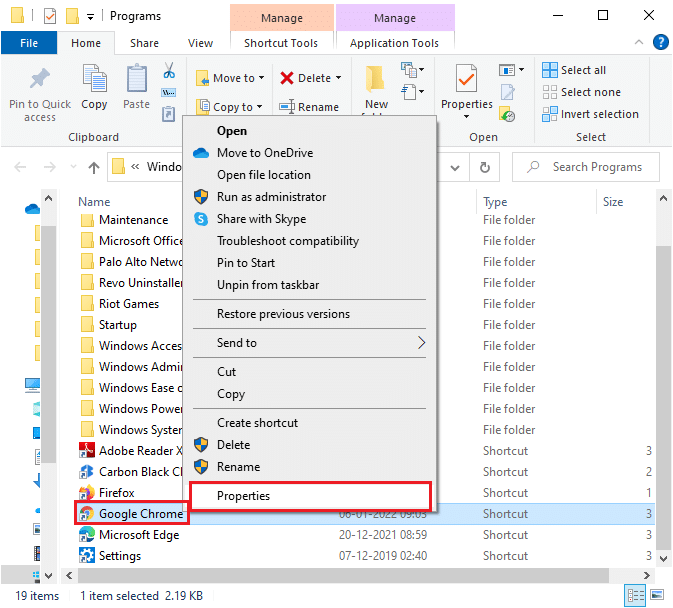
2. Then, right-click on Google Króm og smelltu á Eiginleikar eins og sýnt er.
3. Í Google Chrome Properties window, add -max_old_space_size=4096 í Markmál field as illustrated below.
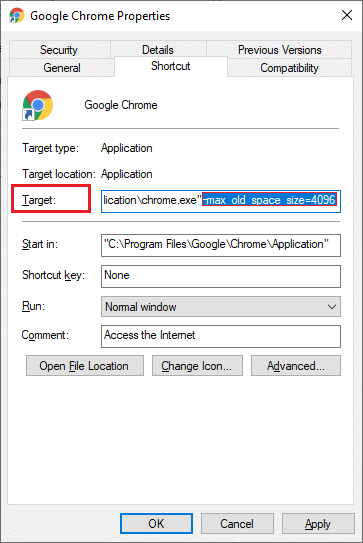
4. Að lokum, smelltu á gilda og þá OK til að vista breytingarnar.
Einnig lesið: Hvernig á að virkja DNS yfir HTTPS í Chrome
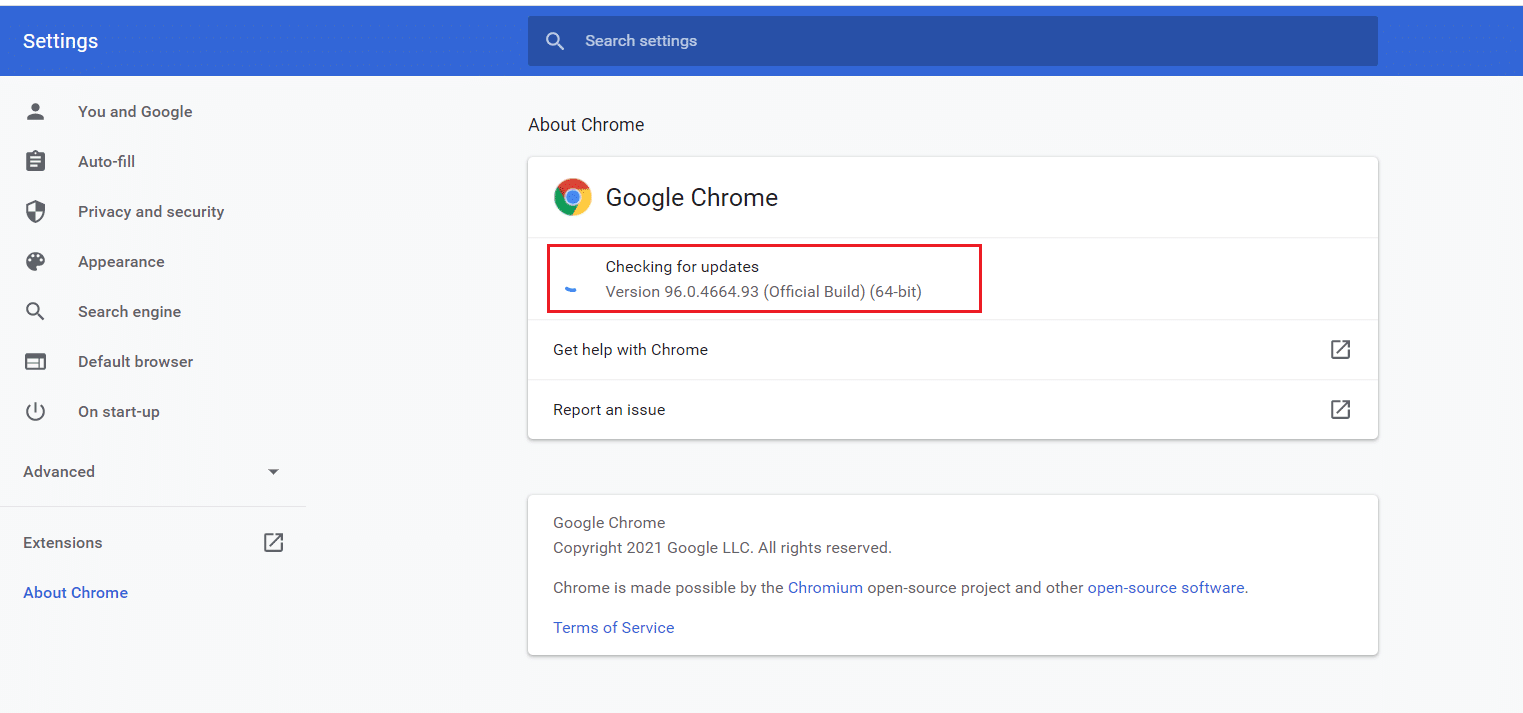
Method 13: Update Chrome
If you have an outdated browser, the improved features of the OS will not be supported. This may also result in Chrome ran out of memory issues. To fix this error, you should update Chrome by following the steps below.
1. Sjósetja Google Króm.
2. Smelltu á þriggja punkta táknmynd að stækka stillingunum valmyndinni.
3. Veldu síðan Help > Um Google Chrome eins og sýnt er hér að neðan.
4. Leyfðu Google Króm to search for updates. The screen will display Leitar að uppfærslum message, as shown.
5A. If updates are available, click on the Uppfæra hnappinn.
5B. If Chrome is already updated then, Google Chrome er uppfært skilaboð munu birtast.
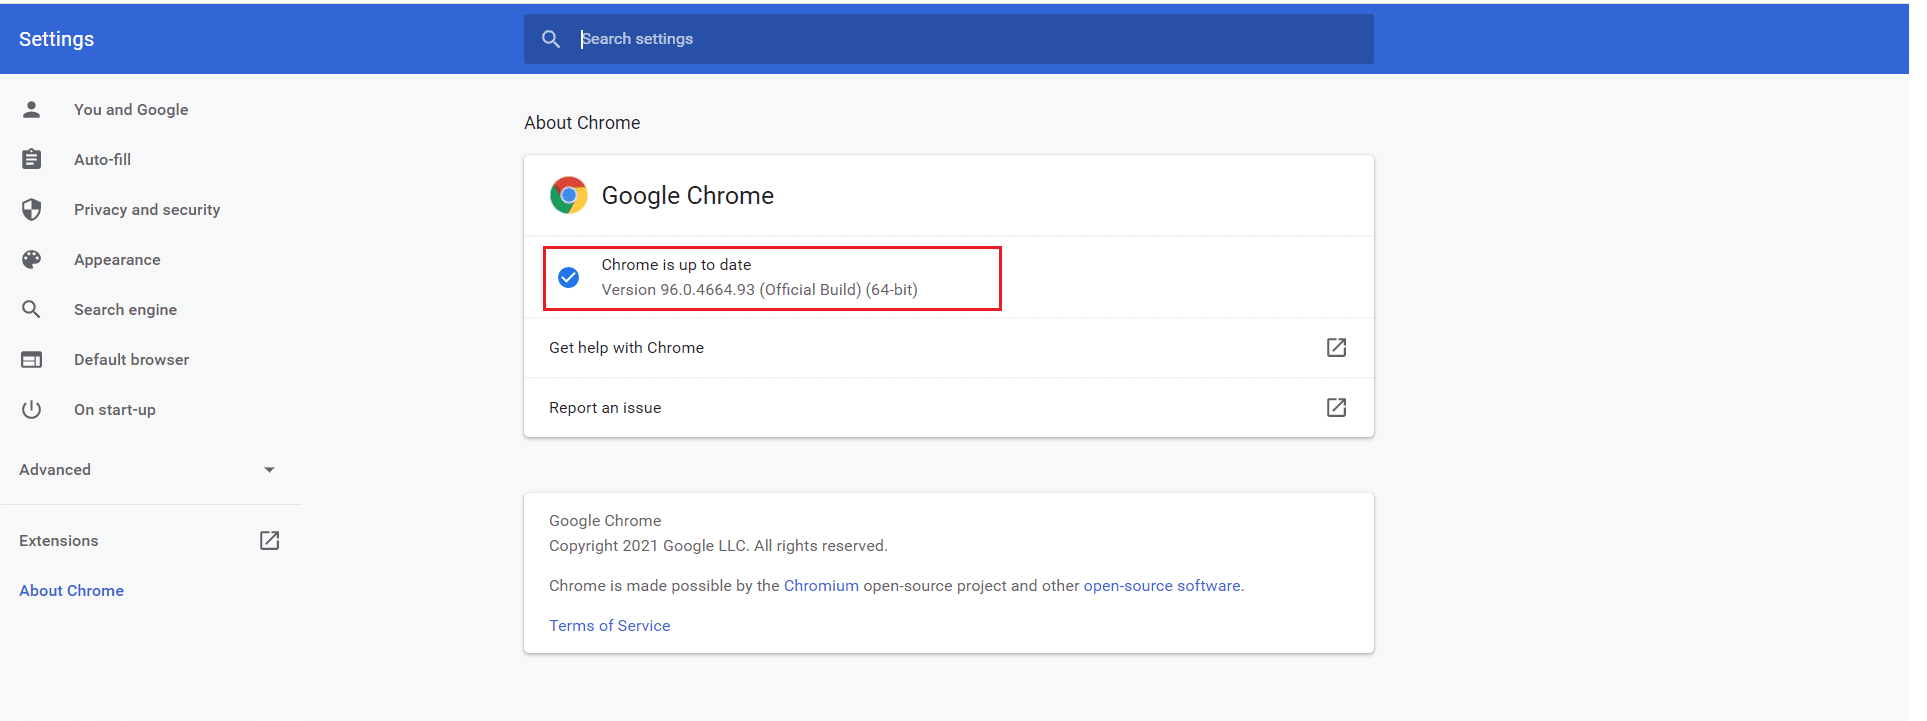
6. Finally, launch the updated browser and check again.
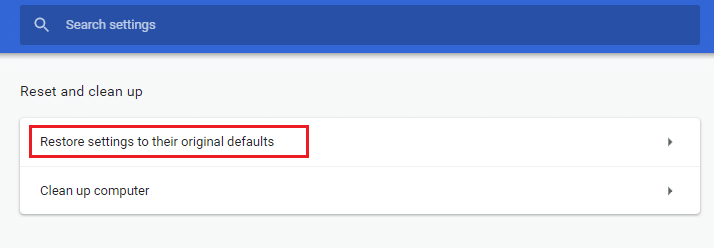
Method 14: Reset Chrome
Resetting Chrome will restore the browser to its default settings, and there are more possibilities that you can fix the discussed error. Follow the below-mentioned steps to reset Google Chrome and check if the issue is resolved.
1. Opna Google Króm og fara til chrome: // stillingar / endurstilla
2. Smelltu á Endurstilla stillingar í upphaflegu vanskilunum valkostur, sýndur auðkenndur.
3. Staðfestu aðgerðina þína með því að smella á Endurstilla stillingar hnappinn.
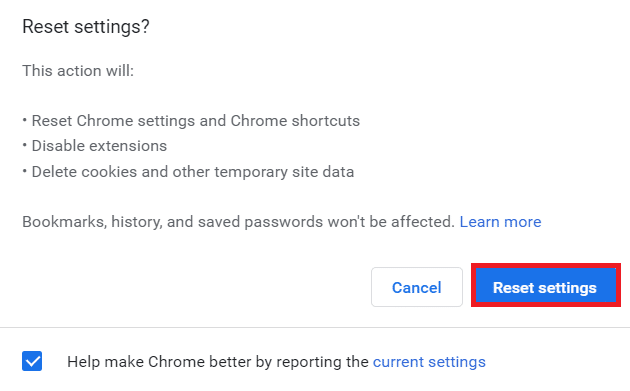
Now, launch the website again and check the issue is resolved.
Einnig lesið: Hvernig á að flytja út vistuð lykilorð frá Google Chrome
Method 15: Reinstall Chrome
If none of those mentioned above methods have helped you, you can try reinstalling Google Chrome to fix Chrome ran out of memory issue. Doing this will fix all the relevant issues with the search engine, updates, or other related problems triggering this issue.
Athugaðu: Back up all favorites, saved passwords, bookmarks and sync your google account with your Gmail. Uninstalling Google Chrome will delete all the saved files.
1. Sláðu á Windows lykill, gerð öpp og eiginleika, og smelltu á Opna.
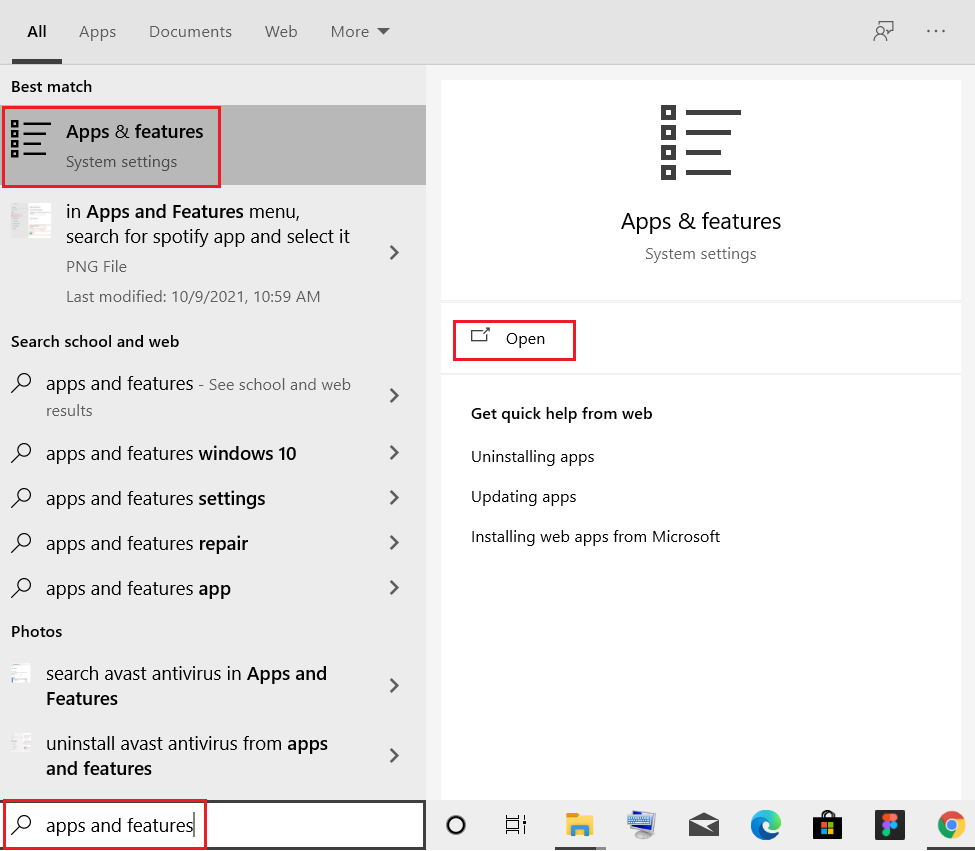
2. Leitaðu að Chrome in Leitaðu á þessum lista reit.
3. Veldu síðan Chrome og smelltu á Uninstall hnappur sýndur auðkenndur.
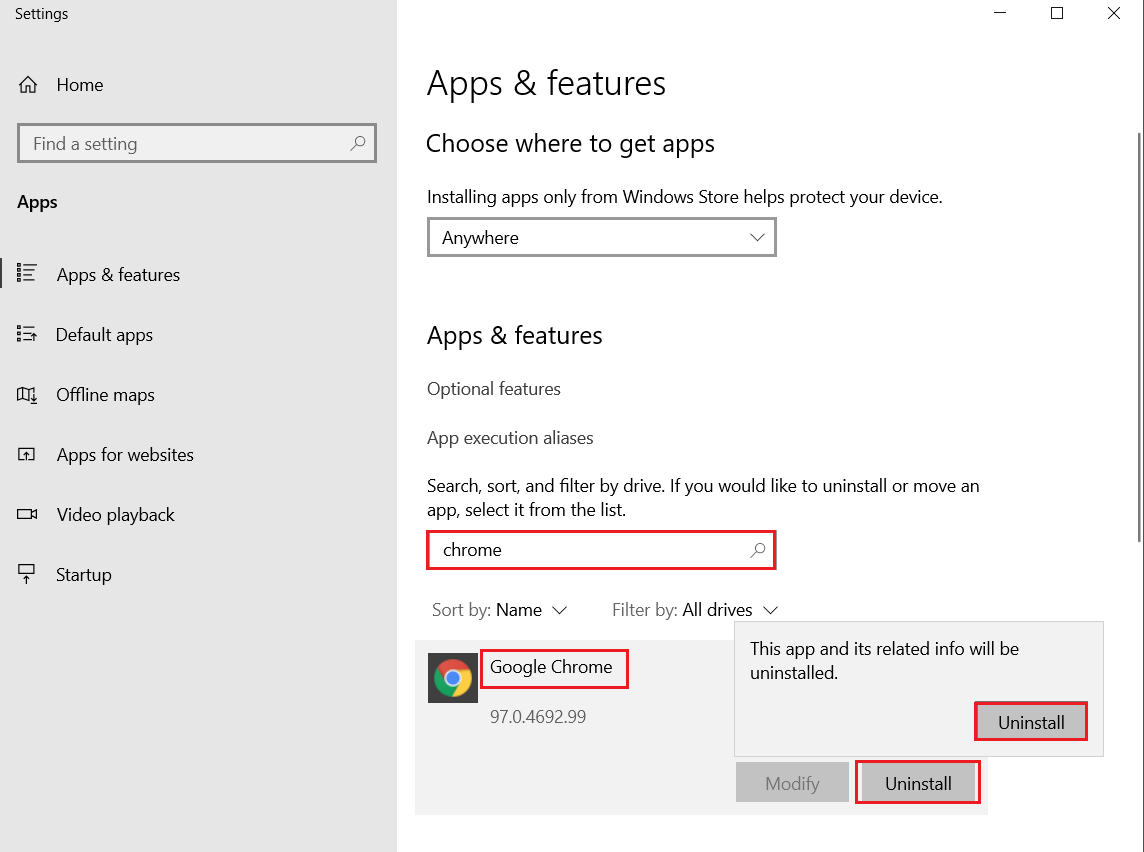
4. Aftur, smelltu á Uninstall að staðfesta.
5. Nú skaltu ýta á Windows lykill, gerð % localappdata%, og smelltu á Opna að fara til AppData Local mappa.
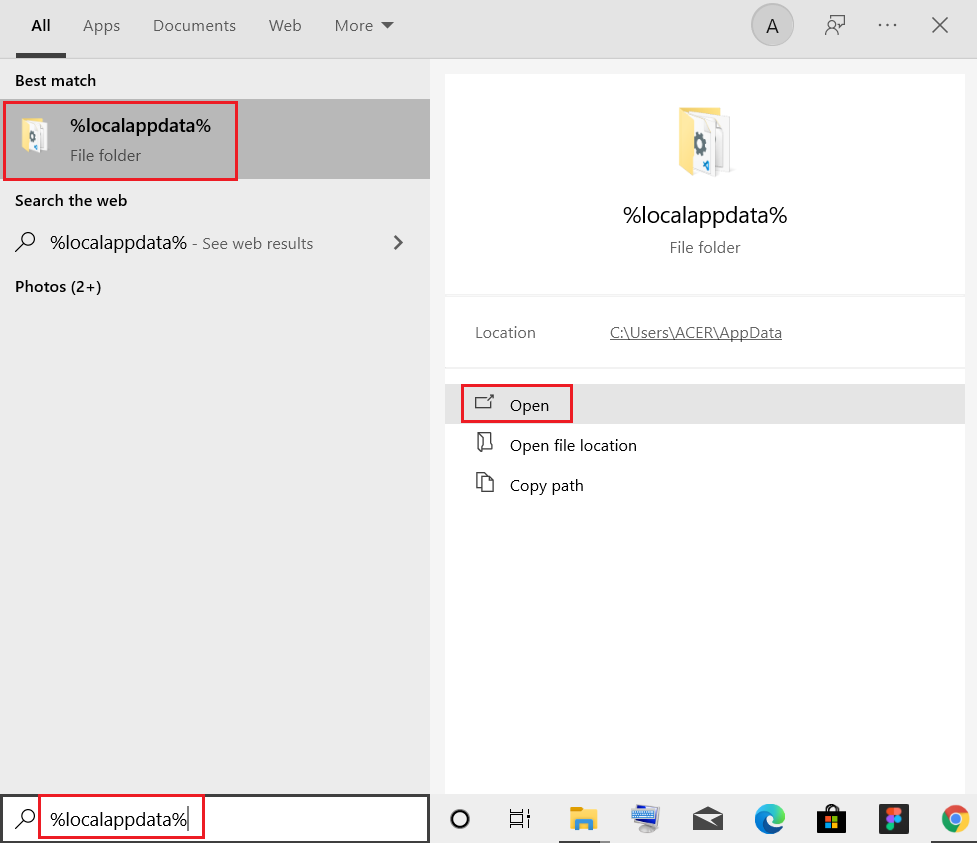
6. opna Google folder by double-clicking on it.

7. Hægri smelltu á Chrome folder and select the eyða valmöguleika eins og sýnt er hér að neðan.
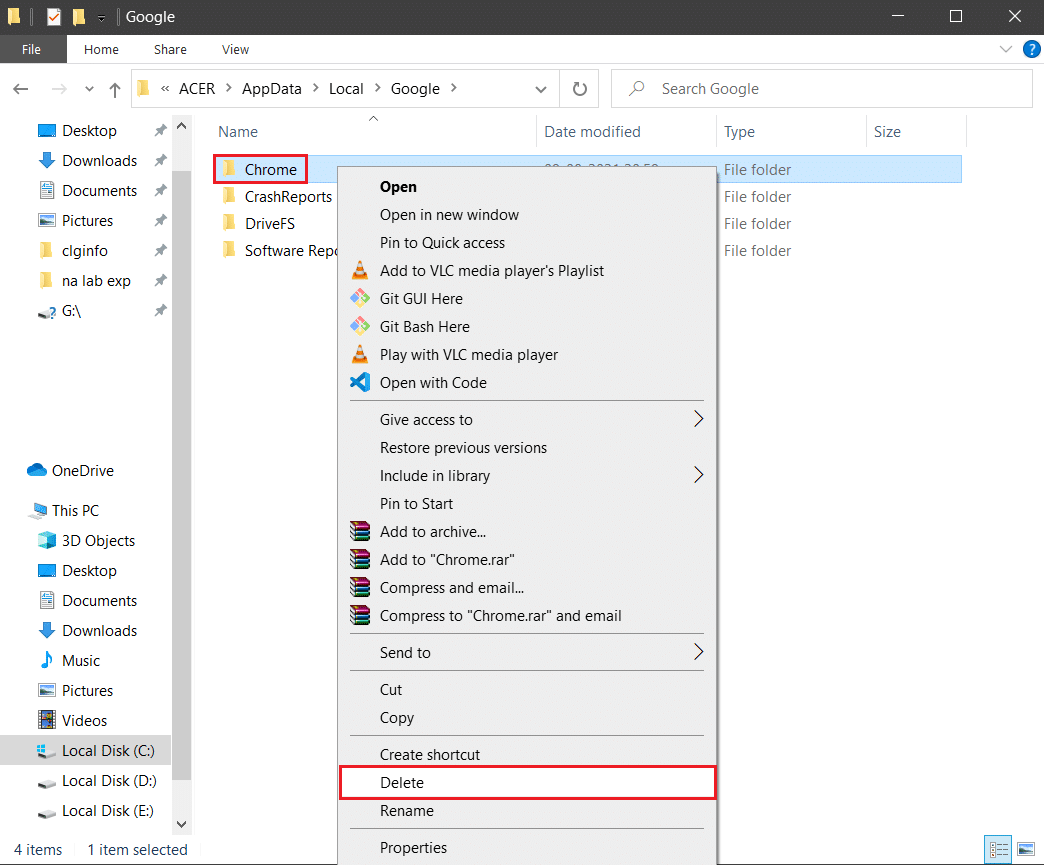
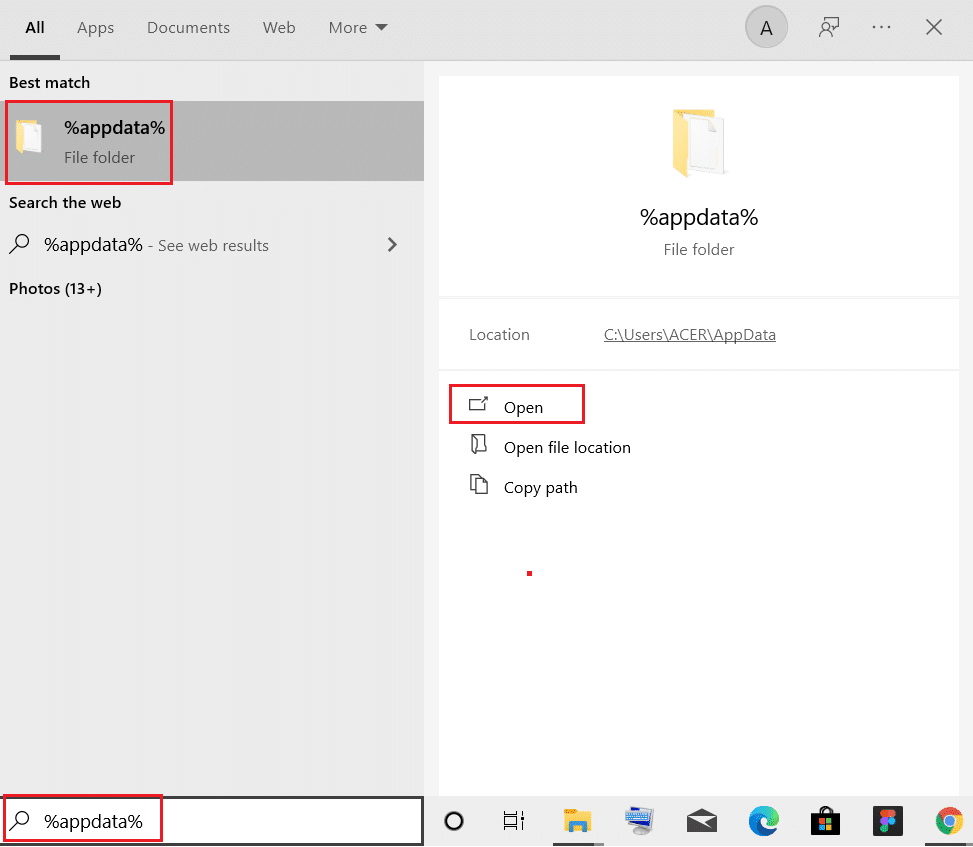
8. Again, hit the Windows lykill, gerð %gögn forrits%, og smelltu á Opna að fara til AppData Roaming mappa.
9. Aftur, farðu í Google mappa og eyða á Chrome folder as shown in skref 6 - 7.
10. Að lokum, endurræsa tölvunni þinni.
11. Next, download the nýjasta útgáfan of Google Króm eins og sýnt er.
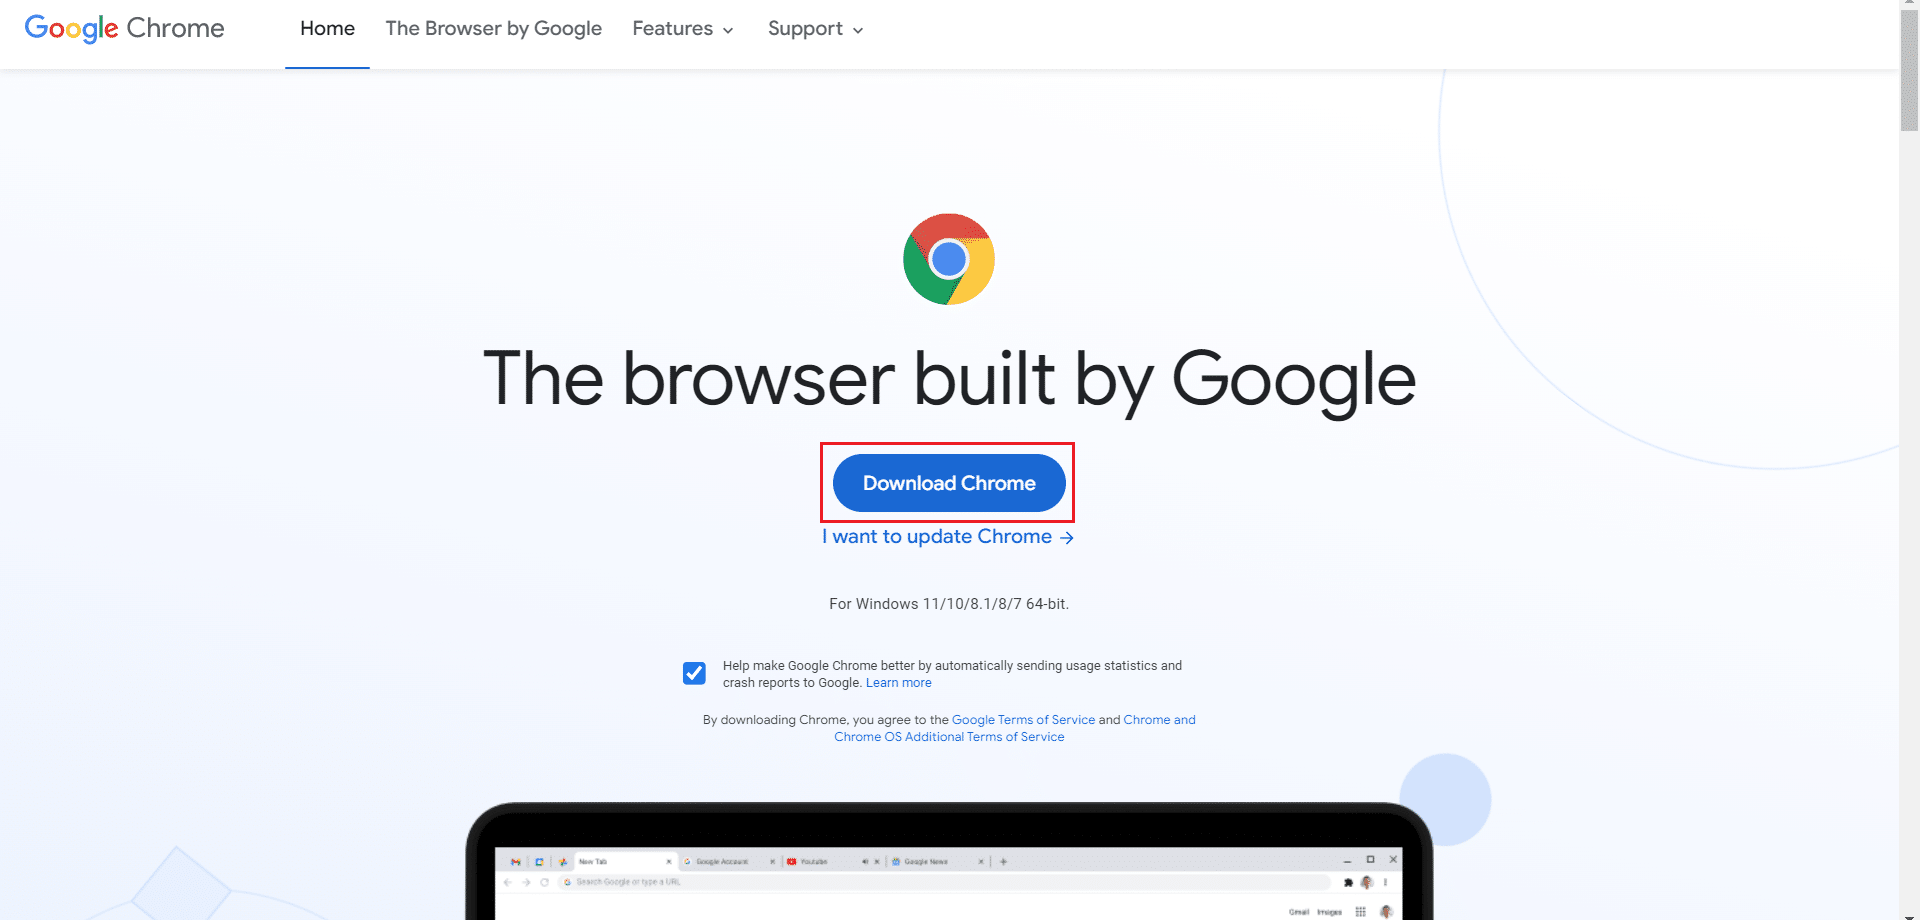
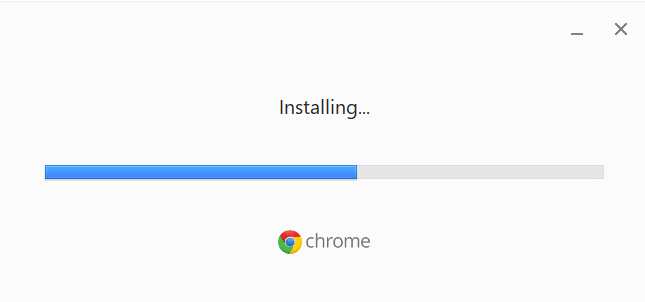
12. Keyrðu uppsetningarskrá og fylgdu leiðbeiningunum á skjánum til að install Chrome.
Mælt með:
Við vonum að þessi handbók hafi verið gagnleg og þú gætir lagað Chrome ran out of memory issue in your system. Let us know which method worked for you the best. Also, if you have any queries/suggestions regarding this article, then feel free to drop them in the comments section.

