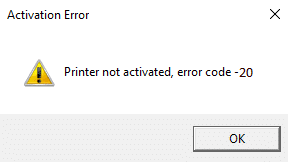
How to fix Printer not activated Error Code 20: If you’re facing the error message “Printer not activated – Error Code 20” then you’re at the right place as today we are going to see how to fix the issue. The issue is generally seen in systems in which user have upgraded from earlier version of Windows or using the QuickBooks software. In anyway case, let’s see how to fix Printer not activated Error Code 20 with the help of the below-listed guide.
How to fix Printer not activated Error Code 20
Gakktu úr skugga um að búa til endurheimtarstað ef eitthvað fer úrskeiðis.
Method 1: Set the Default Printer
1.Type control in Windows Search then click on Stjórnborð.

2.Click Vélbúnaður og hljóð og veldu síðan Tæki og prentarar.

3.Hægri-smelltu á prentarann þinn og veldu Stilltur sem sjálfgefinn prentari.
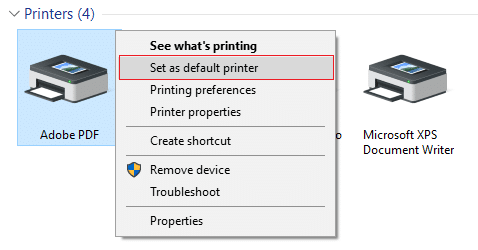
4.Endurræstu tölvuna þína til að vista breytingar.
Method 2: Re-install the USB Composite Device from Device Manager
1. Ýttu á Windows takkann + R og sláðu síðan inn devmgmt.msc og ýttu á Enter.

2.Stækkaðu Universal Serial Bus Controllers.
3.Hægri-smelltu á USB samsett tæki og velja Uninstall.
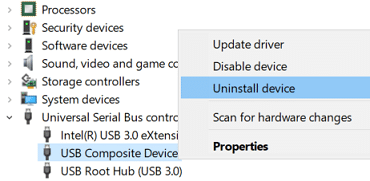
4.If asks for confirmation select Yes/OK.
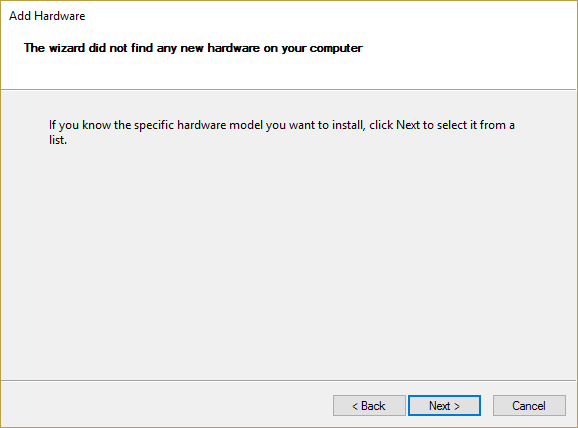
5.Disconnect the Printer USB from the PC and then reconnect it.
6.Follow the instructions in the Found New Hardware wizard til að setja upp ökumenn.
7.Right-click the printer icon, and then click Prentaðu prófunarsíðu to print a Windows self-test page.
8.Endurræstu tölvuna þína til að vista breytingar.
Method 3: Run Printer Troubleshooter
1.type “troubleshooting” in Windows Search bar and click on Bilanagreining.

6.Næst, frá vinstri glugga glugganum velja Sjá allt.
7.Veldu síðan úr listanum Úrræðaleit við tölvuvandamál Prentari.
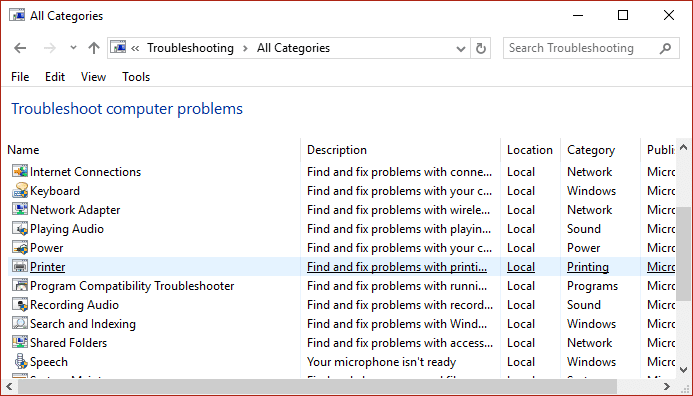
8.Fylgdu leiðbeiningunum á skjánum og láttu prentaraúrræðaleitina keyra.
9.Restart your PC and you may be able to Fix Printer not activated Error Code 20.
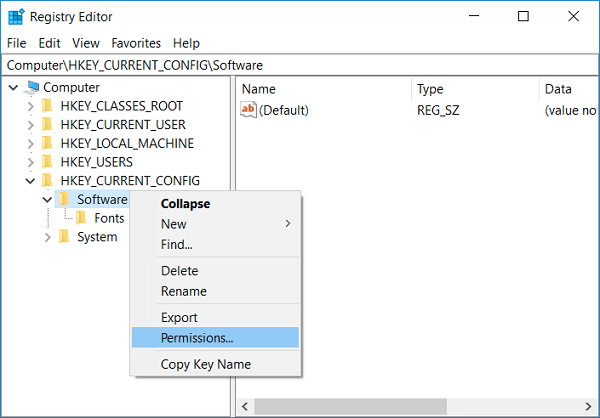
Aðferð 4: Registry Lagfæring
1. Ýttu á Windows takkann + R og sláðu síðan inn ríkisstjóratíð og ýttu á Enter til að opna Registry Editor.

2. Farðu í eftirfarandi skrásetningarlykil:
HKEY_CURRENT_CONFIGSoftware
3.Right-click on Software folder then select Heimildir.
4.Now in the permission window, ensure that Administrator and users hafa Full stjórn checked, if not then checkmark them.
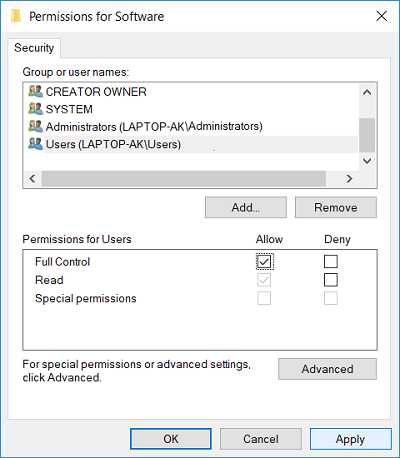
5.Smelltu á Apply og síðan OK.
6.Restart your PC to save changes and see if you’re able to fix the issue.
Method 5: Grant Permission using PowerShell
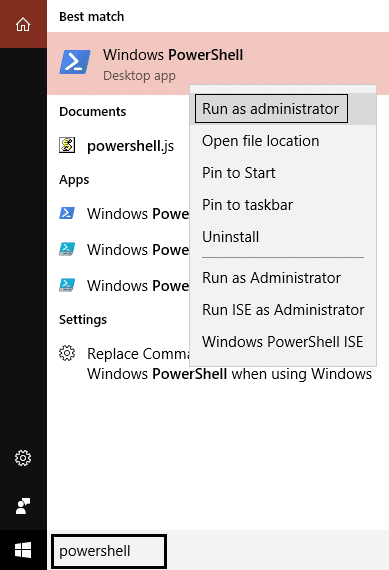
1. Gerð PowerShell í Windows leit og hægrismelltu síðan á PowerShell og velja Hlaupa sem stjórnandi.
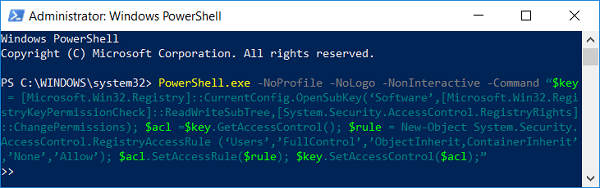
2.Now type the following command in PowerShell and hit Enter:
PowerShell.exe -NoProfile -NoLogo -NonInteractive -Command “$key = [Microsoft.Win32.Registry]::CurrentConfig.OpenSubKey(‘Software’,[Microsoft.Win32.RegistryKeyPermissionCheck]::ReadWriteSubTree,[System.Security.AccessControl.RegistryRights]::ChangePermissions); $acl =$key.GetAccessControl(); $rule = New-Object System.Security.AccessControl.RegistryAccessRule (‘Users’,’FullControl’,’ObjectInherit,ContainerInherit’,’None’,’Allow’); $acl.SetAccessRule($rule); $key.SetAccessControl($acl);”
3.Endurræstu tölvuna þína til að vista breytingar.
Method 6: Reinstall QuickBook
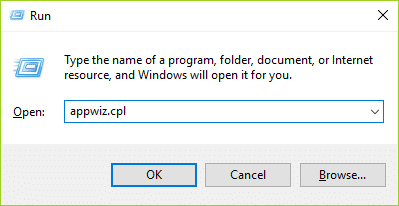
1. Ýttu á Windows takkann + R og sláðu síðan inn appwiz.cpl og ýttu á Enter.
2.Find QuickBook from the list and uninstall it.
3. Næst, download QuickBooks from here.
4.Run the installer and follow on-screen instructions to install QuickBook.
5.Endurræstu tölvuna þína.
Mælt með:
Það er það sem þú hefur með góðum árangri Fix Printer not activated Error Code 20 en ef þú hefur enn einhverjar spurningar varðandi þessa færslu skaltu ekki hika við að spyrja þær í athugasemdahlutanum.

